
Operating Instructions
Page 28
buttons . 4 REW 5 PLAY VOLUME 6 To stop playback Press x. 2 POWER 31 MEMORY OFF CAMERA (CHG) VCR 28 The video control buttons light up. (3) Slide OPEN in the viewfinder. - You can monitor the playback picture on the LCD screen. Playback - Basics - If ... Press m to rewind the tape. (5) Press N to VCR while pressing the small green button. Playing back a tape You can also control playback using the Remote Commander supplied with your camcorder. (1) Install the power source and insert the recorded tape. (2) Set the POWER switch to start playback. (6) To adjust the volume, ...
buttons . 4 REW 5 PLAY VOLUME 6 To stop playback Press x. 2 POWER 31 MEMORY OFF CAMERA (CHG) VCR 28 The video control buttons light up. (3) Slide OPEN in the viewfinder. - You can monitor the playback picture on the LCD screen. Playback - Basics - If ... Press m to rewind the tape. (5) Press N to VCR while pressing the small green button. Playing back a tape You can also control playback using the Remote Commander supplied with your camcorder. (1) Install the power source and insert the recorded tape. (2) Set the POWER switch to start playback. (6) To adjust the volume, ...

Operating Instructions
Page 29
Basics When you can turn the LCD panel over to the camcorder body with your camcorder. To make the indicators disappear, press DISPLAY again. To control the display of the screen indicators Press DISPLAY on the camcorder or on the LCD screen, you close the LCD panel You cannot monitor the sound from ...the speaker. However, when the LCD panel is turned over and move it back to view on the Remote Commander supplied with...
Basics When you can turn the LCD panel over to the camcorder body with your camcorder. To make the indicators disappear, press DISPLAY again. To control the display of the screen indicators Press DISPLAY on the camcorder or on the LCD screen, you close the LCD panel You cannot monitor the sound from ...the speaker. However, when the LCD panel is turned over and move it back to view on the Remote Commander supplied with...

Operating Instructions
Page 31
...direction, press c. To change the playback direction Press on the Remote Commander in the reverse direction, press , then press ×2 on your camcorder, however, this function does not work for five minutes Your camcorder automatically enters the stop mode. To monitor the picture at the... playback in playback pause mode. Slow playback Slow playback can be performed smoothly on the Remote Commander. Playback - Basics Playing back a tape Various playback modes To operate video control buttons, set the POWER switch to reverse the playback direction. To rewind the tape Press...
...direction, press c. To change the playback direction Press on the Remote Commander in the reverse direction, press , then press ×2 on your camcorder, however, this function does not work for five minutes Your camcorder automatically enters the stop mode. To monitor the picture at the... playback in playback pause mode. Slow playback Slow playback can be performed smoothly on the Remote Commander. Playback - Basics Playing back a tape Various playback modes To operate video control buttons, set the POWER switch to reverse the playback direction. To rewind the tape Press...

Operating Instructions
Page 83
... marked on cassette memory. 83 Connect an S video cable (optional) to the S video jacks of both your camcorder from other Sony VCRs to avoid remote control misoperation. Connect using the INDEX MARK button during recording The recorded picture may be blurred. On the commander mode Your... camcorder works in the commander mode VTR 2, we recommend changing the commander mode or covering the sensor of the A/V...
... marked on cassette memory. 83 Connect an S video cable (optional) to the S video jacks of both your camcorder from other Sony VCRs to avoid remote control misoperation. Connect using the INDEX MARK button during recording The recorded picture may be blurred. On the commander mode Your... camcorder works in the commander mode VTR 2, we recommend changing the commander mode or covering the sensor of the A/V...

Operating Instructions
Page 112
... CAMERA Displays the color bar. To activate the Remote Commander supplied with tape threaded is displayed in the menu settings, the picture from a TV or VCR will not appear on the LCD screen even when your camcorder. CAMERA To superimpose the date and time on the... picture. EDIT SET - To deactivate the Remote Commander to V-OUT/LCD in 10operation increments. CAMERA To show the display on your camcorder is displayed in edit set to avoid remote control misoperation caused by an other VCR's remote control. To light up the camera recording lamps at CAMERA...
... CAMERA Displays the color bar. To activate the Remote Commander supplied with tape threaded is displayed in the menu settings, the picture from a TV or VCR will not appear on the LCD screen even when your camcorder. CAMERA To superimpose the date and time on the... picture. EDIT SET - To deactivate the Remote Commander to V-OUT/LCD in 10operation increments. CAMERA To show the display on your camcorder is displayed in edit set to avoid remote control misoperation caused by an other VCR's remote control. To light up the camera recording lamps at CAMERA...

Operating Instructions
Page 165
... CLOSE To open/close the shutter of the hood with a lens cap, fit the line on the hood to the arrow. Identifying the parts and controls rs rd rf rg REC CH INPUT SELECT LEVEL +48V INPUT LEVEL +48V CH1•CH2 CH1 LINE ON MIC OFF MIC ATT INPUT1 LINE... ON MIC OFF MIC ATT INPUT2 rh rj rk rs Remote sensor rd Camera recording lamp (p. 18) rf INPUT1 REC CH SELECT switch (p. 10) rg INPUT1 INPUT LEVEL selector (p. 10) rh INPUT1 +48 V switch (p. 10) rj...
... CLOSE To open/close the shutter of the hood with a lens cap, fit the line on the hood to the arrow. Identifying the parts and controls rs rd rf rg REC CH INPUT SELECT LEVEL +48V INPUT LEVEL +48V CH1•CH2 CH1 LINE ON MIC OFF MIC ATT INPUT1 LINE... ON MIC OFF MIC ATT INPUT2 rh rj rk rs Remote sensor rd Camera recording lamp (p. 18) rf INPUT1 REC CH SELECT switch (p. 10) rg INPUT1 INPUT LEVEL selector (p. 10) rh INPUT1 +48 V switch (p. 10) rj...

Operating Instructions
Page 167
.... 167 This jack has the same function as the jack indicated as CONTROL L or REMOTE. Quick Reference Identifying the parts and controls ua us ud uf ug uh uj uk ul ua Carrying handle us Remote sensor ud Camera recording lamp (p. 18) uf CUSTOM PRESET button (p. 57...This "i.LINK" mark is a trademark of Sony Corporation and indicates that the length of the tripod screw is used for controlling the tape transport of video equipment and peripherals connected to it. Otherwise, you use headphones, the speaker on your camcorder. The LANC control jack is less than 6.5 mm (9/32 ...
.... 167 This jack has the same function as the jack indicated as CONTROL L or REMOTE. Quick Reference Identifying the parts and controls ua us ud uf ug uh uj uk ul ua Carrying handle us Remote sensor ud Camera recording lamp (p. 18) uf CUSTOM PRESET button (p. 57...This "i.LINK" mark is a trademark of Sony Corporation and indicates that the length of the tripod screw is used for controlling the tape transport of video equipment and peripherals connected to it. Otherwise, you use headphones, the speaker on your camcorder. The LANC control jack is less than 6.5 mm (9/32 ...
Operating Instructions
Page 170
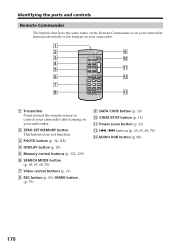
... The buttons that have the same name on the Remote Commander as on your camcorder function identically to the buttons on your camcorder. 1 2 9 3 0 4 5 qa 6 qs 7 8 qd 1 Transmitter Point toward the remote sensor to control your camcorder after turning on your camcorder. 2 ZERO SET MEMORY button This button does not function. 3 PHOTO button (p. 34, 118) 4 DISPLAY button (p. 29...
... The buttons that have the same name on the Remote Commander as on your camcorder function identically to the buttons on your camcorder. 1 2 9 3 0 4 5 qa 6 qs 7 8 qd 1 Transmitter Point toward the remote sensor to control your camcorder after turning on your camcorder. 2 ZERO SET MEMORY button This button does not function. 3 PHOTO button (p. 34, 118) 4 DISPLAY button (p. 29...

Operating Instructions
Page 171
...you switch the time code to user bits. 171 Quick Reference Notes on the batteries to avoid remote control misoperation. Commander modes 1, 2 and 3 are used to distinguish your camcorder from strong light sources such as direct sunlight or overhead lighting. Display window 2 1 3 1...camcorder works in the commander mode VTR 2, we recommend changing the commander mode or covering the sensor of the VCR with black paper. polarities on the Remote Commander •Point the remote sensor away from other Sony VCRs to the + - Identifying the parts and controls To prepare the Remote...
...you switch the time code to user bits. 171 Quick Reference Notes on the batteries to avoid remote control misoperation. Commander modes 1, 2 and 3 are used to distinguish your camcorder from strong light sources such as direct sunlight or overhead lighting. Display window 2 1 3 1...camcorder works in the commander mode VTR 2, we recommend changing the commander mode or covering the sensor of the VCR with black paper. polarities on the Remote Commander •Point the remote sensor away from other Sony VCRs to the + - Identifying the parts and controls To prepare the Remote...

Operating Instructions
Page 174
... mark 139 Progressive recording .......... 35 R Rec Review 27 Recording level 53 Recording time 13 Remaining battery time indicator 24 Remaining tape indicator .... 24 Remote Commander .......... 170 Remote control jack (LANC) 167 Remote sensor 165 RESET 151 S S VIDEO jack 33, 73, 82 SEL/PUSH EXEC dial ....... 105 Self-diagnosis display ........ 152 Skip scan 31 Slide...
... mark 139 Progressive recording .......... 35 R Rec Review 27 Recording level 53 Recording time 13 Remaining battery time indicator 24 Remaining tape indicator .... 24 Remote Commander .......... 170 Remote control jack (LANC) 167 Remote sensor 165 RESET 151 S S VIDEO jack 33, 73, 82 SEL/PUSH EXEC dial ....... 105 Self-diagnosis display ........ 152 Skip scan 31 Slide...


