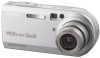

Operating Instructions
Page 3
... . and Canada THIS DEVICE COMPLIES WITH PART 15 OF THE FCC RULES. THIS CLASS B DIGITAL APPARATUS COMPLIES WITH CANADIAN ICES-003. Please consult with the limits sets out in the EMC Directive...the customers in Europe This product has been tested and found compliant with your nearest Sony service station. "Memory Stick" and battery pack For the Customers in the U.S.A. You can help preserve our ...environment by ASTA or BSI to BS 1362, (i.e., marked with or mark) must be sure to power this camera....
... . and Canada THIS DEVICE COMPLIES WITH PART 15 OF THE FCC RULES. THIS CLASS B DIGITAL APPARATUS COMPLIES WITH CANADIAN ICES-003. Please consult with the limits sets out in the EMC Directive...the customers in Europe This product has been tested and found compliant with your nearest Sony service station. "Memory Stick" and battery pack For the Customers in the U.S.A. You can help preserve our ...environment by ASTA or BSI to BS 1362, (i.e., marked with or mark) must be sure to power this camera....

Operating Instructions
Page 4
... the LCD screen and the LCD finder. Do not aim the camera at the sun or other materials may cause irrecoverable damage to make sure that generates strong radio wave or emits radiation. Read this may render the "Memory Stick" unusable or image data breakdown, damage or loss may occur. ...and lens • The LCD screen and the LCD finder are manufactured using the camera. If moisture condensation occurs, see page 115 and follow the instructions on the flash surface to become discolored or to stick to the flash surface, resulting in some tiny black points and/or bright points ...
... the LCD screen and the LCD finder. Do not aim the camera at the sun or other materials may cause irrecoverable damage to make sure that generates strong radio wave or emits radiation. Read this may render the "Memory Stick" unusable or image data breakdown, damage or loss may occur. ...and lens • The LCD screen and the LCD finder are manufactured using the camera. If moisture condensation occurs, see page 115 and follow the instructions on the flash surface to become discolored or to stick to the flash surface, resulting in some tiny black points and/or bright points ...

Operating Instructions
Page 5
... manual. 5 Trademarks • is a trademark of Sony Corporation. • "Memory Stick," , "Memory Stick PRO", , "Memory Stick Duo", , "Memory Stick PRO Duo", , "MagicGate" and are trademarks of Sony Corporation. • "InfoLITHIUM" is a trademark of Sony Corporation. • Picture Package is capable of reproducing ...or registered trademarks of their respective developers or manufacturers. Carl Zeiss lens This camera is equipped with a Carl Zeiss lens which is a trademark of Sony Corporation. • Microsoft, Windows, WindowsMedia, and DirectX are either registered...
... manual. 5 Trademarks • is a trademark of Sony Corporation. • "Memory Stick," , "Memory Stick PRO", , "Memory Stick Duo", , "Memory Stick PRO Duo", , "MagicGate" and are trademarks of Sony Corporation. • "InfoLITHIUM" is a trademark of Sony Corporation. • Picture Package is capable of reproducing ...or registered trademarks of their respective developers or manufacturers. Carl Zeiss lens This camera is equipped with a Carl Zeiss lens which is a trademark of Sony Corporation. • Microsoft, Windows, WindowsMedia, and DirectX are either registered...
Operating Instructions
Page 6
...finder......... 30 Inserting the date and time on a TV screen 38 Deleting still images Deleting images 40 Formatting a "Memory Stick 42 Before advanced operations How to setup and operate your camera .. 44 Changing the menu settings 44 Changing the items in Multi Burst mode - Scene Selection 32 6 Viewing ...still images Viewing images on the LCD screen of your camera 15 How to use the control button 15 Setting the date and time 16 Shooting still images Inserting and removing a "Memory Stick 18 Setting the still image size 19 Image size and quality 20 Basic ...
...finder......... 30 Inserting the date and time on a TV screen 38 Deleting still images Deleting images 40 Formatting a "Memory Stick 42 Before advanced operations How to setup and operate your camera .. 44 Changing the menu settings 44 Changing the items in Multi Burst mode - Scene Selection 32 6 Viewing ...still images Viewing images on the LCD screen of your camera 15 How to use the control button 15 Setting the date and time 16 Shooting still images Inserting and removing a "Memory Stick 18 Setting the still image size 19 Image size and quality 20 Basic ...
Operating Instructions
Page 7
... movies 79 Enjoying images on your computer 86 Image file storage destinations and file names 86 Viewing image files once copied to a computer with your camera 88 Installing "Picture Package 88 Copying images using "Picture Package 90 Using "Picture Package 91 Copying images to print - For Macintosh users 92 Using "...display 107 Additional information Number of images that can be saved or shooting time 108 Menu items 109 SET UP items 113 Precautions 115 On "Memory Stick 116 On "InfoLITHIUM" battery pack .........117 Specifications 118 The LCD screen 120 Index Index 124 7
... movies 79 Enjoying images on your computer 86 Image file storage destinations and file names 86 Viewing image files once copied to a computer with your camera 88 Installing "Picture Package 88 Copying images using "Picture Package 90 Using "Picture Package 91 Copying images to print - For Macintosh users 92 Using "...display 107 Additional information Number of images that can be saved or shooting time 108 Menu items 109 SET UP items 113 Precautions 115 On "Memory Stick 116 On "InfoLITHIUM" battery pack .........117 Specifications 118 The LCD screen 120 Index Index 124 7

Operating Instructions
Page 9
...) F Mode dial (10, 109) G For shooting: Zoom (W/T) button (24) For viewing: / (Playback zoom) button (62)/ (Index) button (37) H DC IN jack cover (11, 14) I Battery/"Memory Stick" cover J RESET button (95) K Access lamp (18) L DC IN jack (11, 14) M Battery eject lever (11) N (Image Size/Delete) button (19, 40) 9 C (Display/LCD on...
...) F Mode dial (10, 109) G For shooting: Zoom (W/T) button (24) For viewing: / (Playback zoom) button (62)/ (Index) button (37) H DC IN jack cover (11, 14) I Battery/"Memory Stick" cover J RESET button (95) K Access lamp (18) L DC IN jack (11, 14) M Battery eject lever (11) N (Image Size/Delete) button (19, 40) 9 C (Display/LCD on...
Operating Instructions
Page 11
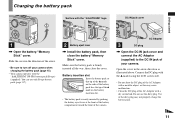
...turn off your camera. Battery insertion slot Insert the battery pack so that tip of the v marks on the side of the battery pack face the tip of the v mark on the battery insertion slot. • The battery pack is firmly inserted all the way, then close the battery/"Memory Stick" cover. Do.... • Do not short the DC plug of the AC Adaptor with the "InfoLITHIUM" logo DC IN jack cover Getting started 1 , Open the battery/"Memory Stick" cover. Slide the cover in the arrow direction as this may cause malfunction. • Clean the DC plug of the dirty plug may not properly...
...turn off your camera. Battery insertion slot Insert the battery pack so that tip of the v marks on the side of the battery pack face the tip of the v mark on the battery insertion slot. • The battery pack is firmly inserted all the way, then close the battery/"Memory Stick" cover. Do.... • Do not short the DC plug of the AC Adaptor with the "InfoLITHIUM" logo DC IN jack cover Getting started 1 , Open the battery/"Memory Stick" cover. Slide the cover in the arrow direction as this may cause malfunction. • Clean the DC plug of the dirty plug may not properly...
Operating Instructions
Page 12
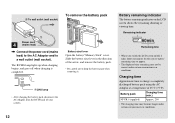
...minute for the correct battery remaining time to a wall outlet (wall socket). To remove the battery pack Battery eject lever Open the battery/"Memory Stick" cover. Battery remaining indicator The battery remaining indicator on /off when charging is completed. /CHG lamp • After charging the battery ...pack, disconnect the AC Adaptor from the DC IN jack of your camera. Slide the battery eject lever in the direction of 25°C (77°F). Battery pack NP-FR1 (supplied) Charging time (min.) Approx...
...minute for the correct battery remaining time to a wall outlet (wall socket). To remove the battery pack Battery eject lever Open the battery/"Memory Stick" cover. Battery remaining indicator The battery remaining indicator on /off when charging is completed. /CHG lamp • After charging the battery ...pack, disconnect the AC Adaptor from the DC IN jack of your camera. Slide the battery eject lever in the direction of 25°C (77°F). Battery pack NP-FR1 (supplied) Charging time (min.) Approx...

Operating Instructions
Page 13
...LCD screen On Off Approx. 160 min. The zoom is used - Shooting one time every 30 seconds - The power turns on CIPA standard. (CIPA: Camera & Imaging Products Association) Viewing still images2) NP-FR1 (supplied) Image size No. The surrounding temperature is set to [Monitor] in the SET UP ...Note that the actual numbers may be recorded or viewed take into account changing the "Memory Stick" as the number of uses increases and over time (page 117). The flash strobes once every two times - The camera has been turned on the conditions of use. • The battery capacity decreases ...
...LCD screen On Off Approx. 160 min. The zoom is used - Shooting one time every 30 seconds - The power turns on CIPA standard. (CIPA: Camera & Imaging Products Association) Viewing still images2) NP-FR1 (supplied) Image size No. The surrounding temperature is set to [Monitor] in the SET UP ...Note that the actual numbers may be recorded or viewed take into account changing the "Memory Stick" as the number of uses increases and over time (page 117). The flash strobes once every two times - The camera has been turned on the conditions of use. • The battery capacity decreases ...
Operating Instructions
Page 18
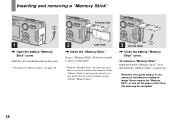
...Memory Stick" cover. Insert a "Memory Stick" all the way in the connector. Slide the cover in the direction of the way in so that it out. • Whenever the access lamp is lit, the camera is securely seated in until it clicks as illustrated. • Push the "Memory Stick" all of the arrow. • For details on "Memory Stick...," see page 116. 2 Label side , Insert the "Memory Stick."
...Memory Stick" cover. Insert a "Memory Stick" all the way in the connector. Slide the cover in the direction of the way in so that it out. • Whenever the access lamp is lit, the camera is securely seated in until it clicks as illustrated. • Push the "Memory Stick" all of the arrow. • For details on "Memory Stick...," see page 116. 2 Label side , Insert the "Memory Stick."

Operating Instructions
Page 20
... ratio. For example, a 5M (2592×1944) size image indicates that can be recorded on a "Memory Stick" decreases. When you want to e-mail or creating home pages 1) The factory setting is the highest image quality on this camera. 2) Images are 2592 pixels horizontally and 1944 pixels vertically. Image size and quality You can...
... ratio. For example, a 5M (2592×1944) size image indicates that can be recorded on a "Memory Stick" decreases. When you want to e-mail or creating home pages 1) The factory setting is the highest image quality on this camera. 2) Images are 2592 pixels horizontally and 1944 pixels vertically. Image size and quality You can...

Operating Instructions
Page 21
... images that can be saved in a "Memory Stick"3) The number of images that can be saved in other modes, see page 108. 4) For more information about the image quality (compression ratio), see page 45. • When images recorded using earlier Sony models are played back on this camera, the display may differ from the... image quality. • For recording a larger number of shooting images can be saved in Fine (Standard)4) mode are viewed on the LCD screen of the camera, they all look the same size. • Number of images.
... images that can be saved in a "Memory Stick"3) The number of images that can be saved in other modes, see page 108. 4) For more information about the image quality (compression ratio), see page 45. • When images recorded using earlier Sony models are played back on this camera, the display may differ from the... image quality. • For recording a larger number of shooting images can be saved in Fine (Standard)4) mode are viewed on the LCD screen of the camera, they all look the same size. • Number of images.

Operating Instructions
Page 22
...ups (Macro) mode (page 26). • The frame indicated on the power or when the zoom function is working (page 24). • This camera can create new folders and select folders to be careful so that your fingers do not block the lens portion, finder window, flash emitter or... portion while it is approx. 50 cm (19 3/4 inches). Using auto adjustment mode Holding the camera correctly Mode dial When shooting pictures with the camera, be stored in the "Memory Stick" (page 46). 2 , Hold the camera steadily with both hands and position the subject in the center of the focus frame. • ...
...ups (Macro) mode (page 26). • The frame indicated on the power or when the zoom function is working (page 24). • This camera can create new folders and select folders to be careful so that your fingers do not block the lens portion, finder window, flash emitter or... portion while it is approx. 50 cm (19 3/4 inches). Using auto adjustment mode Holding the camera correctly Mode dial When shooting pictures with the camera, be stored in the "Memory Stick" (page 46). 2 , Hold the camera steadily with both hands and position the subject in the center of the focus frame. • ...

Operating Instructions
Page 23
... have difficulty working under the following conditions. The beep sounds but in the "Memory Stick." The shutter sounds. The image will be canceled. • You can shoot the next image. • When operating the camera using a battery pack, if you try to shoot a subject that is not...subject is not yet recorded. There are two Auto Focus functions: "AF range finder frame" which sets the focus position according to steadily lit, the camera is seen through glass, such as a window. • A fast-moving subject. • The subject reflects or has a lustrous finish, such ...
... have difficulty working under the following conditions. The beep sounds but in the "Memory Stick." The shutter sounds. The image will be canceled. • You can shoot the next image. • When operating the camera using a battery pack, if you try to shoot a subject that is not...subject is not yet recorded. There are two Auto Focus functions: "AF range finder frame" which sets the focus position according to steadily lit, the camera is seen through glass, such as a window. • A fast-moving subject. • The subject reflects or has a lustrous finish, such ...

Operating Instructions
Page 42
... images in the folder Select [All In This Folder] with B on the control button in the "Memory Stick" will be permanently erased. this process is also called "initialization." • The "Memory Stick" supplied with your camera and commercially available "Memory Stick" are already formatted, and can be used immediately. • When you want to format into the...
... images in the folder Select [All In This Folder] with B on the control button in the "Memory Stick" will be permanently erased. this process is also called "initialization." • The "Memory Stick" supplied with your camera and commercially available "Memory Stick" are already formatted, and can be used immediately. • When you want to format into the...

Operating Instructions
Page 43
OK Cancel 2 , Set the mode dial to SET UP, and turn on the power. 3 , Select (Memory Stick Tool) with v on the control button. folder: Cancel Change REC. To cancel the formatting Select [Cancel] with V on the control button, then press z. 4 ,... the control button, then press z. When this message disappears, the format is complete. 43 Select [Format] with v, then press z. Deleting still images POWER Memory Stick Tool Format: OK Create REC. Select [OK] with B, then press B. The message "Formatting" appears. folder: 1 2 60min Format All data will be erased Ready?
OK Cancel 2 , Set the mode dial to SET UP, and turn on the power. 3 , Select (Memory Stick Tool) with v on the control button. folder: Cancel Change REC. To cancel the formatting Select [Cancel] with V on the control button, then press z. 4 ,... the control button, then press z. When this message disappears, the format is complete. 43 Select [Format] with v, then press z. Deleting still images POWER Memory Stick Tool Format: OK Create REC. Select [OK] with B, then press B. The message "Formatting" appears. folder: 1 2 60min Format All data will be erased Ready?

Operating Instructions
Page 46
...exceeded, a new folder is created or selected. A new folder is stored in the "Memory Stick," and the folder becomes the recording folder. Folder] with B/V, and [OK] with this camera. 46 The recording folder selection screen appears. Folder 102 2/2 Folder Name:102MSDCF No. You ...folder 102MSDCF Ready? To cancel folder creation Select [Cancel] in the newly created folder until a different folder is automatically created. b Select (Memory Stick Tool) with the camera. • Images are recorded in step 2 or 3. • Once you create a new folder, you cannot delete the new folder ...
...exceeded, a new folder is created or selected. A new folder is stored in the "Memory Stick," and the folder becomes the recording folder. Folder] with B/V, and [OK] with this camera. 46 The recording folder selection screen appears. Folder 102 2/2 Folder Name:102MSDCF No. You ...folder 102MSDCF Ready? To cancel folder creation Select [Cancel] in the newly created folder until a different folder is automatically created. b Select (Memory Stick Tool) with the camera. • Images are recorded in step 2 or 3. • Once you create a new folder, you cannot delete the new folder ...

Operating Instructions
Page 58
...you can shoot the next image. c Select [ ] (Flash Level) with b/B, then select the desired setting with v/ V. The maxium number of the "Memory Stick" is used for continuous shooting. When you can shoot per one shooting depends on the image size and image quality settings. Normal: Normal setting. -: Makes...hold the shutter button. Shooting continuously This mode is full, recording stops even if you press and hold down the shutter button, the camera records the maximum number of images shot continuously (Units: images) Image quality Image size 5M 9 Fine Standard 15 3:2 9 15 ...
...you can shoot the next image. c Select [ ] (Flash Level) with b/B, then select the desired setting with v/ V. The maxium number of the "Memory Stick" is used for continuous shooting. When you can shoot per one shooting depends on the image size and image quality settings. Normal: Normal setting. -: Makes...hold the shutter button. Shooting continuously This mode is full, recording stops even if you press and hold down the shutter button, the camera records the maximum number of images shot continuously (Units: images) Image quality Image size 5M 9 Fine Standard 15 3:2 9 15 ...

Operating Instructions
Page 61
... the next folder. : Moves to . c Select (Folder) with b, then press z. To cancel the selection In step 5, select [Cancel]. When multiple folders are created in the "Memory Stick" When the first or last image in this folder" appears. 61
... the next folder. : Moves to . c Select (Folder) with b, then press z. To cancel the selection In step 5, select [Cancel]. When multiple folders are created in the "Memory Stick" When the first or last image in this folder" appears. 61

Operating Instructions
Page 63
... Folder: Plays back all images stored in step 3. Off: After all the images have been played back, the slide show setting Select [Cancel] in the "Memory Stick." The image is recorded, and the image on the image. 63 Advanced still image viewing To cancel the slide show ends. Playing back successive images...
... Folder: Plays back all images stored in step 3. Off: After all the images have been played back, the slide show setting Select [Cancel] in the "Memory Stick." The image is recorded, and the image on the image. 63 Advanced still image viewing To cancel the slide show ends. Playing back successive images...


