
Operating Instructions
Page 3
... cables shorter than 3 meters (9.8 feet). THIS CLASS B DIGITAL APPARATUS COMPLIES WITH CANADIAN ICES-003. Notice on the supplied ...sets out in the EMC Directive for your nearest Sony service station. Attention for the Customers in the ..."Memory Stick" and battery pack For the Customers in the U.S.A. and Canada RECYCLING LITHIUM-ION BATTERIES Lithium-Ion batteries are recyclable. For ..., be replaced, a fuse of the battery used rechargeable batteries to discontinue midway (fail), restart the... picture and sound of rechargeable batteries, call toll free 1-800-822-8837, or visit...
... cables shorter than 3 meters (9.8 feet). THIS CLASS B DIGITAL APPARATUS COMPLIES WITH CANADIAN ICES-003. Notice on the supplied ...sets out in the EMC Directive for your nearest Sony service station. Attention for the Customers in the ..."Memory Stick" and battery pack For the Customers in the U.S.A. and Canada RECYCLING LITHIUM-ION BATTERIES Lithium-Ion batteries are recyclable. For ..., be replaced, a fuse of the battery used rechargeable batteries to discontinue midway (fail), restart the... picture and sound of rechargeable batteries, call toll free 1-800-822-8837, or visit...
Operating Instructions
Page 6
... frame - Table of contents Read this first 4 Identifying the parts 8 Mode dial 10 Getting started Charging the battery pack 11 Using the AC adaptor 14 Using your camera abroad 14 Turning on a still image 31 Shooting according to scene conditions - Macro 26 Using the self-timer ...an image - Playback zoom 62 Recording an enlarged image - Manual Exposure 50 Adjusting the exposure - Folder 61 Enlarging a portion of your camera 36 Viewing images on a TV screen 38 Deleting still images Deleting images 40 Formatting a "Memory Stick 42 Before advanced operations How to setup...
... frame - Table of contents Read this first 4 Identifying the parts 8 Mode dial 10 Getting started Charging the battery pack 11 Using the AC adaptor 14 Using your camera abroad 14 Turning on a still image 31 Shooting according to scene conditions - Macro 26 Using the self-timer ...an image - Playback zoom 62 Recording an enlarged image - Manual Exposure 50 Adjusting the exposure - Folder 61 Enlarging a portion of your camera 36 Viewing images on a TV screen 38 Deleting still images Deleting images 40 Formatting a "Memory Stick 42 Before advanced operations How to setup...
Operating Instructions
Page 7
...Enjoying images on your computer 86 Image file storage destinations and file names 86 Viewing image files once copied to a computer with your camera 88 Installing "Picture Package 88 Copying images using "Picture Package 90 Using "Picture Package 91 Copying images to your computer - Resize 67...UP items 113 Precautions 115 On "Memory Stick 116 On "InfoLITHIUM" battery pack .........117 Specifications 118 The LCD screen 120 Index Index 124 7 For Windows users 81 Installing the USB driver 82 Connecting the camera to your computer 83 Copying images 84 Viewing the images on your ...
...Enjoying images on your computer 86 Image file storage destinations and file names 86 Viewing image files once copied to a computer with your camera 88 Installing "Picture Package 88 Copying images using "Picture Package 90 Using "Picture Package 91 Copying images to your computer - Resize 67...UP items 113 Precautions 115 On "Memory Stick 116 On "InfoLITHIUM" battery pack .........117 Specifications 118 The LCD screen 120 Index Index 124 7 For Windows users 81 Installing the USB driver 82 Connecting the camera to your computer 83 Copying images 84 Viewing the images on your ...

Operating Instructions
Page 9
... (50) F Mode dial (10, 109) G For shooting: Zoom (W/T) button (24) For viewing: / (Playback zoom) button (62)/ (Index) button (37) H DC IN jack cover (11, 14) I Battery/"Memory Stick" cover J RESET button (95) K Access lamp (18) L DC IN jack (11, 14...
... (50) F Mode dial (10, 109) G For shooting: Zoom (W/T) button (24) For viewing: / (Playback zoom) button (62)/ (Index) button (37) H DC IN jack cover (11, 14) I Battery/"Memory Stick" cover J RESET button (95) K Access lamp (18) L DC IN jack (11, 14...
Operating Instructions
Page 11
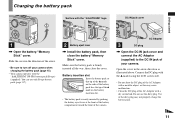
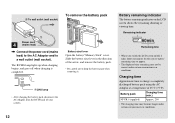
...of the AC Adaptor with a dry cotton bud. Battery insertion slot Insert the battery pack so that tip of the v marks on the side of the battery pack face the tip of your camera when charging the battery pack (page 15). • Your camera operates with the "InfoLITHIUM" logo DC IN jack cover... Getting started Surface with the "InfoLITHIUM" NP-FR1 battery pack (R type) (supplied). Open the cover in...
...of the AC Adaptor with a dry cotton bud. Battery insertion slot Insert the battery pack so that tip of the v marks on the side of the battery pack face the tip of your camera when charging the battery pack (page 15). • Your camera operates with the "InfoLITHIUM" logo DC IN jack cover... Getting started Surface with the "InfoLITHIUM" NP-FR1 battery pack (R type) (supplied). Open the cover in...
Operating Instructions
Page 12
... indicator on /off when charging is completed. /CHG lamp • After charging the battery pack, disconnect the AC Adaptor from the DC IN jack of your camera. Battery pack NP-FR1 (supplied) Charging time (min.) Approx. 200 • The charging time may not be correct under certain circumstances... or conditions. 12 Slide the battery eject lever in the direction of the arrow, and remove the battery pack. • Be ...
... indicator on /off when charging is completed. /CHG lamp • After charging the battery pack, disconnect the AC Adaptor from the DC IN jack of your camera. Battery pack NP-FR1 (supplied) Charging time (min.) Approx. 200 • The charging time may not be correct under certain circumstances... or conditions. 12 Slide the battery eject lever in the direction of the arrow, and remove the battery pack. • Be ...

Operating Instructions
Page 13
... 3) Shooting movies continuously with a fully charged battery pack (supplied) at about three second intervals Shooting movies3) NP-FR1 (supplied) LCD screen LCD screen On Off Approx. 160 min. The camera has been turned on CIPA standard. (CIPA: Camera & Imaging Products Association) Viewing still images2) NP... viewed take into account changing the "Memory Stick" as the number of use. • The battery capacity decreases as necessary. of images and the battery life that can be recorded/viewed are decreased under the following situations: - (P.Quality) is based...
... 3) Shooting movies continuously with a fully charged battery pack (supplied) at about three second intervals Shooting movies3) NP-FR1 (supplied) LCD screen LCD screen On Off Approx. 160 min. The camera has been turned on CIPA standard. (CIPA: Camera & Imaging Products Association) Viewing still images2) NP... viewed take into account changing the "Memory Stick" as the number of use. • The battery capacity decreases as necessary. of images and the battery life that can be recorded/viewed are decreased under the following situations: - (P.Quality) is based...

Operating Instructions
Page 15
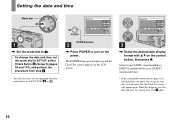
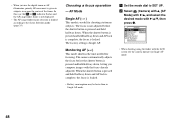
... the USB or A/V multi cable How to use the control button to prevent wearing down the battery. The auto power-off function If you turn on the power when the mode dial is on your camera POWER lamp POWER button POWER , Press POWER. The POWER lamp (green) lights up the menu ...or the SET UP screen (page 45), and use the control button Camera AF Mode: Digital Zoom: Date/Time: 1 Red Eye Reduction: 2 AF Illuminator: Auto Review: Single Smart Off Off Auto Off SELECT Setup 2 File Number: USB Connect: Video Out...
... the USB or A/V multi cable How to use the control button to prevent wearing down the battery. The auto power-off function If you turn on the power when the mode dial is on your camera POWER lamp POWER button POWER , Press POWER. The POWER lamp (green) lights up the menu ...or the SET UP screen (page 45), and use the control button Camera AF Mode: Digital Zoom: Date/Time: 1 Red Eye Reduction: 2 AF Illuminator: Auto Review: Single Smart Off Off Auto Off SELECT Setup 2 File Number: USB Connect: Video Out...
Operating Instructions
Page 16
... this happens, reset the date and time, by starting from [Y/M/D] (year/month/day), [M/D/Y] (month/day/year) or [D/M/Y] (day/month/year). • If the rechargeable button battery (page 116), which provides the power for saving the time data, ever becomes low, the Clock Set screen will appear again. Clock Set Y/M/D M/D/Y D/M/Y 2004 / 1 / 1 12...
... this happens, reset the date and time, by starting from [Y/M/D] (year/month/day), [M/D/Y] (month/day/year) or [D/M/Y] (day/month/year). • If the rechargeable button battery (page 116), which provides the power for saving the time data, ever becomes low, the Clock Set screen will appear again. Clock Set Y/M/D M/D/Y D/M/Y 2004 / 1 / 1 12...
Operating Instructions
Page 18
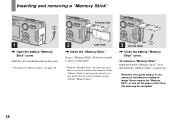
... remove the "Memory Stick" or turn off the power at this time. Shooting still images Inserting and removing a "Memory Stick" Terminal side 1 , Open the battery/"Memory Stick" cover. Slide the cover in the direction of the way in the connector. The data may not be corrupted. 18 To remove a "Memory..., then push the "Memory Stick" to pop it is securely seated in so that it out. • Whenever the access lamp is lit, the camera is not inserted correctly, you may be able to record or display images with the "Memory Stick." 3 Access lamp , Close the battery/"Memory Stick" cover.
... remove the "Memory Stick" or turn off the power at this time. Shooting still images Inserting and removing a "Memory Stick" Terminal side 1 , Open the battery/"Memory Stick" cover. Slide the cover in the direction of the way in the connector. The data may not be corrupted. 18 To remove a "Memory..., then push the "Memory Stick" to pop it is securely seated in so that it out. • Whenever the access lamp is lit, the camera is not inserted correctly, you may be able to record or display images with the "Memory Stick." 3 Access lamp , Close the battery/"Memory Stick" cover.

Operating Instructions
Page 23
... have difficulty working under the following conditions. When the recording lamp (page 9) goes out, you can shoot the next image. • When operating the camera using a battery pack, if you release the shutter button, shooting will be canceled. • You can continue and shoot even when the... camera does not beep, but the image is seen through glass, such as a window. • A fast-moving subject. • The subject reflects or has a lustrous finish...
... have difficulty working under the following conditions. When the recording lamp (page 9) goes out, you can shoot the next image. • When operating the camera using a battery pack, if you release the shutter button, shooting will be canceled. • You can continue and shoot even when the... camera does not beep, but the image is seen through glass, such as a window. • A fast-moving subject. • The subject reflects or has a lustrous finish...
Operating Instructions
Page 30
... finder is difficult to [Single] (page 48). - This is set to confirm the image using the LCD screen. The digital zoom does not function (page 25). - [AF Mode] is due to save battery power, or when it is convenient when you press , the display changes in the following order. Each time you...
... finder is difficult to [Single] (page 48). - This is set to confirm the image using the LCD screen. The digital zoom does not function (page 25). - [AF Mode] is due to save battery power, or when it is convenient when you press , the display changes in the following order. Each time you...
Operating Instructions
Page 48
...AF. When the shutter button is pressed and held halfway down , letting you use the digital zoom or AF illuminator, priority AF movement is limited according to the Scene Selection mode (page 35). b Select (Camera) with v, [AF Mode] with B/v, and select the desired mode with the LCD screen...setting is pressed and held halfway down and AF lock is complete, the focus is locked. • Battery consumption may be faster than in or near the center of the frame. Camera AF Mode: xSingle Digital Zoom: Monitor Date/Time: 1 Red Eye Reduction: 2 AF Illuminator: Auto Review: • When...
...AF. When the shutter button is pressed and held halfway down , letting you use the digital zoom or AF illuminator, priority AF movement is limited according to the Scene Selection mode (page 35). b Select (Camera) with v, [AF Mode] with B/v, and select the desired mode with the LCD screen...setting is pressed and held halfway down and AF lock is complete, the focus is locked. • Battery consumption may be faster than in or near the center of the frame. Camera AF Mode: xSingle Digital Zoom: Monitor Date/Time: 1 Red Eye Reduction: 2 AF Illuminator: Auto Review: • When...

Operating Instructions
Page 58
...with b/B, then select [Burst] with v/ V. d Shoot the image. When "Recording" disappears, you press and hold down the shutter button, the camera records the maximum number of images you press and hold the shutter button. The maximum number of the "Memory Stick" is used for continuous shooting.... Mode dial Shutter MENU Control button • When the battery power decreases with use or the capacity of images shot continuously (Units: images) Image quality Image size 5M 9 Fine Standard 15 3:2...
...with b/B, then select [Burst] with v/ V. d Shoot the image. When "Recording" disappears, you press and hold down the shutter button, the camera records the maximum number of images you press and hold the shutter button. The maximum number of the "Memory Stick" is used for continuous shooting.... Mode dial Shutter MENU Control button • When the battery power decreases with use or the capacity of images shot continuously (Units: images) Image quality Image size 5M 9 Fine Standard 15 3:2...
Operating Instructions
Page 83
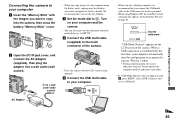
... first time, your computer using Windows XP, the AutoPlay wizard automatically appears on the rear panel. • When using the battery pack, copying may be failed or cause data corruption by battery shutoff. We recommend that you use the AC Adaptor. When a USB connection is set it to the USB connector on... the desktop. b Open the DC IN jack cover, and connect the AC Adaptor (supplied), then plug the adaptor into the camera, then close the battery/"Memory Stick" cover. e Connect the USB multi cable to recognize the...
... first time, your computer using Windows XP, the AutoPlay wizard automatically appears on the rear panel. • When using the battery pack, copying may be failed or cause data corruption by battery shutoff. We recommend that you use the AC Adaptor. When a USB connection is set it to the USB connector on... the desktop. b Open the DC IN jack cover, and connect the AC Adaptor (supplied), then plug the adaptor into the camera, then close the battery/"Memory Stick" cover. e Connect the USB multi cable to recognize the...
Operating Instructions
Page 95
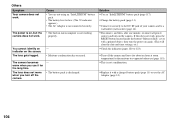
... is disconnected. • The AC Adaptor has malfunctioned. • The battery pack is not installed correctly. • The battery pack is completely charged. p Consult your Sony dealer or local authorized Sony service facility. Troubleshooting 2 Should your camera still not work properly, consult your Sony dealer or local authorized Sony service facility. p Consult your Sony dealer or local authorized...
... is disconnected. • The AC Adaptor has malfunctioned. • The battery pack is not installed correctly. • The battery pack is completely charged. p Consult your Sony dealer or local authorized Sony service facility. Troubleshooting 2 Should your camera still not work properly, consult your Sony dealer or local authorized Sony service facility. p Consult your Sony dealer or local authorized...

Operating Instructions
Page 96
... power is on the camera. p See page 118. p Turn on the LCD screen (page 30). p Consult your Sony dealer or local authorized Sony service facility. The subject is discharged. p Clean the pins of the DC plug with a cotton swab, etc., and charge the battery pack (page 11). ...You cannot turn on , the camera turns off automatically to , P, M, SCN or ...
... power is on the camera. p See page 118. p Turn on the LCD screen (page 30). p Consult your Sony dealer or local authorized Sony service facility. The subject is discharged. p Clean the pins of the DC plug with a cotton swab, etc., and charge the battery pack (page 11). ...You cannot turn on , the camera turns off automatically to , P, M, SCN or ...
Operating Instructions
Page 101
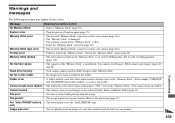
Cause • The camera is turned off. • The battery level is low. • You are not using the correct copy procedure for your OS (pages 84, 85, 90 and 92). p Disconnect the USB multi cable from your camera. Make sure that "USB Mode" is not correctly connected to ...82). p Install the USB driver (page 82). Troubleshooting 101 p Set it again firmly. p Make a USB connection when the computer is turned on the camera (page 15). p Use the supplied USB multi cable (pages 83 and 93). p Consult the computer or software manufacturer. After making a USB connection, ...
Cause • The camera is turned off. • The battery level is low. • You are not using the correct copy procedure for your OS (pages 84, 85, 90 and 92). p Disconnect the USB multi cable from your camera. Make sure that "USB Mode" is not correctly connected to ...82). p Install the USB driver (page 82). Troubleshooting 101 p Set it again firmly. p Make a USB connection when the computer is turned on the camera (page 15). p Use the supplied USB multi cable (pages 83 and 93). p Consult the computer or software manufacturer. After making a USB connection, ...
Operating Instructions
Page 104
... use the AC Adaptor (page 14). 104 Solution p Use an "InfoLITHIUM" battery pack (page 117). p This is not connected securely. p Turn off the camera. - • The battery pack is not working camera does not work. The camera becomes warm when you turn the power on , but the • The... built-in microcomputer is discharged. Others Symptom Your camera does not work , press the RESET button located inside the battery/"Memory Stick" cover with a charged battery pack (page 11) or use (page 115). properly. p Connect it for the moisture to a...
... use the AC Adaptor (page 14). 104 Solution p Use an "InfoLITHIUM" battery pack (page 117). p This is not connected securely. p Turn off the camera. - • The battery pack is not working camera does not work. The camera becomes warm when you turn the power on , but the • The... built-in microcomputer is discharged. Others Symptom Your camera does not work , press the RESET button located inside the battery/"Memory Stick" cover with a charged battery pack (page 11) or use (page 115). properly. p Connect it for the moisture to a...
Operating Instructions
Page 105
... again (page 42). Cannot create more folders • The folder whose first three digits of the "Memory Stick" is set to this folder. • A folder with the same first three digits number already exists in the selected folder. File error • An error occurred while...of a size that cannot be used in this "Memory Stick." Read only memory • Your camera cannot record or delete images to the LOCK position. For "InfoLITHIUM" battery • The battery pack is insufficient. Troubleshooting 105 Memory Stick type error • The inserted "Memory Stick" cannot...
... again (page 42). Cannot create more folders • The folder whose first three digits of the "Memory Stick" is set to this folder. • A folder with the same first three digits number already exists in the selected folder. File error • An error occurred while...of a size that cannot be used in this "Memory Stick." Read only memory • Your camera cannot record or delete images to the LOCK position. For "InfoLITHIUM" battery • The battery pack is insufficient. Troubleshooting 105 Memory Stick type error • The inserted "Memory Stick" cannot...


