
Operating Instructions
Page 1
.... Record the serial number in the space provided below. Refer to these numbers whenever you call upon your computer_________ Troubleshooting Additional information Index DSC-P100/P120 © 2004 Sony Corporation 3-091-477-11(1) Getting started Shooting still images Viewing still images Deleting still images Before advanced operations Advanced still image shooting Advanced still image viewing Still image editing Still image printing PictBridge printer) Enjoying movies Enjoying images on the bottom. Model No. Digital Still Camera Operating Instructions Before operating...
.... Record the serial number in the space provided below. Refer to these numbers whenever you call upon your computer_________ Troubleshooting Additional information Index DSC-P100/P120 © 2004 Sony Corporation 3-091-477-11(1) Getting started Shooting still images Viewing still images Deleting still images Before advanced operations Advanced still image shooting Advanced still image viewing Still image editing Still image printing PictBridge printer) Enjoying movies Enjoying images on the bottom. Model No. Digital Still Camera Operating Instructions Before operating...

Operating Instructions
Page 3
... to this equipment for using connection cables shorter than 3 meters (9.8 feet). If the plug supplied with your used rechargeable batteries to power this camera. Attention for the Customers in the EMC Directive for your nearest Sony service station. "Memory Stick" and battery pack For the Customers in the U.S.A. and Canada THIS DEVICE COMPLIES WITH PART 15 OF THE FCC RULES. OPERATION IS SUBJECT TO...
... to this equipment for using connection cables shorter than 3 meters (9.8 feet). If the plug supplied with your used rechargeable batteries to power this camera. Attention for the Customers in the EMC Directive for your nearest Sony service station. "Memory Stick" and battery pack For the Customers in the U.S.A. and Canada THIS DEVICE COMPLIES WITH PART 15 OF THE FCC RULES. OPERATION IS SUBJECT TO...

Operating Instructions
Page 4
... not to remove it may cause irrecoverable damage to direct sunlight for effective use the camera near a window or outdoors. Precaution on the LCD screen and the LCD finder. The power zoom lens This camera is not possible due to record images, this first Trial recording Before you record one-time events, you may be copyrighted. Water entering the inside of data loss, always copy (back up) data to it...
... not to remove it may cause irrecoverable damage to direct sunlight for effective use the camera near a window or outdoors. Precaution on the LCD screen and the LCD finder. The power zoom lens This camera is not possible due to record images, this first Trial recording Before you record one-time events, you may be copyrighted. Water entering the inside of data loss, always copy (back up) data to it...
Operating Instructions
Page 6
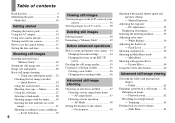
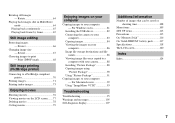
... - Focus preset 49 Shooting with special effects - Folder 61 Enlarging a portion of a still image.........62 Enlarging an image - Quick Review 24 Using the zoom feature 24 Shooting close-ups - White Balance 56 Adjusting the flash level - Picture Effect 60 Using the Cyber-shot Station 60 Advanced still image viewing Selecting the folder and playing back images - Macro 26 Using the self-timer 27 Selecting a flash mode 28 Shooting images with the finder......... 30 Inserting the date and time on /off your camera .. 44 Changing the menu settings...
... - Focus preset 49 Shooting with special effects - Folder 61 Enlarging a portion of a still image.........62 Enlarging an image - Quick Review 24 Using the zoom feature 24 Shooting close-ups - White Balance 56 Adjusting the flash level - Picture Effect 60 Using the Cyber-shot Station 60 Advanced still image viewing Selecting the folder and playing back images - Macro 26 Using the self-timer 27 Selecting a flash mode 28 Shooting images with the finder......... 30 Inserting the date and time on /off your camera .. 44 Changing the menu settings...
Operating Instructions
Page 7
...68 Still image printing (PictBridge printer) Connecting to a PictBridge compliant printer 70 Printing images 71 Printing index-images 73 Enjoying movies Shooting movies 76 Viewing movies on the LCD screen .......77 Deleting movies 78 Cutting movies 79 Enjoying images on your computer 86 Image file storage destinations and file names 86 Viewing image files once copied to a computer with your camera 88 Installing "Picture Package 88 Copying images using "Picture Package 90 Using "Picture Package 91 Copying images to your computer - Protect 66 Changing image size - Resize 67...
...68 Still image printing (PictBridge printer) Connecting to a PictBridge compliant printer 70 Printing images 71 Printing index-images 73 Enjoying movies Shooting movies 76 Viewing movies on the LCD screen .......77 Deleting movies 78 Cutting movies 79 Enjoying images on your computer 86 Image file storage destinations and file names 86 Viewing image files once copied to a computer with your camera 88 Installing "Picture Package 88 Copying images using "Picture Package 90 Using "Picture Package 91 Copying images to your computer - Protect 66 Changing image size - Resize 67...
Operating Instructions
Page 12
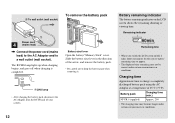
... indicator 60min Remaining time • When you switch the LCD screen on the LCD screen shows the remaining shooting or viewing time. 2 To wall outlet (wall socket) 1 Power cord 4 (mains lead) , Connect the power cord (mains lead) to the AC Adaptor and to charge a completely discharged battery pack using the AC Adaptor at a temperature of 25°C (77°F). Charging time Approximate time to a wall outlet (wall socket). The /CHG lamp lights...
... indicator 60min Remaining time • When you switch the LCD screen on the LCD screen shows the remaining shooting or viewing time. 2 To wall outlet (wall socket) 1 Power cord 4 (mains lead) , Connect the power cord (mains lead) to the AC Adaptor and to charge a completely discharged battery pack using the AC Adaptor at a temperature of 25°C (77°F). Charging time Approximate time to a wall outlet (wall socket). The /CHG lamp lights...

Operating Instructions
Page 15
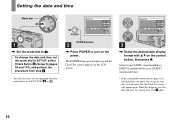
... operating. To set a menu item, press v/V/b/B on the control button to select the desired item and setting, then press z to make the setting. 15 Getting started Turning off function If you turn on the power when the mode dial is on. The POWER lamp (green) lights up the menu or the SET UP screen (page 45), and use the control button Camera AF Mode: Digital Zoom: Date/Time: 1 Red Eye Reduction: 2 AF Illuminator: Auto Review: Single Smart Off Off Auto Off SELECT Setup 2 File Number: USB Connect: Video Out: 1 Clock Set...
... operating. To set a menu item, press v/V/b/B on the control button to select the desired item and setting, then press z to make the setting. 15 Getting started Turning off function If you turn on the power when the mode dial is on. The POWER lamp (green) lights up the menu or the SET UP screen (page 45), and use the control button Camera AF Mode: Digital Zoom: Date/Time: 1 Red Eye Reduction: 2 AF Illuminator: Auto Review: Single Smart Off Off Auto Off SELECT Setup 2 File Number: USB Connect: Video Out: 1 Clock Set...
Operating Instructions
Page 16
... date and time, by starting from [Y/M/D] (year/month/day), [M/D/Y] (month/day/year) or [D/M/Y] (day/month/year). • If the rechargeable button battery (page 116), which provides the power for saving the time data, ever becomes low, the Clock Set screen will appear again. When this operation when the mode dial is set to turn on the power. The POWER lamp (green) lights up and the Clock Set screen appears on the control button...
... date and time, by starting from [Y/M/D] (year/month/day), [M/D/Y] (month/day/year) or [D/M/Y] (day/month/year). • If the rechargeable button battery (page 116), which provides the power for saving the time data, ever becomes low, the Clock Set screen will appear again. When this operation when the mode dial is set to turn on the power. The POWER lamp (green) lights up and the Clock Set screen appears on the control button...
Operating Instructions
Page 45
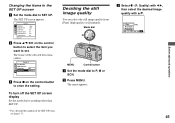
... v/V. Deciding the still image quality You can select the still image quality from [Fine] (high quality) or [Standard]. c Select (P. b Press MENU. Mode dial MENU Control button a Set the mode dial to SET UP. The menu appears. Fine FINE Standard P.Quality WB ISO 45 Before advanced operations To turn off the SET UP screen display Set the mode dial to set. Setup 2 File Number: USB Connect: Video Out: 1 Clock Set: OK Cancel c Press z on the control button to select the...
... v/V. Deciding the still image quality You can select the still image quality from [Fine] (high quality) or [Standard]. c Select (P. b Press MENU. Mode dial MENU Control button a Set the mode dial to SET UP. The menu appears. Fine FINE Standard P.Quality WB ISO 45 Before advanced operations To turn off the SET UP screen display Set the mode dial to set. Setup 2 File Number: USB Connect: Video Out: 1 Clock Set: OK Cancel c Press z on the control button to select the...
Operating Instructions
Page 76
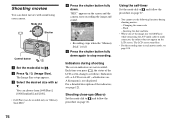
...; You cannot use the following functions during shooting The screen indicators are not recorded. A histogram is full. Changing the zoom scale - b Press (Image Size). You can choose from [640(Fine)], [640(Standard)] and [160]. • [640(Fine)] can shoot movies with v/ V. The Image Size setup appears. For a detailed description of the LCD screen changes as follows: Indicators off t LCD screen off t Indicators on the screen and the camera starts recording the image and sound. Flash - Inserting the date and time •...
...; You cannot use the following functions during shooting The screen indicators are not recorded. A histogram is full. Changing the zoom scale - b Press (Image Size). You can choose from [640(Fine)], [640(Standard)] and [160]. • [640(Fine)] can shoot movies with v/ V. The Image Size setup appears. For a detailed description of the LCD screen changes as follows: Indicators off t LCD screen off t Indicators on the screen and the camera starts recording the image and sound. Flash - Inserting the date and time •...
Operating Instructions
Page 81
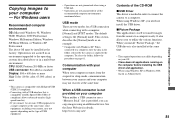
... on the computer before installing the USB driver and application. • When using Windows XP or Windows 2000, log on as an example. * Compatible with a computer, [Normal] and [PTP]* modes. When connected to a computer, only the data in a multi-boot environment. It also allows you need not install the USB driver. The default setting is copied to the computer. x Picture Package This application is used to transfer images from the suspend...
... on the computer before installing the USB driver and application. • When using Windows XP or Windows 2000, log on as an example. * Compatible with a computer, [Normal] and [PTP]* modes. When connected to a computer, only the data in a multi-boot environment. It also allows you need not install the USB driver. The default setting is copied to the computer. x Picture Package This application is used to transfer images from the suspend...
Operating Instructions
Page 88
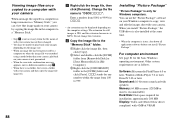
... remains in a "Memory Stick," you install "Picture Package," the USB driver is also installed at the same time. • When the computer is in use the "Picture Package" software on your Windows computer to copy, view and edit the images shot with your camera. Do not change the extension. Change the file name to "DSC0ssss". For computer environment See page 81 for installation: approximately 200 MB Display: Video card (Direct Draw driver compliant) with 4 MB...
... remains in a "Memory Stick," you install "Picture Package," the USB driver is also installed at the same time. • When the computer is in use the "Picture Package" software on your Windows computer to copy, view and edit the images shot with your camera. Do not change the extension. Change the file name to "DSC0ssss". For computer environment See page 81 for installation: approximately 200 MB Display: Video card (Direct Draw driver compliant) with 4 MB...

Operating Instructions
Page 90
... Install the Program" screen. g Confirm if the checkbox of the image files recorded with the USB multi cable. h Remove the CD-ROM. If the "Welcome to setup for Direct X" screen appears after you deactivate the OS AutoPlay Wizard, cancel the activation using "Picture Package" Connect the camera and your computer with the camera are copied into these folders. • Windows XP is checked, then click [Finish]. The installation starts. Your computer restarts...
... Install the Program" screen. g Confirm if the checkbox of the image files recorded with the USB multi cable. h Remove the CD-ROM. If the "Welcome to setup for Direct X" screen appears after you deactivate the OS AutoPlay Wizard, cancel the activation using "Picture Package" Connect the camera and your computer with the camera are copied into these folders. • Windows XP is checked, then click [Finish]. The installation starts. Your computer restarts...
Operating Instructions
Page 97
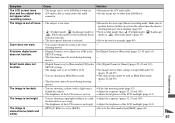
... cable is connected to the multi connector. p Set to other modes than (Twilight mode), (Landscape mode) or (Fireworks mode) (page 35). Zoom does not work. • You cannot change the zoom scale when - p The smart zoom cannot be used in a dark p Adjust the exposure (pages 52, 53 and 109). Symptom Cause Solution The LCD screen turns blue and the subject does not appear when recording movies. • The image size is set to [B&W]. Set [Digital Zoom] to...
... cable is connected to the multi connector. p Set to other modes than (Twilight mode), (Landscape mode) or (Fireworks mode) (page 35). Zoom does not work. • You cannot change the zoom scale when - p The smart zoom cannot be used in a dark p Adjust the exposure (pages 52, 53 and 109). Symptom Cause Solution The LCD screen turns blue and the subject does not appear when recording movies. • The image size is set to [B&W]. Set [Digital Zoom] to...
Operating Instructions
Page 101
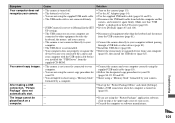
... or software manufacturer. p Set it again firmly. p Start up the "Picture Package Menu" and check [Settings]. Troubleshooting 101 p Connect the camera and your computer correctly using a "Memory Stick" formatted by your camera. You cannot copy images. p Disconnect the USB multi cable from the supplied CD-ROM. • The camera is displayed on (page 83). p Use the supplied USB multi cable (pages 83 and 93). Symptom Your computer does not recognize your camera. After making a USB connection, "Picture...
... or software manufacturer. p Set it again firmly. p Start up the "Picture Package Menu" and check [Settings]. Troubleshooting 101 p Connect the camera and your computer correctly using a "Memory Stick" formatted by your camera. You cannot copy images. p Disconnect the USB multi cable from the supplied CD-ROM. • The camera is displayed on (page 83). p Use the supplied USB multi cable (pages 83 and 93). Symptom Your computer does not recognize your camera. After making a USB connection, "Picture...
Operating Instructions
Page 105
... playing back the image. Format error • Failed to the recording position (page 116). Read only memory • Your camera cannot record or delete images to the LOCK position. System error Memory Stick error • Turn the power off and on the "Memory Stick" is not the "InfoLITHIUM" type. Release the protection (page 67). For "InfoLITHIUM" battery • The battery pack is set to this folder. • A folder with the same first three digits number...
... playing back the image. Format error • Failed to the recording position (page 116). Read only memory • Your camera cannot record or delete images to the LOCK position. System error Memory Stick error • Turn the power off and on the "Memory Stick" is not the "InfoLITHIUM" type. Release the protection (page 67). For "InfoLITHIUM" battery • The battery pack is set to this folder. • A folder with the same first three digits number...

Operating Instructions
Page 113
.... SET UP items Set the mode dial to automatically display the recorded image on the LCD screen immediately after shooting a still image. Folder Change REC. Folder OK / Cancel OK / Cancel Description Formats the "Memory Stick." Creates a folder for recording images (page 46). 113 Changes a folder for recording images (page 46). Selects the digital zoom mode (page 24). Reduces the red-eye phenomenon when using a flash (page 29). Selects whether to SET UP. You cannot shoot the next image during recording. The SET UP screen appears...
.... SET UP items Set the mode dial to automatically display the recorded image on the LCD screen immediately after shooting a still image. Folder Change REC. Folder OK / Cancel OK / Cancel Description Formats the "Memory Stick." Creates a folder for recording images (page 46). 113 Changes a folder for recording images (page 46). Selects the digital zoom mode (page 24). Reduces the red-eye phenomenon when using a flash (page 29). Selects whether to SET UP. You cannot shoot the next image during recording. The SET UP screen appears...
Operating Instructions
Page 116
... camera. • Data read/write speeds differ depending on using the AC Adaptor, or install a charged battery pack, and leave the camera for 24 hours or more with this camera. 3) Supports high-speed data transfer using a parallel interface. 4) 640(Fine) size movies can be recorded and played back only using the camera. The types of "Memory Stick" that requires MagicGate functions cannot be performed with the power off . On internal rechargeable button battery This camera has an internal rechargeable button battery...
... camera. • Data read/write speeds differ depending on using the AC Adaptor, or install a charged battery pack, and leave the camera for 24 hours or more with this camera. 3) Supports high-speed data transfer using a parallel interface. 4) 640(Fine) size movies can be recorded and played back only using the camera. The types of "Memory Stick" that requires MagicGate functions cannot be performed with the power off . On internal rechargeable button battery This camera has an internal rechargeable button battery...

Operating Instructions
Page 121
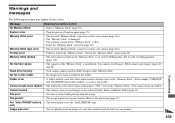
... C White balance indicator (56) D Low battery warning indicator (106) E Metering mode indicator (55)/ Picture effect indicator (60) F Spot metering cross hair (56) G Macro indicator (26) H AF range finder frame indicator (47)/Focus preset value (49) I Image size indicator (76) J Recording time [maximum recordable time] indicator (108) qg qh qj K Recording folder indicator (46) L Remaining "Memory Stick" capacity indicator M Self-diagnosis display (107) N Self-timer indicator (27) O Menu/Guide menu (44) P EV level value indicator (53) Q AF range finder frame (47) • Pressing MENU switches...
... C White balance indicator (56) D Low battery warning indicator (106) E Metering mode indicator (55)/ Picture effect indicator (60) F Spot metering cross hair (56) G Macro indicator (26) H AF range finder frame indicator (47)/Focus preset value (49) I Image size indicator (76) J Recording time [maximum recordable time] indicator (108) qg qh qj K Recording folder indicator (46) L Remaining "Memory Stick" capacity indicator M Self-diagnosis display (107) N Self-timer indicator (27) O Menu/Guide menu (44) P EV level value indicator (53) Q AF range finder frame (47) • Pressing MENU switches...

Operating Instructions
Page 124
... Flash mode 28 Fluorescent 56 Focus 47 Focus preset 49 Folder 46, 61 Format 42 H High-speed shutter mode 33 Histogram 54 I Image quality 20, 45 Image size 19, 20 ImageMixer VCD2 93 Incandescent 56 Index screen 36 "InfoLITHIUM" battery pack 117 Inserting "Memory Stick 18 Install 82, 88, 94 ISO 110 J JPG 87 L Landscape mode 32 LCD Backlight 114 LCD backlight on/off 30 M Manual Exposure 50 Memory Stick 42, 116 Menu settings 44...
... Flash mode 28 Fluorescent 56 Focus 47 Focus preset 49 Folder 46, 61 Format 42 H High-speed shutter mode 33 Histogram 54 I Image quality 20, 45 Image size 19, 20 ImageMixer VCD2 93 Incandescent 56 Index screen 36 "InfoLITHIUM" battery pack 117 Inserting "Memory Stick 18 Install 82, 88, 94 ISO 110 J JPG 87 L Landscape mode 32 LCD Backlight 114 LCD backlight on/off 30 M Manual Exposure 50 Memory Stick 42, 116 Menu settings 44...


