
Operating Instructions
Page 2
...SONY (7669) The number below is encouraged to try to correct the interference by turning the equipment off and on a circuit different from that may cause harmful interference to constitute a risk of the FCC Rules. Consult the dealer or an experienced radio/ TV technician for a Class B digital... radio frequency energy and, if not installed and used with the limits for the FCC related matters only. The supplied interface cable must accept any questions about this equipment does cause harmful interference to radio or television reception, which the receiver is intended to...
...SONY (7669) The number below is encouraged to try to correct the interference by turning the equipment off and on a circuit different from that may cause harmful interference to constitute a risk of the FCC Rules. Consult the dealer or an experienced radio/ TV technician for a Class B digital... radio frequency energy and, if not installed and used with the limits for the FCC related matters only. The supplied interface cable must accept any questions about this equipment does cause harmful interference to radio or television reception, which the receiver is intended to...

Operating Instructions
Page 3
...Lithium-Ion batteries are recyclable. For more information regarding recycling of this camera. If the plug supplied with this equipment has a detachable fuse cover,...and approved by returning your nearest Sony service station. Notice If static electricity or electromagnetism causes data transfer to power this product. THIS CLASS B DIGITAL APPARATUS COMPLIES WITH CANADIAN ICES-003.... your used to discontinue midway (fail), restart the application or disconnect and connect the USB multi cable again. OPERATION IS SUBJECT TO THE FOLLOWING TWO CONDITIONS: (1) THIS DEVICE MAY NOT CAUSE HARMFUL ...
...Lithium-Ion batteries are recyclable. For more information regarding recycling of this camera. If the plug supplied with this equipment has a detachable fuse cover,...and approved by returning your nearest Sony service station. Notice If static electricity or electromagnetism causes data transfer to power this product. THIS CLASS B DIGITAL APPARATUS COMPLIES WITH CANADIAN ICES-003.... your used to discontinue midway (fail), restart the application or disconnect and connect the USB multi cable again. OPERATION IS SUBJECT TO THE FOLLOWING TWO CONDITIONS: (1) THIS DEVICE MAY NOT CAUSE HARMFUL ...

Operating Instructions
Page 15
...when performing SET UP, the camera turns off automatically to make the changes. The auto power-off function also will not operate in the following circumstances. • When viewing movies • When playing back a slide show • When connecting the USB or A/V multi cable How to use the control ...button to prevent wearing down the battery. The POWER lamp (green) lights up the menu or the SET UP screen (page 45), and use the control button Camera AF Mode: Digital Zoom: Date/Time: 1 Red Eye Reduction: 2...
...when performing SET UP, the camera turns off automatically to make the changes. The auto power-off function also will not operate in the following circumstances. • When viewing movies • When playing back a slide show • When connecting the USB or A/V multi cable How to use the control ...button to prevent wearing down the battery. The POWER lamp (green) lights up the menu or the SET UP screen (page 45), and use the control button Camera AF Mode: Digital Zoom: Date/Time: 1 Red Eye Reduction: 2...
Operating Instructions
Page 38
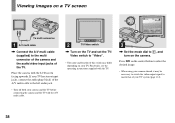
...TV has stereo input jacks, connect the audio plug (black) of the A/V multi cable to the left audio jack. • Turn off both your camera and the TV before connecting the camera and the TV with the A/V multi cable. 2 TV/Video switch , Turn on the TV and set the TV/ Video switch...supplied with the LCD screen facing upwards. Press b/B on a TV screen 60min VGA 101 2/9 To multi connector 1 A/V multi cable , Connect the A/V multi cable (supplied) to the multi connector of the camera and the audio/video input jacks of the TV. Viewing images on the control button to select the desired image...
...TV has stereo input jacks, connect the audio plug (black) of the A/V multi cable to the left audio jack. • Turn off both your camera and the TV before connecting the camera and the TV with the A/V multi cable. 2 TV/Video switch , Turn on the TV and set the TV/ Video switch...supplied with the LCD screen facing upwards. Press b/B on a TV screen 60min VGA 101 2/9 To multi connector 1 A/V multi cable , Connect the A/V multi cable (supplied) to the multi connector of the camera and the audio/video input jacks of the TV. Viewing images on the control button to select the desired image...
Operating Instructions
Page 39
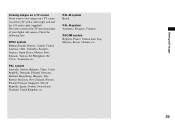
... If you want to view images on a TV screen, you need a TV with a video input jack and the A/V multi cable (supplied). The color system of the TV must match that of your digital still camera. Check the following lists: NTSC system Bahama Islands, Bolivia, Canada, Central America, Chile, Colombia, Ecuador, Jamaica, Japan, Korea...
... If you want to view images on a TV screen, you need a TV with a video input jack and the A/V multi cable (supplied). The color system of the TV must match that of your digital still camera. Check the following lists: NTSC system Bahama Islands, Bolivia, Canada, Central America, Chile, Colombia, Ecuador, Jamaica, Japan, Korea...

Operating Instructions
Page 70
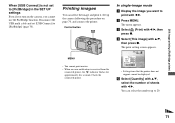
... supplied USB multi cable, then turn on the SET UP screen and connect the camera to the printer with a printer. b Select (Setup 2) with V, 2 then select [USB Connect] with B/v, then press z. Connecting the camera to the printer Connect the multi connector on your camera by connecting the camera to a PictBridge ... a PictBridge compliant printer easily prints the index print*. * An index print function may not be provided depending on the camera to connect the camera with the USB multi cable. Control button a Set the mode dial to SET UP. Mode dial Even if you do not have a computer, ...
... supplied USB multi cable, then turn on the SET UP screen and connect the camera to the printer with a printer. b Select (Setup 2) with V, 2 then select [USB Connect] with B/v, then press z. Connecting the camera to the printer Connect the multi connector on your camera by connecting the camera to a PictBridge ... a PictBridge compliant printer easily prints the index print*. * An index print function may not be provided depending on the camera to connect the camera with the USB multi cable. Control button a Set the mode dial to SET UP. Mode dial Even if you do not have a computer, ...
Operating Instructions
Page 71
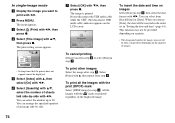
... does not support cannot be displayed. You can select the image and print it. Printing images You can select the number up the camera following the procedure on the camera, you want to print with b/B, then press z. Control button MENU • You cannot print movies. • When an error ...mode a Display the image you cannot use the PictBridge function. d Select [This image] with b/B. c Select (Print) with b/B. b Press MENU. Disconnect the USB multi cable and set to [PictBridge] in the SET UP settings Even if you turn on page 70, and connect the printer. The menu appears.
... does not support cannot be displayed. You can select the image and print it. Printing images You can select the number up the camera following the procedure on the camera, you want to print with b/B, then press z. Control button MENU • You cannot print movies. • When an error ...mode a Display the image you cannot use the PictBridge function. d Select [This image] with b/B. c Select (Print) with b/B. b Press MENU. Disconnect the USB multi cable and set to [PictBridge] in the SET UP settings Even if you turn on page 70, and connect the printer. The menu appears.
Operating Instructions
Page 72
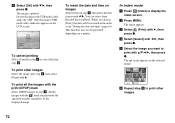
... image you choose [Date], the date will be provided depending on images Select [Date] in step 4. Do not disconnect the USB multi cable while the (Not disconnect USB multi cable) indicator appears on the selected image. To print other images. 72 All the images with v. To insert the date and time on...
... image you choose [Date], the date will be provided depending on images Select [Date] in step 4. Do not disconnect the USB multi cable while the (Not disconnect USB multi cable) indicator appears on the selected image. To print other images. 72 All the images with v. To insert the date and time on...
Operating Instructions
Page 73
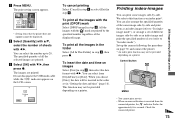
Do not disconnect the USB multi cable while the indicator appears on images Select [Date] in step 9. You can print some images side-by the specified number regardless of sheets with the mark are printed by -side. You can select the number up the camera following the procedure on page 70, and connect...
Do not disconnect the USB multi cable while the indicator appears on images Select [Date] in step 9. You can print some images side-by the specified number regardless of sheets with the mark are printed by -side. You can select the number up the camera following the procedure on page 70, and connect...
Operating Instructions
Page 74
... are printed regardless of the displayed image. You can arrange the specified quantity of images. 74 Do not disconnect the USB multi cable while the (Not disconnect USB multi cable) indicator appears on the quantity of an image side-by -side with b/B. This function may not all the images with v, then repeat...
... are printed regardless of the displayed image. You can arrange the specified quantity of images. 74 Do not disconnect the USB multi cable while the (Not disconnect USB multi cable) indicator appears on the quantity of an image side-by -side with b/B. This function may not all the images with v, then repeat...

Operating Instructions
Page 75
... be inserted in the order set in "Setting the date and time" (page 16). g Press MENU. i Select [Quantity] with b/B. Do not disconnect the USB multi cable while the indicator appears on the selected image. • SELECT MENU TONEXT f Repeat step 5 to 20. You can select the number up to print other...
... be inserted in the order set in "Setting the date and time" (page 16). g Press MENU. i Select [Quantity] with b/B. Do not disconnect the USB multi cable while the indicator appears on the selected image. • SELECT MENU TONEXT f Repeat step 5 to 20. You can select the number up to print other...
Operating Instructions
Page 76
... to and follow the procedure on . Changing the zoom scale - c Select the desired size with sound using your camera. Each time you set the image size to [640(Fine)] while connecting the A/V multi cable to . Flash - Inserting the date and time • When you press , the status of the indicators, see page... stops when the "Memory Stick" is not displayed. Indicators during shooting movies: - b Press (Image Size). You can be recorded only on the screen and the camera starts recording the image and sound. A histogram is full. The Image Size setup appears.
... to and follow the procedure on . Changing the zoom scale - c Select the desired size with sound using your camera. Each time you set the image size to [640(Fine)] while connecting the A/V multi cable to . Flash - Inserting the date and time • When you press , the status of the indicators, see page... stops when the "Memory Stick" is not displayed. Indicators during shooting movies: - b Press (Image Size). You can be recorded only on the screen and the camera starts recording the image and sound. A histogram is full. The Image Size setup appears.
Operating Instructions
Page 83
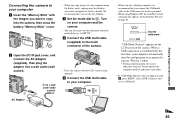
...computer until the indicators turn red. Enjoying images on your computer Connecting the camera to your computer a Insert the "Memory Stick" with the LCD screen facing upwards. e Connect the USB multi cable to your computer using Windows XP, the AutoPlay wizard automatically appears on ...the desktop. d Connect the USB multi cable (supplied) to recognize the camera. USB Mode Normal Switch on MENU Access indicators* "USB Mode ...
...computer until the indicators turn red. Enjoying images on your computer Connecting the camera to your computer a Insert the "Memory Stick" with the LCD screen facing upwards. e Connect the USB multi cable to your computer using Windows XP, the AutoPlay wizard automatically appears on ...the desktop. d Connect the USB multi cable (supplied) to recognize the camera. USB Mode Normal Switch on MENU Access indicators* "USB Mode ...

Operating Instructions
Page 84
Double-click here 2 Click (Sony DSC), then click [Stop]. 3 Confirm the device on the tasktray. For Windows 98 or 98SE users Confirm that image with the same file name exists in your camera. When an image with your camera appear. • This section describes an example of the "Memory... "My Documents" folder. • When the "Removable Disk" icon is unnecessary for Windows XP users. 5 Disconnect the USB multi cable, remove the "Memory Stick," or turn off the camera during a USB connection For Windows 2000, Me, or XP users 1 Double-click on the confirmation window, then click [OK]. ...
Double-click here 2 Click (Sony DSC), then click [Stop]. 3 Confirm the device on the tasktray. For Windows 98 or 98SE users Confirm that image with the same file name exists in your camera. When an image with your camera appear. • This section describes an example of the "Memory... "My Documents" folder. • When the "Removable Disk" icon is unnecessary for Windows XP users. 5 Disconnect the USB multi cable, remove the "Memory Stick," or turn off the camera during a USB connection For Windows 2000, Me, or XP users 1 Double-click on the confirmation window, then click [OK]. ...
Operating Instructions
Page 85
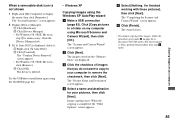
...Confirm Device Removal" screen appears. • For Windows 98, 98SE, Me users, click [Remove]. 3 Click [OK]. The "Completing the Scanner and Camera Wizard" screen appears. Image copying starts. e Select [Nothing. Windows XP Copying images using the CD-ROM (page 82). - The "Picture Name and...your pictures, then click [Next]. The device is not shown 1 Right-click [My Computer] to disconnect the USB multi cable and reconnect it . 1 Right-click [ Sony DSC]. 2 Click [Uninstall]. Try the USB driver installation again using the Windows XP AutoPlay wizard a Make a USB ...
...Confirm Device Removal" screen appears. • For Windows 98, 98SE, Me users, click [Remove]. 3 Click [OK]. The "Completing the Scanner and Camera Wizard" screen appears. Image copying starts. e Select [Nothing. Windows XP Copying images using the CD-ROM (page 82). - The "Picture Name and...your pictures, then click [Next]. The device is not shown 1 Right-click [My Computer] to disconnect the USB multi cable and reconnect it . 1 Right-click [ Sony DSC]. 2 Click [Uninstall]. Try the USB driver installation again using the Windows XP AutoPlay wizard a Make a USB ...

Operating Instructions
Page 90
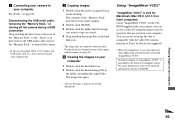
...check [Settings] in [Copy automatically]. The installation starts. g Confirm if the checkbox of the image files recorded with the USB multi cable. After the images are copied, "Picture Package Viewer" starts up automatically and the images are copied to the computer automatically. If the ... for Direct X" screen appears after you deactivate the OS AutoPlay Wizard, cancel the activation using "Picture Package" Connect the camera and your computer with the camera are displayed. h Remove the CD-ROM. "Picture Package" starts up and the images copied are copied into these folders...
...check [Settings] in [Copy automatically]. The installation starts. g Confirm if the checkbox of the image files recorded with the USB multi cable. After the images are copied, "Picture Package Viewer" starts up automatically and the images are copied to the computer automatically. If the ... for Direct X" screen appears after you deactivate the OS AutoPlay Wizard, cancel the activation using "Picture Package" Connect the camera and your computer with the camera are displayed. h Remove the CD-ROM. "Picture Package" starts up and the images copied are copied into these folders...
Operating Instructions
Page 93
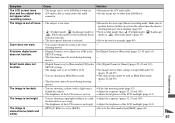
... used with the CD-ROM. Enjoying images on the CDROM supplied with the video CD creation function of the "Memory Stick" inserted in your camera appear. 2 Double-click [DCIM]. 3 Double-click the folder that are stored in use, shut down all other application software before you are... copied to your computer For details, see page 86. a Connecting your camera to your hard disk. Disconnecting the USB multi cable, removing the "Memory Stick," or turning off the camera during a USB connection Drag and drop the drive icon or the icon of "ImageMixer VCD2" ...
... used with the CD-ROM. Enjoying images on the CDROM supplied with the video CD creation function of the "Memory Stick" inserted in your camera appear. 2 Double-click [DCIM]. 3 Double-click the folder that are stored in use, shut down all other application software before you are... copied to your computer For details, see page 86. a Connecting your camera to your hard disk. Disconnecting the USB multi cable, removing the "Memory Stick," or turning off the camera during a USB connection Drag and drop the drive icon or the icon of "ImageMixer VCD2" ...
Operating Instructions
Page 97
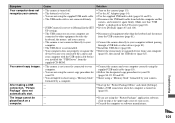
...settings except [5M] and [3:2] (pages 19 and 25). Make sure to the other modes than [B&W] (page 60). Set [Digital Zoom] to [B&W]. Smart zoom does not function. • [Digital Zoom] is set to [Precision]or [Off] in the SET UP settings. • The image size is set to [...and 59). - location such as on a stage. • The brightness of the LCD screen is too low. p Disconnect the A/V multi cable. Precision digital zoom does not function. • [Digital Zoom] is set to [5M] or [3:2]. • You are shooting a subject with a light source behind the subject. • The ...
...settings except [5M] and [3:2] (pages 19 and 25). Make sure to the other modes than [B&W] (page 60). Set [Digital Zoom] to [B&W]. Smart zoom does not function. • [Digital Zoom] is set to [Precision]or [Off] in the SET UP settings. • The image size is set to [...and 59). - location such as on a stage. • The brightness of the LCD screen is too low. p Disconnect the A/V multi cable. Precision digital zoom does not function. • [Digital Zoom] is set to [5M] or [3:2]. • You are shooting a subject with a light source behind the subject. • The ...
Operating Instructions
Page 101
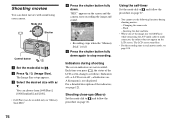
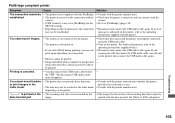
... using a "Memory Stick" formatted by a computer. - - - - Cause • The camera is turned off. • The battery level is low. • You are not using the supplied USB multi cable. • The USB multi cable is not connected firmly. • [USB Connect] is not set to your computer. • The USB driver is not...
... using a "Memory Stick" formatted by a computer. - - - - Cause • The camera is turned off. • The battery level is low. • You are not using the supplied USB multi cable. • The USB multi cable is not connected firmly. • [USB Connect] is not set to your computer. • The USB driver is not...
Operating Instructions
Page 103
... printing, you cannot print still, disconnect the USB multi cable, turn off and on the printer, then connect the USB multi cable again. - - p Disconnect and connect the USB multi cable again. Printing is not recorded on the printer. printed with the camera. p Check that the camera and the printer are properly connected using other than...
... printing, you cannot print still, disconnect the USB multi cable, turn off and on the printer, then connect the USB multi cable again. - - p Disconnect and connect the USB multi cable again. Printing is not recorded on the printer. printed with the camera. p Check that the camera and the printer are properly connected using other than...


