Instruction Manual
Page 4
.... If this equipment. [ Note: This equipment has been tested and found to comply with the limits for a digital device pursuant to correct the interference by turning the equipment off and on, the user is no guarantee that interference will not occur in a particular installation. For...- Increase the separation between the equipment and receiver. - Consult the dealer or an experienced radio/TV technician for a Class B digital device, pursuant to provide reasonable protection against harmful interference in the U.S.A. These limits are cautioned that to radio communications.
.... If this equipment. [ Note: This equipment has been tested and found to comply with the limits for a digital device pursuant to correct the interference by turning the equipment off and on, the user is no guarantee that interference will not occur in a particular installation. For...- Increase the separation between the equipment and receiver. - Consult the dealer or an experienced radio/TV technician for a Class B digital device, pursuant to provide reasonable protection against harmful interference in the U.S.A. These limits are cautioned that to radio communications.
Instruction Manual
Page 6
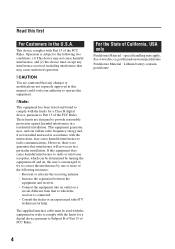
...emission may cause dirt on the flash surface to become discolored or to stick to record or play back properly. • Using the camera in color) that generates strong radio waves or emits radiation. The heat of the pixels are operational for effective use . Unauthorized recording of... In addition to malfunctions and an inability to a malfunction of the recording cannot be compensated for Camera File system) universal standard established by making a back up Do not turn off the camera or remove the batteries or "Memory Stick Duo" while the access lamp is not possible due ...
...emission may cause dirt on the flash surface to become discolored or to stick to record or play back properly. • Using the camera in color) that generates strong radio waves or emits radiation. The heat of the pixels are operational for effective use . Unauthorized recording of... In addition to malfunctions and an inability to a malfunction of the recording cannot be compensated for Camera File system) universal standard established by making a back up Do not turn off the camera or remove the batteries or "Memory Stick Duo" while the access lamp is not possible due ...
Instruction Manual
Page 7
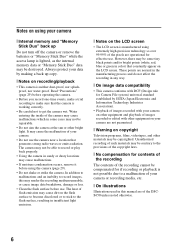
... 8 1 Inserting the batteries/a "Memory Stick Duo" (not supplied 9 2 Turning the camera on/setting the clock 11 Shooting images easily 12 Viewing/deleting images 15 Indicators on using your computer 22 GB Supported Operating Systems for USB connection and application software (supplied 22 Viewing "Cyber-shot Handbook 22 Battery life and memory capacity 23 Battery...
... 8 1 Inserting the batteries/a "Memory Stick Duo" (not supplied 9 2 Turning the camera on/setting the clock 11 Shooting images easily 12 Viewing/deleting images 15 Indicators on using your computer 22 GB Supported Operating Systems for USB connection and application software (supplied 22 Viewing "Cyber-shot Handbook 22 Battery life and memory capacity 23 Battery...
Instruction Manual
Page 10
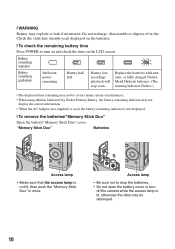
...; Be sure not to drop the batteries. • Do not open the battery cover or turn on and check the time on the batteries. [ To check the remaining battery time Press POWER to turn off the camera while the access lamp is lit, otherwise the data may be correct under certain circumstances. •...
...; Be sure not to drop the batteries. • Do not open the battery cover or turn on and check the time on the batteries. [ To check the remaining battery time Press POWER to turn off the camera while the access lamp is lit, otherwise the data may be correct under certain circumstances. •...
Instruction Manual
Page 11
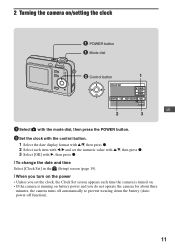
2 Turning the camera on/setting the clock POWER button Mode dial ɟ Control button 1 GB 2 3 1 Select with the mode dial, then press the POWER button. 2 Set the clock ... the power • Unless you set the clock, the Clock Set screen appears each time the camera is turned on. • If the camera is running on battery power and you do not operate the camera for about three minutes, the camera turns off automatically to prevent wearing down the battery (Auto power-off function). 11
2 Turning the camera on/setting the clock POWER button Mode dial ɟ Control button 1 GB 2 3 1 Select with the mode dial, then press the POWER button. 2 Set the clock ... the power • Unless you set the clock, the Clock Set screen appears each time the camera is turned on. • If the camera is running on battery power and you do not operate the camera for about three minutes, the camera turns off automatically to prevent wearing down the battery (Auto power-off function). 11
Instruction Manual
Page 14
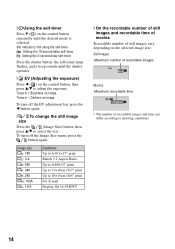
... recordable images Movies Maximum recordable time • The number of still images vary depending on the control button, then press v/V to select the size. To turn off the EV adjustment bar, press the b button again. [ To change the still image size Press the (Image Size) button, then press v/V to adjust the... shutter button, the self-timer lamp flashes, and a beep sounds until the shutter operates. [ EV (Adjusting the exposure) Press b ( ) on the selected image size. To turn off the Image Size menu, press the button again. Toward +: Brightens an image.
... recordable images Movies Maximum recordable time • The number of still images vary depending on the control button, then press v/V to select the size. To turn off the EV adjustment bar, press the b button again. [ To change the still image size Press the (Image Size) button, then press v/V to adjust the... shutter button, the self-timer lamp flashes, and a beep sounds until the shutter operates. [ EV (Adjusting the exposure) Press b ( ) on the selected image size. To turn off the Image Size menu, press the button again. Toward +: Brightens an image.
Instruction Manual
Page 15
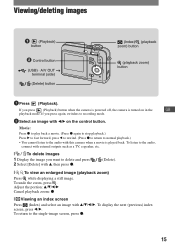
...external outputs such as a TV, a speaker, etc. [ To delete images 1 Display the image you press (Playback) button when the camera is powered off, the camera is played back. Adjust the portion: v/V/b/B Cancel playback zoom: z [ Viewing an index screen Press (Index) and select an image with... this camera when a movie is turned on the control button. To return to the audio with v/V/b/B. If you want to recording mode. 2 Select an image with v, then...
...external outputs such as a TV, a speaker, etc. [ To delete images 1 Display the image you press (Playback) button when the camera is powered off, the camera is played back. Adjust the portion: v/V/b/B Cancel playback zoom: z [ Viewing an index screen Press (Index) and select an image with... this camera when a movie is turned on the control button. To return to the audio with v/V/b/B. If you want to recording mode. 2 Select an image with v, then...
Instruction Manual
Page 17
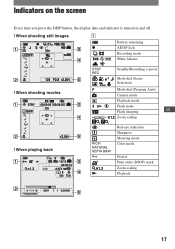
N Red-eye reduction Sharpness Metering mode Color mode Protect Print order (DPOF) mark Zoom scaling Playback 17 Indicators on the screen Every time you press the DISP button, the display data and indicator is turned on and off. [ When shooting still images A Battery remaining z AE/AF lock Recording mode White balance [ When shooting movies STBY REC Standby/Recording a movie Mode dial (Scene Selection) Mode dial (Program Auto) Camera mode Playback mode Flash mode Flash charging GB 1.3 Zoom scaling [ When playing back RICH NATURAL SEPIA B&W -
N Red-eye reduction Sharpness Metering mode Color mode Protect Print order (DPOF) mark Zoom scaling Playback 17 Indicators on the screen Every time you press the DISP button, the display data and indicator is turned on and off. [ When shooting still images A Battery remaining z AE/AF lock Recording mode White balance [ When shooting movies STBY REC Standby/Recording a movie Mode dial (Scene Selection) Mode dial (Program Auto) Camera mode Playback mode Flash mode Flash charging GB 1.3 Zoom scaling [ When playing back RICH NATURAL SEPIA B&W -
Instruction Manual
Page 19
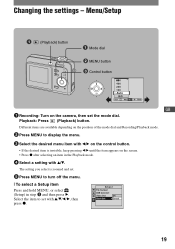
... and set the mode dial. Changing the settings - Menu/Setup (Playback) button Mode dial ɟ MENU button ɠ Control button GB 1 Recording: Turn on the camera, then set . 5 Press MENU to display the menu. 3 Select the desired menu item with b/B on the position of the mode dial and Recording.../Playback mode. 2 Press MENU to turn off the menu. [ To select a Setup item Press and hold MENU, or select (Setup) in the Playback mode. 4 Select...
... and set the mode dial. Changing the settings - Menu/Setup (Playback) button Mode dial ɟ MENU button ɠ Control button GB 1 Recording: Turn on the camera, then set . 5 Press MENU to display the menu. 3 Select the desired menu item with b/B on the position of the mode dial and Recording.../Playback mode. 2 Press MENU to turn off the menu. [ To select a Setup item Press and hold MENU, or select (Setup) in the Playback mode. 4 Select...
Instruction Manual
Page 22
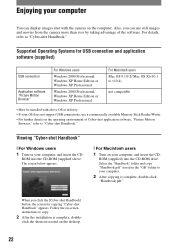
... XP Professional For Macintosh users Mac OS 9.1/9.2/ Mac OS X(v10.1 to "Cyber-shot Handbook." ROM (supplied) into the CD-ROM (supplied) drive. Viewing "Cyber-shot Handbook" [ For Windows users 1 Turn on -screen instructions to copy. 2 After the installation is complete, double-...shot with above OS at delivery. • If your OS does not support USB connections, use still images and movies from the camera more than ever by taking advantage of Cyber-shot application software, "Picture Motion Browser," refer to "Cyber-shot Handbook." Supported Operating Systems for copying "Cyber-shot...
... XP Professional For Macintosh users Mac OS 9.1/9.2/ Mac OS X(v10.1 to "Cyber-shot Handbook." ROM (supplied) into the CD-ROM (supplied) drive. Viewing "Cyber-shot Handbook" [ For Windows users 1 Turn on -screen instructions to copy. 2 After the installation is complete, double-...shot with above OS at delivery. • If your OS does not support USB connections, use still images and movies from the camera more than ever by taking advantage of Cyber-shot application software, "Picture Motion Browser," refer to "Cyber-shot Handbook." Supported Operating Systems for copying "Cyber-shot...
Instruction Manual
Page 23
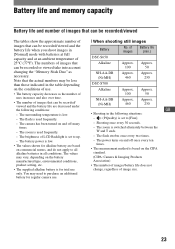
...Memory Stick Duo" as the number of uses increases and also over time. • The number of images Battery life (min.) DSC-S650 Alkaline Approx. The camera has been turned on and off many times. - The zoom is low. - of images that can be recorded/viewed and the battery life when ... with batteries at full capacity and at an ambient temperature of 25°C (77°F). Shooting once every 30 seconds. - The power turns on and off once every ten times. • The measurement method is for regular camera use . • The battery capacity decreases as necessary.
...Memory Stick Duo" as the number of uses increases and also over time. • The number of images Battery life (min.) DSC-S650 Alkaline Approx. The camera has been turned on and off many times. - The zoom is low. - of images that can be recorded/viewed and the battery life when ... with batteries at full capacity and at an ambient temperature of 25°C (77°F). Shooting once every 30 seconds. - The power turns on and off once every ten times. • The measurement method is for regular camera use . • The battery capacity decreases as necessary.
Instruction Manual
Page 27
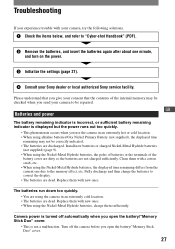
...batteries, the displayed time remaining differs from the current one minute, and turn on the power. 3 Initialize the settings (page 21). 4 Consult your Sony dealer or local authorized Sony service facility. Camera power is turned off the camera before you open the battery/"Memory Stick Duo" cover. • ...is not a malfunction. Fully discharge and then charge the batteries to "Cyber-shot Handbook" (PDF). 2 Remove the batteries, and insert the batteries again after about one due to be checked when you give your camera to the memory effect, etc. Replace them with new ones. Please...
...batteries, the displayed time remaining differs from the current one minute, and turn on the power. 3 Initialize the settings (page 21). 4 Consult your Sony dealer or local authorized Sony service facility. Camera power is turned off the camera before you open the battery/"Memory Stick Duo" cover. • ...is not a malfunction. Fully discharge and then charge the batteries to "Cyber-shot Handbook" (PDF). 2 Remove the batteries, and insert the batteries again after about one due to be checked when you give your camera to the memory effect, etc. Replace them with new ones. Please...
Instruction Manual
Page 28
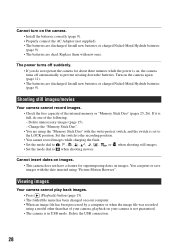
...has been processed by a computer or when the image file was recorded using a model other than that of your camera is not guaranteed. • The camera is in USB mode. The power turns off automatically to prevent wearing down the batteries. Delete unnecessary images (page 15). - You can print or save ... switch, and the switch is set to the LOCK position. Cannot insert dates on images. • This camera does not have a feature for about three minutes while the power is on, the camera turns off suddenly. • If you do one of the internal memory or "Memory Stick Duo" (pages 25...
...has been processed by a computer or when the image file was recorded using a model other than that of your camera is not guaranteed. • The camera is in USB mode. The power turns off automatically to prevent wearing down the batteries. Delete unnecessary images (page 15). - You can print or save ... switch, and the switch is set to the LOCK position. Cannot insert dates on images. • This camera does not have a feature for about three minutes while the power is on, the camera turns off suddenly. • If you do one of the internal memory or "Memory Stick Duo" (pages 25...
Instruction Manual
Page 29
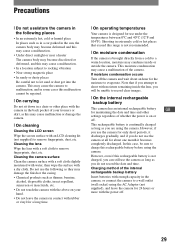
... or skirt, as this rechargeable battery is continually charged as long as you are using the camera. Note that if you attempt to shoot with moisture remaining inside or outside the camera. If moisture condensation occurs Turn off . However, even if this may damage the finish or the casing. • Chemical products such...
... or skirt, as this rechargeable battery is continually charged as long as you are using the camera. Note that if you attempt to shoot with moisture remaining inside or outside the camera. If moisture condensation occurs Turn off . However, even if this may damage the finish or the casing. • Chemical products such...


