Instruction Manual
Page 5
...will help to the applicable collection point for the recycling of materials will help prevent potential negative consequences for using connection cables shorter than 3 meters (9.8 feet). [ Attention The electromagnetic fields at the specific frequencies may influence the picture and sound... If static electricity or electromagnetism causes data transfer to discontinue midway (fail), restart the application or disconnect and connect the communication cable (USB, etc.) again. [ Disposal of this product. The recycling of electrical and electronic equipment. GB 5 Instead it shall be...
...will help to the applicable collection point for the recycling of materials will help prevent potential negative consequences for using connection cables shorter than 3 meters (9.8 feet). [ Attention The electromagnetic fields at the specific frequencies may influence the picture and sound... If static electricity or electromagnetism causes data transfer to discontinue midway (fail), restart the application or disconnect and connect the communication cable (USB, etc.) again. [ Disposal of this product. The recycling of electrical and electronic equipment. GB 5 Instead it shall be...
Instruction Manual
Page 8
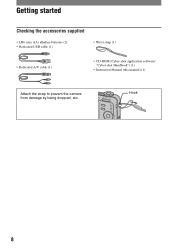
Getting started Checking the accessories supplied • LR6 (size AA) alkaline batteries (2) • Dedicated USB cable (1) • Wrist strap (1) • Dedicated A/V cable (1) • CD-ROM (Cyber-shot application software/ "Cyber-shot Handbook") (1) • Instruction Manual (this manual) (1) Attach the strap to prevent the camera from damage by being dropped, etc. Hook 8
Getting started Checking the accessories supplied • LR6 (size AA) alkaline batteries (2) • Dedicated USB cable (1) • Wrist strap (1) • Dedicated A/V cable (1) • CD-ROM (Cyber-shot application software/ "Cyber-shot Handbook") (1) • Instruction Manual (this manual) (1) Attach the strap to prevent the camera from damage by being dropped, etc. Hook 8
Instruction Manual
Page 16
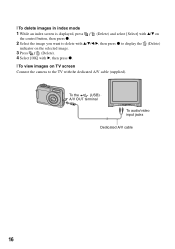
To the (USB) · A/V OUT terminal To audio/video input jacks Dedicated A/V cable 16 [ To delete images in index mode 1 While an index screen is displayed, press (Delete) and select [Select] with v/V on the control button, then press z. 2 Select the image you want to delete with v/V/b/B, then press z to display the (Delete) indicator on the selected image. 3 Press (Delete). 4 Select [OK] with B, then press z. [ To view images on TV screen Connect the camera to the TV with the dedicated A/V cable (supplied).
To the (USB) · A/V OUT terminal To audio/video input jacks Dedicated A/V cable 16 [ To delete images in index mode 1 While an index screen is displayed, press (Delete) and select [Select] with v/V on the control button, then press z. 2 Select the image you want to delete with v/V/b/B, then press z to display the (Delete) indicator on the selected image. 3 Press (Delete). 4 Select [OK] with B, then press z. [ To view images on TV screen Connect the camera to the TV with the dedicated A/V cable (supplied).
Instruction Manual
Page 21
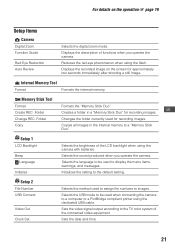
... Sets the date and time. 21 Displays the recorded image on the operation 1 page 19 Setup items Camera Digital Zoom Function Guide Red Eye Reduction Auto Review Selects the digital zoom mode. GB Creates a folder in the internal memory to the TV color system of functions when ... used when connecting the camera to display the menu items, warnings, and messages. Initializes the setting to images. Change REC. Setup 2 File Number USB Connect Video Out Clock Set Selects the method used to a computer or a PictBridge compliant printer using the dedicated USB cable. Setup 1 LCD Backlight...
... Sets the date and time. 21 Displays the recorded image on the operation 1 page 19 Setup items Camera Digital Zoom Function Guide Red Eye Reduction Auto Review Selects the digital zoom mode. GB Creates a folder in the internal memory to the TV color system of functions when ... used when connecting the camera to display the menu items, warnings, and messages. Initializes the setting to images. Change REC. Setup 2 File Number USB Connect Video Out Clock Set Selects the method used to a computer or a PictBridge compliant printer using the dedicated USB cable. Setup 1 LCD Backlight...


