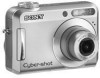
Instruction Manual
Page 4
... to provide reasonable protection against harmful interference in this manual could void your authority to operate this device must be determined by turning the equipment off and on a circuit different from that interference will not occur in the U.S.A. Consult the dealer or an... experienced radio/TV technician for a Class B digital device, pursuant to Part 15 of FCC Rules. These limits are cautioned that any changes or modifications not expressly approved in a residential ...
... to provide reasonable protection against harmful interference in this manual could void your authority to operate this device must be determined by turning the equipment off and on a circuit different from that interference will not occur in the U.S.A. Consult the dealer or an... experienced radio/TV technician for a Class B digital device, pursuant to Part 15 of FCC Rules. These limits are cautioned that any changes or modifications not expressly approved in a residential ...
Instruction Manual
Page 6
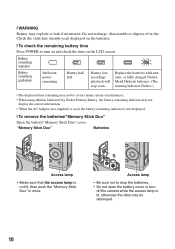
... be some cases may not be repairable. • Do not aim the camera at the sun or other equipment on your camera are operational for Camera File system) universal standard established by making a back up Do not turn off the camera or remove the batteries or "Memory Stick Duo" while the access lamp is... neither dust-proof, nor splashproof, nor water-proof. Water entering the inside of images recorded or edited with other bright light. The camera may not be able to record ...
... be some cases may not be repairable. • Do not aim the camera at the sun or other equipment on your camera are operational for Camera File system) universal standard established by making a back up Do not turn off the camera or remove the batteries or "Memory Stick Duo" while the access lamp is... neither dust-proof, nor splashproof, nor water-proof. Water entering the inside of images recorded or edited with other bright light. The camera may not be able to record ...
Instruction Manual
Page 7
...this first 4 Notes on using your computer 22 GB Supported Operating Systems for USB connection and application software (supplied 22 Viewing "Cyber-shot Handbook 22 Battery life and memory capacity 23 Battery life and number of images that can be recorded/viewed .......... 23 Number ... 30 7 Menu/Setup 19 Menu items 20 Setup items 21 Enjoying your camera 6 Getting started 8 Checking the accessories supplied 8 1 Inserting the batteries/a "Memory Stick Duo" (not supplied 9 2 Turning the camera on/setting the clock 11 Shooting images easily 12 Viewing/deleting images 15 ...
...this first 4 Notes on using your computer 22 GB Supported Operating Systems for USB connection and application software (supplied 22 Viewing "Cyber-shot Handbook 22 Battery life and memory capacity 23 Battery life and number of images that can be recorded/viewed .......... 23 Number ... 30 7 Menu/Setup 19 Menu items 20 Setup items 21 Enjoying your camera 6 Getting started 8 Checking the accessories supplied 8 1 Inserting the batteries/a "Memory Stick Duo" (not supplied 9 2 Turning the camera on/setting the clock 11 Shooting images easily 12 Viewing/deleting images 15 ...
Instruction Manual
Page 10
... battery time Press POWER to drop the batteries. • Do not open the battery cover or turn on and check the time on the LCD screen. Access lamp • Be sure not to turn off the camera while the access lamp is lit, otherwise the data may be correct under certain circumstances. •...
... battery time Press POWER to drop the batteries. • Do not open the battery cover or turn on and check the time on the LCD screen. Access lamp • Be sure not to turn off the camera while the access lamp is lit, otherwise the data may be correct under certain circumstances. •...
Instruction Manual
Page 11
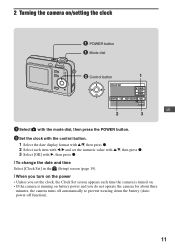
2 Turning the camera on/setting the clock POWER button Mode dial ɟ Control button 1 GB 2 3 1 Select with the mode dial, then press the POWER button. 2 Set the clock ... the power • Unless you set the clock, the Clock Set screen appears each time the camera is turned on. • If the camera is running on battery power and you do not operate the camera for about three minutes, the camera turns off automatically to prevent wearing down the battery (Auto power-off function). 11
2 Turning the camera on/setting the clock POWER button Mode dial ɟ Control button 1 GB 2 3 1 Select with the mode dial, then press the POWER button. 2 Set the clock ... the power • Unless you set the clock, the Clock Set screen appears each time the camera is turned on. • If the camera is running on battery power and you do not operate the camera for about three minutes, the camera turns off automatically to prevent wearing down the battery (Auto power-off function). 11
Instruction Manual
Page 14
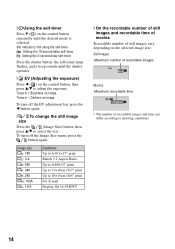
To turn off the Image Size menu, press the button again. Still images Maximum number of recordable images Movies Maximum recordable time • The number of still ...×17" print Match 3:2 Aspect Ratio Up to A4/8×10" print Up to 13×18cm /5×7" print Up to select the size. To turn off the EV adjustment bar, press the b button again. [ To change the still image size Press the (Image Size) button, then press v/V to 10×...
To turn off the Image Size menu, press the button again. Still images Maximum number of recordable images Movies Maximum recordable time • The number of still ...×17" print Match 3:2 Aspect Ratio Up to A4/8×10" print Up to 13×18cm /5×7" print Up to select the size. To turn off the EV adjustment bar, press the b button again. [ To change the still image size Press the (Image Size) button, then press v/V to 10×...
Instruction Manual
Page 15
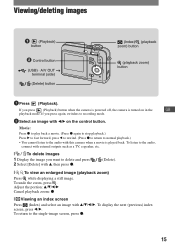
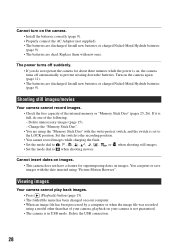
... B to fast forward, press b to rewind. (Press z to return to normal playback.) • You cannot listen to recording mode. 2 Select an image with this camera when a movie is turned on the control button. Viewing/deleting images (Playback) button ɟ Control button (USB) · A/V OUT terminal (side) (Delete) button (Index)/ (playback zoom) ... If you want to the single-image screen, press z. 15 To display the next (previous) index screen, press b/B. If you press (Playback) button when the camera is powered off, the camera is played back. To undo the zoom, press .
... B to fast forward, press b to rewind. (Press z to return to normal playback.) • You cannot listen to recording mode. 2 Select an image with this camera when a movie is turned on the control button. Viewing/deleting images (Playback) button ɟ Control button (USB) · A/V OUT terminal (side) (Delete) button (Index)/ (playback zoom) ... If you want to the single-image screen, press z. 15 To display the next (previous) index screen, press b/B. If you press (Playback) button when the camera is powered off, the camera is played back. To undo the zoom, press .
Instruction Manual
Page 17
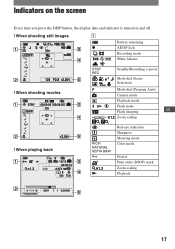
N Red-eye reduction Sharpness Metering mode Color mode Protect Print order (DPOF) mark Zoom scaling Playback 17 Indicators on the screen Every time you press the DISP button, the display data and indicator is turned on and off. [ When shooting still images A Battery remaining z AE/AF lock Recording mode White balance [ When shooting movies STBY REC Standby/Recording a movie Mode dial (Scene Selection) Mode dial (Program Auto) Camera mode Playback mode Flash mode Flash charging GB 1.3 Zoom scaling [ When playing back RICH NATURAL SEPIA B&W -
N Red-eye reduction Sharpness Metering mode Color mode Protect Print order (DPOF) mark Zoom scaling Playback 17 Indicators on the screen Every time you press the DISP button, the display data and indicator is turned on and off. [ When shooting still images A Battery remaining z AE/AF lock Recording mode White balance [ When shooting movies STBY REC Standby/Recording a movie Mode dial (Scene Selection) Mode dial (Program Auto) Camera mode Playback mode Flash mode Flash charging GB 1.3 Zoom scaling [ When playing back RICH NATURAL SEPIA B&W -
Instruction Manual
Page 19
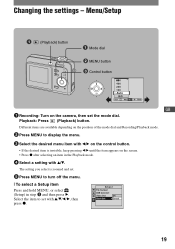
...• If the desired item is zoomed and set. 5 Press MENU to set the mode dial. Playback: Press (Playback) button. Select the item to turn off the menu. [ To select a Setup item Press and hold MENU, or select (Setup) in the Playback mode. 4 Select a setting with v/V/b/B, ... settings - The setting you select is invisible, keep pressing b/B until the item appears on the camera, then set with v/V. Menu/Setup (Playback) button Mode dial ɟ MENU button ɠ Control button GB 1 Recording: Turn on the screen. • Press z after selecting an item in step 3 and then press ...
...• If the desired item is zoomed and set. 5 Press MENU to set the mode dial. Playback: Press (Playback) button. Select the item to turn off the menu. [ To select a Setup item Press and hold MENU, or select (Setup) in the Playback mode. 4 Select a setting with v/V/b/B, ... settings - The setting you select is invisible, keep pressing b/B until the item appears on the camera, then set with v/V. Menu/Setup (Playback) button Mode dial ɟ MENU button ɠ Control button GB 1 Recording: Turn on the screen. • Press z after selecting an item in step 3 and then press ...
Instruction Manual
Page 22
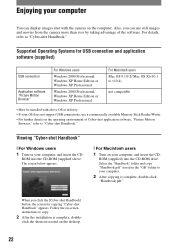
... OS does not support USB connections, use still images and movies from the camera more than ever by taking advantage of Cyber-shot application software, "Picture Motion Browser," refer to "Cyber-shot Handbook." click the shortcut created on your computer, and insert the CD- .../Writer. • For further details on the operating environment of the software. Supported Operating Systems for copying "Cyber-shot Handbook" appears. Viewing "Cyber-shot Handbook" [ For Windows users 1 Turn on the computer. ROM (supplied) into the CD-ROM (supplied) drive. For details, refer to v10.4)...
... OS does not support USB connections, use still images and movies from the camera more than ever by taking advantage of Cyber-shot application software, "Picture Motion Browser," refer to "Cyber-shot Handbook." click the shortcut created on your computer, and insert the CD- .../Writer. • For further details on the operating environment of the software. Supported Operating Systems for copying "Cyber-shot Handbook" appears. Viewing "Cyber-shot Handbook" [ For Windows users 1 Turn on the computer. ROM (supplied) into the CD-ROM (supplied) drive. For details, refer to v10.4)...
Instruction Manual
Page 23
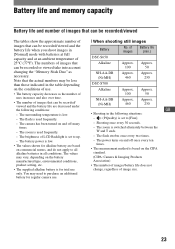
The camera has been turned on commercial norms, and do not apply to purchase an additional battery for alkaline battery are decreased under...based on the conditions of use . [ When shooting still images Battery No. The flash strobes once every two times. - The power turns on the battery manufacturer/type, environmental conditions, product setting, etc. • The supplied alkaline battery is set to up. - The...Normal] mode with batteries at full capacity and at an ambient temperature of images Battery life (min.) DSC-S650 Alkaline Approx. Shooting once every 30 seconds. -
The camera has been turned on commercial norms, and do not apply to purchase an additional battery for alkaline battery are decreased under...based on the conditions of use . [ When shooting still images Battery No. The flash strobes once every two times. - The power turns on the battery manufacturer/type, environmental conditions, product setting, etc. • The supplied alkaline battery is set to up. - The...Normal] mode with batteries at full capacity and at an ambient temperature of images Battery life (min.) DSC-S650 Alkaline Approx. Shooting once every 30 seconds. -
Instruction Manual
Page 27
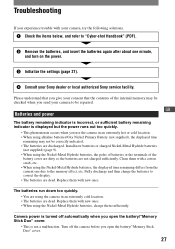
... Sony service facility. Clean them with new ones. Replace them with a cotton swab, etc. • When using the Nickel-Metal Hydride batteries, the displayed time remaining differs from the current one minute, and turn on the power. 3 Initialize the settings (page 21). 4 Consult your camera ... an extremely cold location. • The batteries are not charged sufficiently. Replace them with your camera, try the following solutions. 1 Check the items below, and refer to "Cyber-shot Handbook" (PDF). 2 Remove the batteries, and insert the batteries again after about one due to correct the ...
... Sony service facility. Clean them with new ones. Replace them with a cotton swab, etc. • When using the Nickel-Metal Hydride batteries, the displayed time remaining differs from the current one minute, and turn on the power. 3 Initialize the settings (page 21). 4 Consult your camera ... an extremely cold location. • The batteries are not charged sufficiently. Replace them with your camera, try the following solutions. 1 Check the items below, and refer to "Cyber-shot Handbook" (PDF). 2 Remove the batteries, and insert the batteries again after about one due to correct the ...
Instruction Manual
Page 28
... play back images. • Press (Playback) button (page 15). • The folder/file name has been changed on , the camera turns off suddenly. • If you do one of the following: - Set the switch to the recording position. • You cannot record images while charging ... Set the mode dial to the LOCK position. Shooting still images/movies Your camera cannot record images. • Check the free capacity of your camera, playback on images. You can print or save images with new ones. Cannot turn on the camera again (page 11). • The batteries are discharged. If it is ...
... play back images. • Press (Playback) button (page 15). • The folder/file name has been changed on , the camera turns off suddenly. • If you do one of the following: - Set the switch to the recording position. • You cannot record images while charging ... Set the mode dial to the LOCK position. Shooting still images/movies Your camera cannot record images. • Check the free capacity of your camera, playback on images. You can print or save images with new ones. Cannot turn on the camera again (page 11). • The batteries are discharged. If it is ...
Instruction Manual
Page 29
... moistened with water, then wipe the surface with a dry cloth. If moisture condensation occurs Turn off . 29 However, if you use the camera for only short periods, it becomes completely discharged. Precautions [ Do not use/store the camera in the following as they may damage the finish or the casing. • Chemical products...
... moistened with water, then wipe the surface with a dry cloth. If moisture condensation occurs Turn off . 29 However, if you use the camera for only short periods, it becomes completely discharged. Precautions [ Do not use/store the camera in the following as they may damage the finish or the casing. • Chemical products...


