Read This First guide
Page 1
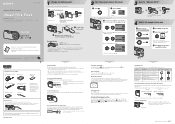
...lead) (1) • USB, A/V cable for multiuse terminal (1) • NP-FR1 battery pack (1) • Wrist strap (1) • CD-ROM (Cyber-shot application software) (1) • Operating instructions for digital still camera "Read This First" (this manual) (1) • Operating instructions "User's Guide/ ...camera turns off the power. button On still image sizes For details on the image size selected. DSC-P200 Refer to "User's Guide/Troubleshooting" (separate volume) Explains advanced techniques and what to display the menu screen. http://www.sony.net/ 1 Charge the battery...
...lead) (1) • USB, A/V cable for multiuse terminal (1) • NP-FR1 battery pack (1) • Wrist strap (1) • CD-ROM (Cyber-shot application software) (1) • Operating instructions for digital still camera "Read This First" (this manual) (1) • Operating instructions "User's Guide/ ...camera turns off the power. button On still image sizes For details on the image size selected. DSC-P200 Refer to "User's Guide/Troubleshooting" (separate volume) Explains advanced techniques and what to display the menu screen. http://www.sony.net/ 1 Charge the battery...
Read This First guide
Page 2
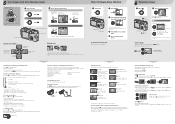
... the control button 60min S AF VGA 101 96 Using the flash for saving battery power, or shooting images when it is dark or against light (default setting)...the zoom scale while shooting a movie. • When the zoom scale exceeds 3×, the camera uses [Digital Zoom]. The contrast between the subject and its background is turned off. 4 Press MENU to flashing...Display/LCD on the control button. 5 Shoot images easily (Auto adjustment mode) Holding the camera 1 Select a mode. Still image (auto adjustment mode): Select . The first time is displayed, press (Delete) and...
... the control button 60min S AF VGA 101 96 Using the flash for saving battery power, or shooting images when it is dark or against light (default setting)...the zoom scale while shooting a movie. • When the zoom scale exceeds 3×, the camera uses [Digital Zoom]. The contrast between the subject and its background is turned off. 4 Press MENU to flashing...Display/LCD on the control button. 5 Shoot images easily (Auto adjustment mode) Holding the camera 1 Select a mode. Still image (auto adjustment mode): Select . The first time is displayed, press (Delete) and...
Operating Instructions
Page 3
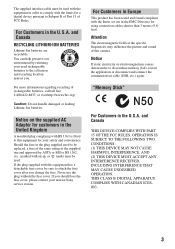
...Notice on the supplied AC Adaptor for customers in order to comply with BS 1363 is fitted to this equipment for your nearest Sony service station. If you should lose the fuse cover, please contact your safety and convenience. Attention The electromagnetic fields at the ...product has been tested and found compliant with this camera. Never use the plug without the fuse cover. For Customers in the EMC Directive for a digital device pursuant to attach the fuse cover after you . and Canada RECYCLING LITHIUM-ION BATTERIES Lithium-Ion batteries are recyclable. "Memory Stick" For Customers in...
...Notice on the supplied AC Adaptor for customers in order to comply with BS 1363 is fitted to this equipment for your nearest Sony service station. If you should lose the fuse cover, please contact your safety and convenience. Attention The electromagnetic fields at the ...product has been tested and found compliant with this camera. Never use the plug without the fuse cover. For Customers in the EMC Directive for a digital device pursuant to attach the fuse cover after you . and Canada RECYCLING LITHIUM-ION BATTERIES Lithium-Ion batteries are recyclable. "Memory Stick" For Customers in...
Operating Instructions
Page 4
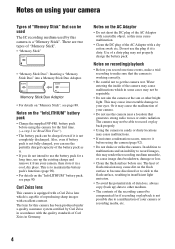
... • If moisture condensation occurs, remove it in a cool, dry place. Notes on the "InfoLITHIUM" battery pack • Charge the supplied NP-FR1 battery pack before using the camera for if recording or playback is capable of the AC Adaptor with a metallic object, as is working correctly....Notes on recording/playback • Before you do not intend to use the battery pack for this camera has been produced under a quality assurance system certified by this may not properly charge the battery pack. This may render the recording medium unusable, or cause image data ...
... • If moisture condensation occurs, remove it in a cool, dry place. Notes on the "InfoLITHIUM" battery pack • Charge the supplied NP-FR1 battery pack before using the camera for if recording or playback is capable of the AC Adaptor with a metallic object, as is working correctly....Notes on recording/playback • Before you do not intend to use the battery pack for this camera has been produced under a quality assurance system certified by this may not properly charge the battery pack. This may render the recording medium unusable, or cause image data ...
Operating Instructions
Page 6
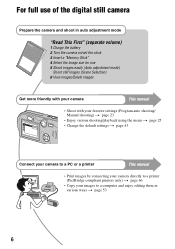
For full use of the digital still camera Prepare the camera and shoot in auto adjustment mode "Read This First" (separate volume) 1 Charge the battery 2 Turn the camera on/set the clock 3 Insert a "Memory Stick" 4 Select the image size for use 5 Shoot images easily (Auto adjustment mode) Shoot still images (Scene Selection) 6 View images/Delete images Get more...
For full use of the digital still camera Prepare the camera and shoot in auto adjustment mode "Read This First" (separate volume) 1 Charge the battery 2 Turn the camera on/set the clock 3 Insert a "Memory Stick" 4 Select the image size for use 5 Shoot images easily (Auto adjustment mode) Shoot still images (Scene Selection) 6 View images/Delete images Get more...
Operating Instructions
Page 7
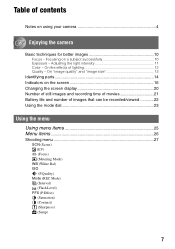
Focusing on the screen 16 Changing the screen display 20 Number of still images and recording time of movies 21 Battery life and number of images that can be recorded/viewed 22 Using the mode dial 23 Using the menu Using menu items...Quality) Mode (REC Mode) M (Interval) (Flash Level) PFX (P.Effect) (Saturation) (Contrast) (Sharpness) (Setup) 7 On the effects of contents Notes on using your camera 4 Enjoying the camera Basic techniques for better images 10 Focus - On "image quality" and "image size 13 Identifying parts 14 Indicators on a subject successfully 10 Exposure - Table...
Focusing on the screen 16 Changing the screen display 20 Number of still images and recording time of movies 21 Battery life and number of images that can be recorded/viewed 22 Using the mode dial 23 Using the menu Using menu items...Quality) Mode (REC Mode) M (Interval) (Flash Level) PFX (P.Effect) (Saturation) (Contrast) (Sharpness) (Setup) 7 On the effects of contents Notes on using your camera 4 Enjoying the camera Basic techniques for better images 10 Focus - On "image quality" and "image size 13 Identifying parts 14 Indicators on a subject successfully 10 Exposure - Table...
Operating Instructions
Page 9
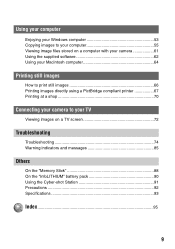
...your computer 55 Viewing image files stored on a computer with your camera 61 Using the supplied software 62 Using your Macintosh computer 64 Printing still images How to print still images 66 Printing images directly using a PictBridge compliant printer 67 ...Printing at a shop 70 Connecting your camera to your TV Viewing images on a TV screen 72 Troubleshooting Troubleshooting 74 Warning indicators and messages 85 Others On the "Memory Stick 88 On the "InfoLITHIUM" battery...
...your computer 55 Viewing image files stored on a computer with your camera 61 Using the supplied software 62 Using your Macintosh computer 64 Printing still images How to print still images 66 Printing images directly using a PictBridge compliant printer 67 ...Printing at a shop 70 Connecting your camera to your TV Viewing images on a TV screen 72 Troubleshooting Troubleshooting 74 Warning indicators and messages 85 Others On the "Memory Stick 88 On the "InfoLITHIUM" battery...
Operating Instructions
Page 15
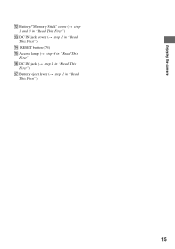
Enjoying the camera L Battery/"Memory Stick" cover (t step 1 and 3 in "Read This First") M DC IN jack cover (t step 1 in "Read This First") N RESET button (74) O Access lamp (t step 4 in "Read This First" P DC IN jack (t step 1 in "Read This First") Q Battery eject lever (t step 1 in "Read This First") 15
Enjoying the camera L Battery/"Memory Stick" cover (t step 1 and 3 in "Read This First") M DC IN jack cover (t step 1 in "Read This First") N RESET button (74) O Access lamp (t step 4 in "Read This First" P DC IN jack (t step 1 in "Read This First") Q Battery eject lever (t step 1 in "Read This First") 15
Operating Instructions
Page 16
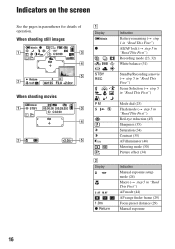
... screen See the pages in "Read This First") AF mode (44) AF range finder frame (29) Focus preset distance (29) Manual exposure 16 When shooting still images When shooting movies 60min STBY STD 640 101 00:00:00 [00:28:25] C:32:00 + +2.0EV A Display 60min z M WB STBY REC M SL 5 ...6 ON B Display S AF M AF 1.0m z Return Indication Battery remaining (t step 1 in "Read This First") AE/AF lock (t step 5 in "Read This First") Recording mode (23, 32) White balance (31) Standby/Recording a movie (t step...
... screen See the pages in "Read This First") AF mode (44) AF range finder frame (29) Focus preset distance (29) Manual exposure 16 When shooting still images When shooting movies 60min STBY STD 640 101 00:00:00 [00:28:25] C:32:00 + +2.0EV A Display 60min z M WB STBY REC M SL 5 ...6 ON B Display S AF M AF 1.0m z Return Indication Battery remaining (t step 1 in "Read This First") AE/AF lock (t step 5 in "Read This First") Recording mode (23, 32) White balance (31) Standby/Recording a movie (t step...

Operating Instructions
Page 17
...85) Date/Time (45) ISO number (32) D Display E + Indication Vibration warning (10) • Indicates vibration will prevent you can still shoot images. Low battery warning (22) Spot metering cross hair (30) AF range finder frame (29) E Display Indication Histogram (20, 28) • appears ...when histogram display is disabled. However, we recommend holding the camera steadily and turning off the indicator to avoid the effects of ...
...85) Date/Time (45) ISO number (32) D Display E + Indication Vibration warning (10) • Indicates vibration will prevent you can still shoot images. Low battery warning (22) Spot metering cross hair (30) AF range finder frame (29) E Display Indication Histogram (20, 28) • appears ...when histogram display is disabled. However, we recommend holding the camera steadily and turning off the indicator to avoid the effects of ...
Operating Instructions
Page 18
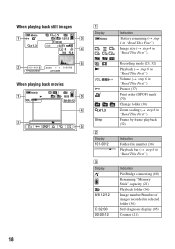
When playing back still images 60min 1.3 M VGA 101 101 12/12 C:32:00 +2.0EV 500 F2.8 BACK/NEXT VOLUME When playing back movies A Display 60min 7M 3:2 5M 3M 1M VGA FINE 640 STD 640 160 M N - 1.3 Step Indication Battery remaining (t step 1 in "Read This First") Image size (t step 4 in "Read This First") Recording mode...
When playing back still images 60min 1.3 M VGA 101 101 12/12 C:32:00 +2.0EV 500 F2.8 BACK/NEXT VOLUME When playing back movies A Display 60min 7M 3:2 5M 3M 1M VGA FINE 640 STD 640 160 M N - 1.3 Step Indication Battery remaining (t step 1 in "Read This First") Image size (t step 4 in "Read This First") Recording mode...
Operating Instructions
Page 22
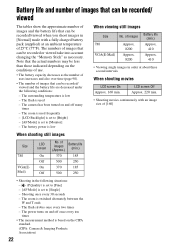
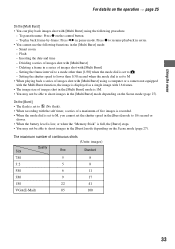
.... The zoom is set to [Single] - The battery power is used frequently - [LCD Backlight] is set to [Bright] - [AF Mode] is low - The camera has been turned on the CIPA standard. (CIPA: Camera & Imaging Products Association) 22 Battery life and number of images that can be recorded/ ... an ambient temperature of 25°C (77°F). The flash is low When viewing still images Size No. LCD screen Off Approx. 220 min. • Shooting movies continuously with a fully charged battery pack (supplied) at about three second intervals When shooting movies LCD screen On Approx. ...
.... The zoom is set to [Single] - The battery power is used frequently - [LCD Backlight] is set to [Bright] - [AF Mode] is low - The camera has been turned on the CIPA standard. (CIPA: Camera & Imaging Products Association) 22 Battery life and number of images that can be recorded/ ... an ambient temperature of 25°C (77°F). The flash is low When viewing still images Size No. LCD screen Off Approx. 220 min. • Shooting movies continuously with a fully charged battery pack (supplied) at about three second intervals When shooting movies LCD screen On Approx. ...
Operating Instructions
Page 33
... the control button. - Press z to shoot images in the [Multi Burst] mode: - Deleting a frame in a series of images shot with [Multi Burst] using a computer or a camera not equipped with the Multi Burst function, the image is displayed as a single image with 16 frames. • The image size of images shot with.... • When the mode dial is set to M, you cannot set the shutter speed in the [Burst] mode to 1/6 second or slower. • When the battery level is low, or when the "Memory Stick" is set to shoot images in pause mode. Dividing a series of images shot with the self timer...
... the control button. - Press z to shoot images in the [Multi Burst] mode: - Deleting a frame in a series of images shot with [Multi Burst] using a computer or a camera not equipped with the Multi Burst function, the image is displayed as a single image with 16 frames. • The image size of images shot with.... • When the mode dial is set to M, you cannot set the shutter speed in the [Burst] mode to 1/6 second or slower. • When the battery level is low, or when the "Memory Stick" is set to shoot images in pause mode. Dividing a series of images shot with the self timer...
Operating Instructions
Page 44
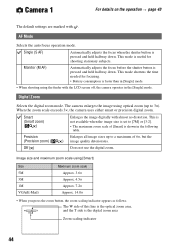
... using the finder with the LCD screen off, the camera operates in the following table. When the zoom scale exceeds 3×, the camera uses either smart or precision digital zoom. Off ( ) Does not use the digital zoom. This mode shortens the time needed for shooting stationary...Monitor (M AF) Automatically adjusts the focus before the shutter button is useful for focusing. • Battery consumption is pressed and held halfway down . Digital Zoom Selects the digital zoom mode. The camera enlarges the image using [Smart] Size 5M 3M 1M VGA(E-Mail) Maximum zoom scale Approx. ...
... using the finder with the LCD screen off, the camera operates in the following table. When the zoom scale exceeds 3×, the camera uses either smart or precision digital zoom. Off ( ) Does not use the digital zoom. This mode shortens the time needed for shooting stationary...Monitor (M AF) Automatically adjusts the focus before the shutter button is useful for focusing. • Battery consumption is pressed and held halfway down . Digital Zoom Selects the digital zoom mode. The camera enlarges the image using [Smart] Size 5M 3M 1M VGA(E-Mail) Maximum zoom scale Approx. ...
Operating Instructions
Page 50
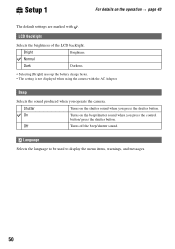
... be used to display the menu items, warnings, and messages. 50 Normal Dark Darkens. • Selecting [Bright] uses up the battery charge faster. • The setting is not displayed when using the camera with . Bright Brightens. Setup 1 1 For details on the operation t page 43 The default settings are marked with the AC...
... be used to display the menu items, warnings, and messages. 50 Normal Dark Darkens. • Selecting [Bright] uses up the battery charge faster. • The setting is not displayed when using the camera with . Bright Brightens. Setup 1 1 For details on the operation t page 43 The default settings are marked with the AC...
Operating Instructions
Page 56
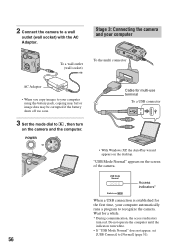
... connector • With Windows XP, the AutoPlay wizard appears on the screen of the camera. POWER Cable for the first time, your computer using the battery pack, copying may fail or image data may be corrupted if the battery shuts off too soon. 3 Set the mode dial to [Normal] (page 51). 56... Stage 3: Connecting the camera and your computer To a wall outlet (wall socket) To the multi ...
... connector • With Windows XP, the AutoPlay wizard appears on the screen of the camera. POWER Cable for the first time, your computer using the battery pack, copying may fail or image data may be corrupted if the battery shuts off too soon. 3 Set the mode dial to [Normal] (page 51). 56... Stage 3: Connecting the camera and your computer To a wall outlet (wall socket) To the multi ...

Operating Instructions
Page 75
... (t step 1 in an extremely hot or cold location (page 90). • The displayed time remaining differs from the camera when charging is discharged. Consult your Sony dealer or local authorized Sony service facility. Install a charged battery pack (t step 1 in "Read This First"). Replace it with a new one. • Disconnect the DC plug from the...
... (t step 1 in an extremely hot or cold location (page 90). • The displayed time remaining differs from the camera when charging is discharged. Consult your Sony dealer or local authorized Sony service facility. Install a charged battery pack (t step 1 in "Read This First"). Replace it with a new one. • Disconnect the DC plug from the...

Operating Instructions
Page 76
...recording movies. Set the image size to , P, M, SCN, or (page 23). This is discharged. Shooting still images/movies The screen does not turn on the camera. • Install the battery pack correctly (t step 1 in "Read This First") - Do one of the following : - The subject ... 6 in "Read This First"). • Properly connect the AC Adaptor. • The AC Adaptor has malfunctioned. Consult your Sony dealer or local authorized Sony service facility. • The battery pack is activated (page 24). Recording takes a long time. • The NR slow shutter function is discharged.
...recording movies. Set the image size to , P, M, SCN, or (page 23). This is discharged. Shooting still images/movies The screen does not turn on the camera. • Install the battery pack correctly (t step 1 in "Read This First") - Do one of the following : - The subject ... 6 in "Read This First"). • Properly connect the AC Adaptor. • The AC Adaptor has malfunctioned. Consult your Sony dealer or local authorized Sony service facility. • The battery pack is activated (page 24). Recording takes a long time. • The NR slow shutter function is discharged.

Operating Instructions
Page 79
...or set to the correct procedure (page 60). To confirm the recordable range, use terminal is in conjunction with the following items. Your camera cannot play back images. • Set the mode dial to image processing. The image appears rough right after playback starts. • The...Stick" to prevent accidental erasure. 79 Troubleshooting This is full. Install a charged battery pack. Disconnect it . Delete the USB communication (page 59). Cannot shoot images in "Read This First"). • The battery level is close. The image seen through the finder does not indicate the actual...
...or set to the correct procedure (page 60). To confirm the recordable range, use terminal is in conjunction with the following items. Your camera cannot play back images. • Set the mode dial to image processing. The image appears rough right after playback starts. • The...Stick" to prevent accidental erasure. 79 Troubleshooting This is full. Install a charged battery pack. Disconnect it . Delete the USB communication (page 59). Cannot shoot images in "Read This First"). • The battery level is close. The image seen through the finder does not indicate the actual...
Operating Instructions
Page 80
... from the USB connectors of your computer with the camera. • Check "Recommended computer environment" (page 54) ...) for multi-use terminal from both the computer and the camera, and connect it again firmly. You cannot display a DPOF...device because you installed the "USB Driver" from your camera. • Turn on the camera (t step 2 in the (Setup) menu (page 51...camera and your computer is not long enough to [Normal] in "Read This First"). • Use the AC Adaptor when the battery... computer. • Connect the camera directly to your computer without passing through a USB ...
... from the USB connectors of your computer with the camera. • Check "Recommended computer environment" (page 54) ...) for multi-use terminal from both the computer and the camera, and connect it again firmly. You cannot display a DPOF...device because you installed the "USB Driver" from your camera. • Turn on the camera (t step 2 in the (Setup) menu (page 51...camera and your computer is not long enough to [Normal] in "Read This First"). • Use the AC Adaptor when the battery... computer. • Connect the camera directly to your computer without passing through a USB ...


