Read This First guide
Page 1
...Select . 2 Press (Image Size). 3 Select the size with v/V, then press z. http://www.sony.net/ 1 Charge the battery pack Be sure to the DC IN jack. To remove a "...; The indicator also lights up while charging the flash. Digital Still Camera 2-582-853-11 (1) Operating Instructions Before operating the unit, please read this manual and "User's Guide/Troubleshooting" (separate volume)... , disconnect the AC Adaptor both from the camera and from the wall outlet (wall socket). • After use your camera abroad - DSC-P200 Refer to "User's Guide/Troubleshooting" (separate...
...Select . 2 Press (Image Size). 3 Select the size with v/V, then press z. http://www.sony.net/ 1 Charge the battery pack Be sure to the DC IN jack. To remove a "...; The indicator also lights up while charging the flash. Digital Still Camera 2-582-853-11 (1) Operating Instructions Before operating the unit, please read this manual and "User's Guide/Troubleshooting" (separate volume)... , disconnect the AC Adaptor both from the camera and from the wall outlet (wall socket). • After use your camera abroad - DSC-P200 Refer to "User's Guide/Troubleshooting" (separate...
Operating Instructions
Page 1
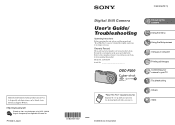
.... DSC-P200 Serial No DSC-P200 "Read This First" (separate volume) Explains the set-up and basic operations for future reference. Record the serial number in Japan Digital Still Camera User's Guide/ Troubleshooting Operating Instructions Before operating the unit, please read this product and answers to these numbers whenever you call upon your TV Troubleshooting Others Index © 2005 Sony...
.... DSC-P200 Serial No DSC-P200 "Read This First" (separate volume) Explains the set-up and basic operations for future reference. Record the serial number in Japan Digital Still Camera User's Guide/ Troubleshooting Operating Instructions Before operating the unit, please read this product and answers to these numbers whenever you call upon your TV Troubleshooting Others Index © 2005 Sony...
Operating Instructions
Page 4
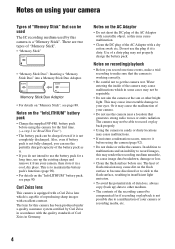
... as is. • If you record one-time events, make a trial recording to make sure that the camera is not completely discharged. Notes on the "InfoLITHIUM" battery pack, see page 88. Notes on the AC Adaptor...Do not short the DC plug of a dirty plug may not be repairable. • Do not aim the camera at the sun or other medium. • The contents of the recording cannot be able to maintain the ... for if recording or playback is to record or play back properly. • Using the camera in "Read This First") • The battery pack can use the plug if it is working correctly....
... as is. • If you record one-time events, make a trial recording to make sure that the camera is not completely discharged. Notes on the "InfoLITHIUM" battery pack, see page 88. Notes on the AC Adaptor...Do not short the DC plug of a dirty plug may not be repairable. • Do not aim the camera at the sun or other medium. • The contents of the recording cannot be able to maintain the ... for if recording or playback is to record or play back properly. • Using the camera in "Read This First") • The battery pack can use the plug if it is working correctly....
Operating Instructions
Page 6
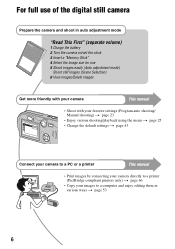
For full use of the digital still camera Prepare the camera and shoot in auto adjustment mode "Read This First" (separate volume) 1 Charge the battery 2 Turn the camera on/set the clock 3 Insert a "Memory Stick" 4 Select the image size for use 5 Shoot images easily (Auto adjustment mode) Shoot still images (Scene Selection) 6 View images/Delete images Get more...
For full use of the digital still camera Prepare the camera and shoot in auto adjustment mode "Read This First" (separate volume) 1 Charge the battery 2 Turn the camera on/set the clock 3 Insert a "Memory Stick" 4 Select the image size for use 5 Shoot images easily (Auto adjustment mode) Shoot still images (Scene Selection) 6 View images/Delete images Get more...
Operating Instructions
Page 13
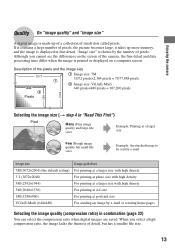
...= 7,077,888 pixels 2 Image size: VGA(E-Mail) 640 pixels×480 pixels = 307,200 pixels Pixels Selecting the image size (t step 4 in "Read This First") Pixel Many (Fine image quality and large file size) Example: Printing at a larger size Few (Rough image quality but has a smaller file ...When you cannot see the differences on a computer screen. If it takes up of a collection of pixels. Enjoying the camera Quality On "image quality" and "image size" A digital image is made up more memory, and the image is displayed in combination (page 32) You can select the compression ratio...
...= 7,077,888 pixels 2 Image size: VGA(E-Mail) 640 pixels×480 pixels = 307,200 pixels Pixels Selecting the image size (t step 4 in "Read This First") Pixel Many (Fine image quality and large file size) Example: Printing at a larger size Few (Rough image quality but has a smaller file ...When you cannot see the differences on a computer screen. If it takes up of a collection of pixels. Enjoying the camera Quality On "image quality" and "image size" A digital image is made up more memory, and the image is displayed in combination (page 32) You can select the compression ratio...
Operating Instructions
Page 14
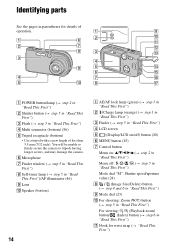
... First") K Hook for details of less than 5.5 mm (7/32 inch). You will be unable to firmly secure the camera to tripods having longer screws, and may damage the camera. Identifying parts See the pages in "Read This First") D Multi connector (bottom) (56) E Tripod receptacle (bottom) • Use a tripod with a screw length of operation...
... First") K Hook for details of less than 5.5 mm (7/32 inch). You will be unable to firmly secure the camera to tripods having longer screws, and may damage the camera. Identifying parts See the pages in "Read This First") D Multi connector (bottom) (56) E Tripod receptacle (bottom) • Use a tripod with a screw length of operation...

Operating Instructions
Page 15
Enjoying the camera L Battery/"Memory Stick" cover (t step 1 and 3 in "Read This First") M DC IN jack cover (t step 1 in "Read This First") N RESET button (74) O Access lamp (t step 4 in "Read This First" P DC IN jack (t step 1 in "Read This First") Q Battery eject lever (t step 1 in "Read This First") 15
Enjoying the camera L Battery/"Memory Stick" cover (t step 1 and 3 in "Read This First") M DC IN jack cover (t step 1 in "Read This First") N RESET button (74) O Access lamp (t step 4 in "Read This First" P DC IN jack (t step 1 in "Read This First") Q Battery eject lever (t step 1 in "Read This First") 15
Operating Instructions
Page 16
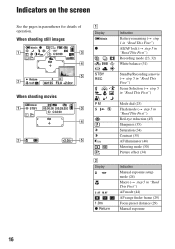
Indicators on the screen See the pages in "Read This First") AF mode (44) AF range finder frame (29) Focus preset distance (29) Manual exposure 16 When shooting still images When shooting movies 60min STBY STD 640 101 00:00:00 [00:28:25] C:32:00 + +2.0EV A Display 60min z M WB ...STBY REC M SL 5 6 ON B Display S AF M AF 1.0m z Return Indication Battery remaining (t step 1 in "Read This First") AE/AF lock (t step...
Indicators on the screen See the pages in "Read This First") AF mode (44) AF range finder frame (29) Focus preset distance (29) Manual exposure 16 When shooting still images When shooting movies 60min STBY STD 640 101 00:00:00 [00:28:25] C:32:00 + +2.0EV A Display 60min z M WB ...STBY REC M SL 5 6 ON B Display S AF M AF 1.0m z Return Indication Battery remaining (t step 1 in "Read This First") AE/AF lock (t step...

Operating Instructions
Page 17
...level value (27) DPOF (not displayed in "Read This First") Self-diagnosis display (85) Date/Time (45) ISO number (32) D Display E + Indication Vibration warning (10) • Indicates vibration will prevent you can still shoot images. However, we recommend holding the camera steadily and turning off the indicator to avoid ...hand side) Menu/Guide menu (25) 17 Enjoying the camera C Display 7M 3:2 5M 3M 1M VGA FINE 640 STD 640 160 FINE STD 101 00:00:00 [00:28:05] 1/30" 400 C:32:00 Indication Image size (t step 4 in "Read This First") Image quality (32) Recording folder (48)...
...level value (27) DPOF (not displayed in "Read This First") Self-diagnosis display (85) Date/Time (45) ISO number (32) D Display E + Indication Vibration warning (10) • Indicates vibration will prevent you can still shoot images. However, we recommend holding the camera steadily and turning off the indicator to avoid ...hand side) Menu/Guide menu (25) 17 Enjoying the camera C Display 7M 3:2 5M 3M 1M VGA FINE 640 STD 640 160 FINE STD 101 00:00:00 [00:28:05] 1/30" 400 C:32:00 Indication Image size (t step 4 in "Read This First") Image quality (32) Recording folder (48)...
Operating Instructions
Page 18
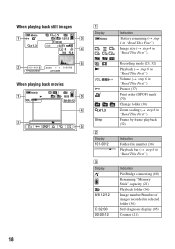
...still images 60min 1.3 M VGA 101 101 12/12 C:32:00 +2.0EV 500 F2.8 BACK/NEXT VOLUME When playing back movies A Display 60min 7M 3:2 5M 3M 1M VGA FINE 640 STD 640 160 M N - 1.3 Step Indication Battery remaining (t step 1 in "Read This First") Image size (t step 4 in "Read... This First") Recording mode (23, 32) Playback (t step 6 in "Read This First") Volume (t step 6 in "Read This First") Protect (37) Print order (DPOF) mark (70) Change folder (36)...
...still images 60min 1.3 M VGA 101 101 12/12 C:32:00 +2.0EV 500 F2.8 BACK/NEXT VOLUME When playing back movies A Display 60min 7M 3:2 5M 3M 1M VGA FINE 640 STD 640 160 M N - 1.3 Step Indication Battery remaining (t step 1 in "Read This First") Image size (t step 4 in "Read... This First") Recording mode (23, 32) Playback (t step 6 in "Read This First") Volume (t step 6 in "Read This First") Protect (37) Print order (DPOF) mark (70) Change folder (36)...
Operating Instructions
Page 19
Enjoying the camera D Display +2.0EV WB Indication Do not disconnect the cable for multi-use terminal (69) EV level value (27) ISO number (32) Metering mode (30) Flash White balance (31) 500 F2.8 Shutter speed (24) Aperture value (24) Playback image (t step 6 in "Read This First") E Display 2005 1 1 DPOF BACK/ NEXT VOLUME Indication Histogram (20, 28) • appears when histogram display is disabled. Recording date/time of the playback image (45) Menu/Guide menu (25) Select images Adjust volume 19
Enjoying the camera D Display +2.0EV WB Indication Do not disconnect the cable for multi-use terminal (69) EV level value (27) ISO number (32) Metering mode (30) Flash White balance (31) 500 F2.8 Shutter speed (24) Aperture value (24) Playback image (t step 6 in "Read This First") E Display 2005 1 1 DPOF BACK/ NEXT VOLUME Indication Histogram (20, 28) • appears when histogram display is disabled. Recording date/time of the playback image (45) Menu/Guide menu (25) Select images Adjust volume 19
Operating Instructions
Page 23
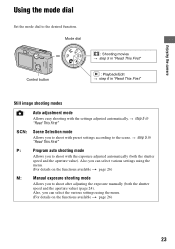
...to shoot with the exposure adjusted automatically (both the shutter speed and the aperture value) (page 24). t step 5 in "Read This First" Still image shooting modes : Auto adjustment mode Allows easy shooting with the settings adjusted automatically. Also you can select the various settings using... the shutter speed and the aperture value). Enjoying the camera Using the mode dial Set the mode dial to the scene. Mode dial : Shooting movies t step 5 in "Read This First" Control button : Playback/Edit t step 6 in "Read This First" SCN: Scene Selection mode Allows you can...
...to shoot with the exposure adjusted automatically (both the shutter speed and the aperture value) (page 24). t step 5 in "Read This First" Still image shooting modes : Auto adjustment mode Allows easy shooting with the settings adjusted automatically. Also you can select the various settings using... the shutter speed and the aperture value). Enjoying the camera Using the mode dial Set the mode dial to the scene. Mode dial : Shooting movies t step 5 in "Read This First" Control button : Playback/Edit t step 6 in "Read This First" SCN: Scene Selection mode Allows you can...
Operating Instructions
Page 27
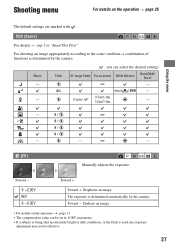
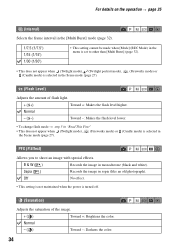
... - Macro - - ( : you can be set in 1/3EV increments. • If a subject is being shot in "Read This First" For shooting an image appropriately according to the scene condition, a combination of functions is determined by the camera. SCN (Scene) For details t step 5 in extremely bright or dark conditions, or the flash is determined...
... - Macro - - ( : you can be set in 1/3EV increments. • If a subject is being shot in "Read This First" For shooting an image appropriately according to the scene condition, a combination of functions is determined by the camera. SCN (Scene) For details t step 5 in extremely bright or dark conditions, or the flash is determined...
Operating Instructions
Page 34
... change flash mode t step 5 in the Scene mode (page 27). Off No effect. • This setting is not maintained when the power is selected in "Read This First" • This does not appear when (Twilight mode), (Fireworks mode) or (Candle mode) is turned off. (Saturation) Adjusts the saturation of flash light...
... change flash mode t step 5 in the Scene mode (page 27). Off No effect. • This setting is not maintained when the power is selected in "Read This First" • This does not appear when (Twilight mode), (Fireworks mode) or (Candle mode) is turned off. (Saturation) Adjusts the saturation of flash light...
Operating Instructions
Page 39
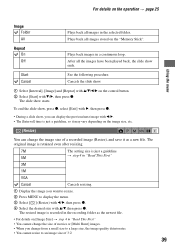
.... 7M The setting size is recorded in the recording folder as the newest file. • For details on [Image Size] t step 4 in "Read This First" 3M 1M VGA Cancel Cancels resizing. 1 Display the image you want to resize. 2 Press MENU to an image size of a recorded ...with b/B, then press z. 4 Select the desired size with V/B, then press z. Cancels the slide show starts. The resized image is just a guideline. 5M t step 4 in "Read This First" • You cannot change the size of movies or [Multi Burst] images. • When you can change the image size of 3:2. 39 Repeat...
.... 7M The setting size is recorded in the recording folder as the newest file. • For details on [Image Size] t step 4 in "Read This First" 3M 1M VGA Cancel Cancels resizing. 1 Display the image you want to resize. 2 Press MENU to an image size of a recorded ...with b/B, then press z. 4 Select the desired size with V/B, then press z. Cancels the slide show starts. The resized image is just a guideline. 5M t step 4 in "Read This First" • You cannot change the size of movies or [Multi Burst] images. • When you can change the image size of 3:2. 39 Repeat...
Operating Instructions
Page 45
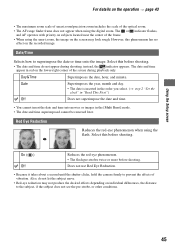
... may look rough. Date Superimposes the year, month and day. • The date is inserted in the order you select. (t step 2 "Set the clock" in "Read This First") Off Does not superimpose the date and time. • You cannot insert the date and time into movies or images in red on... Red Eye Reduction. • Because it takes about a second until the shutter clicks, hold the camera firmly to prevent the effects of the optical zoom. • The AF range finder frame does not appear when using the digital zoom. The date and time appear in the [Multi Burst] mode. • The date...
... may look rough. Date Superimposes the year, month and day. • The date is inserted in the order you select. (t step 2 "Set the clock" in "Read This First") Off Does not superimpose the date and time. • You cannot insert the date and time into movies or images in red on... Red Eye Reduction. • Because it takes about a second until the shutter clicks, hold the camera firmly to prevent the effects of the optical zoom. • The AF range finder frame does not appear when using the digital zoom. The date and time appear in the [Multi Burst] mode. • The date...

Operating Instructions
Page 52
Cancels setting the clock. 52 OK Cancel For details on the operation t page 43 Select [OK] with v on the control button, and press z. Clock Set Sets the date and time. Then, perform the procedure explained in "Setting the clock" (t step 2 in "Read This First").
Cancels setting the clock. 52 OK Cancel For details on the operation t page 43 Select [OK] with v on the control button, and press z. Clock Set Sets the date and time. Then, perform the procedure explained in "Setting the clock" (t step 2 in "Read This First").
Operating Instructions
Page 62
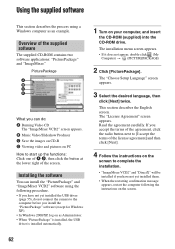
... computer following procedure. • If you have not yet installed the USB driver (page 55), do : A Burning Video CD The "ImageMixer VCD2" screen appears. Read the agreement carefully. PicturePackage A B C D What you install the "PicturePackage" software (except for Windows XP). • In Windows 2000/XP, log on as ...an example. Installing the software You can do not connect the camera to start up the functions: Click one of A-D, then click the button at the lower right of the supplied software The supplied CD-ROM ...
... computer following procedure. • If you have not yet installed the USB driver (page 55), do : A Burning Video CD The "ImageMixer VCD2" screen appears. Read the agreement carefully. PicturePackage A B C D What you install the "PicturePackage" software (except for Windows XP). • In Windows 2000/XP, log on as ...an example. Installing the software You can do not connect the camera to start up the functions: Click one of A-D, then click the button at the lower right of the supplied software The supplied CD-ROM ...
Operating Instructions
Page 69
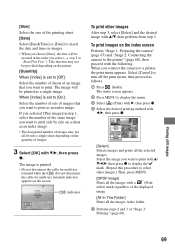
...Select [OK] with V/B, then press z. The image will be inserted in the order you select (t step 2 in "Read This First"). If you selected [This image] in the folder. 5 Perform steps 2 and 3 of "Stage 3: Printing...(Print) with B, then press z. 4 Select the desired printing method with v/V, then perform from step 1. Printing still images 69 When [Index] is set to [On]: Select the number of sets of images that you want to...is set to [Off]: Select the number of sheets of an image that you connect the camera to turn off the print menu, then proceed as an index image. • The designated ...
...Select [OK] with V/B, then press z. The image will be inserted in the order you select (t step 2 in "Read This First"). If you selected [This image] in the folder. 5 Perform steps 2 and 3 of "Stage 3: Printing...(Print) with B, then press z. 4 Select the desired printing method with v/V, then perform from step 1. Printing still images 69 When [Index] is set to [On]: Select the number of sets of images that you want to...is set to [Off]: Select the number of sheets of an image that you connect the camera to turn off the print menu, then proceed as an index image. • The designated ...
Operating Instructions
Page 71
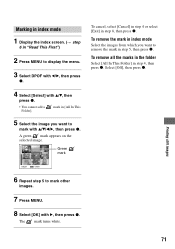
Marking in index mode 1 Display the index screen. (t step 6 in "Read This First") 2 Press MENU to display the menu. 3 Select DPOF with b/B, then press z. 4 Select [Select] with v/V/b/B, then press z. To remove the mark in index mode ... press z. • You cannot add a Folder]. mark in step 4, then press z. SELECT MENU TONEXT 6 Repeat step 5 to remove the mark in step 8, then press z. Printing still images 71 Select [Off], then press z. A green mark appears on the selected image.
Marking in index mode 1 Display the index screen. (t step 6 in "Read This First") 2 Press MENU to display the menu. 3 Select DPOF with b/B, then press z. 4 Select [Select] with v/V/b/B, then press z. To remove the mark in index mode ... press z. • You cannot add a Folder]. mark in step 4, then press z. SELECT MENU TONEXT 6 Repeat step 5 to remove the mark in step 8, then press z. Printing still images 71 Select [Off], then press z. A green mark appears on the selected image.