Read This First guide
Page 1
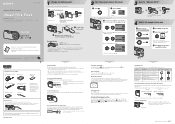
...• CD-ROM (Cyber-shot application software) (1) • Operating instructions for digital still camera "Read This First" (this manual) (1) • Operating instructions "User's Guide/ Troubleshooting" (1) Notes before use , disconnect the ...(E-Mail) Image Size • The screen above is for use your camera. © 2005 Sony Corporation Printed in until the correct battery remaining time appears. • The... if you do not leave the camera with the lens portion extended for a long period of 25°C (77°F). DSC-P200 Refer to "User's Guide/Troubleshooting"...
...• CD-ROM (Cyber-shot application software) (1) • Operating instructions for digital still camera "Read This First" (this manual) (1) • Operating instructions "User's Guide/ Troubleshooting" (1) Notes before use , disconnect the ...(E-Mail) Image Size • The screen above is for use your camera. © 2005 Sony Corporation Printed in until the correct battery remaining time appears. • The... if you do not leave the camera with the lens portion extended for a long period of 25°C (77°F). DSC-P200 Refer to "User's Guide/Troubleshooting"...
Operating Instructions
Page 1
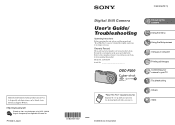
... and serial numbers are located on 100% recycled paper using VOC (Volatile Organic Compound)-free vegetable oil based ink. DSC-P200 Serial No DSC-P200 "Read This First" (separate volume) Explains the set-up and basic operations for future reference. Model No. Refer to ... the Setup screen Using your computer Printing still images Connecting your camera to your Sony dealer regarding this product. Record the serial number in Japan Digital Still Camera User's Guide/ Troubleshooting Operating Instructions Before operating the unit, please read this product and answers to these numbers...
... and serial numbers are located on 100% recycled paper using VOC (Volatile Organic Compound)-free vegetable oil based ink. DSC-P200 Serial No DSC-P200 "Read This First" (separate volume) Explains the set-up and basic operations for future reference. Model No. Refer to ... the Setup screen Using your computer Printing still images Connecting your camera to your Sony dealer regarding this product. Record the serial number in Japan Digital Still Camera User's Guide/ Troubleshooting Operating Instructions Before operating the unit, please read this product and answers to these numbers...
Operating Instructions
Page 4
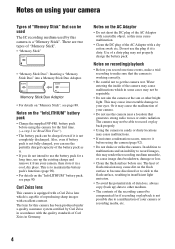
...sure that generates strong radio waves or emits radiation. Or it in a cool, dry place. The lens for the first time. (t step 1 in"Read This First") • The battery pack can be charged even if it is not possible due to maintain the battery pack's functions (page 90). &#... unusable, or cause image data breakdown, damage or loss. • Clean the flash surface before use the plug if it before using the camera for this camera has been produced under a quality assurance system certified by this may cause malfunctions. • If moisture condensation occurs, remove it is to a...
...sure that generates strong radio waves or emits radiation. Or it in a cool, dry place. The lens for the first time. (t step 1 in"Read This First") • The battery pack can be charged even if it is not possible due to maintain the battery pack's functions (page 90). &#... unusable, or cause image data breakdown, damage or loss. • Clean the flash surface before use the plug if it before using the camera for this camera has been produced under a quality assurance system certified by this may cause malfunctions. • If moisture condensation occurs, remove it is to a...
Operating Instructions
Page 6
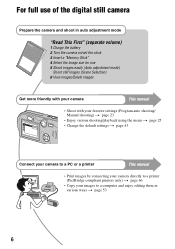
For full use of the digital still camera Prepare the camera and shoot in auto adjustment mode "Read This First" (separate volume) 1 Charge the battery 2 Turn the camera on/set the clock 3 Insert a "Memory Stick" 4 Select the image size for use 5 Shoot images easily (Auto adjustment mode) Shoot still images (Scene Selection) 6 View images/Delete images Get more...
For full use of the digital still camera Prepare the camera and shoot in auto adjustment mode "Read This First" (separate volume) 1 Charge the battery 2 Turn the camera on/set the clock 3 Insert a "Memory Stick" 4 Select the image size for use 5 Shoot images easily (Auto adjustment mode) Shoot still images (Scene Selection) 6 View images/Delete images Get more...
Operating Instructions
Page 13
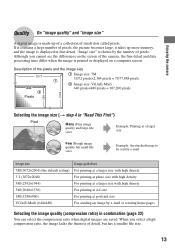
... pixels = 7,077,888 pixels 2 Image size: VGA(E-Mail) 640 pixels×480 pixels = 307,200 pixels Pixels Selecting the image size (t step 4 in "Read This First") Pixel Many (Fine image quality and large file size) Example: Printing at postcard size For sending an image by the number of the... size" is shown by e-mail or creating home pages Selecting the image quality (compression ratio) in fine detail. Enjoying the camera Quality On "image quality" and "image size" A digital image is made up more memory, and the image is printed or displayed on the screen of pixels. If it takes up...
... pixels = 7,077,888 pixels 2 Image size: VGA(E-Mail) 640 pixels×480 pixels = 307,200 pixels Pixels Selecting the image size (t step 4 in "Read This First") Pixel Many (Fine image quality and large file size) Example: Printing at postcard size For sending an image by the number of the... size" is shown by e-mail or creating home pages Selecting the image quality (compression ratio) in fine detail. Enjoying the camera Quality On "image quality" and "image size" A digital image is made up more memory, and the image is printed or displayed on the screen of pixels. If it takes up...
Operating Instructions
Page 14
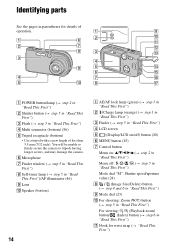
... screws, and may damage the camera. F Microphone G Finder window (t step 5 in "Read This First") H Self-timer lamp (t step 5 in "Read This First")/AF illuminator (46) I Lens J Speaker (bottom) 14 A AE/AF lock lamp (green) (t step 5 in "Read This First") B /Charge lamp (orange) (t step 1 in "Read This First") C Finder (t step 5 in "Read This First") D LCD screen E (Display...
... screws, and may damage the camera. F Microphone G Finder window (t step 5 in "Read This First") H Self-timer lamp (t step 5 in "Read This First")/AF illuminator (46) I Lens J Speaker (bottom) 14 A AE/AF lock lamp (green) (t step 5 in "Read This First") B /Charge lamp (orange) (t step 1 in "Read This First") C Finder (t step 5 in "Read This First") D LCD screen E (Display...
Operating Instructions
Page 15
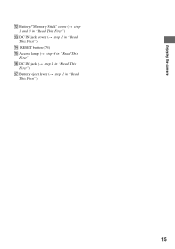
Enjoying the camera L Battery/"Memory Stick" cover (t step 1 and 3 in "Read This First") M DC IN jack cover (t step 1 in "Read This First") N RESET button (74) O Access lamp (t step 4 in "Read This First" P DC IN jack (t step 1 in "Read This First") Q Battery eject lever (t step 1 in "Read This First") 15
Enjoying the camera L Battery/"Memory Stick" cover (t step 1 and 3 in "Read This First") M DC IN jack cover (t step 1 in "Read This First") N RESET button (74) O Access lamp (t step 4 in "Read This First" P DC IN jack (t step 1 in "Read This First") Q Battery eject lever (t step 1 in "Read This First") 15
Operating Instructions
Page 16
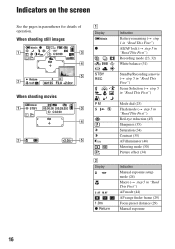
Indicators on the screen See the pages in "Read This First") AF mode (44) AF range finder frame (29) Focus preset distance (29) Manual exposure 16 When shooting still images When shooting movies 60min STBY STD 640 101 00:00:00 [00:28:25] C:32:00 + +2.0EV A Display 60min z M WB ...STBY REC M SL 5 6 ON B Display S AF M AF 1.0m z Return Indication Battery remaining (t step 1 in "Read This First") AE/AF lock (t step...
Indicators on the screen See the pages in "Read This First") AF mode (44) AF range finder frame (29) Focus preset distance (29) Manual exposure 16 When shooting still images When shooting movies 60min STBY STD 640 101 00:00:00 [00:28:25] C:32:00 + +2.0EV A Display 60min z M WB ...STBY REC M SL 5 6 ON B Display S AF M AF 1.0m z Return Indication Battery remaining (t step 1 in "Read This First") AE/AF lock (t step...

Operating Instructions
Page 17
.../Time (45) ISO number (32) D Display E + Indication Vibration warning (10) • Indicates vibration will prevent you can still shoot images. However, we recommend holding the camera steadily and turning off the indicator to avoid the effects of recordable images (21) Self-timer (t step 5 in the column on ... FINE 640 STD 640 160 FINE STD 101 00:00:00 [00:28:05] 1/30" 400 C:32:00 Indication Image size (t step 4 in "Read This First") Image quality (32) Recording folder (48) Remaining "Memory Stick" capacity (21) Recording time [maximum recordable time] (21) Multi Burst interval...
.../Time (45) ISO number (32) D Display E + Indication Vibration warning (10) • Indicates vibration will prevent you can still shoot images. However, we recommend holding the camera steadily and turning off the indicator to avoid the effects of recordable images (21) Self-timer (t step 5 in the column on ... FINE 640 STD 640 160 FINE STD 101 00:00:00 [00:28:05] 1/30" 400 C:32:00 Indication Image size (t step 4 in "Read This First") Image quality (32) Recording folder (48) Remaining "Memory Stick" capacity (21) Recording time [maximum recordable time] (21) Multi Burst interval...
Operating Instructions
Page 18
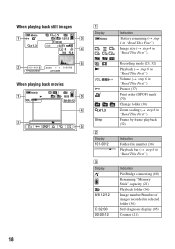
...still images 60min 1.3 M VGA 101 101 12/12 C:32:00 +2.0EV 500 F2.8 BACK/NEXT VOLUME When playing back movies A Display 60min 7M 3:2 5M 3M 1M VGA FINE 640 STD 640 160 M N - 1.3 Step Indication Battery remaining (t step 1 in "Read This First") Image size (t step 4 in "Read... This First") Recording mode (23, 32) Playback (t step 6 in "Read This First") Volume (t step 6 in "Read This First") Protect (37) Print order (DPOF) mark (70) Change folder (36)...
...still images 60min 1.3 M VGA 101 101 12/12 C:32:00 +2.0EV 500 F2.8 BACK/NEXT VOLUME When playing back movies A Display 60min 7M 3:2 5M 3M 1M VGA FINE 640 STD 640 160 M N - 1.3 Step Indication Battery remaining (t step 1 in "Read This First") Image size (t step 4 in "Read... This First") Recording mode (23, 32) Playback (t step 6 in "Read This First") Volume (t step 6 in "Read This First") Protect (37) Print order (DPOF) mark (70) Change folder (36)...
Operating Instructions
Page 19
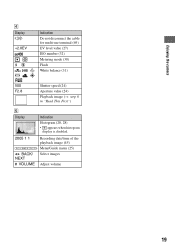
Enjoying the camera D Display +2.0EV WB Indication Do not disconnect the cable for multi-use terminal (69) EV level value (27) ISO number (32) Metering mode (30) Flash White balance (31) 500 F2.8 Shutter speed (24) Aperture value (24) Playback image (t step 6 in "Read This First") E Display 2005 1 1 DPOF BACK/ NEXT VOLUME Indication Histogram (20, 28) • appears when histogram display is disabled. Recording date/time of the playback image (45) Menu/Guide menu (25) Select images Adjust volume 19
Enjoying the camera D Display +2.0EV WB Indication Do not disconnect the cable for multi-use terminal (69) EV level value (27) ISO number (32) Metering mode (30) Flash White balance (31) 500 F2.8 Shutter speed (24) Aperture value (24) Playback image (t step 6 in "Read This First") E Display 2005 1 1 DPOF BACK/ NEXT VOLUME Indication Histogram (20, 28) • appears when histogram display is disabled. Recording date/time of the playback image (45) Menu/Guide menu (25) Select images Adjust volume 19
Operating Instructions
Page 23
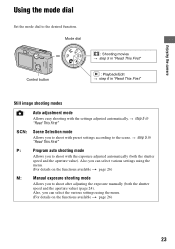
... shoot with the exposure adjusted automatically (both the shutter speed and the aperture value) (page 24). t step 5 in "Read This First" Still image shooting modes : Auto adjustment mode Allows easy shooting with preset settings according to shoot with the settings adjusted automatically. t step ...5 in "Read This First" P: Program auto shooting mode Allows you to the scene. Enjoying the camera Using the mode dial ...
... shoot with the exposure adjusted automatically (both the shutter speed and the aperture value) (page 24). t step 5 in "Read This First" Still image shooting modes : Auto adjustment mode Allows easy shooting with preset settings according to shoot with the settings adjusted automatically. t step ...5 in "Read This First" P: Program auto shooting mode Allows you to the scene. Enjoying the camera Using the mode dial ...
Operating Instructions
Page 27
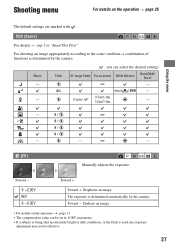
... an image. • For details on the operation t page 25 Using the menu The default settings are marked with . The exposure is determined by the camera. SL Auto/ / WB - Toward - Shooting menu For details on the exposure t page 11 • The compensation value can select the desired setting) ..., or the flash is used, the exposure adjustment may not be set in 1/3EV increments. • If a subject is being shot in "Read This First" For shooting an image appropriately according to the scene condition, a combination of functions is determined automatically by the...
... an image. • For details on the operation t page 25 Using the menu The default settings are marked with . The exposure is determined by the camera. SL Auto/ / WB - Toward - Shooting menu For details on the exposure t page 11 • The compensation value can select the desired setting) ..., or the flash is used, the exposure adjustment may not be set in 1/3EV increments. • If a subject is being shot in "Read This First" For shooting an image appropriately according to the scene condition, a combination of functions is determined automatically by the...
Operating Instructions
Page 34
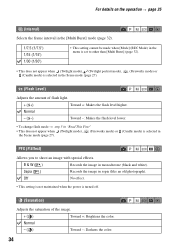
...) Allows you to other than [Multi Burst] (page 32). • This does not appear when (Twilight mode), (Twilight portrait mode), (Candle mode) is selected in "Read This First" • This does not appear when (Twilight mode), (Fireworks mode) or (Candle mode) is turned off. (Saturation) Adjusts the saturation of flash light...
...) Allows you to other than [Multi Burst] (page 32). • This does not appear when (Twilight mode), (Twilight portrait mode), (Candle mode) is selected in "Read This First" • This does not appear when (Twilight mode), (Fireworks mode) or (Candle mode) is turned off. (Saturation) Adjusts the saturation of flash light...
Operating Instructions
Page 39
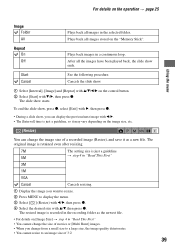
The original image is retained even after resizing. 7M The setting size is just a guideline. 5M t step 4 in "Read This First" 3M 1M VGA Cancel Cancels resizing. 1 Display the image you want to resize. 2 Press MENU to an image size of 3:2. 39 The resized... • You cannot resize to display the menu. 3 Select [ ] (Resize) with b/B, then press z. 4 Select the desired size with b/B. • The [Interval] time is recorded in "Read This First" • You cannot change the image size of movies or [Multi Burst] images. • When you can change the size of a recorded image...
The original image is retained even after resizing. 7M The setting size is just a guideline. 5M t step 4 in "Read This First" 3M 1M VGA Cancel Cancels resizing. 1 Display the image you want to resize. 2 Press MENU to an image size of 3:2. 39 The resized... • You cannot resize to display the menu. 3 Select [ ] (Resize) with b/B, then press z. 4 Select the desired size with b/B. • The [Interval] time is recorded in "Read This First" • You cannot change the image size of movies or [Multi Burst] images. • When you can change the size of a recorded image...
Operating Instructions
Page 45
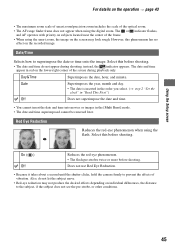
...• The date is inserted in the order you select. (t step 2 "Set the clock" in "Read This First") Off Does not superimpose the date and time. • You cannot insert the date and time... corner of the optical zoom. • The AF range finder frame does not appear when using the digital zoom. Date/Time Selects how to prevent the effects of the frame. • When using the flash...use Red Eye Reduction. • Because it takes about a second until the shutter clicks, hold the camera firmly to superimpose the date or time onto the image. The or indicator flashes, and AF operates ...
...• The date is inserted in the order you select. (t step 2 "Set the clock" in "Read This First") Off Does not superimpose the date and time. • You cannot insert the date and time... corner of the optical zoom. • The AF range finder frame does not appear when using the digital zoom. Date/Time Selects how to prevent the effects of the frame. • When using the flash...use Red Eye Reduction. • Because it takes about a second until the shutter clicks, hold the camera firmly to superimpose the date or time onto the image. The or indicator flashes, and AF operates ...

Operating Instructions
Page 52
Cancels setting the clock. 52 Clock Set Sets the date and time. Then, perform the procedure explained in "Setting the clock" (t step 2 in "Read This First"). OK Cancel For details on the operation t page 43 Select [OK] with v on the control button, and press z.
Cancels setting the clock. 52 Clock Set Sets the date and time. Then, perform the procedure explained in "Setting the clock" (t step 2 in "Read This First"). OK Cancel For details on the operation t page 43 Select [OK] with v on the control button, and press z.
Operating Instructions
Page 62
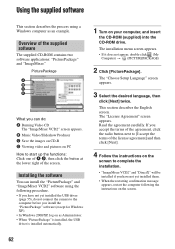
... USB driver is installed automatically. 1 Turn on the screen. 62 This section describes the English screen. Installing the software You can do not connect the camera to start up the functions: Click one of A-D, then click the button at the lower right of the supplied software The supplied CD-ROM contains...
... USB driver is installed automatically. 1 Turn on the screen. 62 This section describes the English screen. Installing the software You can do not connect the camera to start up the functions: Click one of A-D, then click the button at the lower right of the supplied software The supplied CD-ROM contains...
Operating Instructions
Page 69
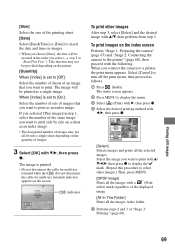
... 3 Select [OK] with v/V, then perform from step 1. This function may not all the images in "Read This First"). The image will be inserted in the order you select (t step 2 in the folder. ...the (Do not disconnect the cable for multi-use terminal) indicator appears on the screen. Printing still images 69 Printing 2/3 Exit indicator To print other images.) Then, press MENU. [DPOF image...] Prints all fit onto a single sheet depending on the quantity of images that you connect the camera to the printer" (page 68), then proceed with b/B, then press z. Select [Cancel] to ...
... 3 Select [OK] with v/V, then perform from step 1. This function may not all the images in "Read This First"). The image will be inserted in the order you select (t step 2 in the folder. ...the (Do not disconnect the cable for multi-use terminal) indicator appears on the screen. Printing still images 69 Printing 2/3 Exit indicator To print other images.) Then, press MENU. [DPOF image...] Prints all fit onto a single sheet depending on the quantity of images that you connect the camera to the printer" (page 68), then proceed with b/B, then press z. Select [Cancel] to ...
Operating Instructions
Page 71
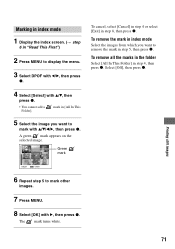
... This Folder] in step 8, then press z. Marking in index mode 1 Display the index screen. (t step 6 in "Read This First") 2 Press MENU to remove the mark in step 5, then press z. Select [Off], then press z. Printing still images 71 Green mark To cancel, select [Cancel] in step 4 or select [Exit] in step 4, then press...
... This Folder] in step 8, then press z. Marking in index mode 1 Display the index screen. (t step 6 in "Read This First") 2 Press MENU to remove the mark in step 5, then press z. Select [Off], then press z. Printing still images 71 Green mark To cancel, select [Cancel] in step 4 or select [Exit] in step 4, then press...