Read This First guide
Page 1
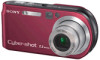
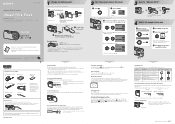
...Do not use your camera. © 2005 Sony Corporation Printed in ...camera is for a long period of recordable images and time can be found at postcard size Sending e-mail/creating home pages No. Access lamp continued on the LCD screen. DSC-P200...160]. 4 Press (Image Size) to it. Digital Still Camera 2-582-853-11 (1) Operating Instructions Before operating the...software) (1) • Operating instructions for future reference. Attach the strap to frequently asked questions can differ according to do if you do not leave the camera with the lens portion extended for still...
...Do not use your camera. © 2005 Sony Corporation Printed in ...camera is for a long period of recordable images and time can be found at postcard size Sending e-mail/creating home pages No. Access lamp continued on the LCD screen. DSC-P200...160]. 4 Press (Image Size) to it. Digital Still Camera 2-582-853-11 (1) Operating Instructions Before operating the...software) (1) • Operating instructions for future reference. Attach the strap to frequently asked questions can differ according to do if you do not leave the camera with the lens portion extended for still...
Operating Instructions
Page 9
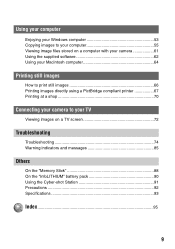
...Copying images to your computer 55 Viewing image files stored on a computer with your camera 61 Using the supplied software 62 Using your Macintosh computer 64 Printing still images How to print still images 66 Printing images directly using a PictBridge compliant printer 67 Printing at a ...shop 70 Connecting your camera to your TV Viewing images on a TV screen 72 Troubleshooting ...
...Copying images to your computer 55 Viewing image files stored on a computer with your camera 61 Using the supplied software 62 Using your Macintosh computer 64 Printing still images How to print still images 66 Printing images directly using a PictBridge compliant printer 67 Printing at a ...shop 70 Connecting your camera to your TV Viewing images on a TV screen 72 Troubleshooting ...

Operating Instructions
Page 40
... function to use when the "Memory Stick" capacity is skipped. Cancels rotation. 1 Display the image to be reflected depending on the software. (Divide) Cuts movies, or deletes unnecessary portions of movies. Cancel Cancels division. 40 Also note that number is insufficient, or when...messages. • Note that the original movie is deleted and that you cannot restore files once you attach movies to rotate images shot with other cameras. • When viewing images on a computer, the image rotation information may not be rotated. 2 Press MENU to display the menu. 3 ...
... function to use when the "Memory Stick" capacity is skipped. Cancels rotation. 1 Display the image to be reflected depending on the software. (Divide) Cuts movies, or deletes unnecessary portions of movies. Cancel Cancels division. 40 Also note that number is insufficient, or when...messages. • Note that the original movie is deleted and that you cannot restore files once you attach movies to rotate images shot with other cameras. • When viewing images on a computer, the image rotation information may not be rotated. 2 Press MENU to display the menu. 3 ...
Operating Instructions
Page 54
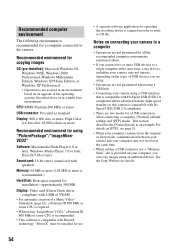
...a Pentium III 800 MHz or faster CPU is recommended. • This software is compatible with HiSpeed USB (USB 2.0 compliant). • There are not guaranteed when using a USB hub. • Connecting your camera using a USB interface that is compatible with Hi-Speed USB (USB 2.0... transfer (high speed transfer) as this camera is compatible with DirectX technology. See the Sony Website for a USB connection when connecting a computer, [Normal] (default setting) and [PTP] modes. "DirectX" must be installed for use. • A separate software application for operating the recording device is...
...a Pentium III 800 MHz or faster CPU is recommended. • This software is compatible with HiSpeed USB (USB 2.0 compliant). • There are not guaranteed when using a USB hub. • Connecting your camera using a USB interface that is compatible with Hi-Speed USB (USB 2.0... transfer (high speed transfer) as this camera is compatible with DirectX technology. See the Sony Website for a USB connection when connecting a computer, [Normal] (default setting) and [PTP] modes. "DirectX" must be installed for use. • A separate software application for operating the recording device is...
Operating Instructions
Page 55
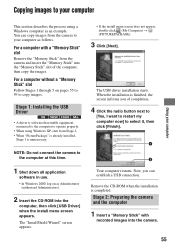
... "Memory Stick" slot Follow Stages 1 through 5 on as Administrator (authorized Administrators). 2 Insert the CD-ROM into the camera. 55 Stage 1: Installing the USB Driver • A driver is software that enable equipment connected to the computer to operate properly. • When using a Windows computer as an example. NOTE...: Do not connect the camera to the computer at this time. 1 Shut down all application software in use. • In Windows 2000, log on pages 55 to 59 to select it, then click [...
... "Memory Stick" slot Follow Stages 1 through 5 on as Administrator (authorized Administrators). 2 Insert the CD-ROM into the camera. 55 Stage 1: Installing the USB Driver • A driver is software that enable equipment connected to the computer to operate properly. • When using a Windows computer as an example. NOTE...: Do not connect the camera to the computer at this time. 1 Shut down all application software in use. • In Windows 2000, log on pages 55 to 59 to select it, then click [...
Operating Instructions
Page 62
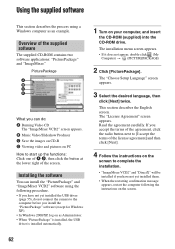
Overview of the screen. Installing the software You can do not connect the camera to the computer before you can install the "PicturePackage" and "ImageMixer VCD2" software using a Windows computer as Administrator. • When "PicturePackage" is installed, the USB driver is installed automatically. 1 Turn... to start up the functions: Click one of A-D, then click the button at the lower right of the supplied software The supplied CD-ROM contains two software applications: "PicturePackage" and "ImageMixer." B Music Video/Slideshow Producer C Save the images on CD-R D Viewing video...
Overview of the screen. Installing the software You can do not connect the camera to the computer before you can install the "PicturePackage" and "ImageMixer VCD2" software using a Windows computer as Administrator. • When "PicturePackage" is installed, the USB driver is installed automatically. 1 Turn... to start up the functions: Click one of A-D, then click the button at the lower right of the supplied software The supplied CD-ROM contains two software applications: "PicturePackage" and "ImageMixer." B Music Video/Slideshow Producer C Save the images on CD-R D Viewing video...

Operating Instructions
Page 63
To start up the software • Double-click the "PicturePackage Menu" icon on -line help. For information on the use of the software Click [?] at the upper-right corner of "PicturePackage Menu" and "PicturePackage destination Folder" are displayed after the installation. For more information, refer to show the on the desktop. Technical support for "PicturePackage"/"ImageMixer VCD2" is provided by the Pixela User Support Center. Using your computer 5 Remove the CD-ROM as the shortcut icons of each screen to the information included on the CD-ROM. 63
To start up the software • Double-click the "PicturePackage Menu" icon on -line help. For information on the use of the software Click [?] at the upper-right corner of "PicturePackage Menu" and "PicturePackage destination Folder" are displayed after the installation. For more information, refer to show the on the desktop. Technical support for "PicturePackage"/"ImageMixer VCD2" is provided by the Pixela User Support Center. Using your computer 5 Remove the CD-ROM as the shortcut icons of each screen to the information included on the CD-ROM. 63
Operating Instructions
Page 65
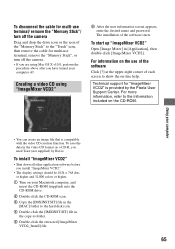
... help. To save the data in [Application], then double-click [ImageMixer VCD2]. To install "ImageMixer VCD2" • Shut down all other application software before you install "ImageMixer VCD2." • The display settings should be 1024 × 768 dots or higher and 32,000 colors or higher. ... [ImageMixer VCD2_Install] file. 65 To start up "ImageMixer VCD2" Open [Image Mixer] in the video CD format on your computer off the camera. • If you are using "ImageMixer VCD2" 6 After the user information screen appears, enter the desired name and password. Technical support ...
... help. To save the data in [Application], then double-click [ImageMixer VCD2]. To install "ImageMixer VCD2" • Shut down all other application software before you install "ImageMixer VCD2." • The display settings should be 1024 × 768 dots or higher and 32,000 colors or higher. ... [ImageMixer VCD2_Install] file. 65 To start up "ImageMixer VCD2" Open [Image Mixer] in the video CD format on your computer off the camera. • If you are using "ImageMixer VCD2" 6 After the user information screen appears, enter the desired name and password. Technical support ...

Operating Instructions
Page 66
..." containing images shot with the printer. For details, see the operating instructions supplied with your camera to a photo printing service shop. Printing directly using the supplied "PicturePackage" software and print the images. Printing at a shop (page 70) You can print images with... a "Memory Stick" compliant printer. Printing still images How to print still images Printing directly using a PictBridge compliant printer (page ...
..." containing images shot with the printer. For details, see the operating instructions supplied with your camera to a photo printing service shop. Printing directly using the supplied "PicturePackage" software and print the images. Printing at a shop (page 70) You can print images with... a "Memory Stick" compliant printer. Printing still images How to print still images Printing directly using a PictBridge compliant printer (page ...
Operating Instructions
Page 81
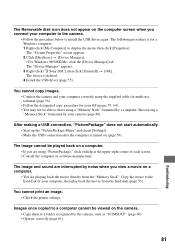
... [ Sony DSC], then click [Uninstall] t [OK]. You cannot copy images. • Connect the camera and your computer correctly using the supplied cable for multi-use terminal (page 56). • Follow the designated copy procedure for a Windows computer. 1 Right-click [My Computer] to the hard disk of each screen. • Consult the computer or software...
... [ Sony DSC], then click [Uninstall] t [OK]. You cannot copy images. • Connect the camera and your computer correctly using the supplied cable for multi-use terminal (page 56). • Follow the designated copy procedure for a Windows computer. 1 Right-click [My Computer] to the hard disk of each screen. • Consult the computer or software...

Operating Instructions
Page 95
... Compression ratio 13 Computer Copying still images ..... 55 Macintosh 64 Recommended environment 54, 64 Software 62 Viewing image stored on a computer with your camera 61 Windows 53 Connecting Computer 56 Printer 68 TV 72 Contrast 35 Copying still images to your computer 55 ...Create REC. Folder 48 Cyber-shot Station 91 D Date 45 Date&Time 45 Date/Time 45 Daylight 31 DC IN jack t step 1 in "Read This First" Delete t step 6 in "Read This First" Digital...
... Compression ratio 13 Computer Copying still images ..... 55 Macintosh 64 Recommended environment 54, 64 Software 62 Viewing image stored on a computer with your camera 61 Windows 53 Connecting Computer 56 Printer 68 TV 72 Contrast 35 Copying still images to your computer 55 ...Create REC. Folder 48 Cyber-shot Station 91 D Date 45 Date&Time 45 Date/Time 45 Daylight 31 DC IN jack t step 1 in "Read This First" Delete t step 6 in "Read This First" Digital...
Operating Instructions
Page 97
...the clock t step 2 in "Read This First" Setup 35, 42, 43 Camera 1 44 Camera 2 47 Memory Stick Tool........48 Setup 1 50 Setup 2 51 Sharpness 35 Shooting Movie t step 5 in "Read This First" Still image t step 5 in "Read This First" Shooting menu 27 Shooting movies ...Software 62 Specifications 93 Spot AF 29 Spot metering 30 Spot metering cross hairs ..... 30 Standard 32 T Tripod receptacle 14 Troubleshooting 74 TV 72 Twilight mode t step 5 in "Read This First" Twilight portrait mode t step 5 in "Read This First" U Underexposure 11 USB Connect 51 USB Driver 55 Using your camera...
...the clock t step 2 in "Read This First" Setup 35, 42, 43 Camera 1 44 Camera 2 47 Memory Stick Tool........48 Setup 1 50 Setup 2 51 Sharpness 35 Shooting Movie t step 5 in "Read This First" Still image t step 5 in "Read This First" Shooting menu 27 Shooting movies ...Software 62 Specifications 93 Spot AF 29 Spot metering 30 Spot metering cross hairs ..... 30 Standard 32 T Tripod receptacle 14 Troubleshooting 74 TV 72 Twilight mode t step 5 in "Read This First" Twilight portrait mode t step 5 in "Read This First" U Underexposure 11 USB Connect 51 USB Driver 55 Using your camera...


