
Operating Instructions
Page 2
...and sound quality. You will soon be of sufficient magnitude to discontinue midway (fail), restart the application or disconnect and connect the USB cable again. For more information regarding recycling of electric shock to the presence of the FCC Rules. WARNING To prevent fire or shock... "dangerous voltage" within the product's enclosure that may be producing home video that may not cause harmful interference, and (2) this Sony Handycam. Congratulations on your purchase of this device must accept any interference received, including interference that you can enjoy for years to ...
...and sound quality. You will soon be of sufficient magnitude to discontinue midway (fail), restart the application or disconnect and connect the USB cable again. For more information regarding recycling of electric shock to the presence of the FCC Rules. WARNING To prevent fire or shock... "dangerous voltage" within the product's enclosure that may be producing home video that may not cause harmful interference, and (2) this Sony Handycam. Congratulations on your purchase of this device must accept any interference received, including interference that you can enjoy for years to ...
Operating Instructions
Page 4
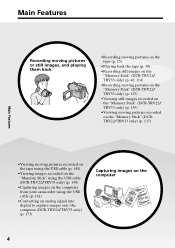
...) Main Features •Viewing moving pictures recorded on the tape using the USB cable (p. 148) •Viewing images recorded on the "Memory Stick" using the USB cable (DCR-TRV22/TRV33 only) (p. 149) •Capturing images on the computer from your camcorder using the USB cable (p. 161) •Converting an analog signal into digital to capture images onto...
...) Main Features •Viewing moving pictures recorded on the tape using the USB cable (p. 148) •Viewing images recorded on the "Memory Stick" using the USB cable (DCR-TRV22/TRV33 only) (p. 149) •Capturing images on the computer from your camcorder using the USB cable (p. 161) •Converting an analog signal into digital to capture images onto...

Operating Instructions
Page 7
... .......... 204 Maintenance information and precautions 205 Specifications 211 Quick Reference Identifying parts and controls 213 Index 219 Viewing images with your camcorder to a computer using the USB cable (For Macintosh users) (DCR-TRV22/TRV33 only) ......... 170 Viewing images recorded on "Memory Stick" on a computer (For Macintosh users) ...Image protection 142 Deleting images - Memory Photo playback .......... 135 Viewing a moving picture - Table of trouble and how to a computer using the USB cable (For Windows users 151 7 Slide show 141 Preventing accidental erasure -
... .......... 204 Maintenance information and precautions 205 Specifications 211 Quick Reference Identifying parts and controls 213 Index 219 Viewing images with your camcorder to a computer using the USB cable (For Macintosh users) (DCR-TRV22/TRV33 only) ......... 170 Viewing images recorded on "Memory Stick" on a computer (For Macintosh users) ...Image protection 142 Deleting images - Memory Photo playback .......... 135 Viewing a moving picture - Table of trouble and how to a computer using the USB cable (For Windows users 151 7 Slide show 141 Preventing accidental erasure -

Operating Instructions
Page 13
... recording of such materials may result in a malfunction of the jack. Getting Started Using this manual Note on Cassette Memory Your camcorder is based on the country or region. Note on connecting other equipment When you connect your recordings on a TV, you need... (Cassette Memory) mark. Copyright precautions Television programs, films, video tapes, and other video equipment or a computer using the USB cable or i.LINK cable, observe the shape of your camcorder. We recommend that you forcibly insert the plug, the jack may be damaged and they may be copyrighted.
... recording of such materials may result in a malfunction of the jack. Getting Started Using this manual Note on Cassette Memory Your camcorder is based on the country or region. Note on connecting other equipment When you connect your recordings on a TV, you need... (Cassette Memory) mark. Copyright precautions Television programs, films, video tapes, and other video equipment or a computer using the USB cable or i.LINK cable, observe the shape of your camcorder. We recommend that you forcibly insert the plug, the jack may be damaged and they may be copyrighted.
Operating Instructions
Page 15
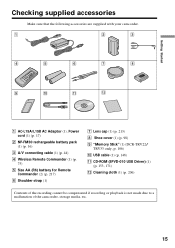
... cover (1) (p. 98) 9 "Memory Stick" (1) (DCR-TRV22/ TRV33 only, p. 106) 0 USB cable (1) (p. 148) qa CD-ROM (SPVD-010 USB Driver) (1) (p. 153, 171) qs Cleaning cloth (1) (p. 206) Contents of the recording cannot be compensated if recording or playback is not made due to a malfunction of the camcorder, storage media, etc. 15 Getting Started Checking supplied accessories...
... cover (1) (p. 98) 9 "Memory Stick" (1) (DCR-TRV22/ TRV33 only, p. 106) 0 USB cable (1) (p. 148) qa CD-ROM (SPVD-010 USB Driver) (1) (p. 153, 171) qs Cleaning cloth (1) (p. 206) Contents of the recording cannot be compensated if recording or playback is not made due to a malfunction of the camcorder, storage media, etc. 15 Getting Started Checking supplied accessories...

Operating Instructions
Page 148
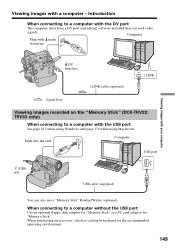
... then insert it into the end. Viewing images with the USB port See page 151 for details. If you connect your camcorder "Memory Stick" image (DCRTRV22/TRV33 only) Camcorder connection jack USB jack DV Interface USB jack Connection cable USB cable (supplied) Computer environment requirements USB port, editing software Reference pages For For Windows Macintosh Users Users 151 - 160...
... then insert it into the end. Viewing images with the USB port See page 151 for details. If you connect your camcorder "Memory Stick" image (DCRTRV22/TRV33 only) Camcorder connection jack USB jack DV Interface USB jack Connection cable USB cable (supplied) Computer environment requirements USB port, editing software Reference pages For For Windows Macintosh Users Users 151 - 160...
Operating Instructions
Page 149
... card adaptor for the recommended operating environment. 149 When purchasing an accessory, check its catalog beforehand for "Memory Stick." Push into the end. Computer USB port (USB) jack USB cable (supplied) You can read video signals. When connecting to a computer with mark facing up. Viewing images with the DV port The computer must have...
... card adaptor for the recommended operating environment. 149 When purchasing an accessory, check its catalog beforehand for "Memory Stick." Push into the end. Computer USB port (USB) jack USB cable (supplied) You can read video signals. When connecting to a computer with mark facing up. Viewing images with the DV port The computer must have...

Operating Instructions
Page 150
... be assured if a "Memory Stick" formatted on your computer is used on your camcorder, or if the "Memory Stick" in your camcorder was formatted from your computer when the USB cable was connected. •Do not compress the data on your camcorder. Software •Depending on your application software, the file size may increase when...
... be assured if a "Memory Stick" formatted on your computer is used on your camcorder, or if the "Memory Stick" in your camcorder was formatted from your computer when the USB cable was connected. •Do not compress the data on your camcorder. Software •Depending on your application software, the file size may increase when...
Operating Instructions
Page 151
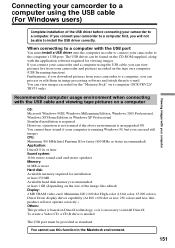
... hard disk memory recommended: at least 1 GB (depending on the size of the USB driver before connecting your camcorder to install DirectX. When connecting to a computer with the USB cable and viewing tape pictures on DirectX technology, so it is running Windows 98, but you...recorded on the "Memory Stick" on a computer (USB Streaming function). Recommended computer usage environment when connecting with the USB port You must be able to the computer's USB port. If you connect your camcorder and a computer using the USB cable (For Windows users) Complete installation of the image ...
... hard disk memory recommended: at least 1 GB (depending on the size of the USB driver before connecting your camcorder to install DirectX. When connecting to a computer with the USB cable and viewing tape pictures on DirectX technology, so it is running Windows 98, but you...recorded on the "Memory Stick" on a computer (USB Streaming function). Recommended computer usage environment when connecting with the USB port You must be able to the computer's USB port. If you connect your camcorder and a computer using the USB cable (For Windows users) Complete installation of the image ...
Operating Instructions
Page 152
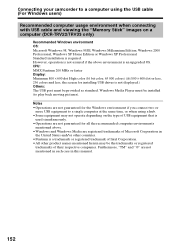
... same time, or when using the USB cable (For Windows users) Recommended computer usage environment when connecting with USB cable and viewing the "Memory Stick" images on the type of USB equipment that is used simultaneously. •Operations are not guaranteed for installing USB driver is an upgraded OS. Connecting your camcorder to a computer using a hub. •...
... same time, or when using the USB cable (For Windows users) Recommended computer usage environment when connecting with USB cable and viewing the "Memory Stick" images on the type of USB equipment that is used simultaneously. •Operations are not guaranteed for installing USB driver is an upgraded OS. Connecting your camcorder to a computer using a hub. •...

Operating Instructions
Page 153
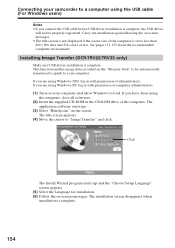
...Remove the CD-ROM, then restart the computer and follow the on the screen. The application software starts up. Connect the USB cable according to "Making the computer recognize your camcorder to a computer using the computer, close all softwares. (2) Insert the supplied CD-ROM in the CD-ROM drive of ...computer administrators. (1) Turn on a computer and allow Windows to "USB Driver" and click. Viewing images with your computer Connecting your camcorder" on page 156. Click The title screen appears. (4) Move the cursor to load.
...Remove the CD-ROM, then restart the computer and follow the on the screen. The application software starts up. Connect the USB cable according to "Making the computer recognize your camcorder to a computer using the computer, close all softwares. (2) Insert the supplied CD-ROM in the CD-ROM drive of ...computer administrators. (1) Turn on a computer and allow Windows to "USB Driver" and click. Viewing images with your computer Connecting your camcorder" on page 156. Click The title screen appears. (4) Move the cursor to load.
Operating Instructions
Page 154
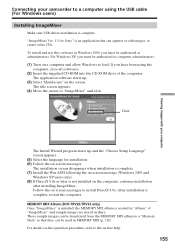
... title screen appears. (4) Move the cursor to less than 800 × 600 dots and 256 colors or less. If you connect the USB cable before USB driver installation is set to "Image Transfer" and click. Click The Install Wizard program starts up . (3) Select "Handycam" on -screen... USB cable (For Windows users) Notes •If you are using Windows 2000, log in the CD-ROM drive of administrators. Installing Image Transfer (DCR-TRV22/TRV33 only) Make sure USB driver installation is complete. 154 The installation screen disappears when installation is complete. Connecting your camcorder to...
... title screen appears. (4) Move the cursor to less than 800 × 600 dots and 256 colors or less. If you connect the USB cable before USB driver installation is set to "Image Transfer" and click. Click The Install Wizard program starts up . (3) Select "Handycam" on -screen... USB cable (For Windows users) Notes •If you are using Windows 2000, log in the CD-ROM drive of administrators. Installing Image Transfer (DCR-TRV22/TRV33 only) Make sure USB driver installation is complete. 154 The installation screen disappears when installation is complete. Connecting your camcorder to...
Operating Instructions
Page 155
... screen appears. (4) Move the cursor to install DirectX 8.0a. After installation is complete. Viewing images with your computer Connecting your camcorder to a computer using the computer, close all softwares. (2) Insert the supplied CD-ROM into the CD-ROM drive of "ImageMixer...Setup Language" screen appears. (5) Select the language for Sony" is created in MEMORY MIX (p. 120). To install and use this software in Windows 2000, you have been using the USB cable (For Windows users) Installing ImageMixer Make sure USB driver installation is complete, restart the computer. Follow the ...
... screen appears. (4) Move the cursor to install DirectX 8.0a. After installation is complete. Viewing images with your computer Connecting your camcorder to a computer using the computer, close all softwares. (2) Insert the supplied CD-ROM into the CD-ROM drive of "ImageMixer...Setup Language" screen appears. (5) Select the language for Sony" is created in MEMORY MIX (p. 120). To install and use this software in Windows 2000, you have been using the USB cable (For Windows users) Installing ImageMixer Make sure USB driver installation is complete, restart the computer. Follow the ...

Operating Instructions
Page 156
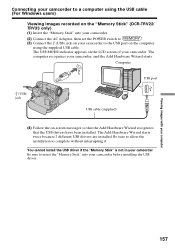
... XP). 156 If you are using Windows XP, log in with permission of computer administrators. Computer USB port (USB) jack USB cable (supplied) (8) Follow the on the computer using the supplied USB cable. The computer recognizes your camcorder to the USB port on -screen messages so that the Add Hardware Wizard recognizes that happens, reinstall the original application...
... XP). 156 If you are using Windows XP, log in with permission of computer administrators. Computer USB port (USB) jack USB cable (supplied) (8) Follow the on the computer using the supplied USB cable. The computer recognizes your camcorder to the USB port on -screen messages so that the Add Hardware Wizard recognizes that happens, reinstall the original application...
Operating Instructions
Page 157
... Wizard starts twice because 2 different USB drivers are installed. Computer USB port (USB) jack USB cable (supplied) (4) Follow the on the LCD screen of your camcorder to complete without interrupting it. Connecting your camcorder to a computer using the supplied USB cable. Be sure to allow the installation to the USB port on the computer using the USB cable (For Windows users) Viewing images...
... Wizard starts twice because 2 different USB drivers are installed. Computer USB port (USB) jack USB cable (supplied) (4) Follow the on the LCD screen of your camcorder to complete without interrupting it. Connecting your camcorder to a computer using the supplied USB cable. Be sure to allow the installation to the USB port on the computer using the USB cable (For Windows users) Viewing images...
Operating Instructions
Page 158
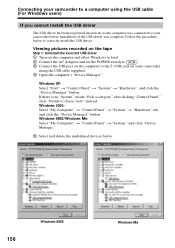
... the tape Step 1: Uninstall the incorrect USB driver 1 Turn on the computer and allow Windows to load. 2 Connect the AC Adaptor and set the POWER switch to . 3 Connect the USB port on the computer to the (USB) jack on your camcorder using the USB cable (For Windows users) If you cannot ...install the USB driver The USB driver has been registered incorrectly as the computer was connected to your...
... the tape Step 1: Uninstall the incorrect USB driver 1 Turn on the computer and allow Windows to load. 2 Connect the AC Adaptor and set the POWER switch to . 3 Connect the USB port on the computer to the (USB) jack on your camcorder using the USB cable (For Windows users) If you cannot ...install the USB driver The USB driver has been registered incorrectly as the computer was connected to your...
Operating Instructions
Page 159
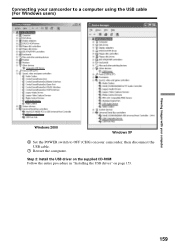
Step 2: Install the USB driver on the supplied CD-ROM Follow the entire procedure in "Installing the USB driver" on your camcorder, then disconnect the USB cable. 7 Restart the computer. Connecting your camcorder to a computer using the USB cable (For Windows users) Viewing images with your computer Windows 2000 Windows XP 6 Set the POWER switch to OFF (CHG) on page 153. 159
Step 2: Install the USB driver on the supplied CD-ROM Follow the entire procedure in "Installing the USB driver" on your camcorder, then disconnect the USB cable. 7 Restart the computer. Connecting your camcorder to a computer using the USB cable (For Windows users) Viewing images with your computer Windows 2000 Windows XP 6 Set the POWER switch to OFF (CHG) on page 153. 159
Operating Instructions
Page 160
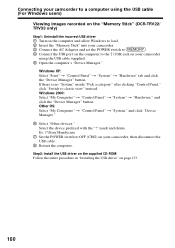
..."Pick a category" after clicking "Control Panel," click "Switch to the (USB) jack on your camcorder using the USB cable (For Windows users) Viewing images recorded on the "Memory Stick" (DCR-TRV22/ TRV33 only) Step1: Uninstall the incorrect USB driver 1 Turn on the computer and allow Windows to load. 2 Insert the... "Memory Stick" into your camcorder. 3 Connect the AC Adaptor and set the POWER switch to . 4 Connect the USB port on the computer to classic view" instead. mark and delete. Ex: (?)Sony Handycam 7 Set the POWER switch to OFF (CHG) on page...
..."Pick a category" after clicking "Control Panel," click "Switch to the (USB) jack on your camcorder using the USB cable (For Windows users) Viewing images recorded on the "Memory Stick" (DCR-TRV22/ TRV33 only) Step1: Uninstall the incorrect USB driver 1 Turn on the computer and allow Windows to load. 2 Insert the... "Memory Stick" into your camcorder. 3 Connect the AC Adaptor and set the POWER switch to . 4 Connect the USB port on the computer to classic view" instead. mark and delete. Ex: (?)Sony Handycam 7 Set the POWER switch to OFF (CHG) on page...

Operating Instructions
Page 162
.... You can control video operations with the buttons on the computer. The picture from your camcorder appears on the monitor window on the computer using the supplied USB cable. Computer USB port (USB) jack USB cable (supplied) (12) Click to the USB port on the computer. 162 Monitor window Video control buttons Viewing pictures live from the tape...
.... You can control video operations with the buttons on the computer. The picture from your camcorder appears on the monitor window on the computer using the supplied USB cable. Computer USB port (USB) jack USB cable (supplied) (12) Click to the USB port on the computer. 162 Monitor window Video control buttons Viewing pictures live from the tape...

Operating Instructions
Page 164
...etc. - If image data cannot be transferred by shifting the upper right slider on the bottom of the screen. Disconnect the USB cable. - The captured images appear in the menu settings when your camcorder is during standby, and no cassette is inserted. •Indicators on images that of your...the thumbnail list window. Some images are not displayed correctly due to that are not displayed correctly. •When your camcorder is captured. If any "Memory Stick" operations during standby with the cracking noise. - Notes •When the USB cable is not a malfunction. -
...etc. - If image data cannot be transferred by shifting the upper right slider on the bottom of the screen. Disconnect the USB cable. - The captured images appear in the menu settings when your camcorder is during standby, and no cassette is inserted. •Indicators on images that of your...the thumbnail list window. Some images are not displayed correctly due to that are not displayed correctly. •When your camcorder is captured. If any "Memory Stick" operations during standby with the cracking noise. - Notes •When the USB cable is not a malfunction. -


