Operating Instructions
Page 5
...;Manual focus (p. 66) •Spot Focus (p. 67) Functions for illustration purposes. SPORTS - The DCR-TRV33 is the model used for using after recording •End search/Edit search/Rec Review (p. 37) •Data code (p. 40) •Tape PB ZOOM* (p. 74)/Memory PB ZOOM* (p. 140) •Zero set memory (p. 75) •Title search (p. 76) •Digital program editing (p. 84, 130*) * DCR-TRV22/TRV33 only Before you start reading this manual and operating your camcorder, check the model number...
...;Manual focus (p. 66) •Spot Focus (p. 67) Functions for illustration purposes. SPORTS - The DCR-TRV33 is the model used for using after recording •End search/Edit search/Rec Review (p. 37) •Data code (p. 40) •Tape PB ZOOM* (p. 74)/Memory PB ZOOM* (p. 140) •Zero set memory (p. 75) •Title search (p. 76) •Digital program editing (p. 84, 130*) * DCR-TRV22/TRV33 only Before you start reading this manual and operating your camcorder, check the model number...

Operating Instructions
Page 6
... Focusing manually 66 Using spot focus function - Tape PB ZOOM (DCR-TRV22/ TRV33 only 74 Quickly locating a scene - Digital effect (DCR-TRV22/TRV33 only 59 Using PROGRAM AE 62 Adjusting the exposure manually ...... 64 Using spot light-metering function - Date search 77 Searching for a photo - End search/Edit search/Rec Review 37 Playback - Basics Playing back tape 39 To display the screen indicators - Frame recording 69 Using the viewfinder 70 Advanced Playback Operations Playing back tape with picture effect . 72 Playing back tape with digital effect (DCR...
... Focusing manually 66 Using spot focus function - Tape PB ZOOM (DCR-TRV22/ TRV33 only 74 Quickly locating a scene - Digital effect (DCR-TRV22/TRV33 only 59 Using PROGRAM AE 62 Adjusting the exposure manually ...... 64 Using spot light-metering function - Date search 77 Searching for a photo - End search/Edit search/Rec Review 37 Playback - Basics Playing back tape 39 To display the screen indicators - Frame recording 69 Using the viewfinder 70 Advanced Playback Operations Playing back tape with picture effect . 72 Playing back tape with digital effect (DCR...
Operating Instructions
Page 12
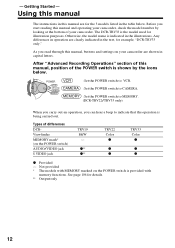
... VCR. : Set the POWER switch to CAMERA. : Set the POWER switch to MEMORY. (DCR-TRV22/TRV33 only) When you carry out an operation, you can hear a beep to indicate that the operation is the model used for example, "DCR-TRV33 only." z** z** TRV22 Color z z z TRV33 Color z z z z Provided - See page 106 for the 3 models listed in the illustrations. Not provided * The models with memory functions. Before you read through this manual and operating your camcorder, check the model number...
... VCR. : Set the POWER switch to CAMERA. : Set the POWER switch to MEMORY. (DCR-TRV22/TRV33 only) When you carry out an operation, you can hear a beep to indicate that the operation is the model used for example, "DCR-TRV33 only." z** z** TRV22 Color z z z TRV33 Color z z z z Provided - See page 106 for the 3 models listed in the illustrations. Not provided * The models with memory functions. Before you read through this manual and operating your camcorder, check the model number...

Operating Instructions
Page 41
... played back. - Each time you press DATA CODE on the Remote Commander when the POWER switch is set . When you press DATA CODE on the Remote Commander, the display changes as follows: date/time t various settings (SteadyShot off, exposure, white balance, gain, shutter speed, aperture value) t (no indicator appears. The tape is being displayed Select DATE in DATA CODE in in the menu setting (p. 184). The tape was recorded by a camcorder without the date and time set to OFF (CHG), no indicator) t date/time t... During tape recording...
... played back. - Each time you press DATA CODE on the Remote Commander when the POWER switch is set . When you press DATA CODE on the Remote Commander, the display changes as follows: date/time t various settings (SteadyShot off, exposure, white balance, gain, shutter speed, aperture value) t (no indicator appears. The tape is being displayed Select DATE in DATA CODE in in the menu setting (p. 184). The tape was recorded by a camcorder without the date and time set to OFF (CHG), no indicator) t date/time t... During tape recording...
Operating Instructions
Page 44
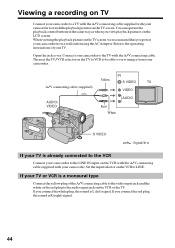
... view images from a wall outlet using the AC Adaptor. Refer to the operating instructions of the A/V connecting cable to the video input jack and the white or the red plug to the audio input jack on the VCR with the A/V connecting cable supplied with your camcorder. Then set the TV/VCR selector on the LCD screen. You can operate the playback control buttons in the same way as when you power your camcorder from your camcorder. Viewing a recording on TV Connect your camcorder...
... view images from a wall outlet using the AC Adaptor. Refer to the operating instructions of the A/V connecting cable to the video input jack and the white or the red plug to the audio input jack on the VCR with the A/V connecting cable supplied with your camcorder. Then set the TV/VCR selector on the LCD screen. You can operate the playback control buttons in the same way as when you power your camcorder from your camcorder. Viewing a recording on TV Connect your camcorder...
Operating Instructions
Page 85
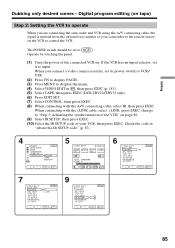
... VCR to operate When you connect a video camera recorder, set its power switch to VCR/ VTR. (2) Press FN to display PAGE1. (3) Press MENU to display the menu. (4) Select VIDEO EDIT in "About the IR SETUP code" (p. 87). 4 OTHERS DATA CODE BEEP COMMANDER D I SPL AY V I DEO ED I T EXIT RETURN TAPE MEMORY EXEC RET. 5 V I DEO ED I T 0:32:30:14 MARK START ED I T UNDO I N SET TOTAL 0:00:00:00 SCENE 0 END 6 V I DEO ED I T END ED I T SET CONTROL...
... VCR to operate When you connect a video camera recorder, set its power switch to VCR/ VTR. (2) Press FN to display PAGE1. (3) Press MENU to display the menu. (4) Select VIDEO EDIT in "About the IR SETUP code" (p. 87). 4 OTHERS DATA CODE BEEP COMMANDER D I SPL AY V I DEO ED I T EXIT RETURN TAPE MEMORY EXEC RET. 5 V I DEO ED I T 0:32:30:14 MARK START ED I T UNDO I N SET TOTAL 0:00:00:00 SCENE 0 END 6 V I DEO ED I T END ED I T SET CONTROL...
Operating Instructions
Page 90
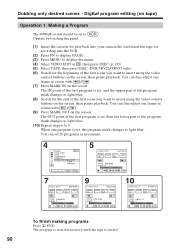
... using the video control buttons on the screen. When one frame at a time with / . (7) Press MARK IN on tape) Operation 1: Making a Program The POWER switch should be set 20 programs in memory until the tape is set , the program mark changes to insert using the video control buttons on the screen, then pause playback. You can fine-adjust one program is stored in maximum. 4 OTHERS DATA CODE BEEP COMMANDER D I SPL AY V I DEO ED I T EXIT RETURN TAPE MEMORY...
... using the video control buttons on the screen. When one frame at a time with / . (7) Press MARK IN on tape) Operation 1: Making a Program The POWER switch should be set 20 programs in memory until the tape is set , the program mark changes to insert using the video control buttons on the screen, then pause playback. You can fine-adjust one program is stored in maximum. 4 OTHERS DATA CODE BEEP COMMANDER D I SPL AY V I DEO ED I T EXIT RETURN TAPE MEMORY...

Operating Instructions
Page 115
... the screen when you press PHOTO on "Memory Stick" - Super NightShot - To display the recording data, press DATA CODE during recording. Wide mode - Title - However, they are recording a still image You cannot turn off the power or press PHOTO. SPORTS of view when the POWER switch is not a malfunction. When you press the button. You can also use the Remote Commander for this operation (p. 40). Fader - Recording data The recording data (date/time or various settings when recorded) do not work: - Picture effect - Digital zoom - Color Slow Shutter...
... the screen when you press PHOTO on "Memory Stick" - Super NightShot - To display the recording data, press DATA CODE during recording. Wide mode - Title - However, they are recording a still image You cannot turn off the power or press PHOTO. SPORTS of view when the POWER switch is not a malfunction. When you press the button. You can also use the Remote Commander for this operation (p. 40). Fader - Recording data The recording data (date/time or various settings when recorded) do not work: - Picture effect - Digital zoom - Color Slow Shutter...

Operating Instructions
Page 156
..." (Windows XP). 156 Viewing pictures recorded on the tape (1) Connect the AC Adaptor to your camcorder. (2) Set the POWER switch to . (3) Press FN to display PAGE1. (4) Press MENU to the USB port on the computer using the supplied USB cable. For Windows 2000 and Windows XP users If you are prompted to complete without interrupting it. Note that the ImageMixer CD writing function may not work properly. Connecting your camcorder If you are using Windows...
..." (Windows XP). 156 Viewing pictures recorded on the tape (1) Connect the AC Adaptor to your camcorder. (2) Set the POWER switch to . (3) Press FN to display PAGE1. (4) Press MENU to the USB port on the computer using the supplied USB cable. For Windows 2000 and Windows XP users If you are prompted to complete without interrupting it. Note that the ImageMixer CD writing function may not work properly. Connecting your camcorder If you are using Windows...
Operating Instructions
Page 157
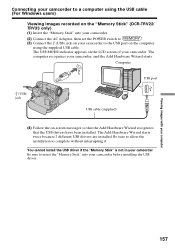
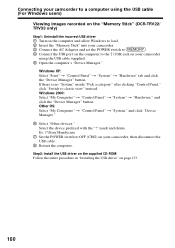
The USB MODE indicator appears on the LCD screen of your camcorder, and the Add Hardware Wizard starts. You cannot install the USB driver if the "Memory Stick" is not in your camcorder Be sure to insert the "Memory Stick" into your camcorder. (2) Connect the AC Adaptor, then set the POWER switch to . (3) Connect the (USB) jack on your camcorder to the USB port on the computer using the USB cable (For Windows users) Viewing images recorded on -screen messages so that the...
The USB MODE indicator appears on the LCD screen of your camcorder, and the Add Hardware Wizard starts. You cannot install the USB driver if the "Memory Stick" is not in your camcorder Be sure to insert the "Memory Stick" into your camcorder. (2) Connect the AC Adaptor, then set the POWER switch to . (3) Connect the (USB) jack on your camcorder to the USB port on the computer using the USB cable (For Windows users) Viewing images recorded on -screen messages so that the...
Operating Instructions
Page 158
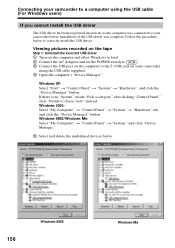
... set the POWER switch to . 3 Connect the USB port on the computer to the (USB) jack on your camcorder before installation of the USB driver was connected to your camcorder using the USB cable supplied. 4 Open the computer's "Device Manager." Windows 98SE/Windows Me: Select "My Computer" t "Control Panel" t "System," and click "Device Manager." 5 Select and delete the underlined devices below to correctly install the USB driver. Connecting your camcorder to a computer using the USB cable (For Windows users) If you cannot install the USB driver...
... set the POWER switch to . 3 Connect the USB port on the computer to the (USB) jack on your camcorder before installation of the USB driver was connected to your camcorder using the USB cable supplied. 4 Open the computer's "Device Manager." Windows 98SE/Windows Me: Select "My Computer" t "Control Panel" t "System," and click "Device Manager." 5 Select and delete the underlined devices below to correctly install the USB driver. Connecting your camcorder to a computer using the USB cable (For Windows users) If you cannot install the USB driver...
Operating Instructions
Page 160
... "Device Manager" button. mark and delete. Windows XP: Select "Start" t "Control Panel" t "System" t "Hardware" tab and click the "Device Manager" button. Ex: (?)Sony Handycam 7 Set the POWER switch to OFF (CHG) on your camcorder using the USB cable (For Windows users) Viewing images recorded on the "Memory Stick" (DCR-TRV22/ TRV33 only) Step1: Uninstall the incorrect USB driver 1 Turn on the computer and allow Windows to load. 2 Insert the "Memory Stick" into your camcorder. 3 Connect the AC Adaptor and set the POWER switch to . 4 Connect the USB...
... "Device Manager" button. mark and delete. Windows XP: Select "Start" t "Control Panel" t "System" t "Hardware" tab and click the "Device Manager" button. Ex: (?)Sony Handycam 7 Set the POWER switch to OFF (CHG) on your camcorder using the USB cable (For Windows users) Viewing images recorded on the "Memory Stick" (DCR-TRV22/ TRV33 only) Step1: Uninstall the incorrect USB driver 1 Turn on the computer and allow Windows to load. 2 Insert the "Memory Stick" into your camcorder. 3 Connect the AC Adaptor and set the POWER switch to . 4 Connect the USB...
Operating Instructions
Page 165
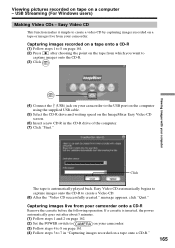
.... (2) Set the POWER switch to on your camcorder. (3) Follow steps 4 to 8 on page 161. (4) Follow steps 3 to create a video CD by capturing images recorded on your camcorder onto a CD-R Remove the cassette before the following operation. USB Streaming (For Windows users) Making Video CDs - Easy Video CD automatically begins to capture images onto the CD-R to the USB port on the computer using the supplied USB cable. (5) Select the CD-R drive and writing speed on...
.... (2) Set the POWER switch to on your camcorder. (3) Follow steps 4 to 8 on page 161. (4) Follow steps 3 to create a video CD by capturing images recorded on your camcorder onto a CD-R Remove the cassette before the following operation. USB Streaming (For Windows users) Making Video CDs - Easy Video CD automatically begins to capture images onto the CD-R to the USB port on the computer using the supplied USB cable. (5) Select the CD-R drive and writing speed on...
Operating Instructions
Page 167
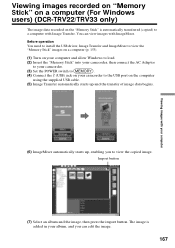
... your camcorder. (3) Set the POWER switch to . (4) Connect the (USB) jack on your computer (6) ImageMixer automatically starts up, enabling you can view images with your camcorder to the USB port on the "Memory Stick" is added in your album, and you to view the copied image. You can edit the image. 167 Viewing images recorded on "Memory Stick" on a computer (For Windows users) (DCR-TRV22/TRV33 only) The image data recorded on the computer using the supplied USB cable. (5) Image Transfer automatically...
... your camcorder. (3) Set the POWER switch to . (4) Connect the (USB) jack on your computer (6) ImageMixer automatically starts up, enabling you can view images with your camcorder to the USB port on the "Memory Stick" is added in your album, and you to view the copied image. You can edit the image. 167 Viewing images recorded on "Memory Stick" on a computer (For Windows users) (DCR-TRV22/TRV33 only) The image data recorded on the computer using the supplied USB cable. (5) Image Transfer automatically...
Operating Instructions
Page 168
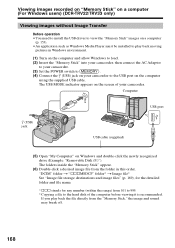
... as Windows Media Player must be installed to play back the file directly from the "Memory Stick," the image and sound may break off. 168 If you play back moving pictures in this order. The USB MODE indicator appears on the computer using the supplied USB cable. The folders inside the "Memory Stick" appear. (6) Double-click a desired image file from 101 to 999. 2) Copying a file to the hard disk of your camcorder. Computer USB port (USB) jack USB cable (supplied) (5) Open...
... as Windows Media Player must be installed to play back the file directly from the "Memory Stick," the image and sound may break off. 168 If you play back moving pictures in this order. The USB MODE indicator appears on the computer using the supplied USB cable. The folders inside the "Memory Stick" appear. (6) Double-click a desired image file from 101 to 999. 2) Copying a file to the hard disk of your camcorder. Computer USB port (USB) jack USB cable (supplied) (5) Open...

Operating Instructions
Page 172
..." folder1) t Image file2) 1) sss stands for any number (within the range) from 101 to 999. 2) Copying a file to the hard disk of your camcorder is recommended. For Mac OS X (v10.0) users Shut down the computer, then disconnect the USB cable and remove the "Memory Stick" or set the POWER switch to OFF (CHG). The USB MODE indicator appears on the screen of the computer before viewing it , then select "Eject disk" from the...
..." folder1) t Image file2) 1) sss stands for any number (within the range) from 101 to 999. 2) Copying a file to the hard disk of your camcorder is recommended. For Mac OS X (v10.0) users Shut down the computer, then disconnect the USB cable and remove the "Memory Stick" or set the POWER switch to OFF (CHG). The USB MODE indicator appears on the screen of the computer before viewing it , then select "Eject disk" from the...
Operating Instructions
Page 174
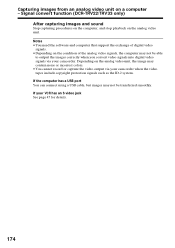
... image may contain noise or incorrect colors. •You cannot record or capture the video output via your camcorder. If the computer has a USB port You can connect using a USB cable, but images may not be transferred smoothly. Capturing images from an analog video unit on the analog video unit. Signal convert function (DCR-TRV22/TRV33 only) After capturing images and sound Stop capturing procedures on the computer, and stop playback on a computer - If your camcorder when the video tapes...
... image may contain noise or incorrect colors. •You cannot record or capture the video output via your camcorder. If the computer has a USB port You can connect using a USB cable, but images may not be transferred smoothly. Capturing images from an analog video unit on the analog video unit. Signal convert function (DCR-TRV22/TRV33 only) After capturing images and sound Stop capturing procedures on the computer, and stop playback on a computer - If your camcorder when the video tapes...
Operating Instructions
Page 179
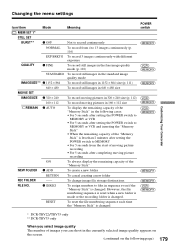
... × 480 MOVIE SET IMAGESIZE z 320 × 240 160 × 112 REMAIN z AUTO ON NEW FOLDER REC FOLDER FILE NO. To reset the file numbering sequence each time the "Memory Stick" is changed POWER switch * DCR-TRV22/TRV33 only ** DCR-TRV33 only When you can shoot in the currently selected image quality appears on the screen. (continued on the following cases: • For 5 seconds after setting the POWER switch to MEMORY or VCR •...
... × 480 MOVIE SET IMAGESIZE z 320 × 240 160 × 112 REMAIN z AUTO ON NEW FOLDER REC FOLDER FILE NO. To reset the file numbering sequence each time the "Memory Stick" is changed POWER switch * DCR-TRV22/TRV33 only ** DCR-TRV33 only When you can shoot in the currently selected image quality appears on the screen. (continued on the following cases: • For 5 seconds after setting the POWER switch to MEMORY or VCR •...
Operating Instructions
Page 211
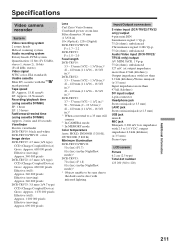
... lighting. Specifications Video camera recorder System Video recording system 2 rotary heads Helical scanning system Audio recording system Rotary heads, PCM system Quantization: 12 bits (Fs 32 kHz, stereo 1, stereo 2), 16 bits (Fs 48 kHz, stereo) Video signal NTSC color, EIA standards Usable cassette Mini DV cassette with the mark printed Tape speed SP: Approx. 18.81 mm/s LP: Approx. 12.56 mm/s Recording/playback time (using cassette DVM60) SP: 1 hour LP: 1.5 hours Fastforward/rewind time (using cassette...
... lighting. Specifications Video camera recorder System Video recording system 2 rotary heads Helical scanning system Audio recording system Rotary heads, PCM system Quantization: 12 bits (Fs 32 kHz, stereo 1, stereo 2), 16 bits (Fs 48 kHz, stereo) Video signal NTSC color, EIA standards Usable cassette Mini DV cassette with the mark printed Tape speed SP: Approx. 18.81 mm/s LP: Approx. 12.56 mm/s Recording/playback time (using cassette DVM60) SP: 1 hour LP: 1.5 hours Fastforward/rewind time (using cassette...
Operating Instructions
Page 219
... 178 AUDIO MODE 182 AUTO SHTR 176 A/V connecting cable 44, 81, 93 BACK LIGHT 33 Battery Info 20 Battery pack 16 BEEP 184 BOUNCE 55 C, D C. FADER 55 NTSC system 204 O, P, Q OLD MOVIE 59 Operation indicators 24 OVERLAP 55 PB FOLDR 139 Picture effect 58, 72 Picture search 42 Playback time 20 Print mark 147 PROGRAM AE 62 R REC FOLDER 134 Rec Review 38 Recording time 19 Remaining battery time indicator 27 Remaining tape...
... 178 AUDIO MODE 182 AUTO SHTR 176 A/V connecting cable 44, 81, 93 BACK LIGHT 33 Battery Info 20 Battery pack 16 BEEP 184 BOUNCE 55 C, D C. FADER 55 NTSC system 204 O, P, Q OLD MOVIE 59 Operation indicators 24 OVERLAP 55 PB FOLDR 139 Picture effect 58, 72 Picture search 42 Playback time 20 Print mark 147 PROGRAM AE 62 R REC FOLDER 134 Rec Review 38 Recording time 19 Remaining battery time indicator 27 Remaining tape...


