
Operating Instructions
Page 148
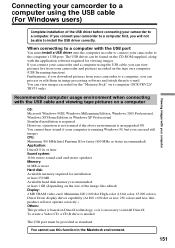
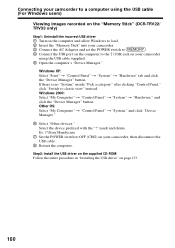
... following ways of the USB driver before connecting your computer's "Memory Stick" slot (DCR-TRV22/TRV33 only). Viewing images with the USB port See page 151 for details. Computer Push into your camcorder to a computer with your camcorder "Memory Stick" image (DCRTRV22/TRV33 only) Camcorder connection jack USB jack DV Interface USB jack Connection cable USB cable (supplied) Computer...
... following ways of the USB driver before connecting your computer's "Memory Stick" slot (DCR-TRV22/TRV33 only). Viewing images with the USB port See page 151 for details. Computer Push into your camcorder to a computer with your camcorder "Memory Stick" image (DCRTRV22/TRV33 only) Camcorder connection jack USB jack DV Interface USB jack Connection cable USB cable (supplied) Computer...
Operating Instructions
Page 151
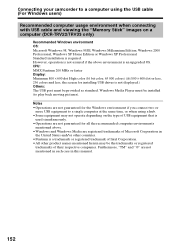
... least 1 GB (depending on the size of the USB driver before connecting your camcorder to a computer. If you connect your camcorder to a computer first, you can view images recorded on the "Memory Stick" on a computer OS: Microsoft Windows 98SE, Windows Millennium Edition, Windows 2000 Professional, Windows XP Home Edition or Windows XP Professional Standard installation is necessary to install...
... least 1 GB (depending on the size of the USB driver before connecting your camcorder to a computer. If you connect your camcorder to a computer first, you can view images recorded on the "Memory Stick" on a computer OS: Microsoft Windows 98SE, Windows Millennium Edition, Windows 2000 Professional, Windows XP Home Edition or Windows XP Professional Standard installation is necessary to install...
Operating Instructions
Page 152
... companies. Connecting your camcorder to a single computer at the same time, or when using the USB cable (For Windows users) Recommended computer usage environment when connecting with USB cable and viewing the "Memory Stick" images on the type of USB equipment that is used simultaneously. •Operations are not guaranteed for installing USB driver is not displayed...
... companies. Connecting your camcorder to a single computer at the same time, or when using the USB cable (For Windows users) Recommended computer usage environment when connecting with USB cable and viewing the "Memory Stick" images on the type of USB equipment that is used simultaneously. •Operations are not guaranteed for installing USB driver is not displayed...

Operating Instructions
Page 153
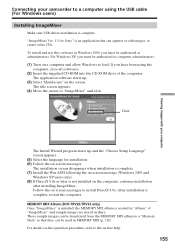
... camcorder" on page 156. If you are using Windows XP, log in with permission of administrators. If the screen does not appear, double-click "My Computer" and then "ImageMixer" (CD-ROM Drive). (3) Select "Handycam" on -screen messages. 153 This starts USB driver installation. If you have been using the USB cable (For Windows users) Installing the USB driver...
... camcorder" on page 156. If you are using Windows XP, log in with permission of administrators. If the screen does not appear, double-click "My Computer" and then "ImageMixer" (CD-ROM Drive). (3) Select "Handycam" on -screen messages. 153 This starts USB driver installation. If you have been using the USB cable (For Windows users) Installing the USB driver...
Operating Instructions
Page 154
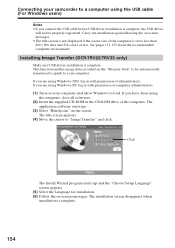
... on the "Memory Stick" to be properly registered. Installing Image Transfer (DCR-TRV22/TRV33 only) Make sure USB driver installation is complete. 154 If you are using Windows 2000, log in with permission of administrators. See pages 151, 152 about the recommended computer environment. If you ...complete. If you connect the USB cable before USB driver installation is set to less than 800 × 600 dots and 256 colors or less. Connecting your computer. Carry out installation again following the on your computer and allow Windows to your camcorder to "Image Transfer" and ...
... on the "Memory Stick" to be properly registered. Installing Image Transfer (DCR-TRV22/TRV33 only) Make sure USB driver installation is complete. 154 If you are using Windows 2000, log in with permission of administrators. See pages 151, 152 about the recommended computer environment. If you ...complete. If you connect the USB cable before USB driver installation is set to less than 800 × 600 dots and 256 colors or less. Connecting your computer. Carry out installation again following the on your computer and allow Windows to your camcorder to "Image Transfer" and ...
Operating Instructions
Page 155
...USB cable (For Windows users) Installing ImageMixer Make sure USB driver installation is not installed on the screen. MEMORY MIX Album (DCR-TRV22/TRV33 only) Once "ImageMixer" is installed, the MEMORY MIX album is created in "Album" of the computer. To install and use this software in Windows ...(7) Install the Win ASPI following the on-screen message (Windows 2000 and Windows XP users only). (8) If DirectX 8.0a or later is complete. Viewing images with your computer Connecting your camcorder to install DirectX 8.0a. For Windows XP, you must be used in there. Click The Install...
...USB cable (For Windows users) Installing ImageMixer Make sure USB driver installation is not installed on the screen. MEMORY MIX Album (DCR-TRV22/TRV33 only) Once "ImageMixer" is installed, the MEMORY MIX album is created in "Album" of the computer. To install and use this software in Windows ...(7) Install the Win ASPI following the on-screen message (Windows 2000 and Windows XP users only). (8) If DirectX 8.0a or later is complete. Viewing images with your computer Connecting your camcorder to install DirectX 8.0a. For Windows XP, you must be used in there. Click The Install...

Operating Instructions
Page 156
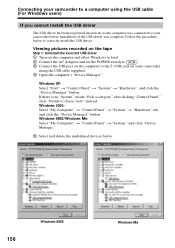
... recognizes that the USB drivers have been installed. Viewing pictures recorded on the tape (1) Connect the AC Adaptor to your camcorder If you are using Windows 2000, log in with permission of administrators. The computer recognizes your camcorder to display the menu. (5) Select USB STREAM in with permission of computer administrators. Computer USB port (USB) jack USB cable (supplied...
... recognizes that the USB drivers have been installed. Viewing pictures recorded on the tape (1) Connect the AC Adaptor to your camcorder If you are using Windows 2000, log in with permission of administrators. The computer recognizes your camcorder to display the menu. (5) Select USB STREAM in with permission of computer administrators. Computer USB port (USB) jack USB cable (supplied...
Operating Instructions
Page 157
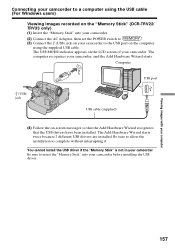
... starts twice because 2 different USB drivers are installed. Computer USB port (USB) jack USB cable (supplied) (4) Follow the on the LCD screen of your camcorder before installing the USB driver. Be sure to allow the installation to insert the "Memory Stick" into your camcorder. (2) Connect the AC Adaptor... that the Add Hardware Wizard recognizes that the USB drivers have been installed. You cannot install the USB driver if the "Memory Stick" is not in your camcorder to the USB port on the computer using the USB cable (For Windows users) Viewing images recorded on the "Memory...
... starts twice because 2 different USB drivers are installed. Computer USB port (USB) jack USB cable (supplied) (4) Follow the on the LCD screen of your camcorder before installing the USB driver. Be sure to allow the installation to insert the "Memory Stick" into your camcorder. (2) Connect the AC Adaptor... that the Add Hardware Wizard recognizes that the USB drivers have been installed. You cannot install the USB driver if the "Memory Stick" is not in your camcorder to the USB port on the computer using the USB cable (For Windows users) Viewing images recorded on the "Memory...
Operating Instructions
Page 158
... "Control Panel," click "Switch to your camcorder before installation of the USB driver was connected to classic view" instead. Windows 98SE/Windows Me: Select "My Computer" t "Control Panel" t "System," and click "Device Manager." 5 Select and delete the underlined devices below to the (USB) jack on the computer to correctly install the USB driver. Windows 2000: Select "My Computer" t "Control...
... "Control Panel," click "Switch to your camcorder before installation of the USB driver was connected to classic view" instead. Windows 98SE/Windows Me: Select "My Computer" t "Control Panel" t "System," and click "Device Manager." 5 Select and delete the underlined devices below to the (USB) jack on the computer to correctly install the USB driver. Windows 2000: Select "My Computer" t "Control...
Operating Instructions
Page 159
Step 2: Install the USB driver on the supplied CD-ROM Follow the entire procedure in "Installing the USB driver" on your camcorder, then disconnect the USB cable. 7 Restart the computer. Connecting your camcorder to a computer using the USB cable (For Windows users) Viewing images with your computer Windows 2000 Windows XP 6 Set the POWER switch to OFF (CHG) on page 153. 159
Step 2: Install the USB driver on the supplied CD-ROM Follow the entire procedure in "Installing the USB driver" on your camcorder, then disconnect the USB cable. 7 Restart the computer. Connecting your camcorder to a computer using the USB cable (For Windows users) Viewing images with your computer Windows 2000 Windows XP 6 Set the POWER switch to OFF (CHG) on page 153. 159
Operating Instructions
Page 160
.... Select the device prefixed with the "?" Ex: (?)Sony Handycam 7 Set the POWER switch to OFF (CHG) on your camcorder using the USB cable (For Windows users) Viewing images recorded on the "Memory Stick" (DCR-TRV22/ TRV33 only) Step1: Uninstall the incorrect USB driver 1 Turn on the computer and allow Windows to load. 2 Insert the "Memory Stick" into...
.... Select the device prefixed with the "?" Ex: (?)Sony Handycam 7 Set the POWER switch to OFF (CHG) on your camcorder using the USB cable (For Windows users) Viewing images recorded on the "Memory Stick" (DCR-TRV22/ TRV33 only) Step1: Uninstall the incorrect USB driver 1 Turn on the computer and allow Windows to load. 2 Insert the "Memory Stick" into...
Operating Instructions
Page 161
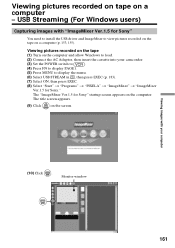
... Ver.1.5 for Sony" You need to install the USB driver and ImageMixer to display the menu. (6) Select USB STREAM in , then press EXEC (p. 183). (7) Select ON, then press EXEC. (8) Select "Start" t "Programs" t "PIXELA" t "ImageMixer" t "ImageMixer Ver.1.5 for Sony" startup screen appears on the screen. Monitor window 161 USB Streaming (For Windows users) Capturing images with your camcorder. (3) Set the...
... Ver.1.5 for Sony" You need to install the USB driver and ImageMixer to display the menu. (6) Select USB STREAM in , then press EXEC (p. 183). (7) Select ON, then press EXEC. (8) Select "Start" t "Programs" t "PIXELA" t "ImageMixer" t "ImageMixer Ver.1.5 for Sony" startup screen appears on the screen. Monitor window 161 USB Streaming (For Windows users) Capturing images with your camcorder. (3) Set the...

Operating Instructions
Page 164
... your camcorder before installation of the screen. Reinstall the USB driver following operations after five minutes. •We recommend setting DEMO MODE to capture. The image shakes up and down. - Carry out the following the procedure on a computer - USB Streaming (For Windows users) (5) Looking at the monitor window, click at the top right of the USB driver was...
... your camcorder before installation of the screen. Reinstall the USB driver following operations after five minutes. •We recommend setting DEMO MODE to capture. The image shakes up and down. - Carry out the following the procedure on a computer - USB Streaming (For Windows users) (5) Looking at the monitor window, click at the top right of the USB driver was...
Operating Instructions
Page 167
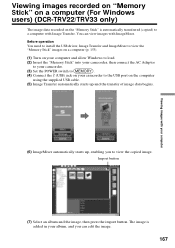
...USB driver, Image Transfer and ImageMixer to view the "Memory Stick" images on a computer (p. 153). (1) Turn on your computer and allow Windows to load. (2) Insert the "Memory Stick" into your camcorder, then connect the AC Adaptor to your camcorder. (3) Set the POWER switch to . (4) Connect the (USB) jack on your camcorder to the USB... button. Viewing images recorded on "Memory Stick" on a computer (For Windows users) (DCR-TRV22/TRV33 only) The image data recorded on the computer using the supplied USB cable. (5) Image Transfer automatically starts up , enabling you can edit the...
...USB driver, Image Transfer and ImageMixer to view the "Memory Stick" images on a computer (p. 153). (1) Turn on your computer and allow Windows to load. (2) Insert the "Memory Stick" into your camcorder, then connect the AC Adaptor to your camcorder. (3) Set the POWER switch to . (4) Connect the (USB) jack on your camcorder to the USB... button. Viewing images recorded on "Memory Stick" on a computer (For Windows users) (DCR-TRV22/TRV33 only) The image data recorded on the computer using the supplied USB cable. (5) Image Transfer automatically starts up , enabling you can edit the...
Operating Instructions
Page 168
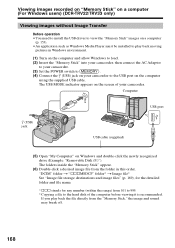
... POWER switch to . (4) Connect the (USB) jack on your camcorder. If you play back moving pictures in this order. Viewing images recorded on "Memory Stick" on a computer (For Windows users) (DCR-TRV22/TRV33 only) Viewing images without Image Transfer Before operation •You need to install the USB driver to view the "Memory Stick" images...
... POWER switch to . (4) Connect the (USB) jack on your camcorder. If you play back moving pictures in this order. Viewing images recorded on "Memory Stick" on a computer (For Windows users) (DCR-TRV22/TRV33 only) Viewing images without Image Transfer Before operation •You need to install the USB driver to view the "Memory Stick" images...


