Operating Guide
Page 4
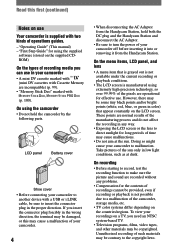
...LCD screen. LCD panel Battery cover Shoe cover • Before connecting your camcorder to another device with , (p. 100). These points are incompatible) (p. 99). • "Memory Stick Duo" marked with a USB or i.LINK cable, be sure to insert the connector plug in any problems. •...in the proper direction. "First Step Guide" for effective use in your camcorder to malfunction. Read this may cause a malfunction of your camcorder. 4 • When disconnecting the AC Adaptor from the Handycam Station. To view your recordings on the supplied CDROM) On the types ...
...LCD screen. LCD panel Battery cover Shoe cover • Before connecting your camcorder to another device with , (p. 100). These points are incompatible) (p. 99). • "Memory Stick Duo" marked with a USB or i.LINK cable, be sure to insert the connector plug in any problems. •...in the proper direction. "First Step Guide" for effective use in your camcorder to malfunction. Read this may cause a malfunction of your camcorder. 4 • When disconnecting the AC Adaptor from the Handycam Station. To view your recordings on the supplied CDROM) On the types ...
Operating Guide
Page 8
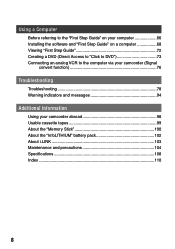
... a DVD (Direct Access to "Click to DVD 73 Connecting an analog VCR to the computer via your camcorder (Signal convert function 76 Troubleshooting Troubleshooting 78 Warning indicators and messages 94 Additional Information Using your camcorder abroad 98 Usable cassette tapes 99 About the "Memory Stick 100 About the "InfoLITHIUM" battery pack 102...
... a DVD (Direct Access to "Click to DVD 73 Connecting an analog VCR to the computer via your camcorder (Signal convert function 76 Troubleshooting Troubleshooting 78 Warning indicators and messages 94 Additional Information Using your camcorder abroad 98 Usable cassette tapes 99 About the "Memory Stick 100 About the "InfoLITHIUM" battery pack 102...
Operating Guide
Page 56
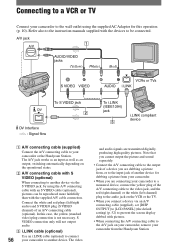
...connection only will not output audio. i.LINK cable (optional) Use an i.LINK cable (optional) to connect 56 your camcorder or the Handycam Station. In this operation (p. 10). Connecting to a VCR or TV Connect your camcorder to the wall outlet using the A/V connecting cable...Red) VCRs or TVs To S VIDEO jack 2 DV Interface : Signal flow To i.LINK (IEEE1394) jack 3 i.LINK compliant device A/V connecting cable (supplied) Connect the A/V connecting cable to your camcorder to another device via an A/V connecting cable (supplied), set [DISP OUTPUT] to [LCD ...
...connection only will not output audio. i.LINK cable (optional) Use an i.LINK cable (optional) to connect 56 your camcorder or the Handycam Station. In this operation (p. 10). Connecting to a VCR or TV Connect your camcorder to the wall outlet using the A/V connecting cable...Red) VCRs or TVs To S VIDEO jack 2 DV Interface : Signal flow To i.LINK (IEEE1394) jack 3 i.LINK compliant device A/V connecting cable (supplied) Connect the A/V connecting cable to your camcorder to another device via an A/V connecting cable (supplied), set [DISP OUTPUT] to [LCD ...
Operating Guide
Page 57
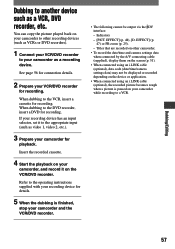
... the picture played back on your camcorder to other camcorder. • To record the date/time and camera settings data when connected by the A/V connecting cable (supplied), display them on the screen (p. 51). • When connected using an i.LINK cable (optional), the recorded picture ...becomes rough when a picture is finished, stop your camcorder for playback. When dubbing to another device such as a recording device. Indicators - [PICT. ...
... the picture played back on your camcorder to other camcorder. • To record the date/time and camera settings data when connected by the A/V connecting cable (supplied), display them on the screen (p. 51). • When connected using an i.LINK cable (optional), the recorded picture ...becomes rough when a picture is finished, stop your camcorder for playback. When dubbing to another device such as a recording device. Indicators - [PICT. ...
Operating Guide
Page 58
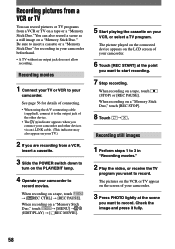
.... • When using the A/V connecting cable (supplied), connect it fully. 58 The pictures on the VCR or TV appear on the screen of your camcorder. You can record pictures or TV programs from a VCR or TV on a tape or a "Memory Stick Duo." Be sure to your... connected device appears on the LCD screen of the other device. • The indicator appears when you connect your camcorder and other devices via an i.LINK cable. (This indicator may also appear on your camcorder to start recording. 7 Stop recording. Recording pictures from a VCR or TV You can also record a scene as a ...
.... • When using the A/V connecting cable (supplied), connect it fully. 58 The pictures on the VCR or TV appear on the screen of your camcorder. You can record pictures or TV programs from a VCR or TV on a tape or a "Memory Stick Duo." Be sure to your... connected device appears on the LCD screen of the other device. • The indicator appears when you connect your camcorder and other devices via an i.LINK cable. (This indicator may also appear on your camcorder to start recording. 7 Stop recording. Recording pictures from a VCR or TV You can also record a scene as a ...
Operating Guide
Page 60
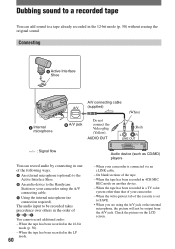
... from the A/V jack. When your camcorder. - AUDIO OUT (Red) L R LINE OUT : Signal flow You can add sound to a tape already recorded in 4CH MIC REC mode on the LCD screen. On blank sections of the cassette is connected via an i.LINK cable. - When the tape has ... in one of the following ways. An external microphone (optional) to the Active Interface Shoe. An audio device to the Handycam Station or your camcorder using the A/V connecting cable. Using the internal microphone (no connection required). When the write-protect tab of the tape. - Check...
... from the A/V jack. When your camcorder. - AUDIO OUT (Red) L R LINE OUT : Signal flow You can add sound to a tape already recorded in 4CH MIC REC mode on the LCD screen. On blank sections of the cassette is connected via an i.LINK cable. - When the tape has ... in one of the following ways. An external microphone (optional) to the Active Interface Shoe. An audio device to the Handycam Station or your camcorder using the A/V connecting cable. Using the internal microphone (no connection required). When the write-protect tab of the tape. - Check...
Operating Guide
Page 66
... tape. For details on connection, see the next section. • There are saved in more clarity than with added music and visual styles. i.LINK cable This method is good for copying video and sound recorded on a tape to the computer, copying files from a "Memory Stick Duo" ... Stick Duo." - Image data is transferred in folders by date. • The CD-ROM (supplied) includes the following operations by connecting your camcorder to your camcorder is playing back on tape or is currently seeing on a computer. USB Driver - For details, refer to chapter 6 of videos and slide ...
... tape. For details on connection, see the next section. • There are saved in more clarity than with added music and visual styles. i.LINK cable This method is good for copying video and sound recorded on a tape to the computer, copying files from a "Memory Stick Duo" ... Stick Duo." - Image data is transferred in folders by date. • The CD-ROM (supplied) includes the following operations by connecting your camcorder to your camcorder is playing back on tape or is currently seeing on a computer. USB Driver - For details, refer to chapter 6 of videos and slide ...
Operating Guide
Page 67
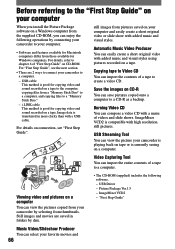
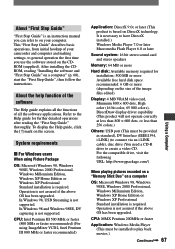
...than 800 × 600 dots, or less than 256 colors.) Others: USB port (This must be provided as standard), DV Interface (IEEE1394, i.LINK) (to connect via an i.LINK cable), disc drive (You need a CD-R drive to create a video CD. About the help function of the software The Help guide explains ...hookup of all the software applications. About "First Step Guide" "First Step Guide" is an instruction manual you use the software stored on your camcorder and computer and making settings, to general operation the first time you can refer to on the CDROM (supplied). In Windows 98 and ...
...than 800 × 600 dots, or less than 256 colors.) Others: USB port (This must be provided as standard), DV Interface (IEEE1394, i.LINK) (to connect via an i.LINK cable), disc drive (You need a CD-R drive to create a video CD. About the help function of the software The Help guide explains ...hookup of all the software applications. About "First Step Guide" "First Step Guide" is an instruction manual you use the software stored on your camcorder and computer and making settings, to general operation the first time you can refer to on the CDROM (supplied). In Windows 98 and ...
Operating Guide
Page 68
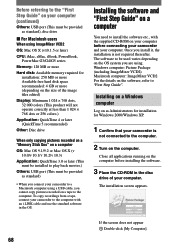
... computer You need to "First Step Guide". Once you connect your computer. Close all applications running on the computer before connecting your camcorder and your camcorder to a Macintosh computer using . Installing on a Windows computer Log on the computer. If the screen does not appear Double...Package (including ImageMixer VCD2) Macintosh computer: ImageMixer VCD2 For the details on the software, refer to install the software etc., with an i.LINK cable and use the standard software in the disc drive of the image files edited) Display: Minimum 1 024 × 768...
... computer You need to "First Step Guide". Once you connect your computer. Close all applications running on the computer before connecting your camcorder and your camcorder to a Macintosh computer using . Installing on a Windows computer Log on the computer. If the screen does not appear Double...Package (including ImageMixer VCD2) Macintosh computer: ImageMixer VCD2 For the details on the software, refer to install the software etc., with an i.LINK cable and use the standard software in the disc drive of the image files edited) Display: Minimum 1 024 × 768...
Operating Guide
Page 73
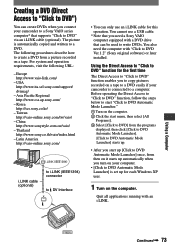
...write DVDs. China http://www.sonystyle.com.cn/vaio/ - You also need a Sony VAIO computer equipped with an i.LINK. Korea http://scs.sony.co.kr/ - Latin America http://vaio-online.sony.com/ i.LINK cable (optional) to i.LINK (IEEE1394) connector to DV Interface • You can only use a USB cable... you connect your camcorder is set up [Click to DVD Automatic Mode Launcher] once, from a picture recorded on a tape to a DVD easily if your camcorder to a Sony VAIO series computer* that supports "Click to DVD" via an i.LINK cable (optional). Thailand http://www.sony.co.th/vaio/...
...write DVDs. China http://www.sonystyle.com.cn/vaio/ - You also need a Sony VAIO computer equipped with an i.LINK. Korea http://scs.sony.co.kr/ - Latin America http://vaio-online.sony.com/ i.LINK cable (optional) to i.LINK (IEEE1394) connector to DV Interface • You can only use a USB cable... you connect your camcorder is set up [Click to DVD Automatic Mode Launcher] once, from a picture recorded on a tape to a DVD easily if your camcorder to a Sony VAIO series computer* that supports "Click to DVD" via an i.LINK cable (optional). Thailand http://www.sony.co.th/vaio/...
Operating Guide
Page 74
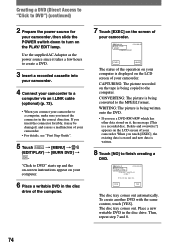
...; [MENU] (EDIT/PLAY) [BURN DVD] . CONVERTING: The picture is written. 8 Touch [NO] to a computer via an i.LINK cable (optional) (p. 73). • When you connect your computer. 6 Place a writable DVD in the disc drive. Delete and overwrite?] appears on the screen of...format. When you insert the connector forcibly, it takes a few hours to create a DVD. 3 Insert a recorded cassette into your camcorder. 4 Connect your camcorder to finish creating a DVD. 60min 0:00:00:00 BURN DVD COMPLETED Create another DVD with the same content, touch [...
...; [MENU] (EDIT/PLAY) [BURN DVD] . CONVERTING: The picture is written. 8 Touch [NO] to a computer via an i.LINK cable (optional) (p. 73). • When you connect your computer. 6 Place a writable DVD in the disc drive. Delete and overwrite?] appears on the screen of...format. When you insert the connector forcibly, it takes a few hours to create a DVD. 3 Insert a recorded cassette into your camcorder. 4 Connect your camcorder to finish creating a DVD. 60min 0:00:00:00 BURN DVD COMPLETED Create another DVD with the same content, touch [...
Operating Guide
Page 75
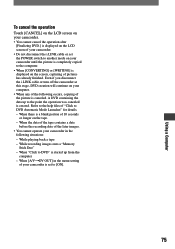
... the operation after [Finalizing DVD.] is displayed on the LCD screen of your camcorder. • Do not disconnect the i.LINK cable or set to the help files of the later images. • You cannot operate your camcorder is canceled. While recording images onto a "Memory Stick Duo" - When [A/V&#... • When [CONVERTING] or [WRITING] is a blank portion of 10 seconds or longer on the tape. - Even if you disconnect the i.LINK cable or turn off the camcorder at this stage, DVD creation will continue on your computer. • When any of the following occurs, copying of your...
... the operation after [Finalizing DVD.] is displayed on the LCD screen of your camcorder. • Do not disconnect the i.LINK cable or set to the help files of the later images. • You cannot operate your camcorder is canceled. While recording images onto a "Memory Stick Duo" - When [A/V&#... • When [CONVERTING] or [WRITING] is a blank portion of 10 seconds or longer on the tape. - Even if you disconnect the i.LINK cable or turn off the camcorder at this stage, DVD creation will continue on your computer. • When any of the following occurs, copying of your...
Operating Guide
Page 76
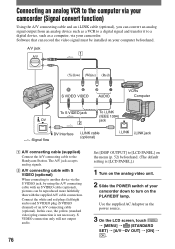
...the computer via your camcorder (Signal convert function) Using the A/V connecting cable and an i.LINK cable (optional), you can record the video signal must be reproduced more faithfully than with S VIDEO (optional) When connecting to another device via your camcorder. Software that can...;ow i.LINK cable (optional) i.LINK jack A/V connecting cable (supplied) Connect the A/V connecting cable to [LCD PANEL] on the menu (p. 52) beforehand. (The default setting is not necessary. S VIDEO connection only will not output audio. 76 Set [DISP OUTPUT] to the Handycam Station. ...
...the computer via your camcorder (Signal convert function) Using the A/V connecting cable and an i.LINK cable (optional), you can record the video signal must be reproduced more faithfully than with S VIDEO (optional) When connecting to another device via your camcorder. Software that can...;ow i.LINK cable (optional) i.LINK jack A/V connecting cable (supplied) Connect the A/V connecting cable to [LCD PANEL] on the menu (p. 52) beforehand. (The default setting is not necessary. S VIDEO connection only will not output audio. 76 Set [DISP OUTPUT] to the Handycam Station. ...

Operating Guide
Page 77
... lack the same smoothness. • When you are using a USB cable or an i.LINK cable to a computer. Using a Computer 4 Start playback on the analog video unit. 5 Start capturing procedures on your camcorder to a computer, make sure you insert the connectors in the correct direction. Regarding operation,... refer to the operating instructions supplied with copyright protection signals to a computer. • You can use a USB cable instead of your camcorder. • You cannot transfer pictures with the software or the on-line help. Note, however, that the picture displayed may not be ...
... lack the same smoothness. • When you are using a USB cable or an i.LINK cable to a computer. Using a Computer 4 Start playback on the analog video unit. 5 Start capturing procedures on your camcorder to a computer, make sure you insert the connectors in the correct direction. Regarding operation,... refer to the operating instructions supplied with copyright protection signals to a computer. • You can use a USB cable instead of your camcorder. • You cannot transfer pictures with the software or the on-line help. Note, however, that the picture displayed may not be ...

Operating Guide
Page 89
...recognize the "Memory Stick Duo" during camcorder operations such as tape playback or editing. Finish camcorder operations before connecting the camcorder to turn on the PLAY/EDIT lamp on your camcorder to the Windows computer with an i.LINK cable and use an i.LINK cable. You cannot view the pictures... a "Memory Stick Duo" in the OS. The "Memory Stick" icon ([Removable Disk] or [Sony Memory Stick]) does not appear on the computer screen. • Insert a "Memory Stick Duo" into your camcorder. • Disconnect the USB device other than the keyboard, the mouse, and the...
...recognize the "Memory Stick Duo" during camcorder operations such as tape playback or editing. Finish camcorder operations before connecting the camcorder to turn on the PLAY/EDIT lamp on your camcorder to the Windows computer with an i.LINK cable and use an i.LINK cable. You cannot view the pictures... a "Memory Stick Duo" in the OS. The "Memory Stick" icon ([Removable Disk] or [Sony Memory Stick]) does not appear on the computer screen. • Insert a "Memory Stick Duo" into your camcorder. • Disconnect the USB device other than the keyboard, the mouse, and the...

Operating Guide
Page 97
... add audio. • Your camcorder does not allow you touch .) HDV recorded tape. Turn the power off then on a section of a tape (p. 60). Disconnect the i.LINK cable (p. 60). Cannot playback. • Your camcorder cannot play back this mode during Easy Handycam • You can select [...STD-USB] when you set the POWER switch to PLAY/EDIT during Easy Handycam operation, but you cannot select [PictBridge] or ...
... add audio. • Your camcorder does not allow you touch .) HDV recorded tape. Turn the power off then on a section of a tape (p. 60). Disconnect the i.LINK cable (p. 60). Cannot playback. • Your camcorder cannot play back this mode during Easy Handycam • You can select [...STD-USB] when you set the POWER switch to PLAY/EDIT during Easy Handycam operation, but you cannot select [PictBridge] or ...

Operating Guide
Page 103
... instructions of Electrical and Electronics Engineers. About i.LINK The DV Interface on how it more and more, and as you use it is stored and the operating conditions and environment for the IEEE 1394 data transport bus proposed by Sony, and is a trademark approved by many corporations.... • IEEE 1394 is an international standard standardized by the Institute of the device to be connected. You can be connected. • i.LINK is limited. Note, however, that the battery...
... instructions of Electrical and Electronics Engineers. About i.LINK The DV Interface on how it more and more, and as you use it is stored and the operating conditions and environment for the IEEE 1394 data transport bus proposed by Sony, and is a trademark approved by many corporations.... • IEEE 1394 is an international standard standardized by the Institute of the device to be connected. You can be connected. • i.LINK is limited. Note, however, that the battery...

Operating Guide
Page 104
...MICROMV or HDV recorders/players are not using your camcorder. • Do not wrap your camcorder and have it . It is Mbps? About the required i.LINK cable Use the Sony i.LINK 4-pin-to direct sunlight. Anywhere extremely hot or cold. The camcorder may differ from rain or sea water. Near ...strong radio waves or radiation. Anywhere very humid. • Operate your camcorder on your computer, make sure that ...
...MICROMV or HDV recorders/players are not using your camcorder. • Do not wrap your camcorder and have it . It is Mbps? About the required i.LINK cable Use the Sony i.LINK 4-pin-to direct sunlight. Anywhere extremely hot or cold. The camcorder may differ from rain or sea water. Near ...strong radio waves or radiation. Anywhere very humid. • Operate your camcorder on your computer, make sure that ...
Operating Guide
Page 111
... 29 INDOOR 41 "InfoLITHIUM" battery pack 102 Initialize (Reset 26 Install 68 Insulation sheet 32 Internal microphone 26 INT.REC-STL (Interval photo recording) .... 48 i.LINK 103 i.LINK cable 56, 73, 76 J Jack 65 JPEG 100 L Label 99 LANDSCAPE 40 LANGUAGE 53 LCD backlight 15, 80 LCD BL LEVEL (LCD back light... LCD BRIGHT 50 LCD COLOR 51 LCD screen 15 LCD SET 50 Lens cover 22 Lid 18 Lithium battery 107 LP (Long Play 50 LUMI. H Handycam Station 10 Help 67 Holding the camcorder......... 14 I Icon ......
... 29 INDOOR 41 "InfoLITHIUM" battery pack 102 Initialize (Reset 26 Install 68 Insulation sheet 32 Internal microphone 26 INT.REC-STL (Interval photo recording) .... 48 i.LINK 103 i.LINK cable 56, 73, 76 J Jack 65 JPEG 100 L Label 99 LANDSCAPE 40 LANGUAGE 53 LCD backlight 15, 80 LCD BL LEVEL (LCD back light... LCD BRIGHT 50 LCD COLOR 51 LCD screen 15 LCD SET 50 Lens cover 22 Lid 18 Lithium battery 107 LP (Long Play 50 LUMI. H Handycam Station 10 Help 67 Holding the camcorder......... 14 I Icon ......
Operating Guide
Page 115
...," " ," "MagicGate," " ," "MagicGate Memory Stick" and "MagicGate Memory Stick Duo" are trademarks or registered trademarks of Sony Corporation. • "InfoLITHIUM" is a trademark of Sony Corporation. • i.LINK and are trademarks of Sony Corporation. • Picture Package is a trademark of Sony Corporation. • is a trademark of Microsoft Corporation. • Macromedia and Macromedia Flash Player are trademarks or...
...," " ," "MagicGate," " ," "MagicGate Memory Stick" and "MagicGate Memory Stick Duo" are trademarks or registered trademarks of Sony Corporation. • "InfoLITHIUM" is a trademark of Sony Corporation. • i.LINK and are trademarks of Sony Corporation. • Picture Package is a trademark of Sony Corporation. • is a trademark of Microsoft Corporation. • Macromedia and Macromedia Flash Player are trademarks or...


