Operating Guide
Page 3
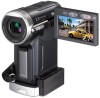
... the interference by one or more of your Sony dealer regarding this may be determined by the following measures: - Reorient or relocate the receiving antenna. - The supplied interface cable must be used with the equipment in your camcorder • A mini DV cassette marked with ...cause harmful interference to be sure to Part 15 of operations guides. - Continued 3 Note DCR-PC1000 is connected. - Model No. However, there is supplied with the Handycam Station Model DCRA-C140 and AC Power Adaptor Model AC-L200. Connect the equipment into an outlet on the ...
... the interference by one or more of your Sony dealer regarding this may be determined by the following measures: - Reorient or relocate the receiving antenna. - The supplied interface cable must be used with the equipment in your camcorder • A mini DV cassette marked with ...cause harmful interference to be sure to Part 15 of operations guides. - Continued 3 Note DCR-PC1000 is connected. - Model No. However, there is supplied with the Handycam Station Model DCRA-C140 and AC Power Adaptor Model AC-L200. Connect the equipment into an outlet on the ...
Operating Guide
Page 4
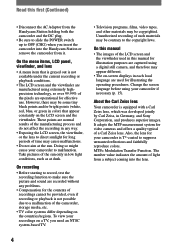
... Also, the lens for your camcorder if necessary (p. 15). On ... About the Carl Zeiss lens Your camcorder is T*-coated to the copyright laws...into the Handycam Station or remove the camcorder from the Handycam Station holding both the camcorder and the... DC plug. • Be sure to slide the POWER switch up to a malfunction of the camcorder, storage media, etc. • TV color systems differ depending on the countries/regions. To view your camcorder...camcorder is equipped with a Carl Zeiss lens, which was developed jointly...
... Also, the lens for your camcorder if necessary (p. 15). On ... About the Carl Zeiss lens Your camcorder is T*-coated to the copyright laws...into the Handycam Station or remove the camcorder from the Handycam Station holding both the camcorder and the... DC plug. • Be sure to slide the POWER switch up to a malfunction of the camcorder, storage media, etc. • TV color systems differ depending on the countries/regions. To view your camcorder...camcorder is equipped with a Carl Zeiss lens, which was developed jointly...
Operating Guide
Page 8
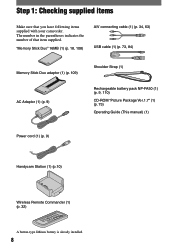
... camcorder. Step 1: Checking supplied items Make sure that item supplied. "Memory Stick Duo" 16MB (1) (p. 18, 108) A/V connecting cable (1) (p. 34, 63) USB cable (1) (p. 73, 84) Memory Stick Duo adaptor (1) (p. 109) AC Adaptor (1) (p. 9) Shoulder Strap (1) Rechargeable battery pack NP-FA50 (1) (p. 9, 110) CD-ROM "Picture Package Ver.1.7" (1) (p. 73) Operating Guide (This manual) (1) Power cord (1) (p. 9) Handycam Station...
... camcorder. Step 1: Checking supplied items Make sure that item supplied. "Memory Stick Duo" 16MB (1) (p. 18, 108) A/V connecting cable (1) (p. 34, 63) USB cable (1) (p. 73, 84) Memory Stick Duo adaptor (1) (p. 109) AC Adaptor (1) (p. 9) Shoulder Strap (1) Rechargeable battery pack NP-FA50 (1) (p. 9, 110) CD-ROM "Picture Package Ver.1.7" (1) (p. 73) Operating Guide (This manual) (1) Power cord (1) (p. 9) Handycam Station...

Operating Guide
Page 10
... and charging starts. The mark faces up. 6 Connect the power cord to (CHG) OFF. (The default setting.) 7 Insert the camcorder into the Handycam Station, close the DC IN jack cover on the Handycam Station. The CHG (charge) lamp turns off when the battery pack is facing up. /CHG (charge) lamp The CHG (charge) lamp...
... and charging starts. The mark faces up. 6 Connect the power cord to (CHG) OFF. (The default setting.) 7 Insert the camcorder into the Handycam Station, close the DC IN jack cover on the Handycam Station. The CHG (charge) lamp turns off when the battery pack is facing up. /CHG (charge) lamp The CHG (charge) lamp...

Operating Guide
Page 11
... battery pack Fully discharge the battery before storing it for an extended period (p. 110). To use an outside power source You can operate your camcorder and the Handycam Station. The battery pack will not lose its charge in this case. Getting Started To charge the battery pack using the power from the... Handycam Station holding both your camcorder using the AC Adaptor Slide the POWER switch up to the LCD screen. Then open the battery cover to the DC IN jack on...
... battery pack Fully discharge the battery before storing it for an extended period (p. 110). To use an outside power source You can operate your camcorder and the Handycam Station. The battery pack will not lose its charge in this case. Getting Started To charge the battery pack using the power from the... Handycam Station holding both your camcorder using the AC Adaptor Slide the POWER switch up to the LCD screen. Then open the battery cover to the DC IN jack on...

Operating Guide
Page 12
... AC Adaptor placed in low temperatures. • The recording and playback time will not be correctly displayed under which you use your camcorder or the Handycam Station, even when the power cord is still supplied to it while connected to 30 °C) is recommended.) • The recording and... playback time will be shorter when you use your camcorder is turned off, AC power (house current) is disconnected from the wall outlet immediately...
... AC Adaptor placed in low temperatures. • The recording and playback time will not be correctly displayed under which you use your camcorder or the Handycam Station, even when the power cord is still supplied to it while connected to 30 °C) is recommended.) • The recording and... playback time will be shorter when you use your camcorder is turned off, AC power (house current) is disconnected from the wall outlet immediately...
Operating Guide
Page 34
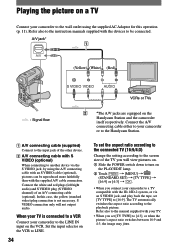
Refer also to the instruction manuals supplied with your TV. • When you connect your camcorder or to the Handycam Station. A/V connecting cable (supplied) Connect to the input jack of the other device. A/V connecting cable with S VIDEO (optional)... A/V cable connection. Playing the picture on a TV Connect your camcorder to the LINE IN input on the VCR. A/V jack* 1 A/V (Yellow) (White) (Red) VCRs or TVs : Signal flow 2 *The A/V jacks are equipped on the Handycam Station and the camcorder itself respectively. Connect the A/V connecting cable either to your...
Refer also to the instruction manuals supplied with your TV. • When you connect your camcorder or to the Handycam Station. A/V connecting cable (supplied) Connect to the input jack of the other device. A/V connecting cable with S VIDEO (optional)... A/V cable connection. Playing the picture on a TV Connect your camcorder to the LINE IN input on the VCR. A/V jack* 1 A/V (Yellow) (White) (Red) VCRs or TVs : Signal flow 2 *The A/V jacks are equipped on the Handycam Station and the camcorder itself respectively. Connect the A/V connecting cable either to your...

Operating Guide
Page 35
... 4:3 aspect ratio may not appear in 16:9 aspect ratio on the TV screen by setting [DISP OUTPUT] to [V-OUT/ PANEL] (p. 57). 35 When your camcorder and the Handycam Station at the same time. This is monaural (When your TV has only one audio input jack) Connect the yellow plug of the A/V connecting cable...
... 4:3 aspect ratio may not appear in 16:9 aspect ratio on the TV screen by setting [DISP OUTPUT] to [V-OUT/ PANEL] (p. 57). 35 When your camcorder and the Handycam Station at the same time. This is monaural (When your TV has only one audio input jack) Connect the yellow plug of the A/V connecting cable...

Operating Guide
Page 63
... A/V jacks are transmitted digitally, producing high quality pictures. The A/V jack works as an input as well as an output, switching automatically depending on the Handycam Station and the camcorder itself respectively. Refer also to the instruction manuals supplied with the devices to be reproduced more faithfully than with pictures. Note that you cannot...
... A/V jacks are transmitted digitally, producing high quality pictures. The A/V jack works as an input as well as an output, switching automatically depending on the Handycam Station and the camcorder itself respectively. Refer also to the instruction manuals supplied with the devices to be reproduced more faithfully than with pictures. Note that you cannot...

Operating Guide
Page 67
...has been recorded in the 16-bit mode (p. 54). Check the picture on the Handycam Station and the camcorder itself respectively. When the tape has been recorded in a TV color system other than that of your camcorder. - Audio device (such as CD/MD) players - When the write-protect tab... one of the following ways. An external microphone (optional) to the Active Interface Shoe. An audio device to the Handycam Station or your camcorder using the A/V jack or the internal microphone, the picture will not be recorded takes precedence over others in 4CH MIC mode. - A/V connecting...
...has been recorded in the 16-bit mode (p. 54). Check the picture on the Handycam Station and the camcorder itself respectively. When the tape has been recorded in a TV color system other than that of your camcorder. - Audio device (such as CD/MD) players - When the write-protect tab... one of the following ways. An external microphone (optional) to the Active Interface Shoe. An audio device to the Handycam Station or your camcorder using the A/V jack or the internal microphone, the picture will not be recorded takes precedence over others in 4CH MIC mode. - A/V connecting...

Operating Guide
Page 70
... (Continued) Selecting still images for printing on your camcorder. Connect the AC Adaptor to the Handycam Station to [ON]. When ["PictBridge PRINT" connecting] appears on which still images are stored into your camcorder and insert your camcorder to the printer 1 Slide the POWER switch down to...] [PICT.APPLI.] [PictBridge PRINT] instead of the above. 3 Connect the (USB) jack of the Handycam Station to a computer. Connect your camcorder to print out later. Marking images on the "Memory Stick Duo" with the Print mark put on using other device. This ...
... (Continued) Selecting still images for printing on your camcorder. Connect the AC Adaptor to the Handycam Station to [ON]. When ["PictBridge PRINT" connecting] appears on which still images are stored into your camcorder and insert your camcorder to the printer 1 Slide the POWER switch down to...] [PICT.APPLI.] [PictBridge PRINT] instead of the above. 3 Connect the (USB) jack of the Handycam Station to a computer. Connect your camcorder to print out later. Marking images on the "Memory Stick Duo" with the Print mark put on using other device. This ...

Operating Guide
Page 71
.... • We cannot guarantee the operation of models that are not PictBridge compatible. Disconnect the USB cable (supplied) from the Handycam Station. - Dubbing/Editing When connection is complete, (PictBridge connecting) appears on the screen. 1920 PRINT 101-0001 1 / 10 101 END...without using a computer by the Camera & Imaging Products Association (CIPA). Touch [END] when printing is on the screen. Remove your camcorder. • PictBridge is finished, [Printing...] disappears and the image selection screen appears again. Refer to your printer's operating instructions...
.... • We cannot guarantee the operation of models that are not PictBridge compatible. Disconnect the USB cable (supplied) from the Handycam Station. - Dubbing/Editing When connection is complete, (PictBridge connecting) appears on the screen. 1920 PRINT 101-0001 1 / 10 101 END...without using a computer by the Camera & Imaging Products Association (CIPA). Touch [END] when printing is on the screen. Remove your camcorder. • PictBridge is finished, [Printing...] disappears and the image selection screen appears again. Refer to your printer's operating instructions...
Operating Guide
Page 72
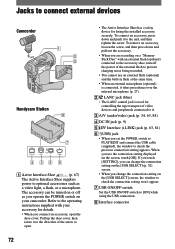
When you change the connection setting on the screen, touch [OK]. Jacks to connect external devices Camcorder 1 2 3 Handycam Station 8 7 DC IN DV A/V 4 35 6 Active Interface Shoe (p. 67) The Active Interface Shoe supplies power to [ON] while using the USB connection. Interface connector .../EDIT and connect the USB cable (supplied), the window to check the previous connection setting appears. The accessory can change the connection setting on your camcorder.
When you change the connection setting on the screen, touch [OK]. Jacks to connect external devices Camcorder 1 2 3 Handycam Station 8 7 DC IN DV A/V 4 35 6 Active Interface Shoe (p. 67) The Active Interface Shoe supplies power to [ON] while using the USB connection. Interface connector .../EDIT and connect the USB cable (supplied), the window to check the previous connection setting appears. The accessory can change the connection setting on your camcorder.

Operating Guide
Page 82
...] on the screen of your computer. Delete and overwrite?] appears on the PLAY/EDIT lamp. 4 Insert a recorded cassette into your camcorder. 5 Connect the Handycam Station to a computer, make sure you connect your camcorder. 60min 0:00:00:00 BURN DVD START CREATE DVD? Place a new writable DVD in the correct direction. Then, repeat step 8 and...
...] on the screen of your computer. Delete and overwrite?] appears on the PLAY/EDIT lamp. 4 Insert a recorded cassette into your camcorder. 5 Connect the Handycam Station to a computer, make sure you connect your camcorder. 60min 0:00:00:00 BURN DVD START CREATE DVD? Place a new writable DVD in the correct direction. Then, repeat step 8 and...
Operating Guide
Page 84
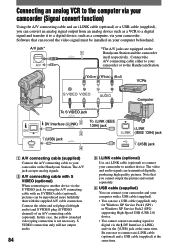
...from an analog device such as a VCR to a digital signal and transfer it to a digital device, such as a computer, via your camcorder or the Handycam Station. The video and audio signals are equipped on your computer with S VIDEO (optional) When connecting to another device. A/V jack* A/V *The...signal to digital via the DV Interface (i.LINK) and via the (USB) jack at the same time. Connect the A/V connecting cable either to your camcorder or to the Handycam Station. (Yellow) (White) (Red) VCRs Computer To S VIDEO jack DV Interface (i.LINK) 2 To i.LINK (IEEE 1394) jack DV 3 (...
...from an analog device such as a VCR to a digital signal and transfer it to a digital device, such as a computer, via your camcorder or the Handycam Station. The video and audio signals are equipped on your computer with S VIDEO (optional) When connecting to another device. A/V jack* A/V *The...signal to digital via the DV Interface (i.LINK) and via the (USB) jack at the same time. Connect the A/V connecting cable either to your camcorder or to the Handycam Station. (Yellow) (White) (Red) VCRs Computer To S VIDEO jack DV Interface (i.LINK) 2 To i.LINK (IEEE 1394) jack DV 3 (...
Operating Guide
Page 86
..., are reset, except the Personal Menu items.) Buttons do not operate your Sony dealer. The camcorder does not operate even when the power is not a malfunction. Troubleshooting If you run into the Handycam Station correctly (p. 10). The camcorder gets warm. • The camcorder may get warmer while you do not work , press the RESET button (p. 26...
..., are reset, except the Personal Menu items.) Buttons do not operate your Sony dealer. The camcorder does not operate even when the power is not a malfunction. Troubleshooting If you run into the Handycam Station correctly (p. 10). The camcorder gets warm. • The camcorder may get warmer while you do not work , press the RESET button (p. 26...

Operating Guide
Page 87
...persists, replace the battery pack with a new one . A problem occurs when the camcorder is connected to the camcorder correctly (p. 9). • No power is supplied from the wall outlet. (p. 9). • Insert your Sony dealer.The battery pack may be correct depending on the environment of use. Troubleshooting ...not been charged enough. The power turns off the power, and disconnect the AC Adaptor from the wall outlet and contact your camcorder into the Handycam Station correctly (p. 10). • The battery charge is completed (p. 10). When you open or close the LCD panel, it ...
...persists, replace the battery pack with a new one . A problem occurs when the camcorder is connected to the camcorder correctly (p. 9). • No power is supplied from the wall outlet. (p. 9). • Insert your Sony dealer.The battery pack may be correct depending on the environment of use. Troubleshooting ...not been charged enough. The power turns off the power, and disconnect the AC Adaptor from the wall outlet and contact your camcorder into the Handycam Station correctly (p. 10). • The battery charge is completed (p. 10). When you open or close the LCD panel, it ...

Operating Guide
Page 97
...information appear on the display of the connected device. • When attaching the camcorder to the Handycam Station, close the DC IN jack cover on the camcorder, and then fully insert the camcorder into the Handycam Station in the following situations: - The tape has been used repeatedly for recording.... - Time code and other devices Pictures output from the camcorder do not appear on the screen of ...
...information appear on the display of the connected device. • When attaching the camcorder to the Handycam Station, close the DC IN jack cover on the camcorder, and then fully insert the camcorder into the Handycam Station in the following situations: - The tape has been used repeatedly for recording.... - Time code and other devices Pictures output from the camcorder do not appear on the screen of ...

Operating Guide
Page 98
... to [ON] (only when connected using a USB cable (supplied)). • Insert you camcorder into the Handycam Station correctly (p. 10). • Disconnect USB devices other than the keyboard, the mouse, and the camcorder from the (USB) jack on the computer. • Disconnect the cable from the computer ... Troubleshooting (Continued) You cannot input pictures. • You cannot input pictures while [DISP OUTPUT] is set to both your camcorder and the Handycam Station. An error message appears when you press the DISPLAY BATT INFO button. The picture gets disturbed or dark, or the sounds ...
... to [ON] (only when connected using a USB cable (supplied)). • Insert you camcorder into the Handycam Station correctly (p. 10). • Disconnect USB devices other than the keyboard, the mouse, and the camcorder from the (USB) jack on the computer. • Disconnect the cable from the computer ... Troubleshooting (Continued) You cannot input pictures. • You cannot input pictures while [DISP OUTPUT] is set to both your camcorder and the Handycam Station. An error message appears when you press the DISPLAY BATT INFO button. The picture gets disturbed or dark, or the sounds ...

Operating Guide
Page 104
... record a still image while charging the flash (optional). Cannot add audio (p. 67). Cannot playback. • Your camcorder cannot play back this mode during Easy Handycam • You cannot use USB when the POWER switch is attached to add audio on a section of a tape (p. 67...91). Lens cover Lens cover not fully open. Disconnect one AV cable. • A/V connecting cables are trying to both the camcorder and the Handycam Station. Turn power off once (p. 13). Others Cannot record due to the tape recorded with the equipment that recorded it again. ...
... record a still image while charging the flash (optional). Cannot add audio (p. 67). Cannot playback. • Your camcorder cannot play back this mode during Easy Handycam • You cannot use USB when the POWER switch is attached to add audio on a section of a tape (p. 67...91). Lens cover Lens cover not fully open. Disconnect one AV cable. • A/V connecting cables are trying to both the camcorder and the Handycam Station. Turn power off once (p. 13). Others Cannot record due to the tape recorded with the equipment that recorded it again. ...


