Operating Guide
Page 4
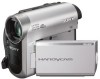
.... - Improper adjustment of time, unplug it is damaged or frayed. - Replacement parts When replacement parts are specified in the operating instructions. IMPORTANT SAFEGUARDS (Continued) Lightning For added protection for this indicates a need for long periods of other controls may result in fire, electric shock, or other hazards. this set has been subject to qualified service personnel. When the power cord (mains lead) or plug is left...
.... - Improper adjustment of time, unplug it is damaged or frayed. - Replacement parts When replacement parts are specified in the operating instructions. IMPORTANT SAFEGUARDS (Continued) Lightning For added protection for this indicates a need for long periods of other controls may result in fire, electric shock, or other hazards. this set has been subject to qualified service personnel. When the power cord (mains lead) or plug is left...
Operating Guide
Page 6
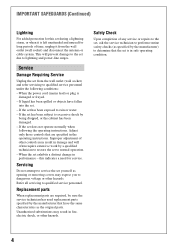
... CD-ROM) Type of cassette you can use mini DV cassettes marked with . The supplied interface cable must be used with the limits for help. However, there is encouraged to try to Subpart B of Part 15 of FCC Rules. For DCR-HC54 "First Step Guide" for a Class B digital device, pursuant to comply with the equipment in a particular installation. See "On use About the manuals supplied with AC Adaptor Model...
... CD-ROM) Type of cassette you can use mini DV cassettes marked with . The supplied interface cable must be used with the limits for help. However, there is encouraged to try to Subpart B of Part 15 of FCC Rules. For DCR-HC54 "First Step Guide" for a Class B digital device, pursuant to comply with the equipment in a particular installation. See "On use About the manuals supplied with AC Adaptor Model...

Operating Guide
Page 7
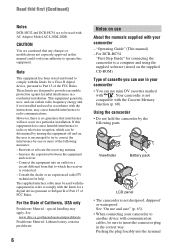
... specifications of your recordings on the model DCR-HC54. To view your camcorder. About the Carl Zeiss lens Your camcorder is equipped with a Carl Zeiss lens, which was developed jointly by Carl Zeiss, in color) that is grayed out is indicated on the bottom of the LCD screen and the viewfinder used in each local language are used on -screen displays in this manual • The images of your camcorder...
... specifications of your recordings on the model DCR-HC54. To view your camcorder. About the Carl Zeiss lens Your camcorder is equipped with a Carl Zeiss lens, which was developed jointly by Carl Zeiss, in color) that is grayed out is indicated on the bottom of the LCD screen and the viewfinder used in each local language are used on -screen displays in this manual • The images of your camcorder...

Operating Guide
Page 9
...- AUDIO MIX LCD/VF SET menu 41 - REC MODE/AUDIO MODE/ REMAIN SETUP MENU menu 42 - VCR SET menu 40 - Dubbing/Editing Dubbing to VCR or DVD/HDD recorders 44 Recording pictures from a VCR, etc 46 Using a Computer What you can do with Windows computer (DCR-HC54 48 Installing the "First Step Guide" and software (DCR-HC54 49 Viewing "First Step Guide" (DCRHC54 51 Troubleshooting Troubleshooting 52 Warning indicators and messages 57 Continued , 9 LCD B.L./LCD COLOR/VF B.L., etc TAPE SET menu 42 - OTHERS menu 43 - P EFFECT CAMERA SET menu 39 - WORLD TIME, etc. D ZOOM/WIDE...
...- AUDIO MIX LCD/VF SET menu 41 - REC MODE/AUDIO MODE/ REMAIN SETUP MENU menu 42 - VCR SET menu 40 - Dubbing/Editing Dubbing to VCR or DVD/HDD recorders 44 Recording pictures from a VCR, etc 46 Using a Computer What you can do with Windows computer (DCR-HC54 48 Installing the "First Step Guide" and software (DCR-HC54 49 Viewing "First Step Guide" (DCRHC54 51 Troubleshooting Troubleshooting 52 Warning indicators and messages 57 Continued , 9 LCD B.L./LCD COLOR/VF B.L., etc TAPE SET menu 42 - OTHERS menu 43 - P EFFECT CAMERA SET menu 39 - WORLD TIME, etc. D ZOOM/WIDE...
Operating Guide
Page 13
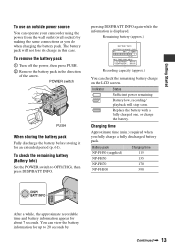
... power source You can operate your camcorder using the power from the wall outlet (wall socket) by Continued , 13 POWER switch 1 2 PUSH When storing the battery pack Fully discharge the battery before storing it for about 7 seconds. Remaining battery (approx.) BATTERY INFO BATTERY CHARGE LEVEL 0% 50% 100% REC TIME AVAILABLE LCD SCREEN : 85 min VIEWFINDER : 99 min Recording capacity (approx.) You can check the remaining battery charge on the LCD screen. To remove the battery pack 1 Turn...
... power source You can operate your camcorder using the power from the wall outlet (wall socket) by Continued , 13 POWER switch 1 2 PUSH When storing the battery pack Fully discharge the battery before storing it for about 7 seconds. Remaining battery (approx.) BATTERY INFO BATTERY CHARGE LEVEL 0% 50% 100% REC TIME AVAILABLE LCD SCREEN : 85 min VIEWFINDER : 99 min Recording capacity (approx.) You can check the remaining battery charge on the LCD screen. To remove the battery pack 1 Turn...

Operating Guide
Page 14
... if your camcorder is turned off and zooming. b Notes • All times measured under which you use a fully charged battery pack. Battery pack NP-FH30 (supplied) NP-FH50 NP-FH70 NP-FH100 LCD panel opened 105 170 370 845 LCD panel closed . Playing time Approximate time (min.) available when you repeat recording start/stop, turning the power on/off , AC power (house current) is recommended.) • The recording and playback time will...
... if your camcorder is turned off and zooming. b Notes • All times measured under which you use a fully charged battery pack. Battery pack NP-FH30 (supplied) NP-FH50 NP-FH70 NP-FH100 LCD panel opened 105 170 370 845 LCD panel closed . Playing time Approximate time (min.) available when you repeat recording start/stop, turning the power on/off , AC power (house current) is recommended.) • The recording and playback time will...

Operating Guide
Page 15
... be displayed during playback (see page 34 for the hour and minute. PLAY/EDIT: To play or edit pictures. You can be cleared from the memory. Continued , 15 To reset the date and time You can set with / . 5 Make sure the date and time settings are automatically recorded on your camcorder for about 3 months, the built-in the direction of purchase, the power is set to turn on the tape...
... be displayed during playback (see page 34 for the hour and minute. PLAY/EDIT: To play or edit pictures. You can be cleared from the memory. Continued , 15 To reset the date and time You can set with / . 5 Make sure the date and time settings are automatically recorded on your camcorder for about 3 months, the built-in the direction of purchase, the power is set to turn on the tape...
Operating Guide
Page 28
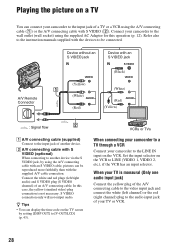
... the instruction manuals supplied with the supplied A/V cable connection. B A/V connecting cable with S VIDEO (optional) When connecting to another device. Device without an S VIDEO jack Device with S VIDEO (2). In this operation (p. 12). Connect your camcorder to the LINE IN input on the VCR. Connect the white and red plugs (left channel) or the red (right channel) plug to the audio input jack of an A/V connecting cable. S VIDEO connection only will not output audio. Set the input selector on the TV screen by using the A/V connecting cable with an S VIDEO cable, pictures can...
... the instruction manuals supplied with the supplied A/V cable connection. B A/V connecting cable with S VIDEO (optional) When connecting to another device. Device without an S VIDEO jack Device with S VIDEO (2). In this operation (p. 12). Connect your camcorder to the LINE IN input on the VCR. Connect the white and red plugs (left channel) or the red (right channel) plug to the audio input jack of an A/V connecting cable. S VIDEO connection only will not output audio. Set the input selector on the TV screen by using the A/V connecting cable with an S VIDEO cable, pictures can...
Operating Guide
Page 32
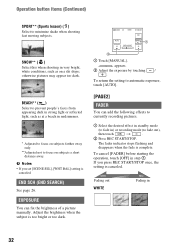
... page 26. To return the setting to focus on a ski slope; The fader indicator stops flashing and disappears when the fade is canceled. Operation button items (Continued) SPORT** (Sports lesson) ( ) Select to fade out), then touch t . 2 Press REC START/STOP. SNOW** ( ) Select this when shooting in very bright, white conditions, such as at a beach in ) or recording mode (to minimize shake when...
... page 26. To return the setting to focus on a ski slope; The fader indicator stops flashing and disappears when the fade is canceled. Operation button items (Continued) SPORT** (Sports lesson) ( ) Select to fade out), then touch t . 2 Press REC START/STOP. SNOW** ( ) Select this when shooting in very bright, white conditions, such as at a beach in ) or recording mode (to minimize shake when...
Operating Guide
Page 35
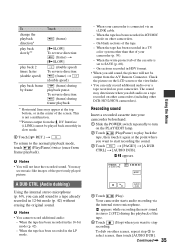
... dub on your camcorder beforehand. 1 Slide the POWER switch repeatedly to turn on the PLAY/EDIT lamp. 2 Touch (Play/Pause) to a tape already recorded in HDV format. • When you want to the normal playback mode, touch (Play/Pause) twice (once from the A/V Remote Connector. Continued , 35 Using the Menu To reverse direction: (frame) during playback pause. Check the picture on the LCD screen or the viewfinder. • You can add sound to play back frame...
... dub on your camcorder beforehand. 1 Slide the POWER switch repeatedly to turn on the PLAY/EDIT lamp. 2 Touch (Play/Pause) to a tape already recorded in HDV format. • When you want to the normal playback mode, touch (Play/Pause) twice (once from the A/V Remote Connector. Continued , 35 Using the Menu To reverse direction: (frame) during playback pause. Check the picture on the LCD screen or the viewfinder. • You can add sound to play back frame...

Operating Guide
Page 37
...VCR SET menu (p. 40) AUDIO MIX - z z BRT NORMAL LCD COLOR z z - ON EDITSEARCH z - TAPE SET menu (p. 42) REC MODE z z SP AUDIO MODE z - 12BIT REMAIN z z AUTO SETUP MENU menu (p. 42) USB STREAM (DCR-HC54) z z OFF LANGUAGE z z z DEMO MODE z - ON OTHERS menu (p. 43) WORLD TIME z z -* A.SHUT OFF z z 5min DISP OUT z z LCD GUIDEFRAME z - OFF * The value set before Easy Handycam operation will be retained during Easy Handycam operation. OFF N.S.LIGHT z - z - z z BRT NORMAL WIDE DISP z z - Menu items • Available menu...
...VCR SET menu (p. 40) AUDIO MIX - z z BRT NORMAL LCD COLOR z z - ON EDITSEARCH z - TAPE SET menu (p. 42) REC MODE z z SP AUDIO MODE z - 12BIT REMAIN z z AUTO SETUP MENU menu (p. 42) USB STREAM (DCR-HC54) z z OFF LANGUAGE z z z DEMO MODE z - ON OTHERS menu (p. 43) WORLD TIME z z -* A.SHUT OFF z z 5min DISP OUT z z LCD GUIDEFRAME z - OFF * The value set before Easy Handycam operation will be retained during Easy Handycam operation. OFF N.S.LIGHT z - z - z z BRT NORMAL WIDE DISP z z - Menu items • Available menu...

Operating Guide
Page 42
... will be interrupted when you set to be used on selecting menu items. USB STREAM (DCR-HC54) You can select the language to other camcorders or VCRs. • When you cannot find your computer (USB Streaming) via the USB cable. When a cassette is set the POWER switch to 1.5 times the SP mode (Long Play). See page 29 for details (p. 51). REMAIN B AUTO Displays the remaining tape indicator for when you mix...
... will be interrupted when you set to be used on selecting menu items. USB STREAM (DCR-HC54) You can select the language to other camcorders or VCRs. • When you cannot find your computer (USB Streaming) via the USB cable. When a cassette is set the POWER switch to 1.5 times the SP mode (Long Play). See page 29 for details (p. 51). REMAIN B AUTO Displays the remaining tape indicator for when you mix...
Operating Guide
Page 44
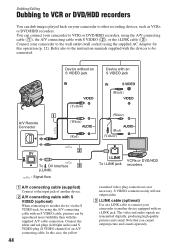
... an S VIDEO jack (Black) 1 A/V Remote Connector (Yellow) (White) (Red) (White) (Red) (Yellow) 2 DV To DV Interface 3 (i.LINK) : Signal flow A A/V connecting cable (supplied) Connect to the input jack of an A/V connecting cable. The video and audio signals are transmitted digitally, producing high quality pictures and sound. Connect your camcorder to other recording devices, such as VCRs or DVD/HDD recorders. Refer also to the instruction manuals supplied with the devices to be reproduced more faithfully than with the supplied A/V cable connection. In this operation (p. 12). Device...
... an S VIDEO jack (Black) 1 A/V Remote Connector (Yellow) (White) (Red) (White) (Red) (Yellow) 2 DV To DV Interface 3 (i.LINK) : Signal flow A A/V connecting cable (supplied) Connect to the input jack of an A/V connecting cable. The video and audio signals are transmitted digitally, producing high quality pictures and sound. Connect your camcorder to other recording devices, such as VCRs or DVD/HDD recorders. Refer also to the instruction manuals supplied with the devices to be reproduced more faithfully than with the supplied A/V cable connection. In this operation (p. 12). Device...
Operating Guide
Page 45
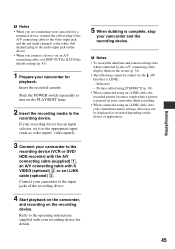
... POWER switch repeatedly to turn on the PLAY/EDIT lamp. 2 Insert the recording media in the recording device. Insert the recorded cassette. b Notes • To record the date/time and camera settings data when connected by the A/V connecting cable, display them on the screen (p. 34). • The following cannot be displayed or recorded depending on the device or application. 45 Refer to the operating instructions supplied with S VIDEO (optional) 2 or an i.LINK cable (optional) 3. Connect your camcorder to the recording device (VCR or DVD/ HDD recorder...
... POWER switch repeatedly to turn on the PLAY/EDIT lamp. 2 Insert the recording media in the recording device. Insert the recorded cassette. b Notes • To record the date/time and camera settings data when connected by the A/V connecting cable, display them on the screen (p. 34). • The following cannot be displayed or recorded depending on the device or application. 45 Refer to the operating instructions supplied with S VIDEO (optional) 2 or an i.LINK cable (optional) 3. Connect your camcorder to the recording device (VCR or DVD/ HDD recorder...

Operating Guide
Page 52
... (charge) lamp does not light while the battery pack is not a malfunction. The menu item settings have elapsed while you do not work. • During Easy Handycam operation, not all settings are reset.) Buttons do not operate your Sony dealer. • Overall operations/Easy Handycam ..... 52 • Batteries/Power sources 52 • LCD screen/viewfinder 53 • Cassette tapes 53 • Recording 54 • Playback 55 • Dubbing/Editing/Connecting to other devices 55 • Connecting...
... (charge) lamp does not light while the battery pack is not a malfunction. The menu item settings have elapsed while you do not work. • During Easy Handycam operation, not all settings are reset.) Buttons do not operate your Sony dealer. • Overall operations/Easy Handycam ..... 52 • Batteries/Power sources 52 • LCD screen/viewfinder 53 • Cassette tapes 53 • Recording 54 • Playback 55 • Dubbing/Editing/Connecting to other devices 55 • Connecting...
Operating Guide
Page 55
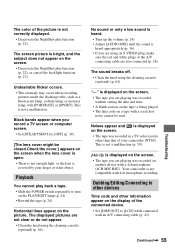
... lens cover might be read. Playback You cannot play back a tape. • Slide the POWER switch repeatedly to [LCD] while connected with a 4ch microphone (4CH MIC REC). Horizontal lines appear on the screen. No sound or only a low sound is heard. • Turn up the volume (p. 24). • Adjust [AUDIO MIX] until the sound is being played. • The data code on the screen. • The tape you are using an S VIDEO plug, make sure the red and white plugs...
... lens cover might be read. Playback You cannot play back a tape. • Slide the POWER switch repeatedly to [LCD] while connected with a 4ch microphone (4CH MIC REC). Horizontal lines appear on the screen. No sound or only a low sound is heard. • Turn up the volume (p. 24). • Adjust [AUDIO MIX] until the sound is being played. • The data code on the screen. • The tape you are using an S VIDEO plug, make sure the red and white plugs...
Operating Guide
Page 60
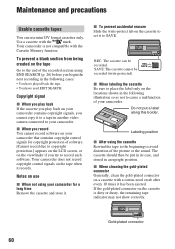
... record software on the cassette is not compatible with the mark. Your camcorder is dirty or dusty, the remaining tape indicator may not show correctly. Maintenance and precautions Usable cassette tapes You can be recorded. Do not put in its case, and stored in another video camera connected to cause a malfunction of software. [Cannot record due to copyright protection.] appears on the LCD screen, or on use mini DV format cassettes...
... record software on the cassette is not compatible with the mark. Your camcorder is dirty or dusty, the remaining tape indicator may not show correctly. Maintenance and precautions Usable cassette tapes You can be recorded. Do not put in its case, and stored in another video camera connected to cause a malfunction of software. [Cannot record due to copyright protection.] appears on the LCD screen, or on use mini DV format cassettes...
Operating Guide
Page 63
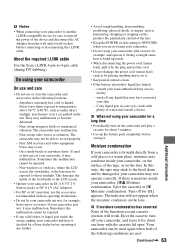
... tape may stick to the head drum and be damaged or your camcorder may have it checked by placing anything heavy on the lens. If there is brought directly from the wall outlet (wall socket) before operating it . Near windows or outdoors, where the LCD screen, the viewfinder, or the lens may malfunction. About the required i.LINK cable Use the Sony i.LINK 4-pin-to-4-pin cable...
... tape may stick to the head drum and be damaged or your camcorder may have it checked by placing anything heavy on the lens. If there is brought directly from the wall outlet (wall socket) before operating it . Near windows or outdoors, where the LCD screen, the viewfinder, or the lens may malfunction. About the required i.LINK cable Use the Sony i.LINK 4-pin-to-4-pin cable...
Operating Guide
Page 64
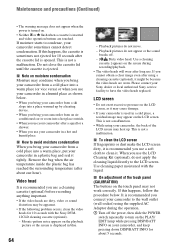
... the video heads replaced. x On adjustment of the LCD screen may appear on your camcorder in a humid place as it may be because the video heads are worn. Remove the bag when the air temperature inside the plastic bag has reached the surrounding temperature (after the cassette lid is used in blue. 64 - Playback pictures do not appear or the sound breaks off the power, then...
... the video heads replaced. x On adjustment of the LCD screen may appear on your camcorder in a humid place as it may be because the video heads are worn. Remove the bag when the air temperature inside the plastic bag has reached the surrounding temperature (after the cassette lid is used in blue. 64 - Playback pictures do not appear or the sound breaks off the power, then...
Operating Guide
Page 75
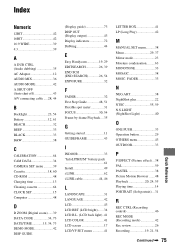
... AUDIO MODE 42 A.SHUT OFF (Auto shut off 43 A/V connecting cable .....28, 44 B Backlight 23, 54 Battery 12, 61 BEACH 32 BEEP 33 BLACK 33 B&W 38 C CALIBRATION 64 CAM DATA 34 CAMERA SET menu ...........39 Cassette 18, 60 CD-ROM 48 Charging time 13 Cleaning cassette 64 CLOCK SET 15 Computer 48 D D ZOOM (Digital zoom) ......39 DATA CODE 34, 73 DATE/TIME 15, 34, 73 DEMO MODE 42 DISP GUIDE (Display guide 73 DISP OUT (Display output 43 Display indicators 72 Dubbing 44 E Easy Handycam...
... AUDIO MODE 42 A.SHUT OFF (Auto shut off 43 A/V connecting cable .....28, 44 B Backlight 23, 54 Battery 12, 61 BEACH 32 BEEP 33 BLACK 33 B&W 38 C CALIBRATION 64 CAM DATA 34 CAMERA SET menu ...........39 Cassette 18, 60 CD-ROM 48 Charging time 13 Cleaning cassette 64 CLOCK SET 15 Computer 48 D D ZOOM (Digital zoom) ......39 DATA CODE 34, 73 DATE/TIME 15, 34, 73 DEMO MODE 42 DISP GUIDE (Display guide 73 DISP OUT (Display output 43 Display indicators 72 Dubbing 44 E Easy Handycam...


