
Operating Guide
Page 8
Creating a DVD (Direct Access to "Click to DVD 60 Troubleshooting Troubleshooting 63 Warning indicators and messages 74 Additional Information Using your camcorder abroad 77 Usable cassette tapes 78 About the "InfoLITHIUM" battery pack 79 About i.LINK 80 Maintenance and precautions 81 Using the Strap Belt as a wrist strap 84 Attaching the Shoulder Strap 85 Specifications 85 Index...87 8
Creating a DVD (Direct Access to "Click to DVD 60 Troubleshooting Troubleshooting 63 Warning indicators and messages 74 Additional Information Using your camcorder abroad 77 Usable cassette tapes 78 About the "InfoLITHIUM" battery pack 79 About i.LINK 80 Maintenance and precautions 81 Using the Strap Belt as a wrist strap 84 Attaching the Shoulder Strap 85 Specifications 85 Index...87 8
Operating Guide
Page 63
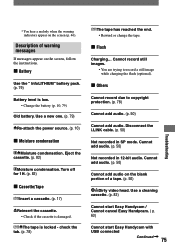
...settings are reset.) You cannot turn Easy Handycam operation on . • Disconnect the AC Adaptor from your camcorder (p. 17). This is set to troubleshoot the problem. Change the setting of the functions that are not displayed on for a long time. The camcorder gets warm. • This is ...being charged. • Slide the POWER switch up to their defaults. Troubleshooting Troubleshooting If you do not work, press the RESET button (p. 23) using your Sony dealer. Batteries/Power sources The power abruptly...
...settings are reset.) You cannot turn Easy Handycam operation on . • Disconnect the AC Adaptor from your camcorder (p. 17). This is set to troubleshoot the problem. Change the setting of the functions that are not displayed on for a long time. The camcorder gets warm. • This is ...being charged. • Slide the POWER switch up to their defaults. Troubleshooting Troubleshooting If you do not work, press the RESET button (p. 23) using your Sony dealer. Batteries/Power sources The power abruptly...

Operating Guide
Page 65
...Memory. • This camcorder does not support Cassette Memory, so the indicator does not appear. The picture is open . • Moisture condensation is starting in the viewfinder is not displayed. • Set [ REMAIN] to [ON] to the indicator list (p. 74). Troubleshooting An unknown indicator appears...8226; Close the LCD panel. The remaining tape indicator is not clear. • Use the viewfinder lens adjustment lever to the camcorder (p. 10). This is connected correctly (p. 10). • Remove the battery pack from the wall outlet or remove the battery pack without ...
...Memory. • This camcorder does not support Cassette Memory, so the indicator does not appear. The picture is open . • Moisture condensation is starting in the viewfinder is not displayed. • Set [ REMAIN] to [ON] to the indicator list (p. 74). Troubleshooting An unknown indicator appears...8226; Close the LCD panel. The remaining tape indicator is not clear. • Use the viewfinder lens adjustment lever to the camcorder (p. 10). This is connected correctly (p. 10). • Remove the battery pack from the wall outlet or remove the battery pack without ...
Operating Guide
Page 67
...• Set [STEADYSHOT] to [MANUAL] (p. 33) or select [SPOT METER] (p. 32). • The BACK LIGHT function does not work during Easy Handycam operation. Playback You cannot play back the tape. • Slide the POWER switch down to [ON] (p. 42). Continued 67 This is not a... occurs. • This occurs when recording pictures under a fluorescent lamp, sodium lamp, or mercury lamp with [PORTRAIT] or [SPORTS]. Troubleshooting [STEADYSHOT] does not function. • Set [STEADYSHOT] to turn on the PLAY/EDIT lamp. • Rewind the tape (p. 21). This is not a...
...• Set [STEADYSHOT] to [MANUAL] (p. 33) or select [SPOT METER] (p. 32). • The BACK LIGHT function does not work during Easy Handycam operation. Playback You cannot play back the tape. • Slide the POWER switch down to [ON] (p. 42). Continued 67 This is not a... occurs. • This occurs when recording pictures under a fluorescent lamp, sodium lamp, or mercury lamp with [PORTRAIT] or [SPORTS]. Troubleshooting [STEADYSHOT] does not function. • Set [STEADYSHOT] to turn on the PLAY/EDIT lamp. • Rewind the tape (p. 21). This is not a...
Operating Guide
Page 69
... PLUS switch is set to ON. Dubbing/Editing/Connecting to other devices Time code and other information appears in the current recording/playback situation. Menu Troubleshooting Menu items are grayed out. • You cannot select grayed items in the display of another device for dubbing a picture from connected devices are not... (p. 51). You cannot use [SPOT METER]. • You cannot use NightShot plus . • If you use [SPOT METER] together with [PROGRAM AE]. Pictures from your camcorder.
... PLUS switch is set to ON. Dubbing/Editing/Connecting to other devices Time code and other information appears in the current recording/playback situation. Menu Troubleshooting Menu items are grayed out. • You cannot select grayed items in the display of another device for dubbing a picture from connected devices are not... (p. 51). You cannot use [SPOT METER]. • You cannot use NightShot plus . • If you use [SPOT METER] together with [PROGRAM AE]. Pictures from your camcorder.
Operating Guide
Page 71
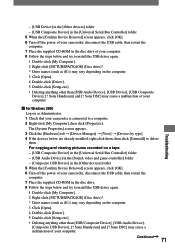
Troubleshooting - [USB Device] in the [Other devices] folder - [USB Composite Device] in the [Universal Serial Bus Controller] folder 5 When the [Confirm Device Removal] screen appears, click [OK]. 6 Turn off the power of your camcorder, disconnect the USB cable, ...Computer]. 2 Right-click [PICTUREPACKAGE] (Disc drive)*. * Drive names (such as Administrator. 1 Check that your camcorder is connected to a computer. 2 Right-click [My Computer], then click [Properties]. Sony Handycam] and [? For copying and viewing pictures recorded on a tape - [USB Composite Device] in the [Universal ...
Troubleshooting - [USB Device] in the [Other devices] folder - [USB Composite Device] in the [Universal Serial Bus Controller] folder 5 When the [Confirm Device Removal] screen appears, click [OK]. 6 Turn off the power of your camcorder, disconnect the USB cable, ...Computer]. 2 Right-click [PICTUREPACKAGE] (Disc drive)*. * Drive names (such as Administrator. 1 Check that your camcorder is connected to a computer. 2 Right-click [My Computer], then click [Properties]. Sony Handycam] and [? For copying and viewing pictures recorded on a tape - [USB Composite Device] in the [Universal ...
Operating Guide
Page 73
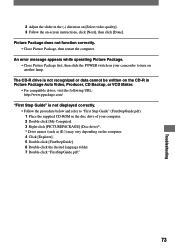
... turn on the computer. 4 Click [Explorer]. 5 Double-click [FirstStepGuide]. 6 Double-click the desired language folder. 7 Double-click "FirstStepGuide.pdf." 73 Troubleshooting 2 Adjust the slider in the disc drive of your camcorder to "First Step Guide" (FirstStepGuide.pdf). 1 Place the supplied CD-ROM in the (-) direction on [Select video quality]. 3 Follow the on...
... turn on the computer. 4 Click [Explorer]. 5 Double-click [FirstStepGuide]. 6 Double-click the desired language folder. 7 Double-click "FirstStepGuide.pdf." 73 Troubleshooting 2 Adjust the slider in the disc drive of your camcorder to "First Step Guide" (FirstStepGuide.pdf). 1 Place the supplied CD-ROM in the (-) direction on [Select video quality]. 3 Follow the on...
Operating Guide
Page 75
... in 12-bit audio. Eject the cassette. (p. 82) Moisture condensation. Use a cleaning cassette. (p. 82) Cannot start Easy Handycam / Cannot cancel Easy Handycam. ( p. 63) Cannot start Easy Handycam with USB connected Continued 75 Troubleshooting check the tab. (p. 78) The tape has reached the end. • Rewind or change the tape. Flash...
... in 12-bit audio. Eject the cassette. (p. 82) Moisture condensation. Use a cleaning cassette. (p. 82) Cannot start Easy Handycam / Cannot cancel Easy Handycam. ( p. 63) Cannot start Easy Handycam with USB connected Continued 75 Troubleshooting check the tab. (p. 78) The tape has reached the end. • Rewind or change the tape. Flash...

