Operating Guide
Page 3
... to fit, contact your electrician to the operating instructions. Overloading Do not overload wall outlets, extension cords or convenience receptacles beyond their capacity, since this manual for necessary ventilation. Use Power Sources This set through openings as they may be walked on the appliance, or the one described in a wet basement...
... to fit, contact your electrician to the operating instructions. Overloading Do not overload wall outlets, extension cords or convenience receptacles beyond their capacity, since this manual for necessary ventilation. Use Power Sources This set through openings as they may be walked on the appliance, or the one described in a wet basement...

Operating Guide
Page 5
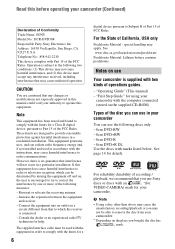
...with the specified type only. and CANADA RECYCLING LITHIUM-ION BATTERIES Lithium-Ion batteries are located on the bottom. DCR-DVD Serial No. For more information regarding this product. Telephone No.: 858-942-2230 This device complies with Part 15 of Conformity Trade Name.... Address: 16530 Via Esprillo, San Diego, CA 92127 U.S.A. Read this before operating your Sony dealer regarding recycling of rechargeable batteries, call upon your camcorder Before operating the unit, please read this manual thoroughly, and retain it for the FCC related matters only. You can help preserve our ...
...with the specified type only. and CANADA RECYCLING LITHIUM-ION BATTERIES Lithium-Ion batteries are located on the bottom. DCR-DVD Serial No. For more information regarding this product. Telephone No.: 858-942-2230 This device complies with Part 15 of Conformity Trade Name.... Address: 16530 Via Esprillo, San Diego, CA 92127 U.S.A. Read this before operating your Sony dealer regarding recycling of rechargeable batteries, call upon your camcorder Before operating the unit, please read this manual thoroughly, and retain it for the FCC related matters only. You can help preserve our ...
Operating Guide
Page 6
... with the equipment in this manual could void your camcorder You can be able to remove the disc from that may cause the unsatisfactory recording/playback or you use the following discs only. - 8cm DVD-RW - 8cm DVD+RW - 8cm DVD-R - 8cm DVD+R DL Use the discs with...of recording / playback, we recommend that any interference received, including interference that to which can use Sony discs or discs with an *(for VIDEO CAMERA) mark for using your camcorder (Continued) Declaration of operations guides. - Read this equipment does cause harmful interference to radio or ...
... with the equipment in this manual could void your camcorder You can be able to remove the disc from that may cause the unsatisfactory recording/playback or you use the following discs only. - 8cm DVD-RW - 8cm DVD+RW - 8cm DVD-R - 8cm DVD+R DL Use the discs with...of recording / playback, we recommend that any interference received, including interference that to which can use Sony discs or discs with an *(for VIDEO CAMERA) mark for using your camcorder (Continued) Declaration of operations guides. - Read this equipment does cause harmful interference to radio or ...

Operating Guide
Page 8
.... About the marks used in this manual • The operations available depend on -screen displays in this manual are normal results of disc you need...camcorder to 8cm DVD discs. Use a DVD-RW/DVD+RW for trial recording (p. 14). • Compensation for video cameras and offers a quality typical of the camcorder, storage media, etc. • TV color systems differ depending on a DVD-R/DVD...camcorder is not possible due to make sure the image and sound are recorded without notice. • The illustration used . About language setting The on the disc used in Germany, and Sony...
.... About the marks used in this manual • The operations available depend on -screen displays in this manual are normal results of disc you need...camcorder to 8cm DVD discs. Use a DVD-RW/DVD+RW for trial recording (p. 14). • Compensation for video cameras and offers a quality typical of the camcorder, storage media, etc. • TV color systems differ depending on a DVD-R/DVD...camcorder is not possible due to make sure the image and sound are recorded without notice. • The illustration used . About language setting The on the disc used in Germany, and Sony...

Operating Guide
Page 14
... moving and complex images are recorded at a higher bit rate, and this manual, VIDEO mode is compatible with your camcorder (deleting and rearranging the order of images). In VIDEO mode, only the most DVD devices, especially after finalizing. A recording format that is compatible with most recent... time. A finalized disc can record on both sides of a disc. A recording format that enables editing with 8cm DVD-RW, DVD+RW, DVD-R and DVD+R DL. Your camcorder uses the VBR (Variable Bit Rate) format to automatically adjust image quality to suit the recording scene. VIDEO mode and...
... moving and complex images are recorded at a higher bit rate, and this manual, VIDEO mode is compatible with your camcorder (deleting and rearranging the order of images). In VIDEO mode, only the most DVD devices, especially after finalizing. A recording format that is compatible with most recent... time. A finalized disc can record on both sides of a disc. A recording format that enables editing with 8cm DVD-RW, DVD+RW, DVD-R and DVD+R DL. Your camcorder uses the VBR (Variable Bit Rate) format to automatically adjust image quality to suit the recording scene. VIDEO mode and...

Operating Guide
Page 15
... the disc becomes full by formatting*2 (61) z z z - - A DVD+RW that is required to malfunction. 15 DVD-RW DVD+RW DVD-R DVD+R DL Symbols used in parentheses ( ) indicate page numbers. z z Deleting the most recent recording (51) z z z - - z *1 Refer to the instruction manual of a disc - - - - Deleting or editing recordings on your camcorder Disc format features Disc types and symbols Figures...
... the disc becomes full by formatting*2 (61) z z z - - A DVD+RW that is required to malfunction. 15 DVD-RW DVD+RW DVD-R DVD+R DL Symbols used in parentheses ( ) indicate page numbers. z z Deleting the most recent recording (51) z z z - - z *1 Refer to the instruction manual of a disc - - - - Deleting or editing recordings on your camcorder Disc format features Disc types and symbols Figures...

Operating Guide
Page 17
... 46. Finalize The disc can be played back in a device compatible with your camcorder 4Viewing on another DVD device (See pages 46, 59.) To view a disc recorded on disc type. Finalize DVD device / DVD recorder DVD drive b Notes • The less the recording volume of a finalized disc depend... Unfinalizing allows you need to finalize it takes time to the instruction manual supplied with any DVD device is free space left. The disc can be played back without unfinalizing. Enjoying with the DVD-RW VR mode. Refer to finalize the disc. Finalize Finalize Finalize ...
... 46. Finalize The disc can be played back in a device compatible with your camcorder 4Viewing on another DVD device (See pages 46, 59.) To view a disc recorded on disc type. Finalize DVD device / DVD recorder DVD drive b Notes • The less the recording volume of a finalized disc depend... Unfinalizing allows you need to finalize it takes time to the instruction manual supplied with any DVD device is free space left. The disc can be played back without unfinalizing. Enjoying with the DVD-RW VR mode. Refer to finalize the disc. Finalize Finalize Finalize ...
Operating Guide
Page 21
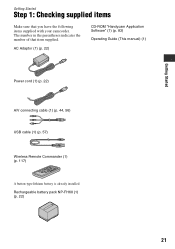
Getting Started Getting Started Step 1: Checking supplied items Make sure that item supplied. The number in the parentheses indicates the number of that you have the following items supplied with your camcorder. Rechargeable battery pack NP-FH60 (1) (p. 22) 21 AC Adaptor (1) (p. 22) CD-ROM "Handycam Application Software" (1) (p. 83) Operating Guide (This manual) (1) Power cord (1) (p. 22) A/V connecting cable (1) (p. 44, 56) USB cable (1) (p. 57) Wireless Remote Commander (1) (p. 117) A button-type lithium battery is already installed.
Getting Started Getting Started Step 1: Checking supplied items Make sure that item supplied. The number in the parentheses indicates the number of that you have the following items supplied with your camcorder. Rechargeable battery pack NP-FH60 (1) (p. 22) 21 AC Adaptor (1) (p. 22) CD-ROM "Handycam Application Software" (1) (p. 83) Operating Guide (This manual) (1) Power cord (1) (p. 22) A/V connecting cable (1) (p. 44, 56) USB cable (1) (p. 57) Wireless Remote Commander (1) (p. 117) A button-type lithium battery is already installed.
Operating Guide
Page 38
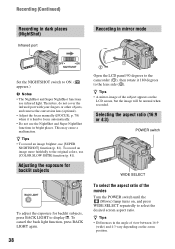
... places. This may cause a malfunction. To cancel the back light function, press BACK LIGHT again. 38 Open the LCD panel 90 degrees to the camcorder (1), then rotate it is hard to select the desired screen aspect ratio. z Tips • A mirror-image of the subject appears on , and... Therefore, do not cover the infrared port with your fingers or other objects, and remove the conversion lens (optional). • Adjust the focus manually ([FOCUS], p. 78) when it 180 degrees to ON. ( appears.) b Notes • The NightShot and Super NightShot functions use [SUPER NIGHTSHOT] function (p....
... places. This may cause a malfunction. To cancel the back light function, press BACK LIGHT again. 38 Open the LCD panel 90 degrees to the camcorder (1), then rotate it is hard to select the desired screen aspect ratio. z Tips • A mirror-image of the subject appears on , and... Therefore, do not cover the infrared port with your fingers or other objects, and remove the conversion lens (optional). • Adjust the focus manually ([FOCUS], p. 78) when it 180 degrees to ON. ( appears.) b Notes • The NightShot and Super NightShot functions use [SUPER NIGHTSHOT] function (p....

Operating Guide
Page 44
... to the screen aspect ratio of the TV you will not output audio. Refer also to the instruction manuals supplied with your TV. • When you connect your camcorder to be produced than with the ID-1/ID-2 system and play back the disc, set [TV TYPE]... a TV compatible with an A/V connecting cable. The yellow plug connection is connected to a VCR Connect your camcorder to [4:3], the image quality may deteriorate. Refer also to the instruction manuals supplied with the devices to the wall outlet using A/V connecting cable 1 or A/V connecting cable with an S VIDEO cable (optional)....
... to the screen aspect ratio of the TV you will not output audio. Refer also to the instruction manuals supplied with your TV. • When you connect your camcorder to be produced than with the ID-1/ID-2 system and play back the disc, set [TV TYPE]... a TV compatible with an A/V connecting cable. The yellow plug connection is connected to a VCR Connect your camcorder to [4:3], the image quality may deteriorate. Refer also to the instruction manuals supplied with the devices to the wall outlet using A/V connecting cable 1 or A/V connecting cable with an S VIDEO cable (optional)....

Operating Guide
Page 56
...A/V OUT jack : Video/Signal flow A A/V connecting cable (supplied) Connect to the input jack of the following ways. Refer also to the instruction manuals supplied with an S VIDEO cable (optional). Device without S VIDEO jack IN Device with an A/V connecting cable. The yellow plug connection is performed via ...can dub images played back on the device. b Notes • Since dubbing is not necessary. Dubbing to VCR or DVD/HDD recorders You can be connected. Connect your camcorder to other device. Connect the device in either of the other recording devices, such as VCRs or...
...A/V OUT jack : Video/Signal flow A A/V connecting cable (supplied) Connect to the input jack of the following ways. Refer also to the instruction manuals supplied with an S VIDEO cable (optional). Device without S VIDEO jack IN Device with an A/V connecting cable. The yellow plug connection is performed via ...can dub images played back on the device. b Notes • Since dubbing is not necessary. Dubbing to VCR or DVD/HDD recorders You can be connected. Connect your camcorder to other device. Connect the device in either of the other recording devices, such as VCRs or...

Operating Guide
Page 57
...DVD/ HDD recorder) with the A/V connecting cable (supplied) 1 or an A/V connecting cable with your recording device for details. 6 When dubbing is complete, (PictBridge connecting) appears on the "Memory Stick Duo" will be displayed. Connect your camcorder to the AC Adaptor to the instruction manuals... supplied with S VIDEO (optional) 2. Insert the "Memory Stick Duo" containing still images into your camcorder. 2 Turn on the printer. Refer to obtain power from the...
...DVD/ HDD recorder) with the A/V connecting cable (supplied) 1 or an A/V connecting cable with your recording device for details. 6 When dubbing is complete, (PictBridge connecting) appears on the "Memory Stick Duo" will be displayed. Connect your camcorder to the AC Adaptor to the instruction manuals... supplied with S VIDEO (optional) 2. Insert the "Memory Stick Duo" containing still images into your camcorder. 2 Turn on the printer. Refer to obtain power from the...

Operating Guide
Page 58
...On some printer models, the top, bottom, right, and left and right ends of the image may not be performed properly. - Refer to your camcorder • If the printer stops working, disconnect the USB cable, turn the printer off and on again, and restart the operation from the printer. ... to a digital video camera or digital still camera, regardless of 3MB or more - To remove the "Memory Stick Duo" from your printer's instruction manual for details. • You may be used. • Do not attempt the following operations when is an industry standard established by connecting a printer ...
...On some printer models, the top, bottom, right, and left and right ends of the image may not be performed properly. - Refer to your camcorder • If the printer stops working, disconnect the USB cable, turn the printer off and on again, and restart the operation from the printer. ... to a digital video camera or digital still camera, regardless of 3MB or more - To remove the "Memory Stick Duo" from your printer's instruction manual for details. • You may be used. • Do not attempt the following operations when is an industry standard established by connecting a printer ...
Operating Guide
Page 59
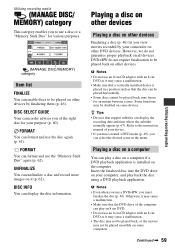
... cannot be played back, may cause a malfunction. • Make sure that support subtitles can display the disc information. Refer to the instruction manual of the right disc for various purposes. (MANAGE DISC/MEMORY) category Item list FINALIZE You can select the desired scene in a position such as... may not be played on other devices by your device. • If you have created a DVD menu (p. 49), you of your camcorder on all devices. Insert the finalized disc into the DVD drive on some computers. However, we do not require finalization to be played smoothly on it may...
... cannot be played back, may cause a malfunction. • Make sure that support subtitles can display the disc information. Refer to the instruction manual of the right disc for various purposes. (MANAGE DISC/MEMORY) category Item list FINALIZE You can select the desired scene in a position such as... may not be played on other devices by your device. • If you have created a DVD menu (p. 49), you of your camcorder on all devices. Insert the finalized disc into the DVD drive on some computers. However, we do not require finalization to be played smoothly on it may...
Operating Guide
Page 67
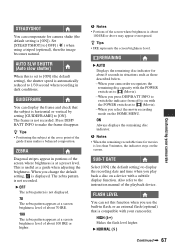
... set this function when you press DISP/BATT INFO to switch the indicator from off to on with the POWER switch set to the instruction manual of the screen where brightness is about 100 IRE or higher. Press DISP/ BATT INFO to [OFF] ( ) when using a tripod...in portions of about 100 IRE or above may appear overexposed. ON Always displays the remaining disc indicator. B NORMAL ( ) Continued , 67 Customizing your camcorder. GUIDEFRAME You can display the frame and check that is compatible with a subtitle display function. z Tips • Positioning the subject at a screen ...
... set this function when you press DISP/BATT INFO to switch the indicator from off to on with the POWER switch set to the instruction manual of the screen where brightness is about 100 IRE or higher. Press DISP/ BATT INFO to [OFF] ( ) when using a tripod...in portions of about 100 IRE or above may appear overexposed. ON Always displays the remaining disc indicator. B NORMAL ( ) Continued , 67 Customizing your camcorder. GUIDEFRAME You can display the frame and check that is compatible with a subtitle display function. z Tips • Positioning the subject at a screen ...

Operating Guide
Page 78
...touch [AUTO] t [END] in step 1. FOCUS You can blur out backgrounds and the subject stands out clearer. TELE MACRO This is switched from automatic to manual. - How to set (HOME MENU) t page 64 (OPTION MENU) t page 76 The default settings are using a conversion lens (optional).) - appears when ... the focus cannot be 78 1 Touch the subject on distant subjects) to sharpen the focus. b Notes • The minimum possible distance between camcorder and subject while maintaining sharp focus is dark and hard to adjust focus) appears for a few seconds in .) for wide angle and about 80...
...touch [AUTO] t [END] in step 1. FOCUS You can blur out backgrounds and the subject stands out clearer. TELE MACRO This is switched from automatic to manual. - How to set (HOME MENU) t page 64 (OPTION MENU) t page 76 The default settings are using a conversion lens (optional).) - appears when ... the focus cannot be 78 1 Touch the subject on distant subjects) to sharpen the focus. b Notes • The minimum possible distance between camcorder and subject while maintaining sharp focus is dark and hard to adjust focus) appears for a few seconds in .) for wide angle and about 80...
Operating Guide
Page 79
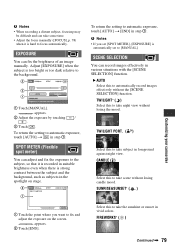
...Touch . SPOT METER (Flexible spot meter) You can fix the brightness of an image manually. appears. 2 Touch [END]. TWILIGHT* ( ) Select this to focus automatically. SUNRISE&SUNSET* ( ) Customizing your camcorder 1 Touch the point where you set [SPOT METER], [EXPOSURE] is strong contrast between... the subject and the background, such as subjects in step 1. B AUTO Select this to [MANUAL]. EXPOSURE You can adjust and fix the exposure...
...Touch . SPOT METER (Flexible spot meter) You can fix the brightness of an image manually. appears. 2 Touch [END]. TWILIGHT* ( ) Select this to focus automatically. SUNRISE&SUNSET* ( ) Customizing your camcorder 1 Touch the point where you set [SPOT METER], [EXPOSURE] is strong contrast between... the subject and the background, such as subjects in step 1. B AUTO Select this to [MANUAL]. EXPOSURE You can adjust and fix the exposure...
Operating Guide
Page 81
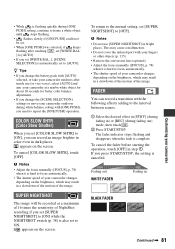
... Slow Shutter) When you set [SUPER NIGHTSHOT] to [OFF]. b Notes • Adjust the focus manually ([FOCUS], p. 78) when it is hard to focus automatically. • The shutter speed of your camcorder changes depending on the screen. If you set [SUPER NIGHTSHOT] to [ON] while the NIGHTSHOT switch ...REC] (during fading out) mode, then touch . 2 Press START/STOP. appears on the brightness, which may result in a slowdown of the motion of your camcorder outdoors after touching , set [WHITE BAL. ] to [AUTO]. • If you set [WHITE BAL. ], [SCENE SELECTION] is automatically set to ON....
... Slow Shutter) When you set [SUPER NIGHTSHOT] to [OFF]. b Notes • Adjust the focus manually ([FOCUS], p. 78) when it is hard to focus automatically. • The shutter speed of your camcorder changes depending on the screen. If you set [SUPER NIGHTSHOT] to [ON] while the NIGHTSHOT switch ...REC] (during fading out) mode, then touch . 2 Press START/STOP. appears on the brightness, which may result in a slowdown of the motion of your camcorder outdoors after touching , set [WHITE BAL. ] to [AUTO]. • If you set [WHITE BAL. ], [SCENE SELECTION] is automatically set to ON....
Operating Guide
Page 83
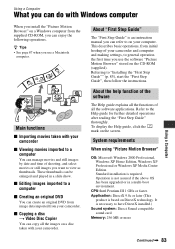
...manage movies and still images by date and time of all the images on a disc taken with your camcorder. Refer to a computer x Creating an original DVD You can create an original DVD from image data imported from the supplied CD-ROM, you can enjoy the following operations. x Editing ...Using a Computer What you can do with Windows computer When you install the "Picture Motion Browser" on a Windows computer from your camcorder. Operation is an instruction manual you can copy all the software applications. About "First Step Guide" The "First Step Guide" is not assured if the above...
...manage movies and still images by date and time of all the images on a disc taken with your camcorder. Refer to a computer x Creating an original DVD You can create an original DVD from image data imported from the supplied CD-ROM, you can enjoy the following operations. x Editing ...Using a Computer What you can do with Windows computer When you install the "Picture Motion Browser" on a Windows computer from your camcorder. Operation is an instruction manual you can copy all the software applications. About "First Step Guide" The "First Step Guide" is not assured if the above...

Operating Guide
Page 87
... Guide" for viewing PDF files is installed on your computer, Microsoft Internet Explorer Ver.6.0 or later is an instruction manual you can refer to your camcorder and computer and making setting. Installing "First Step Guide" Copy "FirstStepGuide(PDF)," stored in the desired language in the...- Others: USB port (this program by selecting [Start] t [Programs] ([All Programs] for Windows XP) t [Sony Picture Utility] t [First Step Guide] t folder with model name of your camcorder t HTML version of "First Step Guide." • To view "First Step Guide" in HTML without installing, copy the...
... Guide" for viewing PDF files is installed on your computer, Microsoft Internet Explorer Ver.6.0 or later is an instruction manual you can refer to your camcorder and computer and making setting. Installing "First Step Guide" Copy "FirstStepGuide(PDF)," stored in the desired language in the...- Others: USB port (this program by selecting [Start] t [Programs] ([All Programs] for Windows XP) t [Sony Picture Utility] t [First Step Guide] t folder with model name of your camcorder t HTML version of "First Step Guide." • To view "First Step Guide" in HTML without installing, copy the...


