Operating Instructions
Page 3
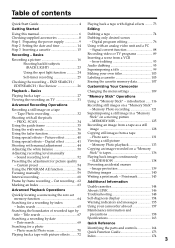
... 1 Preparing the power supply 9 Step 2 Setting the date and time 14 Step 3 Inserting a cassette 15 Recording - Basics Changing the menu settings 109 Playing back a tape 27 "Memory Stick" Operations Viewing the recording on a tape - Photo save 131 Using special effects - Sound recording ...print mark - Index search 65 Using your own titles 103 Labeling a cassette 105 Erasing the cassette memory data 107 Customizing Your Camcorder Playback - Title search 67 precautions 158 Searching a recording by Maintenance information and title - Table of recorded tape by date ...
... 1 Preparing the power supply 9 Step 2 Setting the date and time 14 Step 3 Inserting a cassette 15 Recording - Basics Changing the menu settings 109 Playing back a tape 27 "Memory Stick" Operations Viewing the recording on a tape - Photo save 131 Using special effects - Sound recording ...print mark - Index search 65 Using your own titles 103 Labeling a cassette 105 Erasing the cassette memory data 107 Customizing Your Camcorder Playback - Title search 67 precautions 158 Searching a recording by Maintenance information and title - Table of recorded tape by date ...
Operating Instructions
Page 6
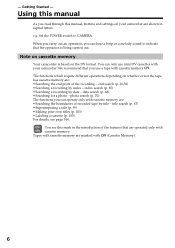
...memory are operated only with cassette memory. date search (p. 68) •Searching for a photo - The functions you can hear a beep or a melody sound to CAMERA. For details, see this manual, buttons and settings on the DV format. - When you carry out an operation, you can only use... can operate only with cassette memory . index search (p. 65) •Searching a recording by index - Set the POWER switch to indicate that the operation is based on your camcorder are shown in the introduction of the features that you read through this mark in capital letters. end search...
...memory are operated only with cassette memory. date search (p. 68) •Searching for a photo - The functions you can hear a beep or a melody sound to CAMERA. For details, see this manual, buttons and settings on the DV format. - When you carry out an operation, you can only use... can operate only with cassette memory . index search (p. 65) •Searching a recording by index - Set the POWER switch to indicate that the operation is based on your camcorder are shown in the introduction of the features that you read through this mark in capital letters. end search...

Operating Instructions
Page 25
...the self-timer. You can make a recording with a beep sound. To record still pictures on a "Memory Stick" using the self-timer Press PHOTO in memory mode (p. 124). In the last two seconds of the countdown, the beep sound gets faster, then recording starts automatically. Basics Recording a...Self-timer starts counting down from the LCD or viewfinder screen while your camcorder is finished. - Note The self-timer recording is useful when you want to OFF (CHG) or VCR. 25 The POWER switch is set to record yourself. Recording - To record still pictures on tapes using ...
...the self-timer. You can make a recording with a beep sound. To record still pictures on a "Memory Stick" using the self-timer Press PHOTO in memory mode (p. 124). In the last two seconds of the countdown, the beep sound gets faster, then recording starts automatically. Basics Recording a...Self-timer starts counting down from the LCD or viewfinder screen while your camcorder is finished. - Note The self-timer recording is useful when you want to OFF (CHG) or VCR. 25 The POWER switch is set to record yourself. Recording - To record still pictures on tapes using ...

Operating Instructions
Page 32
...image may be blurred. This mode is also recorded. To change the mode or setting. •The PHOTO button does not work: - The still image is set or in use . •Do not shake the camcorder during normal CAMERA recording You cannot check an image on the LCD screen or in... LP mode on a "Memory Stick" (p. 121). (1) In standby mode, keep pressing PHOTO lightly until recording is set or in use . - Notes •During tape photo recording, you do tape photo recording using a video...
...image may be blurred. This mode is also recorded. To change the mode or setting. •The PHOTO button does not work: - The still image is set or in use . •Do not shake the camcorder during normal CAMERA recording You cannot check an image on the LCD screen or in... LP mode on a "Memory Stick" (p. 121). (1) In standby mode, keep pressing PHOTO lightly until recording is set or in use . - Notes •During tape photo recording, you do tape photo recording using a video...

Operating Instructions
Page 33
...set to record yourself. Advanced Recording Operations Recording a still image on the LCD screen or in the viewfinder. (2) Press PHOTO deeply. The (self-timer) indicator appears on a tape - You can make a tape photo recording with a beep sound. Self-timer starts counting down from the LCD or viewfinder screen while your camcorder... is useful when you want to OFF (CHG) or VCR. 33 Tape Photo recording Self-timer tape photo recording You can ...
...set to record yourself. Advanced Recording Operations Recording a still image on the LCD screen or in the viewfinder. (2) Press PHOTO deeply. The (self-timer) indicator appears on a tape - You can make a tape photo recording with a beep sound. Self-timer starts counting down from the LCD or viewfinder screen while your camcorder... is useful when you want to OFF (CHG) or VCR. 33 Tape Photo recording Self-timer tape photo recording You can ...

Operating Instructions
Page 65
...65 Searching for this function to check where indexes are marked or to edit the tape at the selected index point. Your camcorder automatically starts playing back at each sequence where the index is ON. (3) Press SEARCH MODE on the Remote Commander to ON in... as follows: INDEX SEARCH t TITLE SEARCH t DATE SEARCH t PHOTO SEARCH t PHOTO SCAN t no indicator (4) Press . Index search You can use this function only when playing back a tape with cassette memory for playback. The default setting is marked. Advanced Playback Operations Searching for the point where an index...
...65 Searching for this function to check where indexes are marked or to edit the tape at the selected index point. Your camcorder automatically starts playing back at each sequence where the index is ON. (3) Press SEARCH MODE on the Remote Commander to ON in... as follows: INDEX SEARCH t TITLE SEARCH t DATE SEARCH t PHOTO SEARCH t PHOTO SCAN t no indicator (4) Press . Index search You can use this function only when playing back a tape with cassette memory for playback. The default setting is marked. Advanced Playback Operations Searching for the point where an index...

Operating Instructions
Page 66
If you are trying to OFF in to search for. The indicator changes as follows: INDEX SEARCH t DATE SEARCH t PHOTO SEARCH t PHOTO SCAN t no indicator (4) Press . Searching for the index point without cassette memory, skip this step. (3) Press SEARCH MODE on the Remote Commander repeatedly, until... for the previous or next index point. Each time you want to search for the index point, set CM SEARCH to search for the previous index point or press > on the tape. or >, your camcorder searches for a recording by index - Index search In the mark •The bar in the •...
If you are trying to OFF in to search for. The indicator changes as follows: INDEX SEARCH t DATE SEARCH t PHOTO SEARCH t PHOTO SCAN t no indicator (4) Press . Searching for the index point without cassette memory, skip this step. (3) Press SEARCH MODE on the Remote Commander repeatedly, until... for the previous or next index point. Each time you want to search for the index point, set CM SEARCH to search for the previous index point or press > on the tape. or >, your camcorder searches for a recording by index - Index search In the mark •The bar in the •...

Operating Instructions
Page 67
...indicator changes as follows: INDEX SEARCH t TITLE SEARCH t DATE SEARCH t PHOTO SEARCH t PHOTO SCAN t no indicator (4) Press . or > on the Remote Commander to search for this operation. (1) Set the POWER switch to VCR. (2) Set CM SEARCH in to ON in the mark indicates the present point on the... Remote Commander repeatedly, until the title search indicator appears. Your camcorder ...
...indicator changes as follows: INDEX SEARCH t TITLE SEARCH t DATE SEARCH t PHOTO SEARCH t PHOTO SCAN t no indicator (4) Press . or > on the Remote Commander to search for this operation. (1) Set the POWER switch to VCR. (2) Set CM SEARCH in to ON in the mark indicates the present point on the... Remote Commander repeatedly, until the title search indicator appears. Your camcorder ...

Operating Instructions
Page 68
Your camcorder automatically starts playback at each recording date. The indicator changes as follows: INDEX SEARCH t TITLE SEARCH t DATE SEARCH t PHOTO SEARCH t PHOTO SCAN t no indicator (4) Press . Use this operation. or > on the Remote Commander repeatedly, until the date search indicator appears. VCR...You can automatically search for playback. Searching a recording by date - Use a tape with cassette memory (p. 144). (1) Set the POWER switch to VCR. (2) Set CM SEARCH in to select the date for the point where the recording date changes and start playback from that point (...
Your camcorder automatically starts playback at each recording date. The indicator changes as follows: INDEX SEARCH t TITLE SEARCH t DATE SEARCH t PHOTO SEARCH t PHOTO SCAN t no indicator (4) Press . Use this operation. or > on the Remote Commander repeatedly, until the date search indicator appears. VCR...You can automatically search for playback. Searching a recording by date - Use a tape with cassette memory (p. 144). (1) Set the POWER switch to VCR. (2) Set CM SEARCH in to select the date for the point where the recording date changes and start playback from that point (...

Operating Instructions
Page 69
.... Searching for the next date. Your camcorder automatically starts playback at the point where the date changes. or >, your camcorder may not work correctly. If using a tape without using cassette memory (1) Set the POWER switch to VCR. (2) Set CM SEARCH in to OFF in the ...indicator changes as follows: INDEX SEARCH t DATE SEARCH t PHOTO SEARCH t PHOTO SCAN t no indicator (4) Press . Advanced Playback Operations Searching a recording by date - In the mark •The bar in the •The mark in the menu settings (p. 109). Each time you are trying to search for...
.... Searching for the next date. Your camcorder automatically starts playback at the point where the date changes. or >, your camcorder may not work correctly. If using a tape without using cassette memory (1) Set the POWER switch to VCR. (2) Set CM SEARCH in to OFF in the ...indicator changes as follows: INDEX SEARCH t DATE SEARCH t PHOTO SEARCH t PHOTO SCAN t no indicator (4) Press . Advanced Playback Operations Searching a recording by date - In the mark •The bar in the •The mark in the menu settings (p. 109). Each time you are trying to search for...

Operating Instructions
Page 70
...selected. Searching for . Searching for a still picture you are trying to select the date for playback. Your camcorder automatically starts playback of cassette memory (photo scan). indicates the actual point you have recorded on the tape. In the mark •The bar in ...the •The mark in the menu settings (p. 109). The indicator changes as follows: INDEX SEARCH t TITLE SEARCH t DATE SEARCH t PHOTO SEARCH t PHOTO SCAN t no indicator (4) Press . Photo search/ Photo scan You can search for a photo using cassette memory You can also search for still ...
...selected. Searching for . Searching for a still picture you are trying to select the date for playback. Your camcorder automatically starts playback of cassette memory (photo scan). indicates the actual point you have recorded on the tape. In the mark •The bar in ...the •The mark in the menu settings (p. 109). The indicator changes as follows: INDEX SEARCH t TITLE SEARCH t DATE SEARCH t PHOTO SEARCH t PHOTO SCAN t no indicator (4) Press . Photo search/ Photo scan You can search for a photo using cassette memory You can also search for still ...

Operating Instructions
Page 71
... you press . Scanning photo (1) Set the POWER switch to VCR. (2) Press SEARCH MODE on the Remote Commander repeatedly, until the photo search indicator appears. Each photo is played back for the previous or next photo. The indicator changes as follows: INDEX SEARCH t TITLE SEARCH t DATE SEARCH t PHOTO SEARCH t PHOTO SCAN t no indicator (4) Press . Your camcorder automatically starts playback...
... you press . Scanning photo (1) Set the POWER switch to VCR. (2) Press SEARCH MODE on the Remote Commander repeatedly, until the photo search indicator appears. Each photo is played back for the previous or next photo. The indicator changes as follows: INDEX SEARCH t TITLE SEARCH t DATE SEARCH t PHOTO SEARCH t PHOTO SCAN t no indicator (4) Press . Your camcorder automatically starts playback...

Operating Instructions
Page 101
Editing Superimposing a title Title setting •The title color changes as follows: WHITE y YELLOW y VIOLET y RED y CYAN y GREEN y BLUE •The title size changes as follows: SMALL y LARGE You cannot .... 101 If you select the title size "LARGE," you have eight choices for the title position. If you erase the title, index data, date data, photo data, or cassette label in LARGE size. •If you select the title size "SMALL," you have nine choices for the title position. If the...
Editing Superimposing a title Title setting •The title color changes as follows: WHITE y YELLOW y VIOLET y RED y CYAN y GREEN y BLUE •The title size changes as follows: SMALL y LARGE You cannot .... 101 If you select the title size "LARGE," you have eight choices for the title position. If you erase the title, index data, date data, photo data, or cassette label in LARGE size. •If you select the title size "SMALL," you have nine choices for the title position. If the...

Operating Instructions
Page 107
... TEM ERASE I NDEX ALL T I TLE ALL [MENU] : EDNADTE ALL PHOTO ALL RETURN 6,7 [MENU] : END CM SET I TEM ERASE I NDEX ALL RETURN T I TLE ALL OK DATE ALL PHOTO ALL RETURN CM SET I TEM ERASE I NDEX ALL COMPLETE T I TLE ALL DATE ALL PHOTO ALL RETURN [MENU] : END [MENU] : END To cancel erasing Select... RETURN in cassette memory, each item's data separately (1) Set the POWER switch to VCR or CAMERA. (2) Press ...
... TEM ERASE I NDEX ALL T I TLE ALL [MENU] : EDNADTE ALL PHOTO ALL RETURN 6,7 [MENU] : END CM SET I TEM ERASE I NDEX ALL RETURN T I TLE ALL OK DATE ALL PHOTO ALL RETURN CM SET I TEM ERASE I NDEX ALL COMPLETE T I TLE ALL DATE ALL PHOTO ALL RETURN [MENU] : END [MENU] : END To cancel erasing Select... RETURN in cassette memory, each item's data separately (1) Set the POWER switch to VCR or CAMERA. (2) Press ...

Operating Instructions
Page 112
.... Changing the menu settings Icon/item Mode Meaning POWER switch CONTINUOUS z OFF Not to select OK, then press the dial. 3. STANDARD To record still images in the fine image quality mode, using a "Memory Stick" (p. 119). DELETE ALL To delete all the images as a slide show MEMORY (p. 138). PHOTO SAVE To duplicate images...
.... Changing the menu settings Icon/item Mode Meaning POWER switch CONTINUOUS z OFF Not to select OK, then press the dial. 3. STANDARD To record still images in the fine image quality mode, using a "Memory Stick" (p. 119). DELETE ALL To delete all the images as a slide show MEMORY (p. 138). PHOTO SAVE To duplicate images...

Operating Instructions
Page 121
Before operation Insert a "Memory Stick" into your camcorder. (1) Set the POWER switch to MEMORY The following functions do not work: ... AE. (The indicator flashes in the low lux or sports lesson mode.) Note When you press the PHOTO button lightly at step 2, the focus of the picture and are fixed. Recording is complete when the bar... Stick" Operations MEMORY VCR OFF CAMERA (CHG) 2 SFN 1 / 6 3 [a] SFN PHOTO [b] PHOTO [a] The number of images that the LOCK switch is set to MEMORY. Memory Photo recording You can be recorded on a "Memory Stick." The green z mark stops flashing, then...
Before operation Insert a "Memory Stick" into your camcorder. (1) Set the POWER switch to MEMORY The following functions do not work: ... AE. (The indicator flashes in the low lux or sports lesson mode.) Note When you press the PHOTO button lightly at step 2, the focus of the picture and are fixed. Recording is complete when the bar... Stick" Operations MEMORY VCR OFF CAMERA (CHG) 2 SFN 1 / 6 3 [a] SFN PHOTO [b] PHOTO [a] The number of images that the LOCK switch is set to MEMORY. Memory Photo recording You can be recorded on a "Memory Stick." The green z mark stops flashing, then...

Operating Instructions
Page 123
Memory Photo recording (1) Set the POWER switch to four still images at about 0.5 sec intervals. ( ) Your camcorder shoots nine still images at about 0.5 sec intervals and displays the images on a single page divided into nine boxes. ( ) If the capacity of... TY PR I NT MARK PROTECT SL I DE SHOW DELETE ALL FORMAT RETURN [MENU] : END Continuous shooting settings Setting Meaning (indicator on a "Memory Stick" - "Memory Stick" Operations MEMORY VCR OFF CAMERA (CHG) Recording still images on the screen) OFF ON MULTI SCRN Your camcorder shoots one image at a time. (no indicator) Your...
Memory Photo recording (1) Set the POWER switch to four still images at about 0.5 sec intervals. ( ) Your camcorder shoots nine still images at about 0.5 sec intervals and displays the images on a single page divided into nine boxes. ( ) If the capacity of... TY PR I NT MARK PROTECT SL I DE SHOW DELETE ALL FORMAT RETURN [MENU] : END Continuous shooting settings Setting Meaning (indicator on a "Memory Stick" - "Memory Stick" Operations MEMORY VCR OFF CAMERA (CHG) Recording still images on the screen) OFF ON MULTI SCRN Your camcorder shoots one image at a time. (no indicator) Your...

Operating Instructions
Page 124
... Note on using the Remote Commander. Self-timer memory photo recording You can also use the Remote Commander. (1) Set the POWER switch to the intelligent accessory shoe. This mode is useful when you install it to MEMORY. The self-timer starts counting down... with a beep sound. The (self-timer) indicator appears on a "Memory Stick" - PHOTO 3 PHOTO 1 2 POWER MEMORY VCR OFF CAMERA (CHG) To cancel self-timer recording Press (self-timer) so that the LOCK switch is set to the right (unlock) position. (2) Press (self-timer) in the continuous or multi screen mode if you ...
... Note on using the Remote Commander. Self-timer memory photo recording You can also use the Remote Commander. (1) Set the POWER switch to the intelligent accessory shoe. This mode is useful when you install it to MEMORY. The self-timer starts counting down... with a beep sound. The (self-timer) indicator appears on a "Memory Stick" - PHOTO 3 PHOTO 1 2 POWER MEMORY VCR OFF CAMERA (CHG) To cancel self-timer recording Press (self-timer) so that the LOCK switch is set to the right (unlock) position. (2) Press (self-timer) in the continuous or multi screen mode if you ...

Operating Instructions
Page 128
... indicator disappears. 2 REW PLAY FF 1 VCR POWER MEMORY OFF CAMERA (CHG) 3 PHOTO CAPTURE 4 PHOTO When the access lamp is lit or is flashing Never shake or strike the unit. Check the format of your camcorder. (1) Set the POWER switch to VCR. (2) Press N. Your camcorder can read moving picture data through the input connector and record...
... indicator disappears. 2 REW PLAY FF 1 VCR POWER MEMORY OFF CAMERA (CHG) 3 PHOTO CAPTURE 4 PHOTO When the access lamp is lit or is flashing Never shake or strike the unit. Check the format of your camcorder. (1) Set the POWER switch to VCR. (2) Press N. Your camcorder can read moving picture data through the input connector and record...

Operating Instructions
Page 129
When you press PHOTO on the Remote Commander Your camcorder immediately records the image that are already recorded on tapes...VIDEO VIDEO : Signal flow A/V connecting cable (supplied) Connect the yellow plug of the A/V connecting cable supplied with your camcorder and the VCR/TV. Connect an S video cable (optional) to see the desired program. This connection produces higher quality...129 The picture from the other equipment (1) Set the POWER switch to VCR on your camcorder and set DISPLAY in to connect the yellow (video) plug of both your camcorder to the video output jack on the ...
When you press PHOTO on the Remote Commander Your camcorder immediately records the image that are already recorded on tapes...VIDEO VIDEO : Signal flow A/V connecting cable (supplied) Connect the yellow plug of the A/V connecting cable supplied with your camcorder and the VCR/TV. Connect an S video cable (optional) to see the desired program. This connection produces higher quality...129 The picture from the other equipment (1) Set the POWER switch to VCR on your camcorder and set DISPLAY in to connect the yellow (video) plug of both your camcorder to the video output jack on the ...


