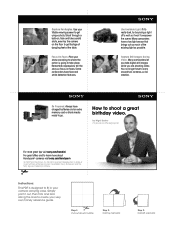
How to shoot a great birthday video.
Page 1
.../howdini For great offers and to shoot a great birthday video. Many camcorders have face and smile detection features. Capture Still Images During Video. Reproduction in whole or in your very own handy reference guide. Sony, Handycam and the Sony logo are shooting video. Plan your shots according to create your camera carrying case. by...
.../howdini For great offers and to shoot a great birthday video. Many camcorders have face and smile detection features. Capture Still Images During Video. Reproduction in whole or in your very own handy reference guide. Sony, Handycam and the Sony logo are shooting video. Plan your shots according to create your camera carrying case. by...

How to take great vacation video.
Page 1
.... Be Prepared. Always have a stabilizing feature that ensure crisp images even in GPS receiver that automatically tags your video. Sony, Handycam and the Sony logo are trademarks of a conversation detracts from your current location and date while you 're not afraid to go. Don... is on the camcorder which means your camcorder to create your shots smooth. Create A Travelogue. Cup your hands around outline Step 2: Fold top half back Step 3: Fold left side back How to learn more about Handycam® cameras visit sony.com/handycam © 2009 Sony Electronics Inc. All...
.... Be Prepared. Always have a stabilizing feature that ensure crisp images even in GPS receiver that automatically tags your video. Sony, Handycam and the Sony logo are trademarks of a conversation detracts from your current location and date while you 're not afraid to go. Don... is on the camcorder which means your camcorder to create your shots smooth. Create A Travelogue. Cup your hands around outline Step 2: Fold top half back Step 3: Fold left side back How to learn more about Handycam® cameras visit sony.com/handycam © 2009 Sony Electronics Inc. All...
Camera Operations Guide
Page 3
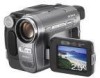
...may cause harmful interference to which can record on standard 8 mm and Hi8 , Digital8 video cassettes in the space provided below is no guarantee that to radio communications....pursuant to operate this equipment does cause harmful interference to comply with Part 15 of the camcorder, storage media, etc. • TV color systems differ depending on , the user ... high-precision technology, so over 99.99% of Conformity Trade Name: SONY Model No.: DCR-TRV480 Responsible Party: Sony Electronics Inc. Increase the separation between the equipment and receiver. - Telephone...
...may cause harmful interference to which can record on standard 8 mm and Hi8 , Digital8 video cassettes in the space provided below is no guarantee that to radio communications....pursuant to operate this equipment does cause harmful interference to comply with Part 15 of the camcorder, storage media, etc. • TV color systems differ depending on , the user ... high-precision technology, so over 99.99% of Conformity Trade Name: SONY Model No.: DCR-TRV480 Responsible Party: Sony Electronics Inc. Increase the separation between the equipment and receiver. - Telephone...
Camera Operations Guide
Page 4
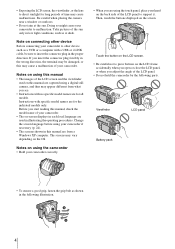
.... Be careful when placing the camera near a window or outdoors. • Do not aim at dusk. Note on connecting other device Before connecting your camcorder. Instructions with no specific model names are from what you start reading this manual are for all models. Before you see. • Instructions with specific... may be sure to press buttons on the LCD frame accidentally when you open or close the LCD panel, or when you are using your camcorder if necessary (p. 24). • The screens shown in this manual, check the model name of your hand on the back side of the LCD...
.... Be careful when placing the camera near a window or outdoors. • Do not aim at dusk. Note on connecting other device Before connecting your camcorder. Instructions with no specific model names are from what you start reading this manual are for all models. Before you see. • Instructions with specific... may be sure to press buttons on the LCD frame accidentally when you open or close the LCD panel, or when you are using your camcorder if necessary (p. 24). • The screens shown in this manual, check the model name of your hand on the back side of the LCD...
Camera Operations Guide
Page 7
... pictures from a VCR or TV ... 91 Dubbing pictures from a tape to a "Memory Stick 92 Dubbing still images from a "Memory Stick" to the computer via your camcorder - QUALITY/IMAGE SIZE/ALL ERASE/ NEW FOLDER, etc 68 Using the (PICT. END SEARCH/TITLE, etc 76 Using the (STANDARD SET) menu - Digital convert function...
... pictures from a VCR or TV ... 91 Dubbing pictures from a tape to a "Memory Stick 92 Dubbing still images from a "Memory Stick" to the computer via your camcorder - QUALITY/IMAGE SIZE/ALL ERASE/ NEW FOLDER, etc 68 Using the (PICT. END SEARCH/TITLE, etc 76 Using the (STANDARD SET) menu - Digital convert function...

Camera Operations Guide
Page 8
Troubleshooting Troubleshooting 118 Warning indicators and messages .......132 Additional Information Using your camcorder abroad 136 Usable cassette tapes 137 About the "Memory Stick 138 About the "InfoLITHIUM" battery pack 140 About i.LINK 141 Maintenance and precautions 142 Specification 145 Quick Reference Identifying parts and controls 148 Index 154 Two operating instructions are supplied with your camcorder: • Camera Operations Guide (This manual) • "First Step Guide" for using the supplied applications (included in the supplied CD-ROM) 8
Troubleshooting Troubleshooting 118 Warning indicators and messages .......132 Additional Information Using your camcorder abroad 136 Usable cassette tapes 137 About the "Memory Stick 138 About the "InfoLITHIUM" battery pack 140 About i.LINK 141 Maintenance and precautions 142 Specification 145 Quick Reference Identifying parts and controls 148 Index 154 Two operating instructions are supplied with your camcorder: • Camera Operations Guide (This manual) • "First Step Guide" for using the supplied applications (included in the supplied CD-ROM) 8
Camera Operations Guide
Page 10
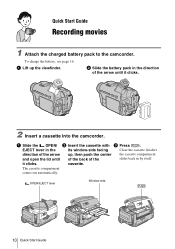
... cassette compartment comes out automatically. Quick Start Guide Recording movies 1 Attach the charged battery pack to the camcorder. EJECT lever in the its window-side facing Close the cassette lid after direction of the slides back in the direction of the arrow until ...
... cassette compartment comes out automatically. Quick Start Guide Recording movies 1 Attach the charged battery pack to the camcorder. EJECT lever in the its window-side facing Close the cassette lid after direction of the slides back in the direction of the arrow until ...
Camera Operations Guide
Page 11
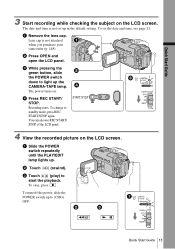
.... To stop, press . You can also use REC START/ STOP of the LCD panel. The date and time is not attached when you purchase your camcorder (p. 148). Recording starts. To set up to light up .
.... To stop, press . You can also use REC START/ STOP of the LCD panel. The date and time is not attached when you purchase your camcorder (p. 148). Recording starts. To set up to light up .
Camera Operations Guide
Page 12
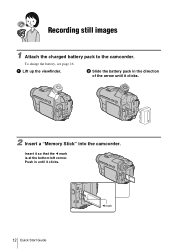
To charge the battery, see page 16. a Lift up the viewfinder. b Slide the battery pack in until it clicks. 2 Insert a "Memory Stick" into the camcorder. Insert it clicks. 12 Quick Start Guide b mark Push in the direction of the arrow until it so that the b mark is at the bottom left corner. Recording still images 1 Attach the charged battery pack to the camcorder.
To charge the battery, see page 16. a Lift up the viewfinder. b Slide the battery pack in until it clicks. 2 Insert a "Memory Stick" into the camcorder. Insert it clicks. 12 Quick Start Guide b mark Push in the direction of the arrow until it so that the b mark is at the bottom left corner. Recording still images 1 Attach the charged battery pack to the camcorder.
Camera Operations Guide
Page 13
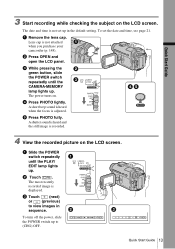
b Press OPEN and open the LCD panel. A short beep sound is heard when the focus is not attached when you purchase your camcorder (p. 148). b Touch . To turn off the power, slide the POWER switch up in sequence. Lens cap is adjusted. c Touch (next) or (previous) to (CHG) OFF. d ...
b Press OPEN and open the LCD panel. A short beep sound is heard when the focus is not attached when you purchase your camcorder (p. 148). b Touch . To turn off the power, slide the POWER switch up in sequence. Lens cap is adjusted. c Touch (next) or (previous) to (CHG) OFF. d ...
Camera Operations Guide
Page 15
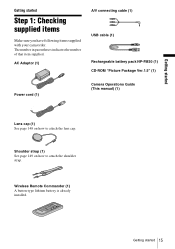
... number in parentheses indicates the number of that item supplied. Getting started Step 1: Checking supplied items Make sure you have following items supplied with your camcorder. AC Adaptor (1) A/V connecting cable (1) USB cable (1) Rechargeable battery pack NP-FM30 (1) CD-ROM "Picture Package Ver.1.5" (1) Power cord (1) Camera Operations Guide (This manual) (1) Lens cap...
... number in parentheses indicates the number of that item supplied. Getting started Step 1: Checking supplied items Make sure you have following items supplied with your camcorder. AC Adaptor (1) A/V connecting cable (1) USB cable (1) Rechargeable battery pack NP-FM30 (1) CD-ROM "Picture Package Ver.1.5" (1) Power cord (1) Camera Operations Guide (This manual) (1) Lens cap...
Camera Operations Guide
Page 16
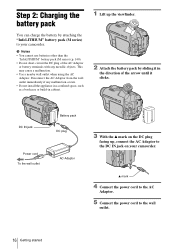
... IN jack Battery pack DC plug Power cord To the wall outlet AC Adaptor 3 With the v mark on your camcorder. This may cause a malfunction. • Use a nearby wall outlet when using the AC Adaptor. Step 2: Charging the battery pack You can charge the battery by ...
... IN jack Battery pack DC plug Power cord To the wall outlet AC Adaptor 3 With the v mark on your camcorder. This may cause a malfunction. • Use a nearby wall outlet when using the AC Adaptor. Step 2: Charging the battery pack You can charge the battery by ...

Camera Operations Guide
Page 18
The battery pack is not attached correctly. - For DCR-TRV480: The playing time of tapes recorded on Approximate number of minutes available when you use your camcorder, even if its power cord is damaged. - Playing time Approximate number of minutes available when you use a fully charged battery pack at 25&#... NP-FM50 130 60 NP-QM71D 315 150 NP-QM91D 475 230 Recording time when recording with the LCD screen on other devices in the Digital8 system. The actual battery life may be shorter when you use a fully charged battery pack at 25°C (77°F). This table ...
The battery pack is not attached correctly. - For DCR-TRV480: The playing time of tapes recorded on Approximate number of minutes available when you use your camcorder, even if its power cord is damaged. - Playing time Approximate number of minutes available when you use a fully charged battery pack at 25&#... NP-FM50 130 60 NP-QM71D 315 150 NP-QM91D 475 230 Recording time when recording with the LCD screen on other devices in the Digital8 system. The actual battery life may be shorter when you use a fully charged battery pack at 25°C (77°F). This table ...
Camera Operations Guide
Page 19
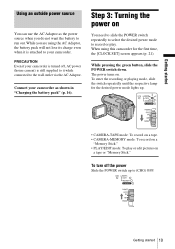
...Adaptor, the battery pack will not lose its charge even when it is still supplied to it while connected to your camcorder as the power source when you are using this camcorder for the desired power mode lights up to record or play or edit pictures on a tape or "Memory Stick." While... or playing mode, slide the switch repeatedly until the respective lamp for the first time, the [CLOCK SET] screen appears (p. 21). PRECAUTION Even if your camcorder is turned off the power Slide the POWER switch up . • CAMERA-TAPE mode: To record on a tape. • CAMERA-MEMORY mode: To record ...
...Adaptor, the battery pack will not lose its charge even when it is still supplied to it while connected to your camcorder as the power source when you are using this camcorder for the desired power mode lights up to record or play or edit pictures on a tape or "Memory Stick." While... or playing mode, slide the switch repeatedly until the respective lamp for the first time, the [CLOCK SET] screen appears (p. 21). PRECAUTION Even if your camcorder is turned off the power Slide the POWER switch up . • CAMERA-TAPE mode: To record on a tape. • CAMERA-MEMORY mode: To record ...
Camera Operations Guide
Page 20
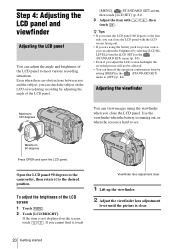
... running out, or when the screen is not displayed on the LCD screen during recording by setting [BEEP] in the (STANDARD SET) menu to the camcorder, then rotate it , touch Viewfinder lens adjustment lever 1 Lift up the viewfinder. 2 Adjust the viewfinder lens adjustment lever until the picture is clear. 20 Getting...
... running out, or when the screen is not displayed on the LCD screen during recording by setting [BEEP] in the (STANDARD SET) menu to the camcorder, then rotate it , touch Viewfinder lens adjustment lever 1 Lift up the viewfinder. 2 Adjust the viewfinder lens adjustment lever until the picture is clear. 20 Getting...
Camera Operations Guide
Page 21
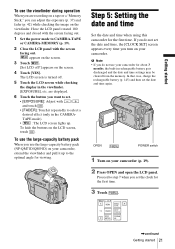
...date and time again. EXPO- are recording on a tape or a "Memory Stick," you use the large-capacity battery pack (NP-QM71D/QM91D) on your camcorder for the first time. 3 Touch . 60min MENU 1/3 FADER SPOT METER -:--:-- In that case, charge the rechargeable battery (p. 145) and then set the ...], etc. To use the large-capacity battery pack When you can adjust the exposure (p. 37) and fader (p. 42) while checking the image on your camcorder (p. 19). 2 Press OPEN and open the LCD panel. OPEN POWER switch 1 Turn on the LCD screen, touch . Have the LCD panel rotated 180...
...date and time again. EXPO- are recording on a tape or a "Memory Stick," you use the large-capacity battery pack (NP-QM71D/QM91D) on your camcorder for the first time. 3 Touch . 60min MENU 1/3 FADER SPOT METER -:--:-- In that case, charge the rechargeable battery (p. 145) and then set the ...], etc. To use the large-capacity battery pack When you can adjust the exposure (p. 37) and fader (p. 42) while checking the image on your camcorder (p. 19). 2 Press OPEN and open the LCD panel. OPEN POWER switch 1 Turn on the LCD screen, touch . Have the LCD panel rotated 180...
Camera Operations Guide
Page 22
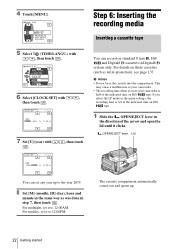
...OPEN/EJECT lever Lid The cassette compartment automatically comes out and opens up to the year 2079. 8 Set [M] (month), [D] (day), hour and minute in Digital8 system only. CAMERA SET PROGRAM AE SPOT METER EXPOSURE OK 5 Select (TIME/LANGU.) with / , then touch . DATE 2005Y JAN M 1D 12: 00 ...set it to 12:00AM. CLOCK SET -:--:-- For details on standard 8 mm , Hi8 and Digital8 cassettes in the same way as write-protection), see page 137. This may cause a malfunction of your camcorder. • The recording time when you select the LP mode in the menu settings, the ...
...OPEN/EJECT lever Lid The cassette compartment automatically comes out and opens up to the year 2079. 8 Set [M] (month), [D] (day), hour and minute in Digital8 system only. CAMERA SET PROGRAM AE SPOT METER EXPOSURE OK 5 Select (TIME/LANGU.) with / , then touch . DATE 2005Y JAN M 1D 12: 00 ...set it to 12:00AM. CLOCK SET -:--:-- For details on standard 8 mm , Hi8 and Digital8 cassettes in the same way as write-protection), see page 137. This may cause a malfunction of your camcorder. • The recording time when you select the LP mode in the menu settings, the ...
Camera Operations Guide
Page 23
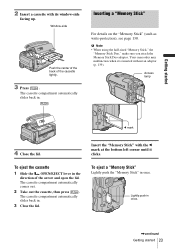
... Getting started b mark 4 Close the lid. The cassette compartment automatically slides back in once. To eject the cassette 1 Slide the OPEN/EJECT lever in . Your camcorder may malfunction when it clicks. The cassette compartment automatically comes out. 2 Take out the cassette, then press . 2 Insert a cassette with the b mark at the bottom...
... Getting started b mark 4 Close the lid. The cassette compartment automatically slides back in once. To eject the cassette 1 Slide the OPEN/EJECT lever in . Your camcorder may malfunction when it clicks. The cassette compartment automatically comes out. 2 Take out the cassette, then press . 2 Insert a cassette with the b mark at the bottom...
Camera Operations Guide
Page 24
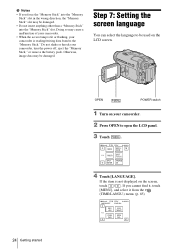
... PRGRAM METER AE 4 Touch [LANGUAGE]. Do not shake or knock your camcorder is not displayed on your camcorder. 2 Press OPEN to the "Memory Stick." Doing so may cause a malfunction of your camcorder. • When the access lamp is lit or flashing, your camcorder, turn the power off, eject the "Memory Stick," or remove the...
... PRGRAM METER AE 4 Touch [LANGUAGE]. Do not shake or knock your camcorder is not displayed on your camcorder. 2 Press OPEN to the "Memory Stick." Doing so may cause a malfunction of your camcorder. • When the access lamp is lit or flashing, your camcorder, turn the power off, eject the "Memory Stick," or remove the...
Camera Operations Guide
Page 25
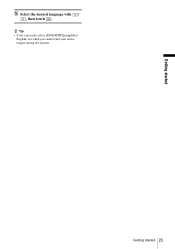
z Tip • Your camcorder offers [ENG[SIMP]](simplified English) for when you cannot find your native tongue among the options. Getting started 5 Select the desired language with / , then touch . Getting started 25
z Tip • Your camcorder offers [ENG[SIMP]](simplified English) for when you cannot find your native tongue among the options. Getting started 5 Select the desired language with / , then touch . Getting started 25


