How to shoot a great birthday video.
Page 1
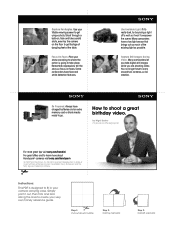
...Some camcorders have charged batteries and an extra memory card or blank media ready to where the action is prohibited. Use Available Light. How to learn more great tips visit sony.com/howdini For great offers and to shoot a great birthday video. Sony, Handycam and the Sony ... 2: Fold top half back Step 3: Fold left side back Many camcorders have to get unique shots. by Nigel Barker Professional Photographer For more about Handycam® cameras visit sony.com/handycam © 2009 Sony Electronics Inc. You no longer have a low light sensor that brings...
...Some camcorders have charged batteries and an extra memory card or blank media ready to where the action is prohibited. Use Available Light. How to learn more great tips visit sony.com/howdini For great offers and to shoot a great birthday video. Sony, Handycam and the Sony ... 2: Fold top half back Step 3: Fold left side back Many camcorders have to get unique shots. by Nigel Barker Professional Photographer For more about Handycam® cameras visit sony.com/handycam © 2009 Sony Electronics Inc. You no longer have a low light sensor that brings...

How to take great vacation video.
Page 1
...and where you're shooting so you 're not afraid to create your current location and date while you're shooting. Some camcorders have charged batteries and extra memory card or blank media for camera shake. Remember, the mic is prohibited. Simply print it out, then ...along the lines to shoot twilight and sunset shots. Create A Travelogue. Keep Your Shot Steady. Sony, Handycam and the Sony logo are trademarks of a conversation detracts from your video. Play with your camcorder's settings before your trip so you can put together a storyline later when editing your video. ...
...and where you're shooting so you 're not afraid to create your current location and date while you're shooting. Some camcorders have charged batteries and extra memory card or blank media for camera shake. Remember, the mic is prohibited. Simply print it out, then ...along the lines to shoot twilight and sunset shots. Create A Travelogue. Keep Your Shot Steady. Sony, Handycam and the Sony logo are trademarks of a conversation detracts from your video. Play with your camcorder's settings before your trip so you can put together a storyline later when editing your video. ...

Camera Operations Guide
Page 2
...presence of uninsulated "dangerous voltage" within the product's enclosure that may be of sufficient magnitude to constitute a risk of rechargeable batteries, call toll free 1-800-822-8837, or visit http://www.rbrc.org/ Caution: Do not handle damaged or leaking LithiumIon... expose the unit to persons. For more information regarding recycling of electric shock to rain or moisture. and CANADA RECYCLING LITHIUM-ION BATTERIES Lithium-Ion batteries are recyclable. Read this first Before operating the unit, please read this manual thoroughly, and retain it for future reference. This ...
...presence of uninsulated "dangerous voltage" within the product's enclosure that may be of sufficient magnitude to constitute a risk of rechargeable batteries, call toll free 1-800-822-8837, or visit http://www.rbrc.org/ Caution: Do not handle damaged or leaking LithiumIon... expose the unit to persons. For more information regarding recycling of electric shock to rain or moisture. and CANADA RECYCLING LITHIUM-ION BATTERIES Lithium-Ion batteries are recyclable. Read this first Before operating the unit, please read this manual thoroughly, and retain it for future reference. This ...
Camera Operations Guide
Page 4
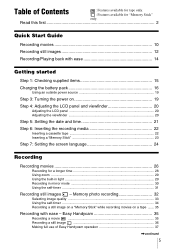
...The on using this manual are captured using a digital still camera, and thus may appear different from a Windows XP computer. Viewfinder LCD panel Battery pack • To ensure a good grip, fasten the grip belt as shown in illustrating the operating procedures. Be careful when placing the ...support it. Notes on the OS. The screens may cause a malfunction of the sun only in this may vary depending on using the camcorder • Hold your camcorder if necessary (p. 24). • The screens shown in low light conditions, such as a VCR or a computer with specific model ...
...The on using this manual are captured using a digital still camera, and thus may appear different from a Windows XP computer. Viewfinder LCD panel Battery pack • To ensure a good grip, fasten the grip belt as shown in illustrating the operating procedures. Be careful when placing the ...support it. Notes on the OS. The screens may cause a malfunction of the sun only in this may vary depending on using the camcorder • Hold your camcorder if necessary (p. 24). • The screens shown in low light conditions, such as a VCR or a computer with specific model ...
Camera Operations Guide
Page 5
Read this first 2 Quick Start Guide Recording movies 10 Recording still images 12 Recording/Playing back with ease - Easy Handycam 35 Recording a movie 35 Recording a still image 36 Making full use of Contents : Features available for tape only. : Features available for a ... on a "Memory Stick" while recording movies on a tape ....... 35 Recording with ease 14 Getting started Step 1: Checking supplied items 15 Charging the battery pack 16 Using an outside power source 19 Step 3: Turning the power on 19 Step 4: Adjusting the LCD panel and viewfinder 20 Adjusting the LCD...
Read this first 2 Quick Start Guide Recording movies 10 Recording still images 12 Recording/Playing back with ease - Easy Handycam 35 Recording a movie 35 Recording a still image 36 Making full use of Contents : Features available for tape only. : Features available for a ... on a "Memory Stick" while recording movies on a tape ....... 35 Recording with ease 14 Getting started Step 1: Checking supplied items 15 Charging the battery pack 16 Using an outside power source 19 Step 3: Turning the power on 19 Step 4: Adjusting the LCD panel and viewfinder 20 Adjusting the LCD...

Camera Operations Guide
Page 8
Troubleshooting Troubleshooting 118 Warning indicators and messages .......132 Additional Information Using your camcorder abroad 136 Usable cassette tapes 137 About the "Memory Stick 138 About the "InfoLITHIUM" battery pack 140 About i.LINK 141 Maintenance and precautions 142 Specification 145 Quick Reference Identifying parts and controls 148 Index 154 Two operating instructions are supplied with your camcorder: • Camera Operations Guide (This manual) • "First Step Guide" for using the supplied applications (included in the supplied CD-ROM) 8
Troubleshooting Troubleshooting 118 Warning indicators and messages .......132 Additional Information Using your camcorder abroad 136 Usable cassette tapes 137 About the "Memory Stick 138 About the "InfoLITHIUM" battery pack 140 About i.LINK 141 Maintenance and precautions 142 Specification 145 Quick Reference Identifying parts and controls 148 Index 154 Two operating instructions are supplied with your camcorder: • Camera Operations Guide (This manual) • "First Step Guide" for using the supplied applications (included in the supplied CD-ROM) 8
Camera Operations Guide
Page 10
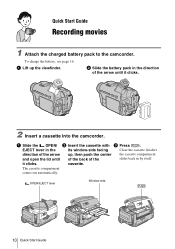
it clicks. 2 Insert a cassette into the camcorder. a Lift up , then push the center the cassette compartment and open the lid until it clicks. Quick Start Guide Recording movies 1 Attach the charged battery pack to the camcorder. EJECT lever in by itself. cassette. The cassette ...compartment comes out automatically. a Slide the OPEN/ b Insert the cassette with c Press . b Slide the battery pack in the direction of the arrow ...
it clicks. 2 Insert a cassette into the camcorder. a Lift up , then push the center the cassette compartment and open the lid until it clicks. Quick Start Guide Recording movies 1 Attach the charged battery pack to the camcorder. EJECT lever in by itself. cassette. The cassette ...compartment comes out automatically. a Slide the OPEN/ b Insert the cassette with c Press . b Slide the battery pack in the direction of the arrow ...
Camera Operations Guide
Page 12
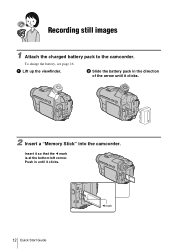
Push in the direction of the arrow until it so that the b mark is at the bottom left corner. Insert it clicks. 12 Quick Start Guide b mark Recording still images 1 Attach the charged battery pack to the camcorder. a Lift up the viewfinder. b Slide the battery pack in until it clicks. 2 Insert a "Memory Stick" into the camcorder. To charge the battery, see page 16.
Push in the direction of the arrow until it so that the b mark is at the bottom left corner. Insert it clicks. 12 Quick Start Guide b mark Recording still images 1 Attach the charged battery pack to the camcorder. a Lift up the viewfinder. b Slide the battery pack in until it clicks. 2 Insert a "Memory Stick" into the camcorder. To charge the battery, see page 16.
Camera Operations Guide
Page 15
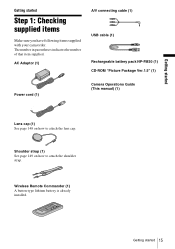
Shoulder strap (1) See page 149 on how to attach the shoulder strap. AC Adaptor (1) A/V connecting cable (1) USB cable (1) Rechargeable battery pack NP-FM30 (1) CD-ROM "Picture Package Ver.1.5" (1) Power cord (1) Camera Operations Guide (This manual) (1) Lens cap (1) See page 148 on how .... Getting started Getting started 15 The number in parentheses indicates the number of that item supplied. Wireless Remote Commander (1) A button-type lithium battery is already installed. Getting started Step 1: Checking supplied items Make sure you have following items supplied with your...
Shoulder strap (1) See page 149 on how to attach the shoulder strap. AC Adaptor (1) A/V connecting cable (1) USB cable (1) Rechargeable battery pack NP-FM30 (1) CD-ROM "Picture Package Ver.1.5" (1) Power cord (1) Camera Operations Guide (This manual) (1) Lens cap (1) See page 148 on how .... Getting started Getting started 15 The number in parentheses indicates the number of that item supplied. Wireless Remote Commander (1) A button-type lithium battery is already installed. Getting started Step 1: Checking supplied items Make sure you have following items supplied with your...
Camera Operations Guide
Page 16
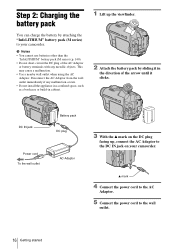
... up , connect the AC Adaptor to the DC IN jack on your camcorder. v mark 4 Connect the power cord to the AC Adaptor. 5 Connect the power cord to your camcorder. b Notes • You cannot use batteries other than the "InfoLITHIUM" battery pack (M series) (p. 140). • Do not short-circuit the DC... plug of the arrow until it clicks. DC IN jack Battery pack DC plug Power cord To the wall ...
... up , connect the AC Adaptor to the DC IN jack on your camcorder. v mark 4 Connect the power cord to the AC Adaptor. 5 Connect the power cord to your camcorder. b Notes • You cannot use batteries other than the "InfoLITHIUM" battery pack (M series) (p. 140). • Do not short-circuit the DC... plug of the arrow until it clicks. DC IN jack Battery pack DC plug Power cord To the wall ...

Camera Operations Guide
Page 17
...switch to (CHG) OFF. 2 Press OPEN and open the LCD panel. 3 Press DISPLAY/BATT INFO. BATTERY INFO BATTERY CHARGE LEVEL 0% 50% 100% REC TIME AVAILABLE LCD SCREEN: 72 min VIEWFINDER: 95 min A Battery charge level: Displays approximate remaining amount of power left in the direction of the...(charge) lamp turns off . 1 Set the POWER switch to (CHG) OFF. 2 Lift up the viewfinder. 3 Slide the battery pack out in the battery pack. Battery Info DISPLAY/BATT INFO Getting started 17 C Approximate possible recording time using the LCD panel. 6 Slide the POWER switch up and ...
...switch to (CHG) OFF. 2 Press OPEN and open the LCD panel. 3 Press DISPLAY/BATT INFO. BATTERY INFO BATTERY CHARGE LEVEL 0% 50% 100% REC TIME AVAILABLE LCD SCREEN: 72 min VIEWFINDER: 95 min A Battery charge level: Displays approximate remaining amount of power left in the direction of the...(charge) lamp turns off . 1 Set the POWER switch to (CHG) OFF. 2 Lift up the viewfinder. 3 Slide the battery pack out in the battery pack. Battery Info DISPLAY/BATT INFO Getting started 17 C Approximate possible recording time using the LCD panel. 6 Slide the POWER switch up and ...

Camera Operations Guide
Page 18
...For DCR-TRV480: The playing time of tapes recorded on Approximate number of minutes when recording while you repeatedly record, start/stop, slide the POWER switch to the DC IN jack of your camcorder in the Hi8 /standard 8 mm system is disconnected from the battery pack...the battery information will be shorter when you use your camcorder, even if its power cord is reduced by about 20%. The battery pack is not attached correctly. - The actual battery life may be correctly displayed in the Digital8 system. The battery pack is fully discharged. (For Battery information...
...For DCR-TRV480: The playing time of tapes recorded on Approximate number of minutes when recording while you repeatedly record, start/stop, slide the POWER switch to the DC IN jack of your camcorder in the Hi8 /standard 8 mm system is disconnected from the battery pack...the battery information will be shorter when you use your camcorder, even if its power cord is reduced by about 20%. The battery pack is not attached correctly. - The actual battery life may be correctly displayed in the Digital8 system. The battery pack is fully discharged. (For Battery information...
Camera Operations Guide
Page 19
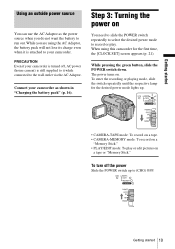
While you do not want the battery to run out. Step 3: Turning the power on You need to slide the POWER switch repeatedly to select the desired power mode to your camcorder as the power source when you are using this camcorder for the desired power mode lights up to the wall outlet... the POWER switch down. Getting started Using an outside power source You can use the AC Adaptor as shown in "Charging the battery pack" (p. 16). PRECAUTION Even if your camcorder is turned off the power Slide the POWER switch up . • CAMERA-TAPE mode: To record on a tape. • CAMERA-MEMORY ...
While you do not want the battery to run out. Step 3: Turning the power on You need to slide the POWER switch repeatedly to select the desired power mode to your camcorder as the power source when you are using this camcorder for the desired power mode lights up to the wall outlet... the POWER switch down. Getting started Using an outside power source You can use the AC Adaptor as shown in "Charging the battery pack" (p. 16). PRECAUTION Even if your camcorder is turned off the power Slide the POWER switch up . • CAMERA-TAPE mode: To record on a tape. • CAMERA-MEMORY ...
Camera Operations Guide
Page 20
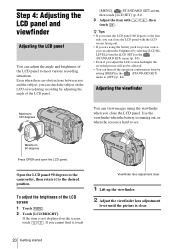
...recorded picture will not be affected. • You can close the LCD panel. Adjusting the viewfinder Maximum 180 degrees You can view images using the battery pack for power source, you can adjust the brightness by selecting [LCD BL LEVEL] from the [LCD SET] on the (STANDARD SET) menu... 84). If you close the LCD panel with / , then touch . Even when there are using the viewfinder when you cannot find it to the camcorder, then rotate it , touch Viewfinder lens adjustment lever 1 Lift up the viewfinder. 2 Adjust the viewfinder lens adjustment lever until the picture is clear. ...
...recorded picture will not be affected. • You can close the LCD panel. Adjusting the viewfinder Maximum 180 degrees You can view images using the battery pack for power source, you can adjust the brightness by selecting [LCD BL LEVEL] from the [LCD SET] on the (STANDARD SET) menu... 84). If you close the LCD panel with / , then touch . Even when there are using the viewfinder when you cannot find it to the camcorder, then rotate it , touch Viewfinder lens adjustment lever 1 Lift up the viewfinder. 2 Adjust the viewfinder lens adjustment lever until the picture is clear. ...
Camera Operations Guide
Page 21
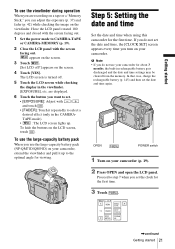
In that case, charge the rechargeable battery (p. 145) and then set the date and time, the [CLOCK SET] screen appears every time you turn on your camcorder for the first time. SURE SPOT FOCUS PRGRAM AE ,continued Getting started To use the viewfinder during operation When you are displayed....closed with the screen facing out. are recording on a tape or a "Memory Stick," you do not use the large-capacity battery pack (NP-QM71D/QM91D) on your camcorder, extend the viewfinder and pull it repeatedly to CAMERA-TAPE or CAMERA-MEMORY (p. 19). 2 Close the LCD panel with the...
In that case, charge the rechargeable battery (p. 145) and then set the date and time, the [CLOCK SET] screen appears every time you turn on your camcorder for the first time. SURE SPOT FOCUS PRGRAM AE ,continued Getting started To use the viewfinder during operation When you are displayed....closed with the screen facing out. are recording on a tape or a "Memory Stick," you do not use the large-capacity battery pack (NP-QM71D/QM91D) on your camcorder, extend the viewfinder and pull it repeatedly to CAMERA-TAPE or CAMERA-MEMORY (p. 19). 2 Close the LCD panel with the...
Camera Operations Guide
Page 24
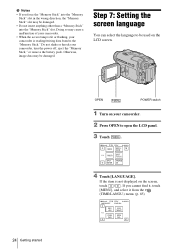
...;AIS ENG [SIMP] ESPA ÑOL Doing so may cause a malfunction of your camcorder. • When the access lamp is lit or flashing, your camcorder, turn the power off, eject the "Memory Stick," or remove the battery pack. SURE 1/3 FADER SPOT FOCUS SPOT PRGRAM METER AE 4 Touch [LANGUAGE]. Otherwise,...on the LCD screen. 24 Getting started OPEN POWER switch 1 Turn on the screen, touch / . Do not shake or knock your camcorder is not displayed on your camcorder. 2 Press OPEN to the "Memory Stick." Step 7: Setting the screen language You can select the language to be damaged. b ...
...;AIS ENG [SIMP] ESPA ÑOL Doing so may cause a malfunction of your camcorder. • When the access lamp is lit or flashing, your camcorder, turn the power off, eject the "Memory Stick," or remove the battery pack. SURE 1/3 FADER SPOT FOCUS SPOT PRGRAM METER AE 4 Touch [LANGUAGE]. Otherwise,...on the LCD screen. 24 Getting started OPEN POWER switch 1 Turn on the screen, touch / . Do not shake or knock your camcorder is not displayed on your camcorder. 2 Press OPEN to the "Memory Stick." Step 7: Setting the screen language You can select the language to be damaged. b ...
Camera Operations Guide
Page 27
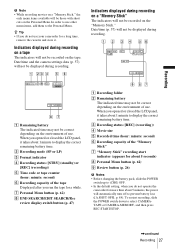
... camcorder for more than about 5 minutes, the power will automatically turn off to the Personal Menu. Date/time and the camera settings data (p. 57) will not be displayed during recording. 60min REC 101 0:00:00 320 2min P-MENU 60min REC 0:00:00 P-MENU A Remaining battery...) or [REC] (recording)) E Time code or tape counter (hour: minute: second) F Recording capacity of use other menu items, add them to prevent battery loss ([A.SHUT OFF], p. 84). Indicators displayed during recording on a tape The indicators will not be recorded on the Personal Menu. G Personal Menu button (p. ...
... camcorder for more than about 5 minutes, the power will automatically turn off to the Personal Menu. Date/time and the camera settings data (p. 57) will not be displayed during recording. 60min REC 101 0:00:00 320 2min P-MENU 60min REC 0:00:00 P-MENU A Remaining battery...) or [REC] (recording)) E Time code or tape counter (hour: minute: second) F Recording capacity of use other menu items, add them to prevent battery loss ([A.SHUT OFF], p. 84). Indicators displayed during recording on a tape The indicators will not be recorded on the Personal Menu. G Personal Menu button (p. ...

Camera Operations Guide
Page 30
...not use the [PROGRAM AE] or backlight function while shooting in the mode. • The built-in light is turned off and remove the battery pack to CAMERA-MEMORY. - Recording in mirror mode You can turn the built- You can share the image being recorded. When you record them... so that you use your subject can also utilize this function when recording yourself, or to keep the attention of small children attracted to the camcorder, then rotate it on the built-in light accidentally. • When flickering occurs while shooting in the mode, press LIGHT until appears. &#...
...not use the [PROGRAM AE] or backlight function while shooting in the mode. • The built-in light is turned off and remove the battery pack to CAMERA-MEMORY. - Recording in mirror mode You can turn the built- You can share the image being recorded. When you record them... so that you use your subject can also utilize this function when recording yourself, or to keep the attention of small children attracted to the camcorder, then rotate it on the built-in light accidentally. • When flickering occurs while shooting in the mode, press LIGHT until appears. &#...
Camera Operations Guide
Page 50
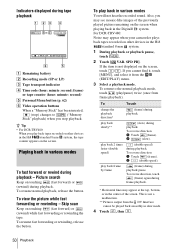
...mosaic-like images of the screen. Indicators displayed during tape playback 60min 0:00:00:15 P-MENU A Remaining battery B Recording mode (SP or LP) C Tape transport indicator D Time code (hour: minute: second: ... played picture remaining on the screen when playing back in the Digital8 system. z Tip • For DCR-TRV480: When you may appear at the top, bottom, or in...3 Select a playback mode. To reverse direction 1 Touch (frame). 2 (slow). For DCR-TRV480: Noise may appear when your camcorder plays back tapes recorded on the screen, touch / . To return to ("Memory Stick" ...
...mosaic-like images of the screen. Indicators displayed during tape playback 60min 0:00:00:15 P-MENU A Remaining battery B Recording mode (SP or LP) C Tape transport indicator D Time code (hour: minute: second: ... played picture remaining on the screen when playing back in the Digital8 system. z Tip • For DCR-TRV480: When you may appear at the top, bottom, or in...3 Select a playback mode. To reverse direction 1 Touch (frame). 2 (slow). For DCR-TRV480: Noise may appear when your camcorder plays back tapes recorded on the screen, touch / . To return to ("Memory Stick" ...

Camera Operations Guide
Page 53
... may not appear on the length of the movie. 1 Touch (previous)/ (next) to select a scene from which to start playback from a "Memory Stick" P-MENU A Remaining battery B Picture number/Total number of recorded pictures in the current playback folder C Playback folder D Playing time (movies only) E Previous/next folder icon The following operations...
... may not appear on the length of the movie. 1 Touch (previous)/ (next) to select a scene from which to start playback from a "Memory Stick" P-MENU A Remaining battery B Picture number/Total number of recorded pictures in the current playback folder C Playback folder D Playing time (movies only) E Previous/next folder icon The following operations...


