Operating Instructions (primary manual)
Page 5
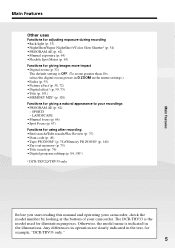
...;Picture effect (p. 58, 72) •Digital effect* (p. 59, 73) •Title (p. 101) •MEMORY MIX* (p. 120) Functions for using after recording •End search/Edit search/Rec Review (p. 37) •Data code (p. 40) •Tape PB ZOOM* (p. 74)/Memory PB ZOOM* (p. 140) •Zero set memory (p. 75) •Title search (p. 76) •Digital program editing (p. 84, 130*) * DCR-TRV22/TRV33 only Before you start reading this manual and operating your camcorder, check the model number...
...;Picture effect (p. 58, 72) •Digital effect* (p. 59, 73) •Title (p. 101) •MEMORY MIX* (p. 120) Functions for using after recording •End search/Edit search/Rec Review (p. 37) •Data code (p. 40) •Tape PB ZOOM* (p. 74)/Memory PB ZOOM* (p. 140) •Zero set memory (p. 75) •Title search (p. 76) •Digital program editing (p. 84, 130*) * DCR-TRV22/TRV33 only Before you start reading this manual and operating your camcorder, check the model number...
Operating Instructions (primary manual)
Page 6
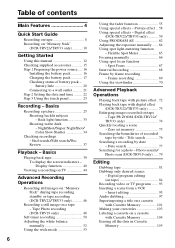
.../ Color Slow Shutter 34 Checking recordings - End search/Edit search/Rec Review 37 Playback - Display function 40 Viewing a recording on TV 44 Advanced Recording Operations Recording still images on "Memory Stick" during tape recording standby or tape recording (DCR-TRV22/TRV33 only 46 Recording a still image on tape 84 Recording video or TV programs ....... 93 Inserting a scene from a VCR - Flexible Spot Meter 65 Focusing manually 66 Using spot focus function - Zero set memory 75 Searching the boundaries of recorded tape by frame recording - Back light function 33 Shooting in...
.../ Color Slow Shutter 34 Checking recordings - End search/Edit search/Rec Review 37 Playback - Display function 40 Viewing a recording on TV 44 Advanced Recording Operations Recording still images on "Memory Stick" during tape recording standby or tape recording (DCR-TRV22/TRV33 only 46 Recording a still image on tape 84 Recording video or TV programs ....... 93 Inserting a scene from a VCR - Flexible Spot Meter 65 Focusing manually 66 Using spot focus function - Zero set memory 75 Searching the boundaries of recorded tape by frame recording - Back light function 33 Shooting in...
Operating Instructions (primary manual)
Page 12
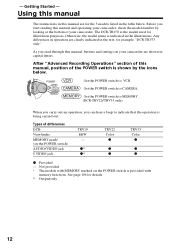
..., "DCR-TRV33 only." Otherwise, the model name is shown by looking at the bottom of the POWER switch is indicated in the text, for details. ** Output only 12 Not provided * The models with memory functions. z** z** TRV22 Color z z z TRV33 Color z z z z Provided - After "Advanced Recording Operations" section of differences DCRViewfinder MEMORY mark* (on your camcorder. Using this manual The instructions in this manual, buttons and settings on the POWER switch) AUDIO/VIDEO jack S VIDEO jack TRV19 B&W - Types of this manual and operating...
..., "DCR-TRV33 only." Otherwise, the model name is shown by looking at the bottom of the POWER switch is indicated in the text, for details. ** Output only 12 Not provided * The models with memory functions. z** z** TRV22 Color z z z TRV33 Color z z z z Provided - After "Advanced Recording Operations" section of differences DCRViewfinder MEMORY mark* (on your camcorder. Using this manual The instructions in this manual, buttons and settings on the POWER switch) AUDIO/VIDEO jack S VIDEO jack TRV19 B&W - Types of this manual and operating...
Operating Instructions (primary manual)
Page 41
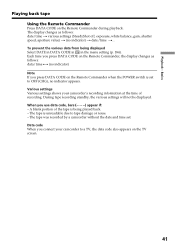
... the TV screen. 41 Playback - Basics Playing back tape Using the Remote Commander Press DATA CODE on the Remote Commander when the POWER switch is set . A blank portion of recording. Each time you press DATA CODE on the Remote Commander, the display changes as follows: date/time t various settings (SteadyShot off, exposure, white balance, gain, shutter speed, aperture value) t (no indicator appears. The tape is being displayed Select DATE in DATA CODE in in the menu setting (p. 184). Various settings Various settings shows your camcorder to...
... the TV screen. 41 Playback - Basics Playing back tape Using the Remote Commander Press DATA CODE on the Remote Commander when the POWER switch is set . A blank portion of recording. Each time you press DATA CODE on the Remote Commander, the display changes as follows: date/time t various settings (SteadyShot off, exposure, white balance, gain, shutter speed, aperture value) t (no indicator appears. The tape is being displayed Select DATE in DATA CODE in in the menu setting (p. 184). Various settings Various settings shows your camcorder to...
Operating Instructions (primary manual)
Page 44
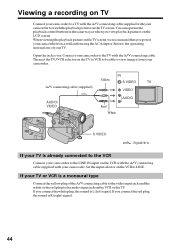
... the audio input jack on the VCR or the TV. Then set the TV/VCR selector on the LCD screen. IN Yellow S VIDEO TV A/V connecting cable (supplied) VIDEO AUDIO/ VIDEO Red White AUDIO S VIDEO : Signal flow If your TV is a monaural type Connect the yellow plug of your TV. You can operate the playback control buttons in the same way as when you view playback pictures on the TV to VCR to be able to view images from a wall outlet using...
... the audio input jack on the VCR or the TV. Then set the TV/VCR selector on the LCD screen. IN Yellow S VIDEO TV A/V connecting cable (supplied) VIDEO AUDIO/ VIDEO Red White AUDIO S VIDEO : Signal flow If your TV is a monaural type Connect the yellow plug of your TV. You can operate the playback control buttons in the same way as when you view playback pictures on the TV to VCR to be able to view images from a wall outlet using...
Operating Instructions (primary manual)
Page 85
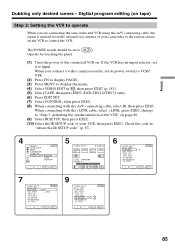
... you are connecting the camcorder and VCR using the A/V connecting cable, the signal is emitted from the infrared rays emitter of your camcorder to the remote sensor on the VCR to "Step 3: Adjusting the synchronization of the VCR" on page 88. (9) Select IR SETUP, then press EXEC. (10) Select the IR SETUP code of the connected VCR on tape) Step 2: Setting the VCR to operate When you connect a video camera recorder, set to input. Check the code in...
... you are connecting the camcorder and VCR using the A/V connecting cable, the signal is emitted from the infrared rays emitter of your camcorder to the remote sensor on the VCR to "Step 3: Adjusting the synchronization of the VCR" on page 88. (9) Select IR SETUP, then press EXEC. (10) Select the IR SETUP code of the connected VCR on tape) Step 2: Setting the VCR to operate When you connect a video camera recorder, set to input. Check the code in...
Operating Instructions (primary manual)
Page 90
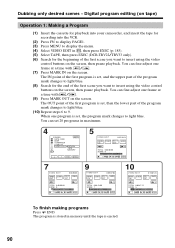
... fine-adjust one frame at a time with / . (7) Press MARK IN on the screen. Dubbing only desired scenes - Digital program editing (on tape) Operation 1: Making a Program (1) Insert the cassette for playback into your camcorder, and insert the tape for recording into the VCR. (2) Press FN to display PAGE1. (3) Press MENU to display the menu. (4) Select VIDEO EDIT in , then press EXEC (p. 185). (5) Select TAPE, then press EXEC (DCR-TRV22/TRV33 only...
... fine-adjust one frame at a time with / . (7) Press MARK IN on the screen. Dubbing only desired scenes - Digital program editing (on tape) Operation 1: Making a Program (1) Insert the cassette for playback into your camcorder, and insert the tape for recording into the VCR. (2) Press FN to display PAGE1. (3) Press MENU to display the menu. (4) Select VIDEO EDIT in , then press EXEC (p. 185). (5) Select TAPE, then press EXEC (DCR-TRV22/TRV33 only...

Operating Instructions (primary manual)
Page 115
.... Recording data The recording data (date/time or various settings when recorded) do not work: - You can also use the Remote Commander for this operation (p. 40). Color Slow Shutter - Digital effect - Super NightShot - Wide mode - SteadyShot While you record still images when the POWER switch is set to MEMORY The following functions do not appear during playback. If you are recorded automatically onto the "Memory Stick." However, they are recording a still image You cannot turn off the power or press PHOTO. Fader - Memory Photo recording When...
.... Recording data The recording data (date/time or various settings when recorded) do not work: - You can also use the Remote Commander for this operation (p. 40). Color Slow Shutter - Digital effect - Super NightShot - Wide mode - SteadyShot While you record still images when the POWER switch is set to MEMORY The following functions do not appear during playback. If you are recorded automatically onto the "Memory Stick." However, they are recording a still image You cannot turn off the power or press PHOTO. Fader - Memory Photo recording When...
Operating Instructions (primary manual)
Page 157
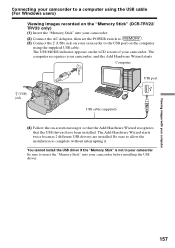
... "Memory Stick" into your camcorder. (2) Connect the AC Adaptor, then set the POWER switch to . (3) Connect the (USB) jack on the computer using the USB cable (For Windows users) Viewing images recorded on the "Memory Stick" (DCR-TRV22/ TRV33 only) (1) Insert the "Memory Stick" into your camcorder. Viewing images with your camcorder, and the Add Hardware Wizard starts. Computer USB port (USB) jack USB cable (supplied) (4) Follow the on the LCD screen of your camcorder before installing the USB driver. The computer recognizes your computer 157 The USB MODE...
... "Memory Stick" into your camcorder. (2) Connect the AC Adaptor, then set the POWER switch to . (3) Connect the (USB) jack on the computer using the USB cable (For Windows users) Viewing images recorded on the "Memory Stick" (DCR-TRV22/ TRV33 only) (1) Insert the "Memory Stick" into your camcorder. Viewing images with your camcorder, and the Add Hardware Wizard starts. Computer USB port (USB) jack USB cable (supplied) (4) Follow the on the LCD screen of your camcorder before installing the USB driver. The computer recognizes your computer 157 The USB MODE...
Operating Instructions (primary manual)
Page 158
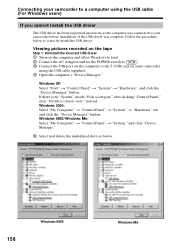
... USB driver. Viewing pictures recorded on the tape Step 1: Uninstall the incorrect USB driver 1 Turn on the computer and allow Windows to load. 2 Connect the AC Adaptor and set the POWER switch to . 3 Connect the USB port on the computer to the (USB) jack on your camcorder before installation of the USB driver was connected to your camcorder using the USB cable supplied. 4 Open the computer's "Device Manager." Connecting your camcorder to a computer using the USB cable (For Windows users) If you cannot install the USB driver The USB driver...
... USB driver. Viewing pictures recorded on the tape Step 1: Uninstall the incorrect USB driver 1 Turn on the computer and allow Windows to load. 2 Connect the AC Adaptor and set the POWER switch to . 3 Connect the USB port on the computer to the (USB) jack on your camcorder before installation of the USB driver was connected to your camcorder using the USB cable supplied. 4 Open the computer's "Device Manager." Connecting your camcorder to a computer using the USB cable (For Windows users) If you cannot install the USB driver The USB driver...
Operating Instructions (primary manual)
Page 160
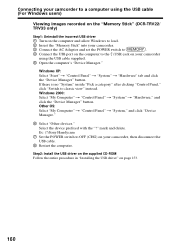
... "Installing the USB driver" on your camcorder using the USB cable (For Windows users) Viewing images recorded on the "Memory Stick" (DCR-TRV22/ TRV33 only) Step1: Uninstall the incorrect USB driver 1 Turn on the computer and allow Windows to load. 2 Insert the "Memory Stick" into your camcorder, then disconnect the USB cable. 8 Restart the computer. Ex: (?)Sony Handycam 7 Set the POWER switch to classic view" instead. mark and delete. Other OS: Select "My Computer" t "Control Panel" t "System," and click "Device Manager." 6 Select "Other devices." Windows XP...
... "Installing the USB driver" on your camcorder using the USB cable (For Windows users) Viewing images recorded on the "Memory Stick" (DCR-TRV22/ TRV33 only) Step1: Uninstall the incorrect USB driver 1 Turn on the computer and allow Windows to load. 2 Insert the "Memory Stick" into your camcorder, then disconnect the USB cable. 8 Restart the computer. Ex: (?)Sony Handycam 7 Set the POWER switch to classic view" instead. mark and delete. Other OS: Select "My Computer" t "Control Panel" t "System," and click "Device Manager." 6 Select "Other devices." Windows XP...

Operating Instructions (primary manual)
Page 165
... the USB port on the computer using the supplied USB cable. (5) Select the CD-R drive and writing speed on the ImageMixer Easy Video CD screen. (6) Insert a new CD-R in "Capturing images recorded on a tape or images live from which you want to capture images onto the CD-R. (3) Click . (4) Connect the (USB) jack on your camcorder to create a video CD by capturing images recorded on a tape onto a CD-R." 165 message appears, click "Quit." Viewing pictures recorded on tape on...
... the USB port on the computer using the supplied USB cable. (5) Select the CD-R drive and writing speed on the ImageMixer Easy Video CD screen. (6) Insert a new CD-R in "Capturing images recorded on a tape or images live from which you want to capture images onto the CD-R. (3) Click . (4) Connect the (USB) jack on your camcorder to create a video CD by capturing images recorded on a tape onto a CD-R." 165 message appears, click "Quit." Viewing pictures recorded on tape on...
Operating Instructions (primary manual)
Page 167
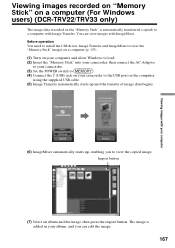
... camcorder. (3) Set the POWER switch to . (4) Connect the (USB) jack on your camcorder to the USB port on the "Memory Stick" is added in your computer (6) ImageMixer automatically starts up and the transfer of image data begins. Import button (7) Select an album and the image, then press the import button. Viewing images with your album, and you to a computer with Image Transfer. You can edit the image. 167 Viewing images recorded on "Memory Stick" on a computer (For Windows users) (DCR-TRV22/TRV33...
... camcorder. (3) Set the POWER switch to . (4) Connect the (USB) jack on your camcorder to the USB port on the "Memory Stick" is added in your computer (6) ImageMixer automatically starts up and the transfer of image data begins. Import button (7) Select an album and the image, then press the import button. Viewing images with your album, and you to a computer with Image Transfer. You can edit the image. 167 Viewing images recorded on "Memory Stick" on a computer (For Windows users) (DCR-TRV22/TRV33...
Operating Instructions (primary manual)
Page 168
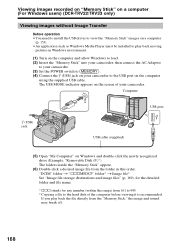
.... (3) Set the POWER switch to . (4) Connect the (USB) jack on your camcorder to the hard disk of your camcorder. The USB MODE indicator appears on Windows and double-click the newly recognized drive (Example: "Removable Disk (F:)"). Viewing images recorded on "Memory Stick" on a computer (For Windows users) (DCR-TRV22/TRV33 only) Viewing images without Image Transfer Before operation •You need to install the USB driver to view the "Memory Stick" images on a computer (p. 153). •An application such as Windows Media Player must be installed to play back the file directly from...
.... (3) Set the POWER switch to . (4) Connect the (USB) jack on your camcorder to the hard disk of your camcorder. The USB MODE indicator appears on Windows and double-click the newly recognized drive (Example: "Removable Disk (F:)"). Viewing images recorded on "Memory Stick" on a computer (For Windows users) (DCR-TRV22/TRV33 only) Viewing images without Image Transfer Before operation •You need to install the USB driver to view the "Memory Stick" images on a computer (p. 153). •An application such as Windows Media Player must be installed to play back the file directly from...
Operating Instructions (primary manual)
Page 172
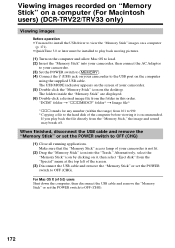
... the USB cable and remove the "Memory Stick" or set the POWER switch to OFF (CHG). 172 Make sure that the "Memory Stick" access lamp of the computer before viewing it , then select "Eject disk" from the folder in this order. Alternatively, select the "Memory Stick" icon by clicking on the desktop. Viewing images recorded on "Memory Stick" on a computer (For Macintosh users) (DCR-TRV22/TRV33 only) Viewing images Before operation •You need to install the USB driver to view the "Memory Stick" images...
... the USB cable and remove the "Memory Stick" or set the POWER switch to OFF (CHG). 172 Make sure that the "Memory Stick" access lamp of the computer before viewing it , then select "Eject disk" from the folder in this order. Alternatively, select the "Memory Stick" icon by clicking on the desktop. Viewing images recorded on "Memory Stick" on a computer (For Macintosh users) (DCR-TRV22/TRV33 only) Viewing images Before operation •You need to install the USB driver to view the "Memory Stick" images...
Operating Instructions (primary manual)
Page 179
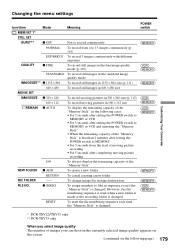
Changing the menu settings Customizing Your Camcorder Icon/item MEM SET 1* STILL SET BURST** Mode z OFF NORMAL EXP BRKTG QUALITY z FINE STANDARD IMAGESIZE** z 1152 × 864 640 × 480 MOVIE SET IMAGESIZE z 320 × 240 160 × 112 REMAIN z AUTO ON NEW FOLDER REC FOLDER FILE NO. To reset the file numbering sequence each time the "Memory Stick" is changed. z SERIES RESET Meaning Not to record continuously To record from 4 to 13 images continuously...
Changing the menu settings Customizing Your Camcorder Icon/item MEM SET 1* STILL SET BURST** Mode z OFF NORMAL EXP BRKTG QUALITY z FINE STANDARD IMAGESIZE** z 1152 × 864 640 × 480 MOVIE SET IMAGESIZE z 320 × 240 160 × 112 REMAIN z AUTO ON NEW FOLDER REC FOLDER FILE NO. To reset the file numbering sequence each time the "Memory Stick" is changed. z SERIES RESET Meaning Not to record continuously To record from 4 to 13 images continuously...
Operating Instructions (primary manual)
Page 211
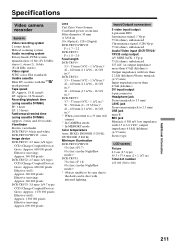
.../rewind time (using cassette DVM60) Approx. 2 min. Specifications Video camera recorder System Video recording system 2 rotary heads Helical scanning system Audio recording system Rotary heads, PCM system Quantization: 12 bits (Fs 32 kHz, stereo 1, stereo 2), 16 bits (Fs 48 kHz, stereo) Video signal NTSC color, EIA standards Usable cassette Mini DV cassette with 2.5 to the dark can be seen due to 3.0 V DC, output impedance 6.8 kΩ (kilohms) (ø 3.5 mm) Stereo type LCD screen Picture 6.2 cm (2.5 type...
.../rewind time (using cassette DVM60) Approx. 2 min. Specifications Video camera recorder System Video recording system 2 rotary heads Helical scanning system Audio recording system Rotary heads, PCM system Quantization: 12 bits (Fs 32 kHz, stereo 1, stereo 2), 16 bits (Fs 48 kHz, stereo) Video signal NTSC color, EIA standards Usable cassette Mini DV cassette with 2.5 to the dark can be seen due to 3.0 V DC, output impedance 6.8 kΩ (kilohms) (ø 3.5 mm) Stereo type LCD screen Picture 6.2 cm (2.5 type...
Operating Instructions (primary manual)
Page 219
... Warning messages 196 White balance 52 Wide-angle 32 Wide mode 53 WIPE 55 Write-protect tab 198 Zero set 22 Color Slow Shutter 35 Continuous photo recording 116 Data code 40 Date search 77 DEMO MODE 183 Digital effect 59, 73 Digital program editing 84, 130 DISPLAY 184 DOT 55 Dual sound track tape .......... 198 E Edit search 38 End search 37 EXP BRKTG 116 Exposure 64 F, G, H Fader 55 FLASH MOTION 59...
... Warning messages 196 White balance 52 Wide-angle 32 Wide mode 53 WIPE 55 Write-protect tab 198 Zero set 22 Color Slow Shutter 35 Continuous photo recording 116 Data code 40 Date search 77 DEMO MODE 183 Digital effect 59, 73 Digital program editing 84, 130 DISPLAY 184 DOT 55 Dual sound track tape .......... 198 E Edit search 38 End search 37 EXP BRKTG 116 Exposure 64 F, G, H Fader 55 FLASH MOTION 59...
Marketing Specifications
Page 1
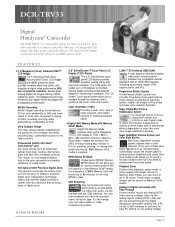
.... Playback Zoom During video playback, pause mode or while viewing still images stored on Memory Stick media. USB Streaming Stay connected with family and friends by broadcasting live video with audio, via the analog inputs. Super SteadyShot Picture Stabilization System An advanced version of Sony's SteadyShot® system that extreme digital zooming is clearer, with less distortion than previous types of the Memory Stick® media. Super NightShot 0 Lux recording mode automatically adjusts the shutter speed to the video controls. Color Slow Shutter mode allows...
.... Playback Zoom During video playback, pause mode or while viewing still images stored on Memory Stick media. USB Streaming Stay connected with family and friends by broadcasting live video with audio, via the analog inputs. Super SteadyShot Picture Stabilization System An advanced version of Sony's SteadyShot® system that extreme digital zooming is clearer, with less distortion than previous types of the Memory Stick® media. Super NightShot 0 Lux recording mode automatically adjusts the shutter speed to the video controls. Color Slow Shutter mode allows...
Marketing Specifications
Page 2
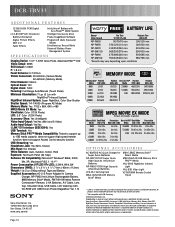
... (Camera Mode) 42-420mm (Memory Mode) Filter Diameter: 30mm Optical Zoom: 10X Digital Zoom: 120X Focusing: Full Range Auto/Manual (Touch Panel) Minimum Illumination: 7 Lux (0 Lux with NightShot® Infrared System) NightShot Infrared System: Super NightShot, Color Slow Shutter Shutter Speed: 1/4-1/4000 (Program AE Mode) Memory Mode: Yes, 1152 x 864, 640 x 480 MPEG Movie EX Mode: Yes Viewfinder: Color (113K Pixels) LCD: 2.5" Color (123K Pixels) Accessory Shoe: Yes (Intelligent) Video Input/Output: Yes/Yes (Mini and S-Video) Audio Input/Output: Yes...
... (Camera Mode) 42-420mm (Memory Mode) Filter Diameter: 30mm Optical Zoom: 10X Digital Zoom: 120X Focusing: Full Range Auto/Manual (Touch Panel) Minimum Illumination: 7 Lux (0 Lux with NightShot® Infrared System) NightShot Infrared System: Super NightShot, Color Slow Shutter Shutter Speed: 1/4-1/4000 (Program AE Mode) Memory Mode: Yes, 1152 x 864, 640 x 480 MPEG Movie EX Mode: Yes Viewfinder: Color (113K Pixels) LCD: 2.5" Color (123K Pixels) Accessory Shoe: Yes (Intelligent) Video Input/Output: Yes/Yes (Mini and S-Video) Audio Input/Output: Yes...


