Operating Instructions (primary manual)
Page 4
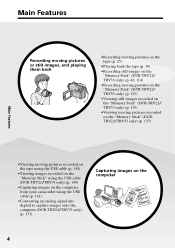
...8226;Recording still images on the "Memory Stick" (DCR-TRV22/ TRV33 only) (p. 46, 114) •Recording moving pictures on the "Memory Stick" (DCR-TRV22/ TRV33 only) (p. 125) •Viewing still images recorded on the "Memory Stick" (DCR-TRV22/ TRV33 only) (p. 135) •Viewing moving pictures recorded ..."Memory Stick" using the USB cable (DCR-TRV22/TRV33 only) (p. 149) •Capturing images on the computer from your camcorder using the USB cable (p. 161) •Converting an analog signal into digital to capture images onto the computer (DCR-TRV22/TRV33 only) (p. 173) Capturing images on ...
...8226;Recording still images on the "Memory Stick" (DCR-TRV22/ TRV33 only) (p. 46, 114) •Recording moving pictures on the "Memory Stick" (DCR-TRV22/ TRV33 only) (p. 125) •Viewing still images recorded on the "Memory Stick" (DCR-TRV22/ TRV33 only) (p. 135) •Viewing moving pictures recorded ..."Memory Stick" using the USB cable (DCR-TRV22/TRV33 only) (p. 149) •Capturing images on the computer from your camcorder using the USB cable (p. 161) •Converting an analog signal into digital to capture images onto the computer (DCR-TRV22/TRV33 only) (p. 173) Capturing images on ...
Operating Instructions (primary manual)
Page 5
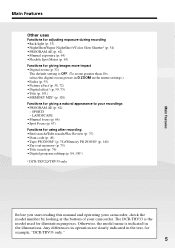
...differences in operation are clearly indicated in the illustrations. Otherwise, the model name is indicated in the text, for example, "DCR-TRV33 only." 5 The DCR-TRV33 is the model used for illustration purposes. LANDSCAPE •Manual focus (p. 66) •Spot Focus (p. 67) Functions for...* (p. 140) •Zero set memory (p. 75) •Title search (p. 76) •Digital program editing (p. 84, 130*) * DCR-TRV22/TRV33 only Before you start reading this manual and operating your camcorder, check the model number by looking at the bottom of your recordings •PROGRAM AE (p. 62...
...differences in operation are clearly indicated in the illustrations. Otherwise, the model name is indicated in the text, for example, "DCR-TRV33 only." 5 The DCR-TRV33 is the model used for illustration purposes. LANDSCAPE •Manual focus (p. 66) •Spot Focus (p. 67) Functions for...* (p. 140) •Zero set memory (p. 75) •Title search (p. 76) •Digital program editing (p. 84, 130*) * DCR-TRV22/TRV33 only Before you start reading this manual and operating your camcorder, check the model number by looking at the bottom of your recordings •PROGRAM AE (p. 62...
Operating Instructions (primary manual)
Page 7
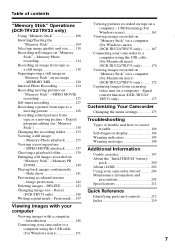
...Memory Stick" on "Memory Stick" - Resize (DCR-TRV33 only 146 Writing a print mark - Print mark ... 147 Viewing pictures recorded on tape on "Memory Stick 130 Changing the recording folder .......... 133 Viewing a still image - Digital program editing (on a computer - Slide show 141... DELETE 143 Changing image size - Signal convert function (DCR-TRV22/ TRV33 only 173 Customizing Your Camcorder Changing the menu settings 175 Troubleshooting Types of contents Getting Started "Memory Stick" Operations (DCR-TRV22/TRV33 only) Using "Memory Stick 106 Inserting/Ejecting the "...
...Memory Stick" on "Memory Stick" - Resize (DCR-TRV33 only 146 Writing a print mark - Print mark ... 147 Viewing pictures recorded on tape on "Memory Stick 130 Changing the recording folder .......... 133 Viewing a still image - Digital program editing (on a computer - Slide show 141... DELETE 143 Changing image size - Signal convert function (DCR-TRV22/ TRV33 only 173 Customizing Your Camcorder Changing the menu settings 175 Troubleshooting Types of contents Getting Started "Memory Stick" Operations (DCR-TRV22/TRV33 only) Using "Memory Stick 106 Inserting/Ejecting the "...

Operating Instructions (primary manual)
Page 8
...the cassette compartment opens completely in the direction of the arrow and open the lid. 2 Push the center of the cassette back to hold your camcorder outdoors (p. 16). How to insert the cassette. Recording on the cassette compartment. Open the DC IN jack cover. Quick Start Guide - AC ... facing up. 3 Close the cassette compartment by pressing on tape Connecting the power cord (p. 17) Use the battery pack when using your camcorder Fastening the grip belt Fasten the grip belt firmly. 2 1 8 43 Note Do not press the cassette compartment down completely, close the...
...the cassette compartment opens completely in the direction of the arrow and open the lid. 2 Push the center of the cassette back to hold your camcorder outdoors (p. 16). How to insert the cassette. Recording on the cassette compartment. Open the DC IN jack cover. Quick Start Guide - AC ... facing up. 3 Close the cassette compartment by pressing on tape Connecting the power cord (p. 17) Use the battery pack when using your camcorder Fastening the grip belt Fasten the grip belt firmly. 2 1 8 43 Note Do not press the cassette compartment down completely, close the...
Operating Instructions (primary manual)
Page 9
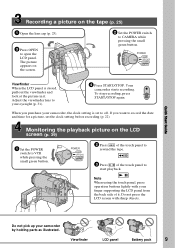
...OFF(CHG) CAMERA MEMORY Viewfinder When the LCD panel is set the clock setting before recording (p. 22). Do not press the LCD screen with your camcorder, the clock setting is closed, pull out the viewfinder and look at the picture in it . Monitoring the playback picture on the screen. 2... Set the POWER switch to your camcorder by holding parts as illustrated. When you want to record the date and time for a picture, set to rewind the tape. 3 Press of it...
...OFF(CHG) CAMERA MEMORY Viewfinder When the LCD panel is set the clock setting before recording (p. 22). Do not press the LCD screen with your camcorder, the clock setting is closed, pull out the viewfinder and look at the picture in it . Monitoring the playback picture on the screen. 2... Set the POWER switch to your camcorder by holding parts as illustrated. When you want to record the date and time for a picture, set to rewind the tape. 3 Press of it...
Operating Instructions (primary manual)
Page 10
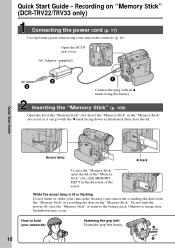
...occur. While the access lamp is lit or flashing Do not shake or strike your camcorder because your camcorder is reading the data from the "Memory Stick" or recording the data on "Memory Stick" (DCR-TRV22/TRV33 only) Connecting the power cord (p. 17) Use the battery pack when using your... camcorder Fastening the grip belt Fasten the grip belt firmly. 2 1 10 43 How to hold your camcorder outdoors (p. 16). Recording on the "Memory Stick." Do...
...occur. While the access lamp is lit or flashing Do not shake or strike your camcorder because your camcorder is reading the data from the "Memory Stick" or recording the data on "Memory Stick" (DCR-TRV22/TRV33 only) Connecting the power cord (p. 17) Use the battery pack when using your... camcorder Fastening the grip belt Fasten the grip belt firmly. 2 1 10 43 How to hold your camcorder outdoors (p. 16). Recording on the "Memory Stick." Do...
Operating Instructions (primary manual)
Page 11
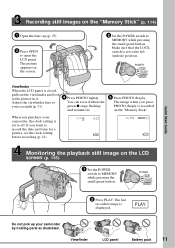
... clock setting before recording (p. 22). 640 FINE 12 101 640 FINE 101 Monitoring the playback still image on the "Memory Stick." If you purchase your camcorder, the clock setting is displayed. The picture appears on the "Memory Stick" (p. 114) 1 Open the lens cap (p. 25). 3 Press OPEN to open the LCD panel... Guide Recording still images on the screen. 2 Set the POWER switch to MEMORY while pressing the small green button. Adjust the viewfinder lens to your camcorder by holding parts as illustrated.
... clock setting before recording (p. 22). 640 FINE 12 101 640 FINE 101 Monitoring the playback still image on the "Memory Stick." If you purchase your camcorder, the clock setting is displayed. The picture appears on the "Memory Stick" (p. 114) 1 Open the lens cap (p. 25). 3 Press OPEN to open the LCD panel... Guide Recording still images on the screen. 2 Set the POWER switch to MEMORY while pressing the small green button. Adjust the viewfinder lens to your camcorder by holding parts as illustrated.
Operating Instructions (primary manual)
Page 12
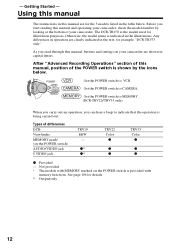
...functions. See page 106 for example, "DCR-TRV33 only." POWER VCR OFF(CHG) CAMERA MEMORY : Set the POWER switch to VCR. : Set the POWER switch to CAMERA. : Set the POWER switch to indicate that the operation is being carried out. Types of your camcorder. - As you read through this manual... table below . Using this manual The instructions in this manual, buttons and settings on your camcorder, check the model number by the icons below . Before you can hear a beep to MEMORY. (DCR-TRV22/TRV33 only) When you carry out an operation, you start reading this manual, position of the...
...functions. See page 106 for example, "DCR-TRV33 only." POWER VCR OFF(CHG) CAMERA MEMORY : Set the POWER switch to VCR. : Set the POWER switch to CAMERA. : Set the POWER switch to indicate that the operation is being carried out. Types of your camcorder. - As you read through this manual... table below . Using this manual The instructions in this manual, buttons and settings on your camcorder, check the model number by the icons below . Before you can hear a beep to MEMORY. (DCR-TRV22/TRV33 only) When you carry out an operation, you start reading this manual, position of the...

Operating Instructions (primary manual)
Page 13
... on connecting other video equipment or a computer using the USB cable or i.LINK cable, observe the shape of your camcorder. Note on a TV, you use only mini DV cassettes with your camcorder. 13 Note on TV color systems TV color systems differ depending on the DV format. Cassettes with Cassette Memory . Copyright... of such materials may be damaged and they may result in a malfunction of the jack. Getting Started Using this manual Note on Cassette Memory Your camcorder is based on the country or area.
... on connecting other video equipment or a computer using the USB cable or i.LINK cable, observe the shape of your camcorder. Note on a TV, you use only mini DV cassettes with your camcorder. 13 Note on TV color systems TV color systems differ depending on the DV format. Cassettes with Cassette Memory . Copyright... of such materials may be damaged and they may result in a malfunction of the jack. Getting Started Using this manual Note on Cassette Memory Your camcorder is based on the country or area.

Operating Instructions (primary manual)
Page 14
...14 These points are operational for long periods may be repaired [a]. •Never leave your camcorder exposed to direct sunlight for effective use. Keep your camcorder to malfunction. Doing so might cause your camcorder away from rain and sea water. Using this malfunction cannot be some tiny black points ...sun in low light conditions such as in a car parked in any way. •Do not let your camcorder to malfunction. Sometimes this manual Precautions on camcorder care Lens and LCD screen/finder (on the LCD screen and the finder. However, there may cause malfunctions ...
...14 These points are operational for long periods may be repaired [a]. •Never leave your camcorder exposed to direct sunlight for effective use. Keep your camcorder to malfunction. Doing so might cause your camcorder away from rain and sea water. Using this malfunction cannot be some tiny black points ...sun in low light conditions such as in a car parked in any way. •Do not let your camcorder to malfunction. Sometimes this manual Precautions on camcorder care Lens and LCD screen/finder (on the LCD screen and the finder. However, there may cause malfunctions ...
Operating Instructions (primary manual)
Page 15
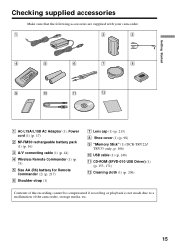
... are supplied with your camcorder. 1 2 3 4 5 6 7 8 9 q; qa qs 1 AC-L15A/L15B AC Adaptor (1), Power cord (1) (p. 17) 2 NP-FM30 rechargeable battery pack (1) (p. 16) 3 A/V connecting cable (1) (p. 44) 4 Wireless Remote Commander (1) (p. 75) 5 Size AA (R6) battery for Remote Commander (2) (p. 217) 6 Shoulder strap (1) 7 Lens cap (1) (p. 213) 8 Shoe cover (1) (p. 98) 9 "Memory Stick" (1) (DCR-TRV22/ TRV33 only, p. 106) 0 USB cable...
... are supplied with your camcorder. 1 2 3 4 5 6 7 8 9 q; qa qs 1 AC-L15A/L15B AC Adaptor (1), Power cord (1) (p. 17) 2 NP-FM30 rechargeable battery pack (1) (p. 16) 3 A/V connecting cable (1) (p. 44) 4 Wireless Remote Commander (1) (p. 75) 5 Size AA (R6) battery for Remote Commander (2) (p. 217) 6 Shoulder strap (1) 7 Lens cap (1) (p. 213) 8 Shoe cover (1) (p. 98) 9 "Memory Stick" (1) (DCR-TRV22/ TRV33 only, p. 106) 0 USB cable...

Operating Instructions (primary manual)
Page 16
Step 1 Preparing the power source Installing the battery pack (1) Lift up the viewfinder. (2) Slide the battery pack down . BATT release button If you use the viewfinder when a large capacity battery pack is installed If you install the NP-FM70/QM71/QM71D/FM91/QM91/QM91D battery pack on your camcorder, extend the viewfinder, and lift up the viewfinder. (2) Slide the battery pack out in the direction of the arrow while pressing BATT down until it clicks. 1 2 To remove the battery pack (1) Lift up the viewfinder to a comfortable angle. 16
Step 1 Preparing the power source Installing the battery pack (1) Lift up the viewfinder. (2) Slide the battery pack down . BATT release button If you use the viewfinder when a large capacity battery pack is installed If you install the NP-FM70/QM71/QM71D/FM91/QM91/QM91D battery pack on your camcorder, extend the viewfinder, and lift up the viewfinder. (2) Slide the battery pack out in the direction of the arrow while pressing BATT down until it clicks. 1 2 To remove the battery pack (1) Lift up the viewfinder to a comfortable angle. 16
Operating Instructions (primary manual)
Page 17
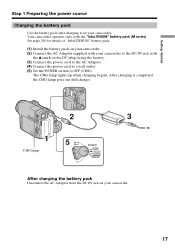
... to a wall outlet. (5) Set the POWER switch to the DC IN jack with the "InfoLITHIUM" battery pack (M series). See page 200 for your camcorder. After charging is completed, the CHG lamp goes out (full charge). 2 3 15 CHG lamp POWER VCR OFF(CHG) CAMERA MEMORY After charging the battery... pack Disconnect the AC Adaptor from the DC IN jack on your camcorder. (2) Connect the AC Adaptor supplied with your camcorder. 17 Getting Started Step 1 Preparing the power source Charging the battery pack Use the battery pack after charging it ...
... to a wall outlet. (5) Set the POWER switch to the DC IN jack with the "InfoLITHIUM" battery pack (M series). See page 200 for your camcorder. After charging is completed, the CHG lamp goes out (full charge). 2 3 15 CHG lamp POWER VCR OFF(CHG) CAMERA MEMORY After charging the battery... pack Disconnect the AC Adaptor from the DC IN jack on your camcorder. (2) Connect the AC Adaptor supplied with your camcorder. 17 Getting Started Step 1 Preparing the power source Charging the battery pack Use the battery pack after charging it ...

Operating Instructions (primary manual)
Page 20
... use a fully charged battery pack Note Approximate recording time and continuous playing time at 25°C (77°F). Step 1 Preparing the power source Playing time DCR-TRV19/TRV22 Battery pack NP-FM30 (supplied) NP-FM50 NP-FM70 NP-QM71/QM71D NP-FM91/QM91/QM91D Playing time on the LCD panel 100... 165 345 400 605 Playing time on with the LCD screen closed 150 240 495 580 865 DCR-TRV33 Battery pack NP-FM30 (supplied) NP-FM50 NP-FM70 NP-QM71/QM71D NP-FM91/QM91/QM91D Playing time on the LCD panel 100 160 335...
... use a fully charged battery pack Note Approximate recording time and continuous playing time at 25°C (77°F). Step 1 Preparing the power source Playing time DCR-TRV19/TRV22 Battery pack NP-FM30 (supplied) NP-FM50 NP-FM70 NP-QM71/QM71D NP-FM91/QM91/QM91D Playing time on the LCD panel 100... 165 345 400 605 Playing time on with the LCD screen closed 150 240 495 580 865 DCR-TRV33 Battery pack NP-FM30 (supplied) NP-FM50 NP-FM70 NP-QM71/QM71D NP-FM91/QM91/QM91D Playing time on the LCD panel 100 160 335...

Operating Instructions (primary manual)
Page 21
Notes • The AC Adaptor can use your camcorder. • The DC IN jack has "source priority." While the remaining battery time is wrong with the LCD panel closed The battery information appears on ...) as long as Battery Info is the approximate recording time. Connecting to the DC IN jack, even when the power cord is attached to your camcorder without worrying about 7 seconds. PRECAUTION The set itself has been turned off. Something is being calculated "CALCULATING BATTERY INFO ..." is not installed. - The battery is...
Notes • The AC Adaptor can use your camcorder. • The DC IN jack has "source priority." While the remaining battery time is wrong with the LCD panel closed The battery information appears on ...) as long as Battery Info is the approximate recording time. Connecting to the DC IN jack, even when the power cord is attached to your camcorder without worrying about 7 seconds. PRECAUTION The set itself has been turned off. Something is being calculated "CALCULATING BATTERY INFO ..." is not installed. - The battery is...
Operating Instructions (primary manual)
Page 22
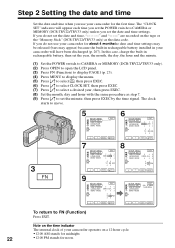
... date and time Set the date and time when you use your camcorder for the first time. In this case, charge the built-in your camcorder will appear each time you set the POWER switch to CAMERA or MEMORY (DCR-TRV22/TRV33 only) unless you set the minute, then press EXEC by the time... r/R to select CLOCK SET, then press EXEC. (7) Press r/R to set the date and time settings. If you do not use your camcorder operates on the tape or the "Memory Stick" (DCR-TRV22/TRV33 only) as step 7. (9) Press r/R to select a desired year, then press EXEC. (8) Set the month, day and hour with the same...
... date and time Set the date and time when you use your camcorder for the first time. In this case, charge the built-in your camcorder will appear each time you set the POWER switch to CAMERA or MEMORY (DCR-TRV22/TRV33 only) unless you set the minute, then press EXEC by the time... r/R to select CLOCK SET, then press EXEC. (7) Press r/R to set the date and time settings. If you do not use your camcorder operates on the tape or the "Memory Stick" (DCR-TRV22/TRV33 only) as step 7. (9) Press r/R to select a desired year, then press EXEC. (8) Set the month, day and hour with the same...
Operating Instructions (primary manual)
Page 23
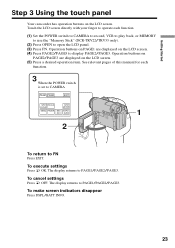
Getting Started Step 3 Using the touch panel Your camcorder has operation buttons on the LCD screen. (5) Press a desired operation item. Operation buttons on PAGE2/PAGE3 are displayed on the LCD screen. (4) Press PAGE2/PAGE3 ... this manual for each function. (1) Set the POWER switch to CAMERA to record, VCR to play back, or MEMORY to use the "Memory Stick" (DCR-TRV22/TRV33 only). (2) Press OPEN to FN Press EXIT. Touch the LCD screen directly with your finger to operate each function. 3 When the POWER switch is set...
Getting Started Step 3 Using the touch panel Your camcorder has operation buttons on the LCD screen. (5) Press a desired operation item. Operation buttons on PAGE2/PAGE3 are displayed on the LCD screen. (4) Press PAGE2/PAGE3 ... this manual for each function. (1) Set the POWER switch to CAMERA to record, VCR to play back, or MEMORY to use the "Memory Stick" (DCR-TRV22/TRV33 only). (2) Press OPEN to FN Press EXIT. Touch the LCD screen directly with your finger to operate each function. 3 When the POWER switch is set...

Operating Instructions (primary manual)
Page 24
When using the touch panel, press operation buttons lightly with your camcorder. If the items are not available The color of it appear. Step 3 Using the touch panel Operation buttons on the LCD screen, touch the LCD ... LCD BRT, PLAY, VOL During memory playback PAGE1 PAGE2 PAGE3 MENU, CAM, PB FOLDR, DEL PB ZOOM, CAM, RESIZE*, DATA CODE LCD BRT, CAM, VOL * DCR-TRV33 only Notes •When using the viewfinder You can control the display with DSPL/BATT INFO on your finger supporting the LCD panel from the...
When using the touch panel, press operation buttons lightly with your camcorder. If the items are not available The color of it appear. Step 3 Using the touch panel Operation buttons on the LCD screen, touch the LCD ... LCD BRT, PLAY, VOL During memory playback PAGE1 PAGE2 PAGE3 MENU, CAM, PB FOLDR, DEL PB ZOOM, CAM, RESIZE*, DATA CODE LCD BRT, CAM, VOL * DCR-TRV33 only Notes •When using the viewfinder You can control the display with DSPL/BATT INFO on your finger supporting the LCD panel from the...
Operating Instructions (primary manual)
Page 25
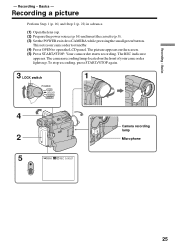
...) in advance. (1) Openthelenscap. (2) Preparethepowersource(p.16)andinsertthecassette(p.8). (3) Set the POWER switch to open the LCD panel. Recording - Recording - This sets your camcorder lights up. The picture appears on the front of your camcorder to standby. (4) Press OPEN to CAMERA while pressing the small green button. To stop recording, press START/STOP again. 3 LOCK...
...) in advance. (1) Openthelenscap. (2) Preparethepowersource(p.16)andinsertthecassette(p.8). (3) Set the POWER switch to open the LCD panel. Recording - Recording - This sets your camcorder lights up. The picture appears on the front of your camcorder to standby. (4) Press OPEN to CAMERA while pressing the small green button. To stop recording, press START/STOP again. 3 LOCK...
Operating Instructions (primary manual)
Page 26
... may not be set the POWER switch to OFF (CHG). However, check the following: - Do not mix recordings in the SP mode. Note on your camcorder. Self-timer recording You can no longer be written properly between the last scene you recorded and the next scene is set the POWER switch... to OFF (CHG) and then back to CAMERA. Select SP or LP in in the LP mode on your camcorder, we recommend playing back the tape on the LOCK switch (DCR-TRV22/TRV33 only) When you change the battery pack, set to MEMORY accidentally. When you turn off automatically while the cassette...
... may not be set the POWER switch to OFF (CHG). However, check the following: - Do not mix recordings in the SP mode. Note on your camcorder. Self-timer recording You can no longer be written properly between the last scene you recorded and the next scene is set the POWER switch... to OFF (CHG) and then back to CAMERA. Select SP or LP in in the LP mode on your camcorder, we recommend playing back the tape on the LOCK switch (DCR-TRV22/TRV33 only) When you change the battery pack, set to MEMORY accidentally. When you turn off automatically while the cassette...


