
Operating Instructions (primary manual)
Page 8
.... AC Adaptor (supplied) 2 3 1 Connect the plug with the window facing up. 3 Close the cassette compartment by pressing on tape Connecting the power cord (p. 17) Use the battery pack when using your camcorder Fastening the grip belt Fasten the grip belt firmly. 2 1 8 43 Quick Start Guide - Recording on the cassette compartment. Note Do not...
.... AC Adaptor (supplied) 2 3 1 Connect the plug with the window facing up. 3 Close the cassette compartment by pressing on tape Connecting the power cord (p. 17) Use the battery pack when using your camcorder Fastening the grip belt Fasten the grip belt firmly. 2 1 8 43 Quick Start Guide - Recording on the cassette compartment. Note Do not...
Operating Instructions (primary manual)
Page 10
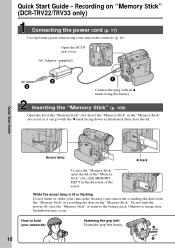
... lamp is reading the data from the "Memory Stick" or recording the data on "Memory Stick" (DCR-TRV22/TRV33 only) Connecting the power cord (p. 17) Use the battery pack when using your camcorder outdoors (p. 16). Do not turn the power off, eject the "Memory Stick" or remove the battery pack. Recording on the "Memory Stick." AC...
... lamp is reading the data from the "Memory Stick" or recording the data on "Memory Stick" (DCR-TRV22/TRV33 only) Connecting the power cord (p. 17) Use the battery pack when using your camcorder outdoors (p. 16). Do not turn the power off, eject the "Memory Stick" or remove the battery pack. Recording on the "Memory Stick." AC...
Operating Instructions (primary manual)
Page 15
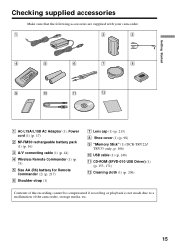
... Adaptor (1), Power cord (1) (p. 17) 2 NP-FM30 rechargeable battery pack (1) (p. 16) 3 A/V connecting cable (1) (p. 44) 4 Wireless Remote Commander (1) (p. 75) 5 Size AA (R6) battery for Remote Commander (2) (p. 217) 6 Shoulder strap (1) 7 Lens cap (1) (p. 213) 8 Shoe cover (1) (p. 98) 9 "Memory Stick" (1) (DCR-TRV22/ TRV33 only, p.... 106) 0 USB cable (1) (p. 148) qa CD-ROM (SPVD-010 USB Driver) (1) (p. 153, 171) qs Cleaning cloth (1) (p. 206) Contents of the recording cannot be compensated if recording or playback is not made due to a malfunction of the camcorder, ...
... Adaptor (1), Power cord (1) (p. 17) 2 NP-FM30 rechargeable battery pack (1) (p. 16) 3 A/V connecting cable (1) (p. 44) 4 Wireless Remote Commander (1) (p. 75) 5 Size AA (R6) battery for Remote Commander (2) (p. 217) 6 Shoulder strap (1) 7 Lens cap (1) (p. 213) 8 Shoe cover (1) (p. 98) 9 "Memory Stick" (1) (DCR-TRV22/ TRV33 only, p.... 106) 0 USB cable (1) (p. 148) qa CD-ROM (SPVD-010 USB Driver) (1) (p. 153, 171) qs Cleaning cloth (1) (p. 206) Contents of the recording cannot be compensated if recording or playback is not made due to a malfunction of the camcorder, ...
Operating Instructions (primary manual)
Page 17
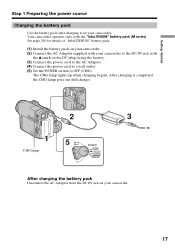
...See page 200 for your camcorder to the DC IN jack with the v mark on the DC plug facing the battery. (3) Connect the power cord to the AC Adaptor. (4) Connect the power cord to a wall outlet. (5) Set the POWER switch to OFF (CHG). Your camcorder operates only with the "...InfoLITHIUM" battery pack (M series). Getting Started Step 1 Preparing the power source Charging the battery pack Use the...
...See page 200 for your camcorder to the DC IN jack with the v mark on the DC plug facing the battery. (3) Connect the power cord to the AC Adaptor. (4) Connect the power cord to a wall outlet. (5) Set the POWER switch to OFF (CHG). Your camcorder operates only with the "...InfoLITHIUM" battery pack (M series). Getting Started Step 1 Preparing the power source Charging the battery pack Use the...

Operating Instructions (primary manual)
Page 21
...cannot supply any power if the power cord is connected to the DC IN jack, even when the power cord is not installed. - Getting Started Step 1 Preparing the power source Notes • The BATTERY INFO indicator may not be displayed in the same way as Battery Info is attached to your camcorder without worrying ...about 7 seconds. The battery pack is not plugged into a wall outlet. 21 Connecting to a wall outlet You can supply power from the AC power source (house current) as long as it is set to ...
...cannot supply any power if the power cord is connected to the DC IN jack, even when the power cord is not installed. - Getting Started Step 1 Preparing the power source Notes • The BATTERY INFO indicator may not be displayed in the same way as Battery Info is attached to your camcorder without worrying ...about 7 seconds. The battery pack is not plugged into a wall outlet. 21 Connecting to a wall outlet You can supply power from the AC power source (house current) as long as it is set to ...
Operating Instructions (primary manual)
Page 194
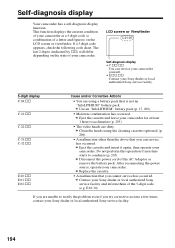
...are unable to condense (p. 205). LCD screen or Viewfinder C:21:00 Self-diagnosis display • C:ss:ss You can service your camcorder yourself. • E:ss:ss Contact your camcorder for at least 1 hour to acclimatize (p. 205). • The video heads are using the cleaning cassette (optional) (p. 206). ...Eject the cassette and leave your Sony dealer or local authorized Sony service facility. 5-digit display C:04:ss C:21:ss C:22:ss C:31:ss C:32:ss E:20:ss E:61:ss E:62:ss Cause and/or Corrective Actions • You are dirty. c Disconnect the power cord of a letter and figures) on...
...are unable to condense (p. 205). LCD screen or Viewfinder C:21:00 Self-diagnosis display • C:ss:ss You can service your camcorder yourself. • E:ss:ss Contact your camcorder for at least 1 hour to acclimatize (p. 205). • The video heads are using the cleaning cassette (optional) (p. 206). ...Eject the cassette and leave your Sony dealer or local authorized Sony service facility. 5-digit display C:04:ss C:21:ss C:22:ss C:31:ss C:32:ss E:20:ss E:61:ss E:62:ss Cause and/or Corrective Actions • You are dirty. c Disconnect the power cord of a letter and figures) on...

Operating Instructions (primary manual)
Page 209
.... • To prevent an accident from coming into contact with a damaged cord or if the unit has been dropped or damaged. • Do not bend the power cord forcibly, or place a heavy object on and operating your camcorder in use . We recommend turning on it out by the plug. Never... pull the power cord itself. • Do not operate the unit with the battery terminals. &#...
.... • To prevent an accident from coming into contact with a damaged cord or if the unit has been dropped or damaged. • Do not bend the power cord forcibly, or place a heavy object on and operating your camcorder in use . We recommend turning on it out by the plug. Never... pull the power cord itself. • Do not operate the unit with the battery terminals. &#...

Operating Instructions (primary manual)
Page 212
... DVM60 and lens cap DCR-TRV19: 610 g (1 lb 5 oz) DCR-TRV22: 620 g (1 lb 5 oz) DCR-TRV33: 630 g (1 lb 5 oz) Supplied accessories See page 15. AC Adaptor AC-L15A/L15B Power requirements 100 - 240 V AC, 50/60 Hz Current consumption 0.35 - 0.18 A Power consumption 18 W Output ...approx.) 56 × 31 × 100 mm (2 1/4 × 1 1/4 × 4 in.) (w/h/d) excluding projecting parts Mass (approx.) 190 g (6.7 oz) excluding power cord Rechargeable battery pack NP-FM30 Maximum output voltage DC 8.4 V Output voltage DC 7.2 V Capacity 5.0 Wh (700 mAh) Dimensions (approx.) 38.2 × 20.5 × 55...
... DVM60 and lens cap DCR-TRV19: 610 g (1 lb 5 oz) DCR-TRV22: 620 g (1 lb 5 oz) DCR-TRV33: 630 g (1 lb 5 oz) Supplied accessories See page 15. AC Adaptor AC-L15A/L15B Power requirements 100 - 240 V AC, 50/60 Hz Current consumption 0.35 - 0.18 A Power consumption 18 W Output ...approx.) 56 × 31 × 100 mm (2 1/4 × 1 1/4 × 4 in.) (w/h/d) excluding projecting parts Mass (approx.) 190 g (6.7 oz) excluding power cord Rechargeable battery pack NP-FM30 Maximum output voltage DC 8.4 V Output voltage DC 7.2 V Capacity 5.0 Wh (700 mAh) Dimensions (approx.) 38.2 × 20.5 × 55...


