
Operating Instructions
Page 4
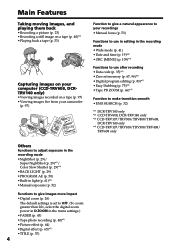
...• Recording a still image on a tape (p. 40)*1) •Playing back a tape (p. 33) Capturing images on your computer (CCD-TRV608, DCRTRV140 only) •Viewing images recorded on a tape (p. 97) •Viewing images live from your camcorder (p. 97) Function to give a natural appearance...(p. 83)*1) • Easy Dubbing (p. 75)*4) • Tape PB ZOOM (p. 66)*1) Function to make transition smooth •END SEARCH (p. 32) *1) DCR-TRV140 only *2) CCD-TRV608, DCR-TRV140 only *3) CCD-TRV107/TRV308/TRV408/TRV608, DCR-TRV140 only *4) CCD-TRV107/TRV108/TRV308/TRV408/ TRV608 only Others Functions...
...• Recording a still image on a tape (p. 40)*1) •Playing back a tape (p. 33) Capturing images on your computer (CCD-TRV608, DCRTRV140 only) •Viewing images recorded on a tape (p. 97) •Viewing images live from your camcorder (p. 97) Function to give a natural appearance...(p. 83)*1) • Easy Dubbing (p. 75)*4) • Tape PB ZOOM (p. 66)*1) Function to make transition smooth •END SEARCH (p. 32) *1) DCR-TRV140 only *2) CCD-TRV608, DCR-TRV140 only *3) CCD-TRV107/TRV308/TRV408/TRV608, DCR-TRV140 only *4) CCD-TRV107/TRV108/TRV308/TRV408/ TRV608 only Others Functions...

Operating Instructions
Page 6
...in light (CCD-TRV107/TRV308/TRV408/ TRV608, DCR-TRV140 only) ......... 61 Advanced Playback Operations (DCR-TRV140 only) Playing back a tape with picture effects 64 Playing back a tape with digital effects 65 Enlarging images recorded on a tape - Digital effect (DCR-TRV140 only 47 Using the PROGRAM AE function .... ...50 Adjusting the exposure manually ...... 52 Focusing manually 53 Interval recording (DCR-TRV140 only 54 Frame by date - Photo search/Photo scan 70 6 Tape Photo recording (DCR-TRV140 only 40 Using the wide mode 41 Using the fader function 43 Using special ...
...in light (CCD-TRV107/TRV308/TRV408/ TRV608, DCR-TRV140 only) ......... 61 Advanced Playback Operations (DCR-TRV140 only) Playing back a tape with picture effects 64 Playing back a tape with digital effects 65 Enlarging images recorded on a tape - Digital effect (DCR-TRV140 only 47 Using the PROGRAM AE function .... ...50 Adjusting the exposure manually ...... 52 Focusing manually 53 Interval recording (DCR-TRV140 only 54 Frame by date - Photo search/Photo scan 70 6 Tape Photo recording (DCR-TRV140 only 40 Using the wide mode 41 Using the fader function 43 Using special ...
Operating Instructions
Page 7
... editing (DCR-TRV140 only 83 Recording from video (DCR-TRV140 only 93 Inserting a scene from a VCR - USB Streaming (Windows users only 97 Customizing Your Camcorder Changing the menu settings 105 Troubleshooting Types of contents Editing Dubbing a tape 72 Dubbing a tape easily -...TRV107/TRV108/TRV308/ TRV408/TRV608 only 75 Dubbing only desired scenes - Insert Editing (DCR-TRV140 only 95 PC Connection (CCD-TRV608, DCR-TRV140 only) Viewing images using your camcorder abroad .......... 128 Maintenance information and precautions 129 Specifications 134 Quick Reference Identifying the ...
... editing (DCR-TRV140 only 83 Recording from video (DCR-TRV140 only 93 Inserting a scene from a VCR - USB Streaming (Windows users only 97 Customizing Your Camcorder Changing the menu settings 105 Troubleshooting Types of contents Editing Dubbing a tape 72 Dubbing a tape easily -...TRV107/TRV108/TRV308/ TRV408/TRV608 only 75 Dubbing only desired scenes - Insert Editing (DCR-TRV140 only 95 PC Connection (CCD-TRV608, DCR-TRV140 only) Viewing images using your camcorder abroad .......... 128 Maintenance information and precautions 129 Specifications 134 Quick Reference Identifying the ...
Operating Instructions
Page 9
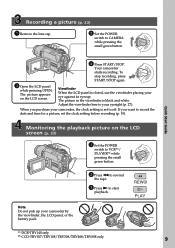
.... Viewfinder When the LCD panel is black and white. REW PLAY *1) DCR-TRV140 only *2) CCD-TRV107/TRV108/TRV308/TRV408/TRV608 only 9 VCR OFF(CHG) CAME RA RA RA VCR OFF(CHG) 4 Press START/STOP. When you want to start playback. Note Do not pick up your camcorder, the clock setting ...is set the clock setting before recording (p. 19). If you purchase your camcorder by the viewfinder, the LCD panel, or the battery pack. 2 Press m to rewind the tape. 3 Press N to record the date and time for a ...
.... Viewfinder When the LCD panel is black and white. REW PLAY *1) DCR-TRV140 only *2) CCD-TRV107/TRV108/TRV308/TRV408/TRV608 only 9 VCR OFF(CHG) CAME RA RA RA VCR OFF(CHG) 4 Press START/STOP. When you want to start playback. Note Do not pick up your camcorder, the clock setting ...is set the clock setting before recording (p. 19). If you purchase your camcorder by the viewfinder, the LCD panel, or the battery pack. 2 Press m to rewind the tape. 3 Press N to record the date and time for a ...
Operating Instructions
Page 10
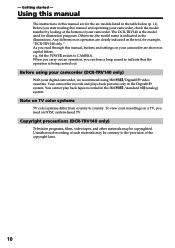
e.g. Set the POWER switch to country. Before using Hi8 /Digital8 video cassettes. To view your recordings on your camcorder are shown in the text, for example, "DCR-TRV140 only." Copyright precautions (DCR-TRV140 only) Television programs, films, video tapes, and other materials may be copyrighted. The DCR-TRV140 is the model used for the six models listed in the Hi8...
e.g. Set the POWER switch to country. Before using Hi8 /Digital8 video cassettes. To view your recordings on your camcorder are shown in the text, for example, "DCR-TRV140 only." Copyright precautions (DCR-TRV140 only) Television programs, films, video tapes, and other materials may be copyrighted. The DCR-TRV140 is the model used for the six models listed in the Hi8...

Operating Instructions
Page 11
...Dubbing z z ORC (Optimizing the z z Recording Condition) TBC z z (Time Base Corrector) Data Code - - Digital program editing - - Interval recording - - Tape Photo recording - - Not provided TRV408 Hi8 Hi8/8 560× 6.2 cm (2.5 type) z z z - z z z z z z z z z z ...Using this manual Types of differences Model name TRV107 TRV108 System Hi8 Hi8 Playback Hi8/8 Hi8/8 Digital Zoom 450× 460× LCD screen 6.2 cm 6.2 cm (2.5 type) (2.5 type) Buit-in light z - DV IN/OUT jack - - TRV608 Hi8 Hi8/8 560× 7.5 cm (3 type) z - DCRTRV140...
...Dubbing z z ORC (Optimizing the z z Recording Condition) TBC z z (Time Base Corrector) Data Code - - Digital program editing - - Interval recording - - Tape Photo recording - - Not provided TRV408 Hi8 Hi8/8 560× 6.2 cm (2.5 type) z z z - z z z z z z z z z z ...Using this manual Types of differences Model name TRV107 TRV108 System Hi8 Hi8 Playback Hi8/8 Hi8/8 Digital Zoom 450× 460× LCD screen 6.2 cm 6.2 cm (2.5 type) (2.5 type) Buit-in light z - DV IN/OUT jack - - TRV608 Hi8 Hi8/8 560× 7.5 cm (3 type) z - DCRTRV140...

Operating Instructions
Page 20
... function works only once a day. Press DATE (or TIME) and then press TIME (or DATE) to your local time before you eject and insert the tape again. - Note on a 12-hour cycle. • 12:00 AM stands for midnight. • 12:00 PM stands for the first time, turn it back...
... function works only once a day. Press DATE (or TIME) and then press TIME (or DATE) to your local time before you eject and insert the tape again. - Note on a 12-hour cycle. • 12:00 AM stands for midnight. • 12:00 PM stands for the first time, turn it back...

Operating Instructions
Page 21
... supply (p. 13). (2) Open the lid of the indicated time on Hi8 /Digital8 tape. Mosaic noise may not be sure to record in the Digital8 system.*1) • The recording time when you want to play back standard 8 mm tape on other camcorders (including other DCR-TRV140.)*1) •The cassette compartment may appear when you press any part of...
... supply (p. 13). (2) Open the lid of the indicated time on Hi8 /Digital8 tape. Mosaic noise may not be sure to record in the Digital8 system.*1) • The recording time when you want to play back standard 8 mm tape on other camcorders (including other DCR-TRV140.)*1) •The cassette compartment may appear when you press any part of...

Operating Instructions
Page 23
... - Select SP or LP in microphone during recording. The camera recording lamp located on Recording mode Your camcorder records and plays back in the SP (standard play back the tape on its sides and attach the lens cap to CAMERA while pressing the small green button. Recording - .... The viewfinder automatically turns off. (5) Press START/STOP. See "Step 1" to the standby mode. (4) Open the LCD panel while pressing OPEN. When you record a tape in the LP mode on your camcorder, we recommend that you record with the viewfinder. 1 3 V POWER CR OFF(CHG) CAME RA RA 4 2 Camera...
... - Select SP or LP in microphone during recording. The camera recording lamp located on Recording mode Your camcorder records and plays back in the SP (standard play back the tape on its sides and attach the lens cap to CAMERA while pressing the small green button. Recording - .... The viewfinder automatically turns off. (5) Press START/STOP. See "Step 1" to the standby mode. (4) Open the LCD panel while pressing OPEN. When you record a tape in the LP mode on your camcorder, we recommend that you record with the viewfinder. 1 3 V POWER CR OFF(CHG) CAME RA RA 4 2 Camera...
Operating Instructions
Page 24
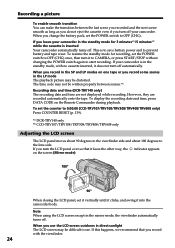
... camcorder. Recording a picture To enable smooth transition You can make the transition between scenes.*1) Recording date and time (DCR-TRV140 only) The recording date and time are recorded automatically onto the tape. To display the recording date and time, press DATA CODE on the screen (Mirror mode). 180° 90° When closing the LCD...
... camcorder. Recording a picture To enable smooth transition You can make the transition between scenes.*1) Recording date and time (DCR-TRV140 only) The recording date and time are recorded automatically onto the tape. To display the recording date and time, press DATA CODE on the screen (Mirror mode). 180° 90° When closing the LCD...

Operating Instructions
Page 28
...is set to be correct, depending on tape. [a] [b] [c] [d] [e] [a] [i] [c] [d] [j] 40min SP REC 0:00:01 [f] 40min SP REC 0:00:01 [f] [g] JUL 4 2002 12:05:56 AM DCR-TRV140 [h] CCD-TRV107/TRV108/TRV308/TRV408/ ...TRV608 [a] : Remaining battery time indicator [b] : Format indicator [c] : Recording mode indicator/ Mirror mode indicator [d] : STBY/REC indicator [e] : Time code indicator/ Tape photo recording indicator [f] : Remaining tape indicator This appears after you start to record for a while.*1) This appears after you close the LCD...
...is set to be correct, depending on tape. [a] [b] [c] [d] [e] [a] [i] [c] [d] [j] 40min SP REC 0:00:01 [f] 40min SP REC 0:00:01 [f] [g] JUL 4 2002 12:05:56 AM DCR-TRV140 [h] CCD-TRV107/TRV108/TRV308/TRV408/ ...TRV608 [a] : Remaining battery time indicator [b] : Format indicator [c] : Recording mode indicator/ Mirror mode indicator [d] : STBY/REC indicator [e] : Time code indicator/ Tape photo recording indicator [f] : Remaining tape indicator This appears after you start to record for a while.*1) This appears after you close the LCD...

Operating Instructions
Page 32
... in the recorded portions (DCR-TRV140 only) The end search function may not be smooth. •Once you eject the cassette after using the end search function, occasionally, the transition between the last scene you have recorded on the tape, the end search function does not work correctly. 32 If a tape has a blank portion...
... in the recorded portions (DCR-TRV140 only) The end search function may not be smooth. •Once you eject the cassette after using the end search function, occasionally, the transition between the last scene you have recorded on the tape, the end search function does not work correctly. 32 If a tape has a blank portion...

Operating Instructions
Page 33
... button. (3) Open the LCD panel while pressing OPEN. (4) Press m to rewind the tape. (5) Press N to start playback. (6) To adjust the volume, press either of the two VOLUME buttons. You can monitor the playback picture on your camcorder.*3) CR OFF(CHG) 4 REW 5 2 V POWER PLAY RA CAME 6 VOLUME 3 1 To stop playback Press x. *1) DCR-TRV140 only *2) CCD-TRV107...
... button. (3) Open the LCD panel while pressing OPEN. (4) Press m to rewind the tape. (5) Press N to start playback. (6) To adjust the volume, press either of the two VOLUME buttons. You can monitor the playback picture on your camcorder.*3) CR OFF(CHG) 4 REW 5 2 V POWER PLAY RA CAME 6 VOLUME 3 1 To stop playback Press x. *1) DCR-TRV140 only *2) CCD-TRV107...

Operating Instructions
Page 34
DISPLAY*1) DATA CODE*2) DISPLAY *1) CCD-TRV107/TRV408, DCR-TRV140 only *2) DCR-TRV140 only 34 Playing back a tape When monitoring on the LCD screen You can adjust the angle of the LCD panel by lifting the LCD panel up by 7 degrees [b]. [a] [b] 7° To display the screen indicators - The indicators appear on your camcorder. To make the indicators disappear, press DISPLAY again...
DISPLAY*1) DATA CODE*2) DISPLAY *1) CCD-TRV107/TRV408, DCR-TRV140 only *2) DCR-TRV140 only 34 Playing back a tape When monitoring on the LCD screen You can adjust the angle of the LCD panel by lifting the LCD panel up by 7 degrees [b]. [a] [b] 7° To display the screen indicators - The indicators appear on your camcorder. To make the indicators disappear, press DISPLAY again...
Operating Instructions
Page 35
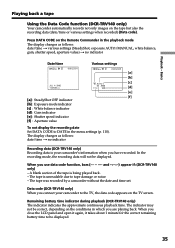
...recording data will not be displayed. 35 Data code (DCR-TRV140 only) When you connect your camcorder's information when you are playing back. When you use data code function, bars and --:--:--) appear if: (DCR-TRV140 only) - When you close the LCD panel and open it again, it takes about 1 ..., white balance, gain, shutter speed, aperture value) t no indicator Recording data (DCR-TRV140 only) Recording data is your camcorder to tape damage or noise. - The tape is being played back. - A blank section of the tape is unreadable due to the TV, the data code appears on the TV screen. ...
...recording data will not be displayed. 35 Data code (DCR-TRV140 only) When you connect your camcorder's information when you are playing back. When you use data code function, bars and --:--:--) appear if: (DCR-TRV140 only) - When you close the LCD panel and open it again, it takes about 1 ..., white balance, gain, shutter speed, aperture value) t no indicator Recording data (DCR-TRV140 only) Recording data is your camcorder to tape damage or noise. - The tape is being played back. - A blank section of the tape is unreadable due to the TV, the data code appears on the TV screen. ...

Operating Instructions
Page 36
...recorded (END SEARCH) Press END SEARCH in the stop mode. To change the playback direction (DCR-TRV140 only) Press on the Remote Commander.*1) To resume normal playback, press N. To advance the tape Press M in the reverse direction, press , then press y on the Remote Commander during... playback, press N. To monitor the high-speed picture while advancing or rewinding the tape (skip scan) Keep pressing m while rewinding or M while advancing the tape. To view the picture at double speed (DCR-TRV140 only) Press ×2 on the Remote Commander. To resume normal playback, release...
...recorded (END SEARCH) Press END SEARCH in the stop mode. To change the playback direction (DCR-TRV140 only) Press on the Remote Commander.*1) To resume normal playback, press N. To advance the tape Press M in the reverse direction, press , then press y on the Remote Commander during... playback, press N. To monitor the high-speed picture while advancing or rewinding the tape (skip scan) Keep pressing m while rewinding or M while advancing the tape. To view the picture at double speed (DCR-TRV140 only) Press ×2 on the Remote Commander. To resume normal playback, release...
Operating Instructions
Page 37
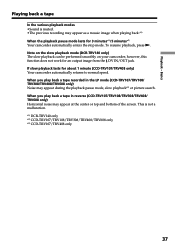
...tape In the various playback modes •Sound is not a malfunction. *1) DCR-TRV140 only *2) CCD-TRV107/TRV108/TRV308/TRV408/TRV608 only *3) CCD-TRV107/TRV408 only 37 This is muted. • The previous recording may appear as a mosaic image when playing back.*1) When the playback pause mode lasts for 3 minutes*1)/5 minutes*2) Your camcorder... automatically enters the stop mode. Note on the slow playback mode (DCR-TRV140 only) The slow playback can be performed smoothly on your camcorder; Playback - If slow playback lasts for an...
...tape In the various playback modes •Sound is not a malfunction. *1) DCR-TRV140 only *2) CCD-TRV107/TRV108/TRV308/TRV408/TRV608 only *3) CCD-TRV107/TRV408 only 37 This is muted. • The previous recording may appear as a mosaic image when playing back.*1) When the playback pause mode lasts for 3 minutes*1)/5 minutes*2) Your camcorder... automatically enters the stop mode. Note on the slow playback mode (DCR-TRV140 only) The slow playback can be performed smoothly on your camcorder; Playback - If slow playback lasts for an...

Operating Instructions
Page 40
... lightly until recording is displayed on the screen by pressing PHOTO lightly. Recording a still image on the screen immediately. The still image is completed. Your camcorder records an image on a tape - DCR-TRV140 only You can record for about seven seconds. Recording does not start yet. PHOTO 1 PHOTO CAPTURE 2 PHOTO Notes •During the...
... lightly until recording is displayed on the screen by pressing PHOTO lightly. Recording a still image on the screen immediately. The still image is completed. Your camcorder records an image on a tape - DCR-TRV140 only You can record for about seven seconds. Recording does not start yet. PHOTO 1 PHOTO CAPTURE 2 PHOTO Notes •During the...
Operating Instructions
Page 45
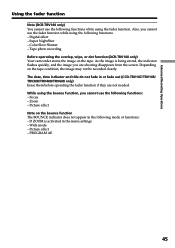
.... D ZOOM is being stored, the indicator flashes quickly, and the image you are not needed. Zoom - Tape photo recording Before operating the overlap, wipe, or dot function (DCR-TRV140 only) Your camcorder stores the image on the tape condition, the image may not be recorded clearly. Picture effect Note on the bounce function The BOUNCE...
.... D ZOOM is being stored, the indicator flashes quickly, and the image you are not needed. Zoom - Tape photo recording Before operating the overlap, wipe, or dot function (DCR-TRV140 only) Your camcorder stores the image on the tape condition, the image may not be recorded clearly. Picture effect Note on the bounce function The BOUNCE...

Operating Instructions
Page 49
... the old movie mode: - Digital effect Notes •The following functions do not work in the slow shutter mode Auto focus may not be effective. Tape photo recording - Focus manually using a tripod. Advanced Recording Operations Using special effects -
... the old movie mode: - Digital effect Notes •The following functions do not work in the slow shutter mode Auto focus may not be effective. Tape photo recording - Focus manually using a tripod. Advanced Recording Operations Using special effects -


