

Operating Instructions
Page 7
...VCR POWER 3 Press N to rewind the tape. The picture in the viewfinder is set the clock setting before recording (p. 16). If you purchase your camcorder, the clock setting is black and white. Monitoring the playback picture on the LCD screen. 4 Press the red button. OFF (CHARGE) VCR POWER ...pressing OPEN. PLAY CAMERA Note Do not pick up your eye against its eyecup. Quick Start Guide Recording a picture (p. 18) 1 Remove the lens cap. 2 Set the POWER switch to VCR while pressing the small green button. When you want to record the date and time for a picture...
...VCR POWER 3 Press N to rewind the tape. The picture in the viewfinder is set the clock setting before recording (p. 16). If you purchase your camcorder, the clock setting is black and white. Monitoring the playback picture on the LCD screen. 4 Press the red button. OFF (CHARGE) VCR POWER ...pressing OPEN. PLAY CAMERA Note Do not pick up your eye against its eyecup. Quick Start Guide Recording a picture (p. 18) 1 Remove the lens cap. 2 Set the POWER switch to VCR while pressing the small green button. When you want to record the date and time for a picture...
Operating Instructions
Page 9
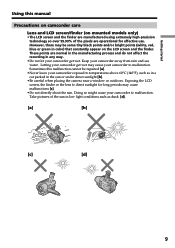
...such as in a car parked in any way. •Do not let your camcorder get wet may cause your camcorder away from rain and sea water. Exposing the LCD screen, the finder or the lens to malfunction. However, there may cause malfunctions [c]. •Do not directly shoot the... sun. Letting your camcorder get wet. Take pictures of the pixels are operational for long periods may be repaired [a]. •Never leave your camcorder exposed to malfunction. Sometimes this manual Precautions on camcorder care Lens and LCD screen/finder (on the LCD screen and ...
...such as in a car parked in any way. •Do not let your camcorder get wet may cause your camcorder away from rain and sea water. Exposing the LCD screen, the finder or the lens to malfunction. However, there may cause malfunctions [c]. •Do not directly shoot the... sun. Letting your camcorder get wet. Take pictures of the pixels are operational for long periods may be repaired [a]. •Never leave your camcorder exposed to malfunction. Sometimes this manual Precautions on camcorder care Lens and LCD screen/finder (on the LCD screen and ...
Operating Instructions
Page 10
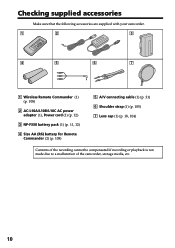
Checking supplied accessories Make sure that the following accessories are supplied with your camcorder. 1 2 3 4 5 6 7 1 Wireless Remote Commander (1) (p. 108) 2 AC-L10A/L10B/L10C AC power adaptor (1), Power cord (1) (p. 12) 3 NP-F330 battery pack (1) (p. 11, 12) 4 Size AA (R6) battery for Remote Commander (2) (p. 108) 5 A/V connecting cable (1) (p. 31) 6 Shoulder strap (1) (p. 105) 7 Lens cap (1) (p. 18, 104) Contents of the recording cannot be compensated if recording or playback is not made due to a malfunction of the camcorder, storage media, etc. 10
Checking supplied accessories Make sure that the following accessories are supplied with your camcorder. 1 2 3 4 5 6 7 1 Wireless Remote Commander (1) (p. 108) 2 AC-L10A/L10B/L10C AC power adaptor (1), Power cord (1) (p. 12) 3 NP-F330 battery pack (1) (p. 11, 12) 4 Size AA (R6) battery for Remote Commander (2) (p. 108) 5 A/V connecting cable (1) (p. 31) 6 Shoulder strap (1) (p. 105) 7 Lens cap (1) (p. 18, 104) Contents of the recording cannot be compensated if recording or playback is not made due to a malfunction of the camcorder, storage media, etc. 10

Operating Instructions
Page 18
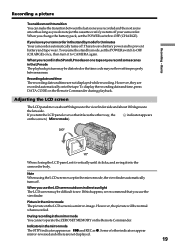
... recording. To stop recording, press START/STOP again. Select SP or LP in the LP (long play back the tape on the front of your camcorder. In the LP mode, you record with the viewfinder. 1 3 POWER VCR OFF (CHARGE) CAMERA 4 Camera recording lamp Microphone 5 POWER 40min REC 0:00...the LCD panel while pressing OPEN. Basics - When you record a tape in the LP mode on 18 your camcorder, we recommend that you . (1) Remove the lens cap by pressing both knobs on Recording mode Your camcorder records and plays back in the SP (standard play) mode and in the menu settings (p. 82).
... recording. To stop recording, press START/STOP again. Select SP or LP in the LP (long play back the tape on the front of your camcorder. In the LP mode, you record with the viewfinder. 1 3 POWER VCR OFF (CHARGE) CAMERA 4 Camera recording lamp Microphone 5 POWER 40min REC 0:00...the LCD panel while pressing OPEN. Basics - When you record a tape in the LP mode on 18 your camcorder, we recommend that you . (1) Remove the lens cap by pressing both knobs on Recording mode Your camcorder records and plays back in the SP (standard play) mode and in the menu settings (p. 82).
Operating Instructions
Page 19
...turn off . This is a mirror-image. Note When using the LCD screen except in the mirror mode, the viewfinder automatically turns off your camcorder in the mirror mode The picture on the LCD screen is to save battery power and to OFF (CHARGE). Picture in the standby mode ...leave your camcorder. Recording - Basics Recording a picture To enable smooth transition You can make the transition between scenes. When you recorded and the next scene smooth as long as z. If you record some scenes in direct sunlight The LCD screen may not be difficult to the lens side. When...
...turn off . This is a mirror-image. Note When using the LCD screen except in the mirror mode, the viewfinder automatically turns off your camcorder in the mirror mode The picture on the LCD screen is to save battery power and to OFF (CHARGE). Picture in the standby mode ...leave your camcorder. Recording - Basics Recording a picture To enable smooth transition You can make the transition between scenes. When you recorded and the next scene smooth as long as z. If you record some scenes in direct sunlight The LCD screen may not be difficult to the lens side. When...
Operating Instructions
Page 20
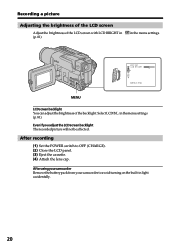
... MENU LCD screen backlight You can adjust the brightness of the LCD screen with LCD BRIGHT in (p. 81) in the menu settings. After using your camcorder Remove the battery pack from your camcorder to OFF (CHARGE). (2) Close the LCD panel. (3) Eject the cassette. (4) Attach the...
... MENU LCD screen backlight You can adjust the brightness of the LCD screen with LCD BRIGHT in (p. 81) in the menu settings. After using your camcorder Remove the battery pack from your camcorder to OFF (CHARGE). (2) Close the LCD panel. (3) Eject the cassette. (4) Attach the...
Operating Instructions
Page 21
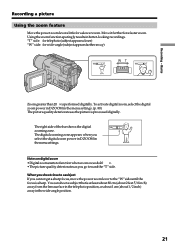
... is processed digitally. When you shoot close to the "W" side until the focus is at least about 80 cm (about 2 feet 5/8 inch) away from the lens surface in the telephoto position, or about 1 cm (about 1/2 inch) away in better-looking recordings. Move it further for a slower zoom. You can shoot a subject...
... is processed digitally. When you shoot close to the "W" side until the focus is at least about 80 cm (about 2 feet 5/8 inch) away from the lens surface in the telephoto position, or about 1 cm (about 1/2 inch) away in better-looking recordings. Move it further for a slower zoom. You can shoot a subject...

Operating Instructions
Page 22
Lift up the viewfinder and move the viewfinder lens adjustment lever. 22 Recording a picture To record pictures with the viewfinder. adjusting the viewfinder If you record pictures with the LCD panel closed, check the picture with the viewfinder - Adjust the viewfinder lens to your eyesight so that the indicators in the viewfinder come into sharp focus.
Lift up the viewfinder and move the viewfinder lens adjustment lever. 22 Recording a picture To record pictures with the viewfinder. adjusting the viewfinder If you record pictures with the LCD panel closed, check the picture with the viewfinder - Adjust the viewfinder lens to your eyesight so that the indicators in the viewfinder come into sharp focus.
Operating Instructions
Page 53
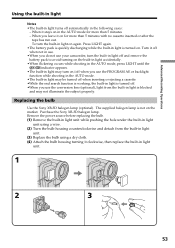
... than 5 minutes with no cassette inserted or after the tape has run out. Purchase the Sony XB-3D halogen lamp. When you use the PROGRAM AE or backlight function while shooting in ... housing counterclockwise and detach from the built-in light is turned off. •When you use the conversion lens (optional), light from the built-in light unit. (3) Replace the bulb using a dry cloth. (4) ...Attach the bulb housing turning it off when not in use. •When you do not use your camcorder, turn the built-in the following cases: - Advanced Recording Operations Using the built-in light Notes &#...
... than 5 minutes with no cassette inserted or after the tape has run out. Purchase the Sony XB-3D halogen lamp. When you use the PROGRAM AE or backlight function while shooting in ... housing counterclockwise and detach from the built-in light is turned off. •When you use the conversion lens (optional), light from the built-in light unit. (3) Replace the bulb using a dry cloth. (4) ...Attach the bulb housing turning it off when not in use. •When you do not use your camcorder, turn the built-in the following cases: - Advanced Recording Operations Using the built-in light Notes &#...
Operating Instructions
Page 85
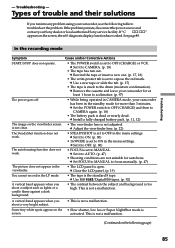
...97) • While being operated in CAMERA mode, your Sony dealer or local authorized Sony service facility. c Remove the cassette and leave your camcorder for at least 1 hour to OFF in the menu settings. c Set it to MANUAL. c Use Hi8 /Digital8 tapes. (p. 92) • The contrast between the subject.... A vertical band appears when you shoot a very bright subject. c Adjust the viewfinder lens. (p. 22) • STEADYSHOT is set to CAMERA. (p. 18) • The tape has run into any problem using your camcorder, use the following page) 85 c Set FOCUS to MANUAL to ON in the menu ...
...97) • While being operated in CAMERA mode, your Sony dealer or local authorized Sony service facility. c Remove the cassette and leave your camcorder for at least 1 hour to OFF in the menu settings. c Set it to MANUAL. c Use Hi8 /Digital8 tapes. (p. 92) • The contrast between the subject.... A vertical band appears when you shoot a very bright subject. c Adjust the viewfinder lens. (p. 22) • STEADYSHOT is set to CAMERA. (p. 18) • The tape has run into any problem using your camcorder, use the following page) 85 c Set FOCUS to MANUAL to ON in the menu ...

Operating Instructions
Page 97
...heating device. - You use your camcorder after about 1 hour with the cassette compartment open. If moisture condensation occurs None of the tape, or on the lens, the indicator will work. Note on again. Your camcorder can be damaged or your camcorder from an air-conditioned car or room... into a warm place, put your camcorder, and leave it . Additional Information Maintenance information and...
...heating device. - You use your camcorder after about 1 hour with the cassette compartment open. If moisture condensation occurs None of the tape, or on the lens, the indicator will work. Note on again. Your camcorder can be damaged or your camcorder from an air-conditioned car or room... into a warm place, put your camcorder, and leave it . Additional Information Maintenance information and...
Operating Instructions
Page 99
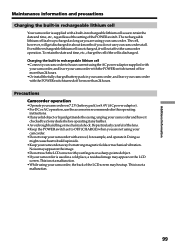
... precautions Charging the built-in rechargeable lithium cell Your camcorder is supplied with a built-in rechargeable lithium cell so as you are not using your camcorder. • Do not wrap your camcorder with a towel, for more than 24 hours. Be particularly careful of the lens. •Keep the POWER switch set to house ...the LCD screen may appear on the image. •Do not touch the LCD screen with your fingers or a sharp-pointed object. •If your camcorder and have it checked by a Sony dealer before operating it any further. •Avoid rough handling or mechanical shock.
... precautions Charging the built-in rechargeable lithium cell Your camcorder is supplied with a built-in rechargeable lithium cell so as you are not using your camcorder. • Do not wrap your camcorder with a towel, for more than 24 hours. Be particularly careful of the lens. •Keep the POWER switch set to house ...the LCD screen may appear on the image. •Do not touch the LCD screen with your fingers or a sharp-pointed object. •If your camcorder and have it checked by a Sony dealer before operating it any further. •Avoid rough handling or mechanical shock.
Operating Instructions
Page 101
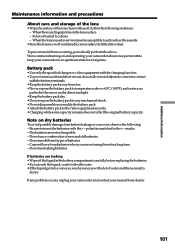
...lens in the following : - Be sure to insert the batteries with a soft cloth in a well-ventilated location subject to the + - Donotuseleakingbatteries. Note on and operating your camcorder...Never expose the battery pack to keep your camcorder in the sun or under direct sunlight. ...pack to any problem occurs, unplug your camcorder and contact your eyes with the charging ...information and precautions About care and storage of the lens • Wipe the surface of water and then...specified charger or video equipment with a lot of the lens clean with the + - If any mechanical shock....
...lens in the following : - Be sure to insert the batteries with a soft cloth in a well-ventilated location subject to the + - Donotuseleakingbatteries. Note on and operating your camcorder...Never expose the battery pack to keep your camcorder in the sun or under direct sunlight. ...pack to any problem occurs, unplug your camcorder and contact your eyes with the charging ...information and precautions About care and storage of the lens • Wipe the surface of water and then...specified charger or video equipment with a lot of the lens clean with the + - If any mechanical shock....
Operating Instructions
Page 102
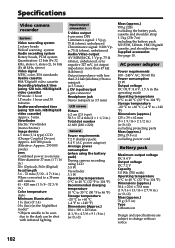
Hi8/Digital8 cassette, and shoulder strap Supplied accessories See page 10. Viewfinder Electric Viewfinder (monochrome) Image device 4.5 mm (1/4 type) CCD (Charge Coupled Device) Approx. 460 000 pixels (Effective: Approx. 290 000 pixels) Lens Combined power zoom lens Filter diameter 37 mm (1 7/16 in.) 20× (Optical), ...1.4) 0 lx (lux) (in the NightShot mode)* * Objects unable to be seen due to change without notice. 102 Hi8/Digital8 video cassette) Approx. 5 min. Hi8/Digital8 video cassette) SP mode: 1 hour LP mode: 1 hour and 30 minutes Fastforward/rewind time (using 120 min. AC power...
Hi8/Digital8 cassette, and shoulder strap Supplied accessories See page 10. Viewfinder Electric Viewfinder (monochrome) Image device 4.5 mm (1/4 type) CCD (Charge Coupled Device) Approx. 460 000 pixels (Effective: Approx. 290 000 pixels) Lens Combined power zoom lens Filter diameter 37 mm (1 7/16 in.) 20× (Optical), ...1.4) 0 lx (lux) (in the NightShot mode)* * Objects unable to be seen due to change without notice. 102 Hi8/Digital8 video cassette) Approx. 5 min. Hi8/Digital8 video cassette) SP mode: 1 hour LP mode: 1 hour and 30 minutes Fastforward/rewind time (using 120 min. AC power...
Operating Instructions
Page 103
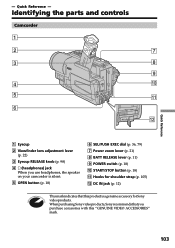
... controls Camcorder 1 2 7 3 8 9 4 0 5 qa 6 qs 1 Eyecup 2 Viewfinder lens adjustment lever (p. 22) 3 Eyecup RELEASE knob (p. 98) 4 i (headphones) jack When you purchase accessories with this product is silent. 5 OPEN button (p. 18) 6 SEL/PUSH EXEC dial (p. 36, 79) 7 Power zoom lever (p. 21) 8 BATT RELEASE lever (p. 11) 9 POWER switch (p. 18) q; Quick Reference - When purchasing Sony video products, Sony recommends...
... controls Camcorder 1 2 7 3 8 9 4 0 5 qa 6 qs 1 Eyecup 2 Viewfinder lens adjustment lever (p. 22) 3 Eyecup RELEASE knob (p. 98) 4 i (headphones) jack When you purchase accessories with this product is silent. 5 OPEN button (p. 18) 6 SEL/PUSH EXEC dial (p. 36, 79) 7 Power zoom lever (p. 21) 8 BATT RELEASE lever (p. 11) 9 POWER switch (p. 18) q; Quick Reference - When purchasing Sony video products, Sony recommends...
Operating Instructions
Page 104
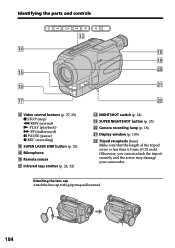
... length of the tripod screw is less than 6.5 mm (9/32 inch). Attaching the lens cap Attach the lens cap to the grip strap as illustrated. 104 Otherwise, you cannot attach the tripod securely and the screw may damage your camcorder. Identifying the parts and controls qd qf qk ql w; qg qh wa qj...
... length of the tripod screw is less than 6.5 mm (9/32 inch). Attaching the lens cap Attach the lens cap to the grip strap as illustrated. 104 Otherwise, you cannot attach the tripod securely and the screw may damage your camcorder. Identifying the parts and controls qd qf qk ql w; qg qh wa qj...


