Operating Guide
Page 7
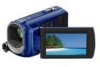
...USB cable (1) Rechargeable battery pack NP-FH30 (1) CD-ROM "Handycam Application Software" (1) (p. 24) "PMB" (software) including "PMB Guide" "Handycam Handbook" (PDF) "Operating Guide" (This manual) (1) See page 38...SONY Model No.: DCR-SX40, DCR-SX41, DCR-SX60 Responsible Party:Sony Electronics Inc. If this equipment does cause harmful interference to radio or television reception, which the receiver is encouraged to try to operate this product, you may not cause harmful interference, and (2) this camcorder...
...USB cable (1) Rechargeable battery pack NP-FH30 (1) CD-ROM "Handycam Application Software" (1) (p. 24) "PMB" (software) including "PMB Guide" "Handycam Handbook" (PDF) "Operating Guide" (This manual) (1) See page 38...SONY Model No.: DCR-SX40, DCR-SX41, DCR-SX60 Responsible Party:Sony Electronics Inc. If this equipment does cause harmful interference to radio or television reception, which the receiver is encouraged to try to operate this product, you may not cause harmful interference, and (2) this camcorder...
Operating Guide
Page 8
... dripproofed or waterproofed. About this manual The images of the camcorder, recording media, etc. TV color systems differ depending on the country/region. Pushing the plug forcibly into the terminal will find the "Handycam Handbook" (PDF) on the supplied CD-ROM (p. 44). ...; The screenshots are operational for effective use Using the camcorder The camcorder is not possible due to the copyright laws. To prevent...
... dripproofed or waterproofed. About this manual The images of the camcorder, recording media, etc. TV color systems differ depending on the country/region. Pushing the plug forcibly into the terminal will find the "Handycam Handbook" (PDF) on the supplied CD-ROM (p. 44). ...; The screenshots are operational for effective use Using the camcorder The camcorder is not possible due to the copyright laws. To prevent...
Operating Guide
Page 10
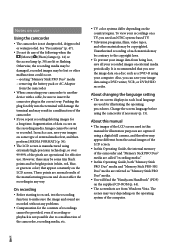
... setting the date and time 14 Changing the language setting 15 Recording Recording 16 Recording and playing movies and photos easily (Easy Handycam operation 19 Playback Playback on the camcorder 20 Playing images on a TV 23 Saving movies and photos with a computer Preparing a computer (Windows 24 When using a Macintosh 24 Creating a disc...
... setting the date and time 14 Changing the language setting 15 Recording Recording 16 Recording and playing movies and photos easily (Easy Handycam operation 19 Playback Playback on the camcorder 20 Playing images on a TV 23 Saving movies and photos with a computer Preparing a computer (Windows 24 When using a Macintosh 24 Creating a disc...
Operating Guide
Page 11
Table of contents Making good use of your camcorder Deleting movies and photos 36 Coping with shooting conditions 37 Changing the recording media 37 To check the recording media settings 38 Dubbing or copying movies and photos from the internal memory to "Memory Stick PRO Duo" media 39 Customizing your camcorder with menus 40 Using the HELP function 40 Getting detailed information from the "Handycam Handbook 44 Additional information Troubleshooting 45 Precautions 47 Specifications 49 Screen indicators 52 Parts and controls 53 Index 54 US 11
Table of contents Making good use of your camcorder Deleting movies and photos 36 Coping with shooting conditions 37 Changing the recording media 37 To check the recording media settings 38 Dubbing or copying movies and photos from the internal memory to "Memory Stick PRO Duo" media 39 Customizing your camcorder with menus 40 Using the HELP function 40 Getting detailed information from the "Handycam Handbook 44 Additional information Troubleshooting 45 Precautions 47 Specifications 49 Screen indicators 52 Parts and controls 53 Index 54 US 11
Operating Guide
Page 25
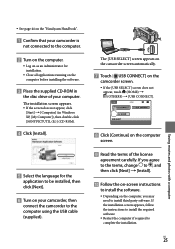
... license agreement carefully. US 25 Saving movies and photos with a computer See page 44 on the "Handycam Handbook". Confirm that your camcorder is not connected to the computer. Turn on the computer. Log on as an Administrator ...Select the language for installation. Close all applications running on your computer. The [USB SELECT] screen appears on the camcorder screen automatically. Touch [ USB CONNECT] on the camcorder screen. If the [USB SELECT] screen does not appear, touch (HOME) (OTHERS) [...
... license agreement carefully. US 25 Saving movies and photos with a computer See page 44 on the "Handycam Handbook". Confirm that your camcorder is not connected to the computer. Turn on the computer. Log on as an Administrator ...Select the language for installation. Close all applications running on your computer. The [USB SELECT] screen appears on the camcorder screen automatically. Touch [ USB CONNECT] on the camcorder screen. If the [USB SELECT] screen does not appear, touch (HOME) (OTHERS) [...
Operating Guide
Page 26
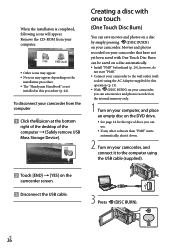
... can be saved on a disc automatically. Install "PMB" beforehand (p. 24), however, do not start "PMB." Connect your camcorder to the computer using the AC Adaptor supplied for the type of discs you can save movies and photos recorded on the internal memory only... No icon may appear depending on the installation procedure. The "Handycam Handbook" is completed, following icons will appear. When the installation is not installed in this operation (p. 13). With (DISC BURN) on your camcorder, you can save movies and photos on a disc by simply pressing (...
... can be saved on a disc automatically. Install "PMB" beforehand (p. 24), however, do not start "PMB." Connect your camcorder to the computer using the AC Adaptor supplied for the type of discs you can save movies and photos recorded on the internal memory only... No icon may appear depending on the installation procedure. The "Handycam Handbook" is completed, following icons will appear. When the installation is not installed in this operation (p. 13). With (DISC BURN) on your camcorder, you can save movies and photos on a disc by simply pressing (...
Operating Guide
Page 27
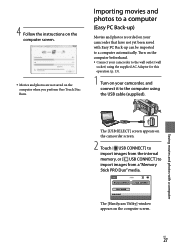
...photos are not saved on the computer screen. The [Handycam Utility] window appears on the computer when you perform One Touch Disc Burn. US 27 Saving movies and photos with Easy PC Back-up ) Movies and photos recorded on the camcorder screen. 2 Touch [ USB CONNECT] to import ... outlet (wall socket) using the supplied AC Adaptor for this operation (p. 13). 1 Turn on your camcorder that have not yet been saved with a computer The [USB SELECT] screen appears on your camcorder, and connect it to import images from a "Memory Stick PRO Duo" media. Importing movies and photos...
...photos are not saved on the computer screen. The [Handycam Utility] window appears on the computer when you perform One Touch Disc Burn. US 27 Saving movies and photos with Easy PC Back-up ) Movies and photos recorded on the camcorder screen. 2 Touch [ USB CONNECT] to import ... outlet (wall socket) using the supplied AC Adaptor for this operation (p. 13). 1 Turn on your camcorder that have not yet been saved with a computer The [USB SELECT] screen appears on your camcorder, and connect it to import images from a "Memory Stick PRO Duo" media. Importing movies and photos...

Operating Guide
Page 40
... touch . To hide the HOME MENU screen, touch . You cannot select the grayed items or settings. You can change in the "Handycam Handbook" (p. 44). Menu item Using the HELP function To see the descriptions on the HOME MENU, touch (HELP) on the HOME MENU screen. (The ...58371; After completing the setting, touch . When the item is not on the screen, touch another tab. (There may be changed. Customizing your camcorder. (HOME) Touch the desired category the menu item to know about. Using the OPTION MENU The OPTION MENU appears just like the ...
... touch . To hide the HOME MENU screen, touch . You cannot select the grayed items or settings. You can change in the "Handycam Handbook" (p. 44). Menu item Using the HELP function To see the descriptions on the HOME MENU, touch (HELP) on the HOME MENU screen. (The ...58371; After completing the setting, touch . When the item is not on the screen, touch another tab. (There may be changed. Customizing your camcorder. (HOME) Touch the desired category the menu item to know about. Using the OPTION MENU The OPTION MENU appears just like the ...
Operating Guide
Page 42
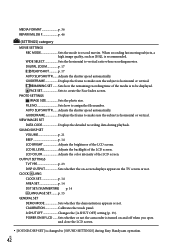
...SLW SHUTTR....... FACE SET Sets to vertical ratio when recording movies. VIEW IMAGES SET DATA CODE Displays the detailed recording data during Easy Handycam operation. A.SHUT OFF Changes the [A.SHUT OFF] setting (p. 13). POWER ON BY LCD........ CALIBRATION Calibrates the touch panel. PHOTO ... 15 GENERAL SET DEMO MODE Sets whether the demonstration appears or not. Adjusts the shutter speed automatically. Sets whether or not the camcorder is turned on the TV screen or not. LCD COLOR Adjusts the color intensity of the LCD screen. When recording fast moving ...
...SLW SHUTTR....... FACE SET Sets to vertical ratio when recording movies. VIEW IMAGES SET DATA CODE Displays the detailed recording data during Easy Handycam operation. A.SHUT OFF Changes the [A.SHUT OFF] setting (p. 13). POWER ON BY LCD........ CALIBRATION Calibrates the touch panel. PHOTO ... 15 GENERAL SET DEMO MODE Sets whether the demonstration appears or not. Adjusts the shutter speed automatically. Sets whether or not the camcorder is turned on the TV screen or not. LCD COLOR Adjusts the color intensity of the LCD screen. When recording fast moving ...

Operating Guide
Page 44
... and the model name of your computer. US 44 The functions of your camcorder are described, some of your camcorder is intended to be read when you can download it from your camcorder, then click [Handycam Handbook (PDF)]. The model name of them with color photos. To... view the "Handycam Handbook," double-click the short-cut icon on the computer screen. When using a Macintosh, open the [Handbook...
... and the model name of your computer. US 44 The functions of your camcorder are described, some of your camcorder is intended to be read when you can download it from your camcorder, then click [Handycam Handbook (PDF)]. The model name of them with color photos. To... view the "Handycam Handbook," double-click the short-cut icon on the computer screen. When using a Macintosh, open the [Handbook...
Operating Guide
Page 45
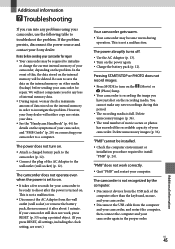
...; Disconnect the USB cable from the USB jack of the computer other media (backup) before sending your camcorder for details on the symptoms of your Sony dealer. "PMB" cannot be installed. Check the computer environment or installation procedure required to a...camcorder, and "PMB Guide" (p. 28) on connecting your camcorder to be ready to troubleshoot the problem. However, your Sony dealer will neither copy nor retain your camcorder, depending on the problem. In the event of your data. See the "Handycam Handbook" (p. 44) for repair Your camcorder...
...; Disconnect the USB cable from the USB jack of the computer other media (backup) before sending your camcorder for details on the symptoms of your Sony dealer. "PMB" cannot be installed. Check the computer environment or installation procedure required to a...camcorder, and "PMB Guide" (p. 28) on connecting your camcorder to be ready to troubleshoot the problem. However, your Sony dealer will neither copy nor retain your camcorder, depending on the problem. In the event of your data. See the "Handycam Handbook" (p. 44) for repair Your camcorder...
Operating Guide
Page 48
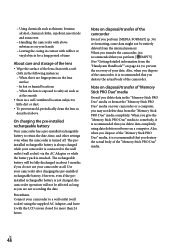
...deletion software on a computer. Using chemicals such as thinner, benzine, alcohol, chemical cloths, repellent, insecticide and sunscreen Handling the camcorder with above . Note on disposal/transfer of the lens clean with a soft cloth in the following instances: When there are not recording ...to little dirt or dust. To prevent mold, periodically clean the lens as you may not delete data from the "Handycam Handbook"" on page 44.) to somebody, it is recommended that you delete data completely using the supplied AC Adaptor, and leave it ...
...deletion software on a computer. Using chemicals such as thinner, benzine, alcohol, chemical cloths, repellent, insecticide and sunscreen Handling the camcorder with above . Note on disposal/transfer of the lens clean with a soft cloth in the following instances: When there are not recording ...to little dirt or dust. To prevent mold, periodically clean the lens as you may not delete data from the "Handycam Handbook"" on page 44.) to somebody, it is recommended that you delete data completely using the supplied AC Adaptor, and leave it ...


