Operating Guide
Page 4
...Handycam Station Model DCRA-C200 and AC Adaptor Model AC-L200/L200B. Otherwise, fire or injury may not cause harmful interference, and (2) this product. For more information regarding this device must accept any interference received, including interference that may cause undesired operation. Note DCR-SR65/SR85... number: 858-942-2230 This device complies with Part 15 of Conformity Trade Name: SONY Model No.: DCR-SR65, DCR-SR85 Responsible Party: Sony Electronics Inc. Record the serial number in the U.S.A. You can help preserve our environment by returning your...
...Handycam Station Model DCRA-C200 and AC Adaptor Model AC-L200/L200B. Otherwise, fire or injury may not cause harmful interference, and (2) this product. For more information regarding this device must accept any interference received, including interference that may cause undesired operation. Note DCR-SR65/SR85... number: 858-942-2230 This device complies with Part 15 of Conformity Trade Name: SONY Model No.: DCR-SR65, DCR-SR85 Responsible Party: Sony Electronics Inc. Record the serial number in the U.S.A. You can help preserve our environment by returning your...
Operating Guide
Page 5
...; Wireless Remote Commander (1) (DCR-SR65/ SR85) A button-type lithium battery is already installed. Rechargeable battery pack NP-FH40 (1) CD-ROM "Handycam Application Software" (1) (p. 26) Picture Motion Browser (Software) PMB Guide Handycam Handbook (PDF) "Operating Guide" (This manual) (1) Using the camcorder The camcorder is connected. Consult...
...; Wireless Remote Commander (1) (DCR-SR65/ SR85) A button-type lithium battery is already installed. Rechargeable battery pack NP-FH40 (1) CD-ROM "Handycam Application Software" (1) (p. 26) Picture Motion Browser (Software) PMB Guide Handycam Handbook (PDF) "Operating Guide" (This manual) (1) Using the camcorder The camcorder is connected. Consult...
Operating Guide
Page 7
... data from Windows Vista, and may be provided, even if recording or playback is not possible due to the above, when you dispose of the camcorder, it is connected to a computer Do not try to format the hard disk of a "Memory Stick PRO Duo." "Memory Stick... to a malfunction of your recordings on the operating system of the computer. * Refer also to format the hard disk of the camcorder. If you perform [MEDIA FORMAT]* to "Handycam Handbook" (PDF) and "PMB Guide." It is recommended that you need an NTSC system-based TV. Television programs, films...
... data from Windows Vista, and may be provided, even if recording or playback is not possible due to the above, when you dispose of the camcorder, it is connected to a computer Do not try to format the hard disk of a "Memory Stick PRO Duo." "Memory Stick... to a malfunction of your recordings on the operating system of the computer. * Refer also to format the hard disk of the camcorder. If you perform [MEDIA FORMAT]* to "Handycam Handbook" (PDF) and "PMB Guide." It is recommended that you need an NTSC system-based TV. Television programs, films...
Operating Guide
Page 9
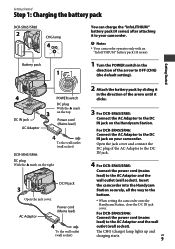
...camcorder. The CHG (charge) lamp lights up and charging starts. Getting Started Step 1: Charging the battery pack DCR-SR65/SR85 CHG lamp Battery pack You can charge the "InfoLITHIUM" battery pack (H series) after attaching it clicks. 3 For DCR-SR65/SR85: Connect the AC Adaptor to the DC IN jack on the Handycam Station. For DCR...For DCR-SR65/SR85: Connect the power cord (mains lead) to the DC IN jack on the right DC IN jack Open the jack cover. For DCR-SR45/SR46: Connect the power cord (mains lead) to the bottom. When setting the camcorder onto the Handycam Station...
...camcorder. The CHG (charge) lamp lights up and charging starts. Getting Started Step 1: Charging the battery pack DCR-SR65/SR85 CHG lamp Battery pack You can charge the "InfoLITHIUM" battery pack (H series) after attaching it clicks. 3 For DCR-SR65/SR85: Connect the AC Adaptor to the DC IN jack on the Handycam Station. For DCR...For DCR-SR65/SR85: Connect the power cord (mains lead) to the DC IN jack on the right DC IN jack Open the jack cover. For DCR-SR45/SR46: Connect the power cord (mains lead) to the bottom. When setting the camcorder onto the Handycam Station...

Operating Guide
Page 10
... time will not be supplied from the battery as long as the AC Adaptor is connected to the DC IN jack of your camcorder or the Handycam Station (DCR-SR65/SR85), even when the power cord (mains lead) is recommended). The available recording and playback time will be shorter depending ... time: Approximate time (min.) required to 86 ˚F) is disconnected from the DC IN jack holding both the DC plug and the Handycam Station (DCR-SR65/ SR85) or your camcorder (DCR-SR45/ SR46). Tips For DCR-SR65/SR85: Same as DCR-SR45/SR46, you use a fully charged battery pack.
... time will not be supplied from the battery as long as the AC Adaptor is connected to the DC IN jack of your camcorder or the Handycam Station (DCR-SR65/SR85), even when the power cord (mains lead) is recommended). The available recording and playback time will be shorter depending ... time: Approximate time (min.) required to 86 ˚F) is disconnected from the DC IN jack holding both the DC plug and the Handycam Station (DCR-SR65/ SR85) or your camcorder (DCR-SR45/ SR46). Tips For DCR-SR65/SR85: Same as DCR-SR45/SR46, you use a fully charged battery pack.
Operating Guide
Page 17
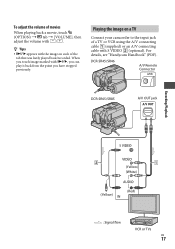
... A/V Remote Connector DCR-SR65/SR85 A/V OUT jack Recording/Playback (Yellow) (White) (Yellow) (Red) : Signal flow VCR or TVs US...57672;, you can play it back from the point you touch image marked with S VIDEO (optional). For details, see "Handycam Handbook" (PDF). When you have stopped previously. To adjust the volume of movies When playing back a movie, touch (OPTION) ...; [VOLUME], then adjust the volume with / . Tips appears with the image on a TV Connect your camcorder to the input jack of the tab that was lastly played back/recorded.
... A/V Remote Connector DCR-SR65/SR85 A/V OUT jack Recording/Playback (Yellow) (White) (Yellow) (Red) : Signal flow VCR or TVs US...57672;, you can play it back from the point you touch image marked with S VIDEO (optional). For details, see "Handycam Handbook" (PDF). When you have stopped previously. To adjust the volume of movies When playing back a movie, touch (OPTION) ...; [VOLUME], then adjust the volume with / . Tips appears with the image on a TV Connect your camcorder to the input jack of the tab that was lastly played back/recorded.
Operating Guide
Page 18
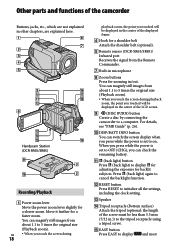
Handycam Station (DCR-SR65/SR85) Recording/Playback Power zoom lever Move the power zoom lever slightly for a faster zoom. US When you touch the screen during playback zoom, ...) to display for adjusting the exposure for zooming in the center of the LCD screen. (DISC BURN) button Create a disc by connecting the camcorder to a computer. Press (back light) again to cancel the backlight function. RESET button Press RESET to initialize all the settings, including the clock...
Handycam Station (DCR-SR65/SR85) Recording/Playback Power zoom lever Move the power zoom lever slightly for a faster zoom. US When you touch the screen during playback zoom, ...) to display for adjusting the exposure for zooming in the center of the LCD screen. (DISC BURN) button Create a disc by connecting the camcorder to a computer. Press (back light) again to cancel the backlight function. RESET button Press RESET to initialize all the settings, including the clock...
Operating Guide
Page 19
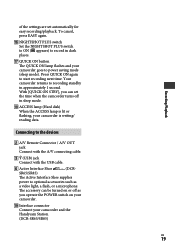
... Active Interface Shoe supplies power to optional accessories such as you can be turned on your camcorder. Interface connector Connect your camcorder and the Handycam Station. (DCR-SR65/SR85) US 19 To cancel, press EASY again. NIGHTSHOT PLUS switch Set the NIGHTSHOT PLUS ...switch to ON ( appears) to record in approximately 1 second. Your camcorder returns to start recording next time...
... Active Interface Shoe supplies power to optional accessories such as you can be turned on your camcorder. Interface connector Connect your camcorder and the Handycam Station. (DCR-SR65/SR85) US 19 To cancel, press EASY again. NIGHTSHOT PLUS switch Set the NIGHTSHOT PLUS ...switch to ON ( appears) to record in approximately 1 second. Your camcorder returns to start recording next time...
Operating Guide
Page 21
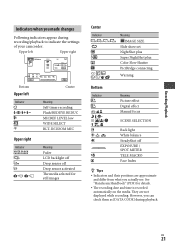
...selected for details. The recording date and time is recorded automatically on the media. Recording/Playback Indicators when you actually see. See "Handycam Handbook" (PDF) for still images Center Indicator Meaning IMAGE SIZE Slide show set NightShot plus Super NightShot plus Color Slow Shutter PictBridge... displayed while recording. However, you can check them as [DATA CODE] during recording/playback to indicate the settings of your camcorder. US 21 They are approximate and differ from what you made changes Following indicators appear during playback.
...selected for details. The recording date and time is recorded automatically on the media. Recording/Playback Indicators when you actually see. See "Handycam Handbook" (PDF) for still images Center Indicator Meaning IMAGE SIZE Slide show set NightShot plus Super NightShot plus Color Slow Shutter PictBridge... displayed while recording. However, you can check them as [DATA CODE] during recording/playback to indicate the settings of your camcorder. US 21 They are approximate and differ from what you made changes Following indicators appear during playback.

Operating Guide
Page 22
...you cannot find the item anywhere, the function is not available under the current situation. The (OPTION) menu cannot be used during Easy Handycam operation. US 22 Using the OPTION MENU The (OPTION) menu appears like the pop-up window that moment appears. " HOME" and " OPTION"... screen for your convenience. Menu items Category 1 Touch the desired category then item to change the setting. 2 Follow the guide on the menu items, see "Handycam Handbook" (PDF) (p. 26). (HOME) To see the explanation of the (HELP) button turns orange. (HOME) (OPTION) Using the HOME...
...you cannot find the item anywhere, the function is not available under the current situation. The (OPTION) menu cannot be used during Easy Handycam operation. US 22 Using the OPTION MENU The (OPTION) menu appears like the pop-up window that moment appears. " HOME" and " OPTION"... screen for your convenience. Menu items Category 1 Touch the desired category then item to change the setting. 2 Follow the guide on the menu items, see "Handycam Handbook" (PDF) (p. 26). (HOME) To see the explanation of the (HELP) button turns orange. (HOME) (OPTION) Using the HOME...
Operating Guide
Page 23
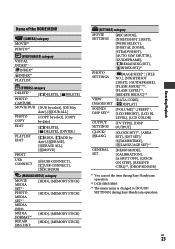
... SET]/ [SUMMERTIME], [ LANGUAGE SET]*1 GENERAL SET [DEMO MODE], [CALIBRATION], [A.SHUT OFF], [QUICK ON STBY], [REMOTE CTRL]*2, [DROP SENSOR] *1 You can set the item during Easy Handycam operation. *2 DCR-SR65/SR85 *3 The menu name is changed to [SOUND SETTINGS] during Easy...
... SET]/ [SUMMERTIME], [ LANGUAGE SET]*1 GENERAL SET [DEMO MODE], [CALIBRATION], [A.SHUT OFF], [QUICK ON STBY], [REMOTE CTRL]*2, [DROP SENSOR] *1 You can set the item during Easy Handycam operation. *2 DCR-SR65/SR85 *3 The menu name is changed to [SOUND SETTINGS] during Easy...
Operating Guide
Page 24
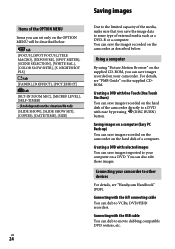
... devices For details, see "PMB Guide" on the supplied CDROM. Saving images on a computer (Easy PC Back-up) You can save images recorded on the camcorder on the hard disk of a computer. tab [FOCUS], [SPOT FOCUS], [TELE MACRO], [EXPOSURE], [SPOT METER], [SCENE SELECTION], [WHITE BAL.], [COLOR SLOW... SHTR], [S. For details, see "Handycam Handbook" (PDF). Creating a DVD with One Touch (One Touch Disc Burn) You can save images recorded on the hard disk of the camcorder directly to a DVD with the USB cable You can save images imported to your...
... devices For details, see "PMB Guide" on the supplied CDROM. Saving images on a computer (Easy PC Back-up) You can save images recorded on the camcorder on the hard disk of a computer. tab [FOCUS], [SPOT FOCUS], [TELE MACRO], [EXPOSURE], [SPOT METER], [SCENE SELECTION], [WHITE BAL.], [COLOR SLOW... SHTR], [S. For details, see "Handycam Handbook" (PDF). Creating a DVD with One Touch (One Touch Disc Burn) You can save images recorded on the hard disk of the camcorder directly to a DVD with the USB cable You can save images imported to your...
Operating Guide
Page 26
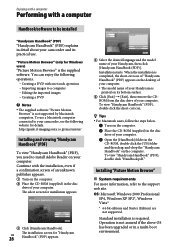
...and Starter (Edition) are not supported. Enjoying with a computer Performing with a computer Handbook/software to be installed "Handycam Handbook" (PDF) "Handycam Handbook" (PDF) explains in detail about your camcorder and its bottom surface. Click [Exit] [Exit], then remove the CDROM from the disc...model name of an unknown publisher appears. Turn on your Handycam is the supplied software. http://guide.d-imaging.sony.co.jp/mac/ms/us/ Installing and viewing "Handycam Handbook" (PDF) To view "Handycam Handbook" (PDF), you need to the support web site. The select...
...and Starter (Edition) are not supported. Enjoying with a computer Performing with a computer Handbook/software to be installed "Handycam Handbook" (PDF) "Handycam Handbook" (PDF) explains in detail about your camcorder and its bottom surface. Click [Exit] [Exit], then remove the CDROM from the disc...model name of an unknown publisher appears. Turn on your Handycam is the supplied software. http://guide.d-imaging.sony.co.jp/mac/ms/us/ Installing and viewing "Handycam Handbook" (PDF) To view "Handycam Handbook" (PDF), you need to the support web site. The select...
Operating Guide
Page 27
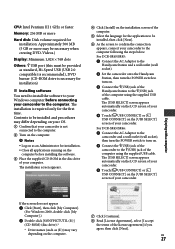
...] screen of the license agreement] if you agree, then click [Next]. For DCR-SR65/SR85: Connect the AC Adaptor to the Handycam Station and a wall outlet (wall socket). Set the camcorder onto the Handycam Station, then turn the POWER switch to turn on. Connect the &#...58341;(USB) jack of the camcorder to the computer. Turn on the computer. ...
...] screen of the license agreement] if you agree, then click [Next]. For DCR-SR65/SR85: Connect the AC Adaptor to the Handycam Station and a wall outlet (wall socket). Set the camcorder onto the Handycam Station, then turn the POWER switch to turn on. Connect the &#...58341;(USB) jack of the camcorder to the computer. Turn on the computer. ...
Operating Guide
Page 29
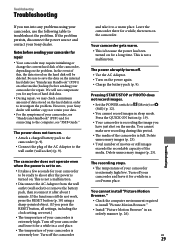
...Sony dealer will be ready to the computer, see "PMB Guide." The camcorder does not operate even when the power is extremely high. Delete unnecessary images (p. 25). Notes before sending your camcorder is set to the wall outlet (wall socket) (p. 9). The recording stops. The temperature of your camcorder, see "Handycam... in order to save the data on the internal hard disk (see "Handycam Handbook" (PDF) and for a while in an orderly manner (p. 26). Leave the camcorder there for your camcorder and leave it for connecting to shoot after about 1 minute. Press the...
...Sony dealer will be ready to the computer, see "PMB Guide." The camcorder does not operate even when the power is extremely high. Delete unnecessary images (p. 25). Notes before sending your camcorder is set to the wall outlet (wall socket) (p. 9). The recording stops. The temperature of your camcorder, see "Handycam... in order to save the data on the internal hard disk (see "Handycam Handbook" (PDF) and for a while in an orderly manner (p. 26). Leave the camcorder there for your camcorder and leave it for connecting to shoot after about 1 minute. Press the...

Operating Guide
Page 30
... Duo" is low. The temperature of the Handycam Station or your Sony dealer or local authorized Sony service facility. Use an "InfoLITHIUM" battery pack (H series)(p. 9). Connect the DC plug of the AC Adaptor to the DC IN jack of your camcorder again in your camcorder. Delete unnecessary images. Battery power is...
... Duo" is low. The temperature of the Handycam Station or your Sony dealer or local authorized Sony service facility. Use an "InfoLITHIUM" battery pack (H series)(p. 9). Connect the DC plug of the AC Adaptor to the DC IN jack of your camcorder again in your camcorder. Delete unnecessary images. Battery power is...
Operating Guide
Page 35
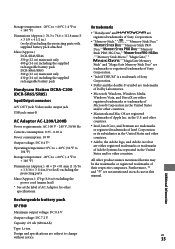
...only 400 g (14 oz) including the supplied rechargeable battery pack DCR-SR65/SR85 360 g (12 oz) main unit only 410 g (14 oz) including the supplied rechargeable battery pack Handycam Station DCRA-C200 (DCR-SR65/SR85) Input/Output connectors A/V OUT jack: Video/audio output jack USB...; 29 × 81 mm (1 15/16 × 1 3/16 × 3 1/4 in the United States and/or other countries. On trademarks "Handycam" and are registered trademarks of Sony Corporation. "Memory Stick," " ," "Memory Stick Duo," " ," "Memory Stick PRO Duo," " ," "Memory Stick PRO-HG Duo," " ," "Memory...
...only 400 g (14 oz) including the supplied rechargeable battery pack DCR-SR65/SR85 360 g (12 oz) main unit only 410 g (14 oz) including the supplied rechargeable battery pack Handycam Station DCRA-C200 (DCR-SR65/SR85) Input/Output connectors A/V OUT jack: Video/audio output jack USB...; 29 × 81 mm (1 15/16 × 1 3/16 × 3 1/4 in the United States and/or other countries. On trademarks "Handycam" and are registered trademarks of Sony Corporation. "Memory Stick," " ," "Memory Stick Duo," " ," "Memory Stick PRO Duo," " ," "Memory Stick PRO-HG Duo," " ," "Memory...


