
Operating Guide
Page 9
..." (This manual) (1) 9 Rechargeable battery pack NP-FH40 (1) (p.11) (DCR-SR42/SR62/ SR82) NP-FH60 (1) (p.11) (DCR-SR200/SR300) Handycam Station (1) (p.11) A/V connecting cable (1) (p.25) USB cable (1) (p.27) CD-ROM "Handycam Application Software" (1) (p.26) - Picture Motion Browser (Software) - AC Adaptor (1) (p.11) Power cord (1) (p.11) Wireless Remote Commander (1) (except for DCR-SR42) A button-type lithium battery is already installed. Getting...
..." (This manual) (1) 9 Rechargeable battery pack NP-FH40 (1) (p.11) (DCR-SR42/SR62/ SR82) NP-FH60 (1) (p.11) (DCR-SR200/SR300) Handycam Station (1) (p.11) A/V connecting cable (1) (p.25) USB cable (1) (p.27) CD-ROM "Handycam Application Software" (1) (p.26) - Picture Motion Browser (Software) - AC Adaptor (1) (p.11) Power cord (1) (p.11) Wireless Remote Commander (1) (except for DCR-SR42) A button-type lithium battery is already installed. Getting...

Operating Guide
Page 24
Saving images using a computer By using the software on the supplied CD-ROM, you can save images on a DVD or the hard disk of a computer. Saving images on a computer You can save images recorded on the camcorder on the hard disk of a computer. The selected image is marked with . 3 Touch t...the still image to some type of external media such as described below. For details, see "Handycam Handbook" (PDF). Creating a DVD with ease. You can also edit those images. You can save images recorded on the hard disk 1 On the (HOME MENU), touch (OTHERS) t [DELETE]. 2 Touch [ DELETE]. ...
Saving images using a computer By using the software on the supplied CD-ROM, you can save images on a DVD or the hard disk of a computer. Saving images on a computer You can save images recorded on the camcorder on the hard disk of a computer. The selected image is marked with . 3 Touch t...the still image to some type of external media such as described below. For details, see "Handycam Handbook" (PDF). Creating a DVD with ease. You can also edit those images. You can save images recorded on the hard disk 1 On the (HOME MENU), touch (OTHERS) t [DELETE]. 2 Touch [ DELETE]. ...
Operating Guide
Page 26
.... 3 Open the [Handbook] folder in a multi-boot environment. The installation screen for installation appears. 3 Click [Handycam Handbook]. ROM from the disc drive of your camcorder or how to use connecting to a computer - Installing the supplied software • The supplied software is based on the computer. CPU: Intel Pentium III 1 GHz or faster Application: DirectX 9.0c...
.... 3 Open the [Handbook] folder in a multi-boot environment. The installation screen for installation appears. 3 Click [Handycam Handbook]. ROM from the disc drive of your camcorder or how to use connecting to a computer - Installing the supplied software • The supplied software is based on the computer. CPU: Intel Pentium III 1 GHz or faster Application: DirectX 9.0c...

Operating Guide
Page 27
... camcorder onto the Handycam Station, then turn the POWER switch to your computer after completing the installation. 27 Provide the camcorder and the Handycam Station, and a USB cable beforehand. Even if a screen prompting you do not need to install the software...CDROM) (disc drive).* * Drive names (such as Administrators for installation. • Close all applications running on computers fulfilling the above system requirements. • Picture Motion Browser does not support 5.1ch surround sound reproduction. Recording/Playback Hard disk: Available free hard disk space for ...
... camcorder onto the Handycam Station, then turn the POWER switch to your computer after completing the installation. 27 Provide the camcorder and the Handycam Station, and a USB cable beforehand. Even if a screen prompting you do not need to install the software...CDROM) (disc drive).* * Drive names (such as Administrators for installation. • Close all applications running on computers fulfilling the above system requirements. • Picture Motion Browser does not support 5.1ch surround sound reproduction. Recording/Playback Hard disk: Available free hard disk space for ...

Operating Guide
Page 28
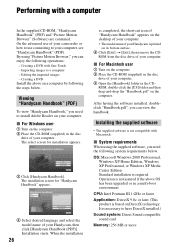
...appears, follow the instructions to complete the installation. For details, see "Handycam Handbook" (PDF). 1 Turn on your computer. • For disconnecting the USB cable, see the explanation of the function of your camcorder, then press (HOME) A (or B). 2 Touch the desired ...sony.net/support-disoft/ Performing various functions - q; Follow the on the HOME MENU (HELP) 1 Press (HOME). 28 After you install the software, a shortcut icon for your convenience. Windows Media Format 9 Series Runtime (Windows 2000 only) Software required to install the software. To see "Handycam ...
...appears, follow the instructions to complete the installation. For details, see "Handycam Handbook" (PDF). 1 Turn on your computer. • For disconnecting the USB cable, see the explanation of the function of your camcorder, then press (HOME) A (or B). 2 Touch the desired ...sony.net/support-disoft/ Performing various functions - q; Follow the on the HOME MENU (HELP) 1 Press (HOME). 28 After you install the software, a shortcut icon for your convenience. Windows Media Format 9 Series Runtime (Windows 2000 only) Software required to install the software. To see "Handycam ...


