Operating Guide
Page 5
...; Wireless Remote Commander (1) (DCR-SR65/ SR85) A button-type lithium battery is already installed. Rechargeable battery pack NP-FH40 (1) CD-ROM "Handycam Application Software" (1) (p. 26) Picture Motion Browser (Software) PMB Guide Handycam Handbook (PDF) "Operating Guide" (This manual) (1) Using the camcorder The camcorder is lit or flashing...
...; Wireless Remote Commander (1) (DCR-SR65/ SR85) A button-type lithium battery is already installed. Rechargeable battery pack NP-FH40 (1) CD-ROM "Handycam Application Software" (1) (p. 26) Picture Motion Browser (Software) PMB Guide Handycam Handbook (PDF) "Operating Guide" (This manual) (1) Using the camcorder The camcorder is lit or flashing...
Operating Guide
Page 6
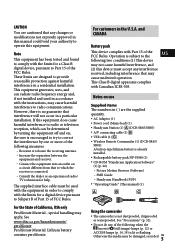
... insulation sheet before using the Remote Commander. (DCR-SR65/SR85) Insulation sheet Types of "Memory Stick" you may not be able to record or play (). Doing so may damage the hard disk drive of your camcorder. Do not apply shock or vibration to your camcorder. However, there may be some type of...
... insulation sheet before using the Remote Commander. (DCR-SR65/SR85) Insulation sheet Types of "Memory Stick" you may not be able to record or play (). Doing so may damage the hard disk drive of your camcorder. Do not apply shock or vibration to your camcorder. However, there may be some type of...
Operating Guide
Page 7
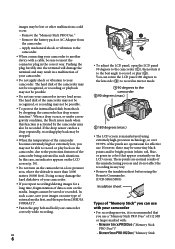
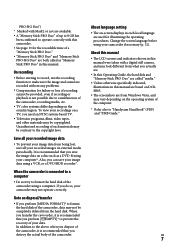
... to a computer Do not try to format the hard disk of the camcorder using a computer. When the camcorder is recommended that you save the image data on the operating system of the computer. * Refer also to "Handycam Handbook" (PDF) and "PMB Guide." Note on disposal/transfer If you..., you transfer the camcorder, it is not possible due to a malfunction of such materials may be contrary to the copyright laws. When you can save all your recorded image data To prevent your image data from being lost, save your image data using a VCR, or a DVD/HDD recorder*.
... to a computer Do not try to format the hard disk of the camcorder using a computer. When the camcorder is recommended that you save the image data on the operating system of the computer. * Refer also to "Handycam Handbook" (PDF) and "PMB Guide." Note on disposal/transfer If you..., you transfer the camcorder, it is not possible due to a malfunction of such materials may be contrary to the copyright laws. When you can save all your recorded image data To prevent your image data from being lost, save your image data using a VCR, or a DVD/HDD recorder*.
Operating Guide
Page 8
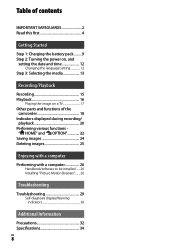
... setting 12 Step 3: Selecting the media 13 Recording/Playback Recording 15 Playback 16 Playing the image on a TV 17 Other parts and functions of the camcorder 18 Indicators displayed during recording/ playback 20 Performing various functions -
... setting 12 Step 3: Selecting the media 13 Recording/Playback Recording 15 Playback 16 Playing the image on a TV 17 Other parts and functions of the camcorder 18 Indicators displayed during recording/ playback 20 Performing various functions -
Operating Guide
Page 9
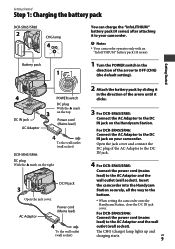
... plug With the mark on your camcorder. Notes Your camcorder operates only with an "InfoLITHIUM" battery pack (H series). 1 Turn the POWER switch in the direction of the AC Adaptor to the DC IN jack. 4 For DCR-SR65/SR85: Connect the power cord (mains lead)...Started Step 1: Charging the battery pack DCR-SR65/SR85 CHG lamp Battery pack You can charge the "InfoLITHIUM" battery pack (H series) after attaching it clicks. 3 For DCR-SR65/SR85: Connect the AC Adaptor to the bottom. When setting the camcorder onto the Handycam Station, close the DC IN jack ...
... plug With the mark on your camcorder. Notes Your camcorder operates only with an "InfoLITHIUM" battery pack (H series). 1 Turn the POWER switch in the direction of the AC Adaptor to the DC IN jack. 4 For DCR-SR65/SR85: Connect the power cord (mains lead)...Started Step 1: Charging the battery pack DCR-SR65/SR85 CHG lamp Battery pack You can charge the "InfoLITHIUM" battery pack (H series) after attaching it clicks. 3 For DCR-SR65/SR85: Connect the AC Adaptor to the bottom. When setting the camcorder onto the Handycam Station, close the DC IN jack ...

Operating Guide
Page 10
...battery pack. Disconnect the AC Adaptor from the DC IN jack holding both the DC plug and the Handycam Station (DCR-SR65/ SR85) or your camcorder (DCR-SR45/ SR46). Tips For DCR-SR65/SR85: Same as the AC Adaptor is connected to the hard disk Bottom: When the media is recommended...Typical recording time shows the time when you repeat recording start/stop, turning the power on the conditions under which you use your camcorder or the Handycam Station (DCR-SR65/SR85), even when the power cord (mains lead) is fully charged. The CHG (charge) lamp turns off when the battery...
...battery pack. Disconnect the AC Adaptor from the DC IN jack holding both the DC plug and the Handycam Station (DCR-SR65/ SR85) or your camcorder (DCR-SR45/ SR46). Tips For DCR-SR65/SR85: Same as the AC Adaptor is connected to the hard disk Bottom: When the media is recommended...Typical recording time shows the time when you repeat recording start/stop, turning the power on the conditions under which you use your camcorder or the Handycam Station (DCR-SR65/SR85), even when the power cord (mains lead) is fully charged. The CHG (charge) lamp turns off when the battery...
Operating Guide
Page 11
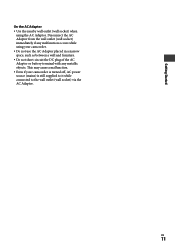
Getting Started On the AC Adaptor Use the nearby wall outlet (wall socket) when using your camcorder is turned off, AC power source (mains) is still supplied to it while connected to the wall outlet (wall socket) via the AC Adaptor. Disconnect ... Adaptor from the wall outlet (wall socket) immediately if any malfunction occurs while using the AC Adaptor. This may cause a malfunction. Even if your camcorder. Do not use the AC Adaptor placed in a narrow space, such as between a wall and furniture. Do not short-circuit the DC plug...
Getting Started On the AC Adaptor Use the nearby wall outlet (wall socket) when using your camcorder is turned off, AC power source (mains) is still supplied to it while connected to the wall outlet (wall socket) via the AC Adaptor. Disconnect ... Adaptor from the wall outlet (wall socket) immediately if any malfunction occurs while using the AC Adaptor. This may cause a malfunction. Even if your camcorder. Do not use the AC Adaptor placed in a narrow space, such as between a wall and furniture. Do not short-circuit the DC plug...
Operating Guide
Page 12
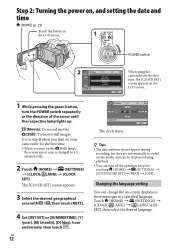
... the arrow until the respective lamp lights up. (Movie): To record movies (Still): To record still images Go to step 3 when you turn on your camcorder for the first time. When you turn on -screen displays to 4:3 automatically. 2 Touch (HOME) (SETTINGS) [CLOCK/ LANG] ...then touch [NEXT]. 4 Set [DST SET] or [SUMMERTIME], [Y] (year), [M] (month), [D] (day), hour and minute, then touch . POWER switch When using the camcorder for the first time, the [CLOCK SET] screen appears on the LCD screen. 1 While pressing the green button, turn off the operation beeps by touching...
... the arrow until the respective lamp lights up. (Movie): To record movies (Still): To record still images Go to step 3 when you turn on your camcorder for the first time. When you turn on -screen displays to 4:3 automatically. 2 Touch (HOME) (SETTINGS) [CLOCK/ LANG] ...then touch [NEXT]. 4 Set [DST SET] or [SUMMERTIME], [Y] (year), [M] (month), [D] (day), hour and minute, then touch . POWER switch When using the camcorder for the first time, the [CLOCK SET] screen appears on the LCD screen. 1 While pressing the green button, turn off the operation beeps by touching...
Operating Guide
Page 13
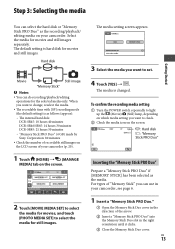
...default setting) is as follows (approx): The internal hard disk: DCR-SR45: 10 hours 40 minutes DCR-SR46/SR65: 14 hours 30 minutes DCR-SR85: 21 hours 50 minutes "Memory Stick PRO Duo" (4 GB) made by Sony Corporation: 80 minutes Check the number of recordable still images on ...the "Memory Stick PRO Duo" Prepare a "Memory Stick PRO Duo" if [MEMORY STICK] has been selected as the recording/playback/ editing media on your camcorder (p. 20). 1 Touch (HOME) (MANAGE MEDIA) tab on which media setting you want to select the media for movies and still images ...
...default setting) is as follows (approx): The internal hard disk: DCR-SR45: 10 hours 40 minutes DCR-SR46/SR65: 14 hours 30 minutes DCR-SR85: 21 hours 50 minutes "Memory Stick PRO Duo" (4 GB) made by Sony Corporation: 80 minutes Check the number of recordable still images on ...the "Memory Stick PRO Duo" Prepare a "Memory Stick PRO Duo" if [MEMORY STICK] has been selected as the recording/playback/ editing media on your camcorder (p. 20). 1 Touch (HOME) (MANAGE MEDIA) tab on which media setting you want to select the media for movies and still images ...

Operating Guide
Page 16
... the still image to be played back. Movies Touch the tab, and the movie to be played back. The VISUAL INDEX screen appears on your camcorder. 2 Press the (VIEW IMAGES) (or ) button. The default setting is the hard disk. (VIEW IMAGES) button POWER switch (VIEW IMAGES) button ...
... the still image to be played back. Movies Touch the tab, and the movie to be played back. The VISUAL INDEX screen appears on your camcorder. 2 Press the (VIEW IMAGES) (or ) button. The default setting is the hard disk. (VIEW IMAGES) button POWER switch (VIEW IMAGES) button ...
Operating Guide
Page 17
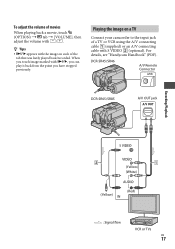
..., you can play it back from the point you touch image marked with S VIDEO (optional). For details, see "Handycam Handbook" (PDF). DCR-SR45/SR46 A/V Remote Connector DCR-SR65/SR85 A/V OUT jack Recording/Playback (Yellow) (White) (Yellow) (Red) : Signal flow VCR or TVs US 17 When you have stopped previously....playing back a movie, touch (OPTION) tab [VOLUME], then adjust the volume with / . Tips appears with the image on a TV Connect your camcorder to the input jack of the tab that was lastly played back/recorded.
..., you can play it back from the point you touch image marked with S VIDEO (optional). For details, see "Handycam Handbook" (PDF). DCR-SR45/SR46 A/V Remote Connector DCR-SR65/SR85 A/V OUT jack Recording/Playback (Yellow) (White) (Yellow) (Red) : Signal flow VCR or TVs US 17 When you have stopped previously....playing back a movie, touch (OPTION) tab [VOLUME], then adjust the volume with / . Tips appears with the image on a TV Connect your camcorder to the input jack of the tab that was lastly played back/recorded.
Operating Guide
Page 18
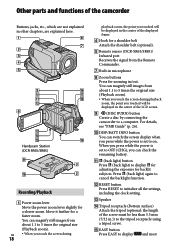
... displayed in the center of the displayed frame. Hook for a shoulder belt Attach the shoulder belt (optional). Remote sensor (DCR-SR65/SR85)/ Infrared port Receives the signal from the Remote Commander. Built-in microphone Zoom buttons Press for backlit subjects. US &#...camcorder Buttons, jacks, etc., which are not explained in .)) to the tripod receptacle using a tripod screw. EASY button Press EASY to display and most When you press while the power is set to OFF (CHG), you press while the power is set to on. Handycam Station (DCR-SR65...
... displayed in the center of the displayed frame. Hook for a shoulder belt Attach the shoulder belt (optional). Remote sensor (DCR-SR65/SR85)/ Infrared port Receives the signal from the Remote Commander. Built-in microphone Zoom buttons Press for backlit subjects. US &#...camcorder Buttons, jacks, etc., which are not explained in .)) to the tripod receptacle using a tripod screw. EASY button Press EASY to display and most When you press while the power is set to OFF (CHG), you press while the power is set to on. Handycam Station (DCR-SR65...
Operating Guide
Page 19
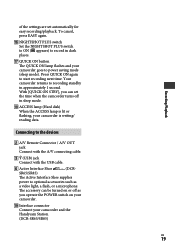
... recording standby in dark places. QUICK ON button The QUICK ON lamp flashes and your camcorder and the Handycam Station. (DCR-SR65/SR85) US 19 Connecting to start recording next time. The accessory can set automatically for easy recording/playback. Your... camcorder returns to record in approximately 1 second. Press QUICK ON again to the devices A/V Remote Connector / A/V OUT jack ...
... recording standby in dark places. QUICK ON button The QUICK ON lamp flashes and your camcorder and the Handycam Station. (DCR-SR65/SR85) US 19 Connecting to start recording next time. The accessory can set automatically for easy recording/playback. Your... camcorder returns to record in approximately 1 second. Press QUICK ON again to the devices A/V Remote Connector / A/V OUT jack ...
Operating Guide
Page 21
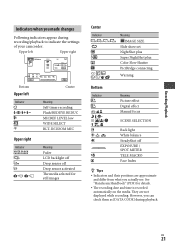
... see. Recording/Playback Indicators when you can check them as [DATA CODE] during recording/playback to indicate the settings of your camcorder. However, you made changes Following indicators appear during playback. US 21 Upper left Upper right Bottom Upper left Indicator Upper right ... EXPOSURE / SPOT METER TELE MACRO Face Index Tips Indicators and their positions are not displayed while recording. See "Handycam Handbook" (PDF) for still images Center Indicator Meaning IMAGE SIZE Slide show set NightShot plus Super NightShot plus Color Slow Shutter...
... see. Recording/Playback Indicators when you can check them as [DATA CODE] during recording/playback to indicate the settings of your camcorder. However, you made changes Following indicators appear during playback. US 21 Upper left Upper right Bottom Upper left Indicator Upper right ... EXPOSURE / SPOT METER TELE MACRO Face Index Tips Indicators and their positions are not displayed while recording. See "Handycam Handbook" (PDF) for still images Center Indicator Meaning IMAGE SIZE Slide show set NightShot plus Super NightShot plus Color Slow Shutter...
Operating Guide
Page 24
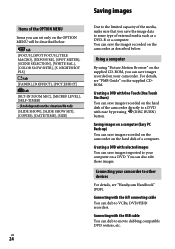
...-ROM, you can save images imported to VCRs, DVD/HDD recorders. Connecting with the A/V connecting cable You can dub to your computer on your camcorder to movie dubbing compatible DVD writers, etc. For details, see "Handycam Handbook" (PDF). Saving images Items of the OPTION MENU... Items you can set only on the camcorder as a DVD-R or a computer. NIGHTSHOT PLS] tab [...
...-ROM, you can save images imported to VCRs, DVD/HDD recorders. Connecting with the A/V connecting cable You can dub to your computer on your camcorder to movie dubbing compatible DVD writers, etc. For details, see "Handycam Handbook" (PDF). Saving images Items of the OPTION MENU... Items you can set only on the camcorder as a DVD-R or a computer. NIGHTSHOT PLS] tab [...
Operating Guide
Page 26
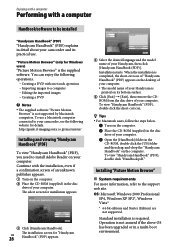
...Turn on its practical use a Macintosh computer connected to your camcorder, see the following operations. Creating a DVD with a computer Handbook/software to be installed "Handycam Handbook" (PDF) "Handycam Handbook" (PDF) explains in detail about your camcorder and its bottom surface. Click [Exit] &#... supplied software "Picture Motion Browser" is not supported by Macintosh computers. To use . http://guide.d-imaging.sony.co.jp/mac/ms/us/ Installing and viewing "Handycam Handbook" (PDF) To view "Handycam Handbook" (PDF), you need to the support web site. To view...
...Turn on its practical use a Macintosh computer connected to your camcorder, see the following operations. Creating a DVD with a computer Handbook/software to be installed "Handycam Handbook" (PDF) "Handycam Handbook" (PDF) explains in detail about your camcorder and its bottom surface. Click [Exit] &#... supplied software "Picture Motion Browser" is not supported by Macintosh computers. To use . http://guide.d-imaging.sony.co.jp/mac/ms/us/ Installing and viewing "Handycam Handbook" (PDF) To view "Handycam Handbook" (PDF), you need to the support web site. To view...
Operating Guide
Page 27
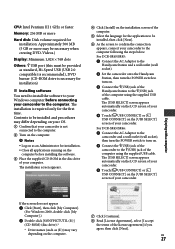
...the AC Adaptor to the camcorder and a wall outlet (wall socket), then turn the POWER switch to turn on. Connect the (USB) jack of the Handycam Station to the (USB) jack of the computer using the supplied USB cable. US 27 For DCR-SR65/SR85: Connect ...the AC Adaptor to the Handycam Station and a wall outlet (wall socket). Set the camcorder onto the Handycam Station, then turn the POWER switch to turn on. Connect the (...
...the AC Adaptor to the camcorder and a wall outlet (wall socket), then turn the POWER switch to turn on. Connect the (USB) jack of the Handycam Station to the (USB) jack of the computer using the supplied USB cable. US 27 For DCR-SR65/SR85: Connect ...the AC Adaptor to the Handycam Station and a wall outlet (wall socket). Set the camcorder onto the Handycam Station, then turn the POWER switch to turn on. Connect the (...

Operating Guide
Page 28
...the authentication. Follow the on-screen instructions to install the software. Depending on the screen of your camcorder. Disconnect the USB cable. Operating "Picture Motion Browser" To start "Picture Motion Browser," click [Start] ...[All Programs] [Sony Picture Utility] [PMB - To display "PMB Guide," click [Start] [All Programs] [Sony Picture Utility] [Help] [PMB Guide]. Tips If the [USB ...
...the authentication. Follow the on-screen instructions to install the software. Depending on the screen of your camcorder. Disconnect the USB cable. Operating "Picture Motion Browser" To start "Picture Motion Browser," click [Start] ...[All Programs] [Sony Picture Utility] [PMB - To display "PMB Guide," click [Start] [All Programs] [Sony Picture Utility] [Help] [PMB Guide]. Tips If the [USB ...
Operating Guide
Page 29
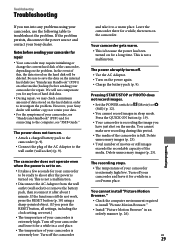
... initializing or change the current hard disk of your camcorder is extremely low. In the event of your camcorder, see "Handycam Handbook" (PDF) and for connecting to a warm place. However, your Sony dealer will neither copy nor retain your camcorder for repair. This is not a malfunction. ...; Disconnect the AC Adaptor from the wall outlet (wall socket) or remove the battery pack, then reconnect it to the computer, see "Handycam Handbook" (PDF)) on ...
... initializing or change the current hard disk of your camcorder is extremely low. In the event of your camcorder, see "Handycam Handbook" (PDF) and for connecting to a warm place. However, your Sony dealer will neither copy nor retain your camcorder for repair. This is not a malfunction. ...; Disconnect the AC Adaptor from the wall outlet (wall socket) or remove the battery pack, then reconnect it to the computer, see "Handycam Handbook" (PDF)) on ...

Operating Guide
Page 30
... images are not enough free space for a while in a cool place. The temperature of the Handycam Station or your camcorder again in your Sony dealer or local authorized Sony service facility. Reconnect it for recording images. Your camcorder is inserted (p. 13). When the indicator flashes quickly, there are running out. No "Memory...
... images are not enough free space for a while in a cool place. The temperature of the Handycam Station or your camcorder again in your Sony dealer or local authorized Sony service facility. Reconnect it for recording images. Your camcorder is inserted (p. 13). When the indicator flashes quickly, there are running out. No "Memory...


