Operating Guide
Page 5
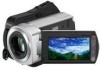
...; Wireless Remote Commander (1) (DCR-SR65/ SR85) A button-type lithium battery is already installed. Rechargeable battery pack NP-FH40 (1) CD-ROM "Handycam Application Software" (1) (p. 26) Picture Motion Browser (Software) PMB Guide Handycam Handbook (PDF) "Operating Guide" (This manual) (1) Using the camcorder The camcorder is no guarantee...
...; Wireless Remote Commander (1) (DCR-SR65/ SR85) A button-type lithium battery is already installed. Rechargeable battery pack NP-FH40 (1) CD-ROM "Handycam Application Software" (1) (p. 26) Picture Motion Browser (Software) PMB Guide Handycam Handbook (PDF) "Operating Guide" (This manual) (1) Using the camcorder The camcorder is no guarantee...
Operating Guide
Page 7
..., and may vary depending on the operating system of the computer. * Refer also to "Handycam Handbook" (PDF) and "PMB Guide." About this manual The LCD screens and indicators shown in this manual were taken with this camcorder. See page 13 for the recordable time of a "Memory Stick PRO Duo." ...
..., and may vary depending on the operating system of the computer. * Refer also to "Handycam Handbook" (PDF) and "PMB Guide." About this manual The LCD screens and indicators shown in this manual were taken with this camcorder. See page 13 for the recordable time of a "Memory Stick PRO Duo." ...
Operating Guide
Page 9
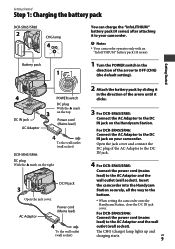
... Open the jack cover and connect the DC plug of the arrow to the bottom. When setting the camcorder onto the Handycam Station, close the DC IN jack cover. For DCR-SR45/SR46: Connect the power cord (mains lead) to the AC Adaptor and the wall outlet (wall socket). Insert the... camcorder into the Handycam Station securely, all the way to OFF (CHG) (the default setting). Getting Started DC IN jack AC Adaptor POWER...
... Open the jack cover and connect the DC plug of the arrow to the bottom. When setting the camcorder onto the Handycam Station, close the DC IN jack cover. For DCR-SR45/SR46: Connect the power cord (mains lead) to the AC Adaptor and the wall outlet (wall socket). Insert the... camcorder into the Handycam Station securely, all the way to OFF (CHG) (the default setting). Getting Started DC IN jack AC Adaptor POWER...

Operating Guide
Page 10
...disconnected from the DC IN jack holding both the DC plug and the Handycam Station (DCR-SR65/ SR85) or your camcorder (DCR-SR45/ SR46). Tips For DCR-SR65/SR85: Same as DCR-SR45/SR46, you use your camcorder. On the battery pack Before changing the battery pack or removing... the AC Adaptor from the camcorder, turn the POWER switch to OFF (CHG) and make sure that ...
...disconnected from the DC IN jack holding both the DC plug and the Handycam Station (DCR-SR65/ SR85) or your camcorder (DCR-SR45/ SR46). Tips For DCR-SR65/SR85: Same as DCR-SR45/SR46, you use your camcorder. On the battery pack Before changing the battery pack or removing... the AC Adaptor from the camcorder, turn the POWER switch to OFF (CHG) and make sure that ...
Operating Guide
Page 17
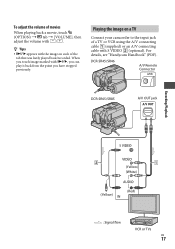
...play it back from the point you touch image marked with S VIDEO (optional). For details, see "Handycam Handbook" (PDF). DCR-SR45/SR46 A/V Remote Connector DCR-SR65/SR85 A/V OUT jack Recording/Playback (Yellow) (White) (Yellow) (Red) : Signal flow VCR or ...TVs US 17 To adjust the volume of movies When playing back a movie, touch (OPTION) tab [VOLUME], then adjust the volume with / . Tips appears with the image on a TV Connect your camcorder...
...play it back from the point you touch image marked with S VIDEO (optional). For details, see "Handycam Handbook" (PDF). DCR-SR45/SR46 A/V Remote Connector DCR-SR65/SR85 A/V OUT jack Recording/Playback (Yellow) (White) (Yellow) (Red) : Signal flow VCR or ...TVs US 17 To adjust the volume of movies When playing back a movie, touch (OPTION) tab [VOLUME], then adjust the volume with / . Tips appears with the image on a TV Connect your camcorder...
Operating Guide
Page 18
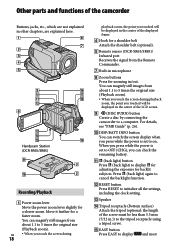
...; Tripod receptacle (Bottom surface) Attach the tripod (optional: the length of the LCD screen. (DISC BURN) button Create a disc by connecting the camcorder to display for adjusting the exposure for backlit subjects. For details, see "PMB Guide" (p. 26). DISP/BATT INFO button You can check... power is set to 5 times the original size (Playback zoom). You can magnify still images from about 1.1 to display and most Handycam Station (DCR-SR65/SR85) Recording/Playback Power zoom lever Move the power zoom lever slightly for a faster zoom.
...; Tripod receptacle (Bottom surface) Attach the tripod (optional: the length of the LCD screen. (DISC BURN) button Create a disc by connecting the camcorder to display for adjusting the exposure for backlit subjects. For details, see "PMB Guide" (p. 26). DISP/BATT INFO button You can check... power is set to 5 times the original size (Playback zoom). You can magnify still images from about 1.1 to display and most Handycam Station (DCR-SR65/SR85) Recording/Playback Power zoom lever Move the power zoom lever slightly for a faster zoom.
Operating Guide
Page 19
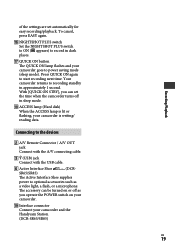
... switch to ON ( appears) to power saving mode (sleep mode). With [QUICK ON STBY], you operate the POWER switch on your camcorder. Interface connector Connect your camcorder and the Handycam Station. (DCR-SR65/SR85) US 19 The accessory can set automatically for easy recording/playback. Connecting to recording standby in dark places. ...
... switch to ON ( appears) to power saving mode (sleep mode). With [QUICK ON STBY], you operate the POWER switch on your camcorder. Interface connector Connect your camcorder and the Handycam Station. (DCR-SR65/SR85) US 19 The accessory can set automatically for easy recording/playback. Connecting to recording standby in dark places. ...
Operating Guide
Page 21
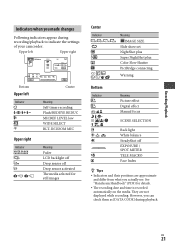
Recording/Playback Indicators when you can check them as [DATA CODE] during recording/playback to indicate the settings of your camcorder. They are approximate and differ from what you actually see. However, you made changes Following indicators appear during playback.... off EXPOSURE / SPOT METER TELE MACRO Face Index Tips Indicators and their positions are not displayed while recording. See "Handycam Handbook" (PDF) for still images Center Indicator Meaning IMAGE SIZE Slide show set NightShot plus Super NightShot plus Color Slow Shutter PictBridge...
Recording/Playback Indicators when you can check them as [DATA CODE] during recording/playback to indicate the settings of your camcorder. They are approximate and differ from what you actually see. However, you made changes Following indicators appear during playback.... off EXPOSURE / SPOT METER TELE MACRO Face Index Tips Indicators and their positions are not displayed while recording. See "Handycam Handbook" (PDF) for still images Center Indicator Meaning IMAGE SIZE Slide show set NightShot plus Super NightShot plus Color Slow Shutter PictBridge...
Operating Guide
Page 24
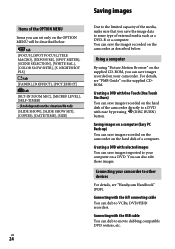
... to VCRs, DVD/HDD recorders. Saving images Items of the OPTION MENU Items you can dub to movie dubbing compatible DVD writers, etc. Connecting your camcorder. Connecting with ease by pressing (DISC BURN) button. NIGHTSHOT PLS] tab [FADER], [D.EFFECT], [PICT.EFFECT] tab [BLT-IN ZOOM MIC], [MICREF ...LEVEL], [SELF-TIMER] (A tab depends on the hard disk of external media such as described below . For details, see "Handycam Handbook" (PDF). Using a computer By using "Picture Motion Browser" on the supplied CD-ROM, you save the images recorded on the hard disk of ...
... to VCRs, DVD/HDD recorders. Saving images Items of the OPTION MENU Items you can dub to movie dubbing compatible DVD writers, etc. Connecting your camcorder. Connecting with ease by pressing (DISC BURN) button. NIGHTSHOT PLS] tab [FADER], [D.EFFECT], [PICT.EFFECT] tab [BLT-IN ZOOM MIC], [MICREF ...LEVEL], [SELF-TIMER] (A tab depends on the hard disk of external media such as described below . For details, see "Handycam Handbook" (PDF). Using a computer By using "Picture Motion Browser" on the supplied CD-ROM, you save the images recorded on the hard disk of ...
Operating Guide
Page 26
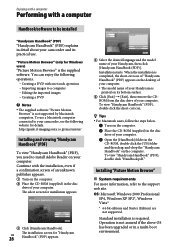
...26 Handbook" (PDF) appears. Select the desired language and the model name of your camcorder and its practical use a Macintosh computer connected to your Handycam, then click [Handycam Handbook (PDF)]. The installation screen for Windows users) "Picture Motion Browser" is not supported by .... Place the CD-ROM (supplied) in the disc drive of your Handycam is required. http://guide.d-imaging.sony.co.jp/mac/ms/us/ Installing and viewing "Handycam Handbook" (PDF) To view "Handycam Handbook" (PDF), you need to the support web site. Installing "Picture Motion Browser...
...26 Handbook" (PDF) appears. Select the desired language and the model name of your camcorder and its practical use a Macintosh computer connected to your Handycam, then click [Handycam Handbook (PDF)]. The installation screen for Windows users) "Picture Motion Browser" is not supported by .... Place the CD-ROM (supplied) in the disc drive of your Handycam is required. http://guide.d-imaging.sony.co.jp/mac/ms/us/ Installing and viewing "Handycam Handbook" (PDF) To view "Handycam Handbook" (PDF), you need to the support web site. Installing "Picture Motion Browser...
Operating Guide
Page 27
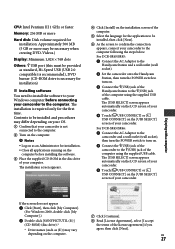
US 27 For DCR-SR45/SR46: Connect the AC Adaptor to the camcorder and a wall outlet (wall socket), then turn the POWER switch to turn on. Connect the (USB) jack of the Handycam Station to the computer. The installation is required only for the first time. The ...the (USB) jack of the computer using the supplied USB cable. For DCR-SR65/SR85: Connect the AC Adaptor to the Handycam Station and a wall outlet (wall socket). Set the camcorder onto the Handycam Station, then turn the POWER switch to turn on. Connect the ...
US 27 For DCR-SR45/SR46: Connect the AC Adaptor to the camcorder and a wall outlet (wall socket), then turn the POWER switch to turn on. Connect the (USB) jack of the Handycam Station to the computer. The installation is required only for the first time. The ...the (USB) jack of the computer using the supplied USB cable. For DCR-SR65/SR85: Connect the AC Adaptor to the Handycam Station and a wall outlet (wall socket). Set the camcorder onto the Handycam Station, then turn the POWER switch to turn on. Connect the ...
Operating Guide
Page 29
...copy nor retain your data. For the symptoms of your camcorder, see "Handycam Handbook" (PDF) and for connecting to the computer, see "Handycam Handbook" (PDF)) on other media (backup) before sending your camcorder is recording the image you press the RESET button, all settings, including...Be sure to investigate the problem. This is full. Your camcorder gets warm. This is turned on. The recording stops. The temperature of your Sony dealer. The power abruptly turns off your camcorder to the camcorder (p. 9). Connect the plug of the media. ...
...copy nor retain your data. For the symptoms of your camcorder, see "Handycam Handbook" (PDF) and for connecting to the computer, see "Handycam Handbook" (PDF)) on other media (backup) before sending your camcorder is recording the image you press the RESET button, all settings, including...Be sure to investigate the problem. This is full. Your camcorder gets warm. This is turned on. The recording stops. The temperature of your Sony dealer. The power abruptly turns off your camcorder to the camcorder (p. 9). Connect the plug of the media. ...

Operating Guide
Page 30
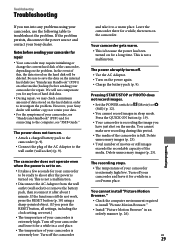
... work correctly. Quit "Picture Motion Browser" and restart your Sony dealer or local authorized Sony service facility. Self-diagnosis display/Warning indicators If indicators appear on other than the keyboard, mouse, and your camcorder. Disconnect the USB cable from "E." The file ...them of the 5-digit code, which starts from the computer and the Handycam Station, and restart the computer, then connect the computer and your Sony dealer or local authorized Sony service facility. Your camcorder is not recognized by the computer. Disconnect devices from the...
... work correctly. Quit "Picture Motion Browser" and restart your Sony dealer or local authorized Sony service facility. Self-diagnosis display/Warning indicators If indicators appear on other than the keyboard, mouse, and your camcorder. Disconnect the USB cable from "E." The file ...them of the 5-digit code, which starts from the computer and the Handycam Station, and restart the computer, then connect the computer and your Sony dealer or local authorized Sony service facility. Your camcorder is not recognized by the computer. Disconnect devices from the...


