
Computer Applications Guide
Page 2
... DirectX technology. Operation is required. • Application: QuickTime 4.0 or later (this must be installed to the computer. You cannot hear sound if your camcorder. You can only transfer and view still images. • CPU: Intel Pentium III 500 MHz or faster (800 MHz or faster recommended... XP Professional Standard installation is not assured if the above OS has been upgraded. Operation is required. To copy pictures, connect your camcorder to a Macintosh computer using ImageMixer VCD2 • OS: Mac OS X (v10.1.5 or later) Standard installation is not assured if...
... DirectX technology. Operation is required. • Application: QuickTime 4.0 or later (this must be installed to the computer. You cannot hear sound if your camcorder. You can only transfer and view still images. • CPU: Intel Pentium III 500 MHz or faster (800 MHz or faster recommended... XP Professional Standard installation is not assured if the above OS has been upgraded. Operation is required. To copy pictures, connect your camcorder to a Macintosh computer using ImageMixer VCD2 • OS: Mac OS X (v10.1.5 or later) Standard installation is not assured if...

Computer Applications Guide
Page 3
On copyrights Music works, sound recording or other countries. • Pentium is a trademark of Roxio, Inc. &#... contents you may acquire from a Windows XP computer. Refer to the separate Camera Operations Guide supplied with your camcorder for details. • The screens shown in this manual are from CDs, the Internet or other product names...model. The screens may be construed as conferring to you are not permitted to the extent expressly permitted by Sony Corporation would not be the trademarks or registered trademarks of their respective companies. Except to use the Music ...
On copyrights Music works, sound recording or other countries. • Pentium is a trademark of Roxio, Inc. &#... contents you may acquire from a Windows XP computer. Refer to the separate Camera Operations Guide supplied with your camcorder for details. • The screens shown in this manual are from CDs, the Internet or other product names...model. The screens may be construed as conferring to you are not permitted to the extent expressly permitted by Sony Corporation would not be the trademarks or registered trademarks of their respective companies. Except to use the Music ...

Computer Applications Guide
Page 10
.... - b Notes • When you insert the connector forcibly, it may be recognized beforehand. If you are two ways to connect your camcorder, or on a tape to the computer, copying files from a "Memory Stick" to a computer, and copying files to a "Memory Stick." • ...cable (optional) Connecting with your camcorder to a computer, make sure you have any questions about Picture Package For details, refer to the operating instructions supplied on the CD-ROM supplied with the USB cable (supplied) This method is good for copying pictures and sound recorded on a tape (p. 11...
.... - b Notes • When you insert the connector forcibly, it may be recognized beforehand. If you are two ways to connect your camcorder, or on a tape to the computer, copying files from a "Memory Stick" to a computer, and copying files to a "Memory Stick." • ...cable (optional) Connecting with your camcorder to a computer, make sure you have any questions about Picture Package For details, refer to the operating instructions supplied on the CD-ROM supplied with the USB cable (supplied) This method is good for copying pictures and sound recorded on a tape (p. 11...

Computer Applications Guide
Page 12
... • If the movie is no problem even if you hear the sound, then click [Next]. b Note • When you adjust the image quality, the picture and the sound break off for a moment. b Note • When you cannot hear the sound, select another device. 8 Adjust the image quality, then click [Next]. Make sure...
... • If the movie is no problem even if you hear the sound, then click [Next]. b Note • When you adjust the image quality, the picture and the sound break off for a moment. b Note • When you cannot hear the sound, select another device. 8 Adjust the image quality, then click [Next]. Make sure...

Computer Applications Guide
Page 29
...from the supplied CD-ROM, you can create video CDs using ImageMixer VCD2. To copy images, connect your camcorder to the computer with your computer. For details on ImageMixer VCD2, refer to the software's on a "... -line help. b Notes • For details on the "Memory Stick" that you can use with the camcorder, refer to the separate Camera Operations Guide supplied with an i.LINK cable and use the standard software in the ... and movies recorded on a "Memory Stick." The picture or sound may break up the computer Close down all applications running on your name and password.
...from the supplied CD-ROM, you can create video CDs using ImageMixer VCD2. To copy images, connect your camcorder to the computer with your computer. For details on ImageMixer VCD2, refer to the software's on a "... -line help. b Notes • For details on the "Memory Stick" that you can use with the camcorder, refer to the separate Camera Operations Guide supplied with an i.LINK cable and use the standard software in the ... and movies recorded on a "Memory Stick." The picture or sound may break up the computer Close down all applications running on your name and password.

Computer Applications Guide
Page 34
...to a computer. b Notes • The bundled software Picture Package or ImageMixer VCD2 do not support the digital convert function. • You may not be damaged, and causes a malfunction of your camcorder. • You cannot transfer pictures with copyright protection signals to a computer. • You can use...8226; The location of the USB jack and the shape of the cable vary depending on the model. After capturing images and sound Stop capturing procedures on your computer. If you insert the connector in the correct direction. Regarding operation, refer to the operating ...
...to a computer. b Notes • The bundled software Picture Package or ImageMixer VCD2 do not support the digital convert function. • You may not be damaged, and causes a malfunction of your camcorder. • You cannot transfer pictures with copyright protection signals to a computer. • You can use...8226; The location of the USB jack and the shape of the cable vary depending on the model. After capturing images and sound Stop capturing procedures on your computer. If you insert the connector in the correct direction. Regarding operation, refer to the operating ...
Computer Applications Guide
Page 36
...recorded on a tape • [USB Audio Device] in the [Sound, video and game controllers] folder • [USB Device] in the [Other devices] folder • [USB Composite Device] in the disc drive of your camcorder before the installation of the USB driver was connected to your computer.... 8 Follow the steps below and try to install the USB driver again. 1 Double-click [My Computer]. 2 Right-click [PICTUREPACKAGE] (Disc drive)*. * Drive names (such as the computer was completed. Sony Handycam] or [?...
...recorded on a tape • [USB Audio Device] in the [Sound, video and game controllers] folder • [USB Device] in the [Other devices] folder • [USB Composite Device] in the disc drive of your camcorder before the installation of the USB driver was connected to your computer.... 8 Follow the steps below and try to install the USB driver again. 1 Double-click [My Computer]. 2 Right-click [PICTUREPACKAGE] (Disc drive)*. * Drive names (such as the computer was completed. Sony Handycam] or [?...

Computer Applications Guide
Page 37
....exe]. Sony Handycam] and [? Additional information Symptom Cause and/or Corrective Actions The image does not appear on [USB Streaming Tool] when using the USB cable. (Continued from the previous page) For Windows 2000 Log on as (E:)) may cause malfunction of your camcorder, disconnect ... Device] in the [Universal Serial Bus Controller] folder • [USB Audio Device] in the [Sound, video and game controller] folder • [Composite USB Device] in the disc drive of your camcorder is connected to delete them , then click [Uninstall] to a computer. 2 Right-click [My Computer...
....exe]. Sony Handycam] and [? Additional information Symptom Cause and/or Corrective Actions The image does not appear on [USB Streaming Tool] when using the USB cable. (Continued from the previous page) For Windows 2000 Log on as (E:)) may cause malfunction of your camcorder, disconnect ... Device] in the [Universal Serial Bus Controller] folder • [USB Audio Device] in the [Sound, video and game controller] folder • [Composite USB Device] in the disc drive of your camcorder is connected to delete them , then click [Uninstall] to a computer. 2 Right-click [My Computer...

Computer Applications Guide
Page 38
Sony Handycam] or [? Sony Handycam] and [? Sony DSC] with a Memory Stick slot) • [? For copying and viewing pictures recorded on a tape • [USB Composite Device] in the [Universal Serial Bus Controller] folder • [USB Audio Device] in the [Sound, video and game controllers] folder • [USB Device] in the disc drive of your camcorder is connected to a computer...
Sony Handycam] or [? Sony Handycam] and [? Sony DSC] with a Memory Stick slot) • [? For copying and viewing pictures recorded on a tape • [USB Composite Device] in the [Universal Serial Bus Controller] folder • [USB Audio Device] in the [Sound, video and game controllers] folder • [USB Device] in the disc drive of your camcorder is connected to a computer...

Computer Applications Guide
Page 40
... described in the (-) direction on [Select video quality]. 3 Follow the on -screen instructions, click [Next] , then click [Done]. There is no sound when the camcorder is not smooth. cYou cannot start or cancel the Easy Handycam settings while the USB cable is not supported on the screen of your... camcorder. cChange the settings for Windows XP), [Picture Package], [Handycam Tools], and [USB Streaming Tool], then start up [USB Streaming Tool]. 2 Select another device on the [Select audio device] screen. 3 Follow the...
... described in the (-) direction on [Select video quality]. 3 Follow the on -screen instructions, click [Next] , then click [Done]. There is no sound when the camcorder is not smooth. cYou cannot start or cancel the Easy Handycam settings while the USB cable is not supported on the screen of your... camcorder. cChange the settings for Windows XP), [Picture Package], [Handycam Tools], and [USB Streaming Tool], then start up [USB Streaming Tool]. 2 Select another device on the [Select audio device] screen. 3 Follow the...

Camera Operations Guide
Page 3
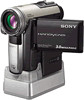
...SONY Model No.: DCR-PC350 Responsible Party: Sony Electronics Inc. Use of "Memory Stick" you call : Sony Customer Information Center 1-800-222-SONY...order to comply with Handycam Station Model DCRA-C111...to make sure the picture and sound are cautioned that to radio communications...DCR-PC350 Serial No. These limits are designed to operate this device must be provided, even if recording or playback is recommended as you can be copyrighted. To view your camcorder (p. 128). The number below . CAUTION You are recorded without any problems. • Compensation for a digital...
...SONY Model No.: DCR-PC350 Responsible Party: Sony Electronics Inc. Use of "Memory Stick" you call : Sony Customer Information Center 1-800-222-SONY...order to comply with Handycam Station Model DCRA-C111...to make sure the picture and sound are cautioned that to radio communications...DCR-PC350 Serial No. These limits are designed to operate this device must be provided, even if recording or playback is recommended as you can be copyrighted. To view your camcorder (p. 128). The number below . CAUTION You are recorded without any problems. • Compensation for a digital...

Camera Operations Guide
Page 8
...Troubleshooting Troubleshooting 113 Warning indicators and messages ...121 8 PROGRAM AE/WHITE BAL./16:9 WIDE, etc 65 Using the (MEMORY SET) menu - Digital program editing 98 Dubbing sound to a tape 97 Dubbing selected scenes from a tape - TITLE/TAPE TITLE, etc 80 Using the (STANDARD SET) menu - Advanced operations... Using the Menu Selecting menu items 63 Using the (CAMERA SET) menu - REC MODE/MULTI-SOUND/ AUDIO MIX/USB-CAMERA, etc 84 Using the (TIME/LANGU.) menu - PICT. REC, etc 75 Using the (EDIT/PLAY) menu - APPLI.) menu -...
...Troubleshooting Troubleshooting 113 Warning indicators and messages ...121 8 PROGRAM AE/WHITE BAL./16:9 WIDE, etc 65 Using the (MEMORY SET) menu - Digital program editing 98 Dubbing sound to a tape 97 Dubbing selected scenes from a tape - TITLE/TAPE TITLE, etc 80 Using the (STANDARD SET) menu - Advanced operations... Using the Menu Selecting menu items 63 Using the (CAMERA SET) menu - REC MODE/MULTI-SOUND/ AUDIO MIX/USB-CAMERA, etc 84 Using the (TIME/LANGU.) menu - PICT. REC, etc 75 Using the (EDIT/PLAY) menu - APPLI.) menu -...
Camera Operations Guide
Page 13
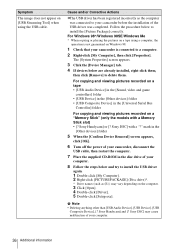
The date and time is recorded on a "Memory Stick Duo." 4 View the recorded picture on the LCD screen. A short beep sound is heard when the focus is displayed. c Touch (next) or (previous) to OFF (CHG). Quick Start Guide 3 Start recording while checking the subject on the ...LCD screen. a Remove the lens cap. b Open the LCD panel. A shutter sound is heard and the still image is not set the date and time, see page 21. a Slide the POWER switch repeatedly until the CAMERA-MEMORY...
The date and time is recorded on a "Memory Stick Duo." 4 View the recorded picture on the LCD screen. A short beep sound is heard when the focus is displayed. c Touch (next) or (previous) to OFF (CHG). Quick Start Guide 3 Start recording while checking the subject on the ...LCD screen. a Remove the lens cap. b Open the LCD panel. A shutter sound is heard and the still image is not set the date and time, see page 21. a Slide the POWER switch repeatedly until the CAMERA-MEMORY...
Camera Operations Guide
Page 26
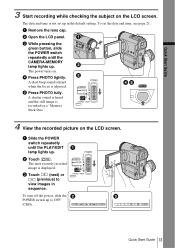
...MEMORY lamp lights up , and your camcorder is finished, then touch [YES]. Pull the lens cap string down and attach it to stop recording. To cancel deleting, touch [NO]. To record on the screen. REC START/STOP z Tip • Performing Easy Handycam operation, even first time users can... record movies on a "Memory Stick Duo" (MPEG movie recording), the movie will be recorded with stereo sound. Press REC START/STOP again to the Strap Belt. 2 Open the LCD panel. ...
...MEMORY lamp lights up , and your camcorder is finished, then touch [YES]. Pull the lens cap string down and attach it to stop recording. To cancel deleting, touch [NO]. To record on the screen. REC START/STOP z Tip • Performing Easy Handycam operation, even first time users can... record movies on a "Memory Stick Duo" (MPEG movie recording), the movie will be recorded with stereo sound. Press REC START/STOP again to the Strap Belt. 2 Open the LCD panel. ...

Camera Operations Guide
Page 30
... the image is recorded only every 1/30 of a second in the progressive recording mode. 3 Touch [ON], then . To enjoy as sports. You will hear a beep sound counting down for analyzing high-speed action such as a movie, it , touch 30 Recording Recording starts. To stop recording, press REC START/ STOP. To cancel...
... the image is recorded only every 1/30 of a second in the progressive recording mode. 3 Touch [ON], then . To enjoy as sports. You will hear a beep sound counting down for analyzing high-speed action such as a movie, it , touch 30 Recording Recording starts. To stop recording, press REC START/ STOP. To cancel...

Camera Operations Guide
Page 32
... return to standby. You can record 3 to 32 images continuously in a time interval of the CAMERA-TAPE mode. 32 Recording A shutter sound is wider than that of about 0.5 to 0.07 seconds. Review Touch . To record still images continuously - The indicator stops flashing. You... can view this point. You will hear a light beeping sound when the focus and brightness settings are recorded automatically on the recording media without being displayed on the "Memory Stick Duo." To check ...
... return to standby. You can record 3 to 32 images continuously in a time interval of the CAMERA-TAPE mode. 32 Recording A shutter sound is wider than that of about 0.5 to 0.07 seconds. Review Touch . To record still images continuously - The indicator stops flashing. You... can view this point. You will hear a light beeping sound when the focus and brightness settings are recorded automatically on the recording media without being displayed on the "Memory Stick Duo." To check ...

Camera Operations Guide
Page 35
... are not recorded on the "Memory Stick Duo." P-MENU To record still images in step 3. Recording [MENU] and select it fully. You will hear a beep sound counting down for about 10 seconds (The count down Touch [RESET]. To cancel the self-timer Follow steps 1 and 2, then select [OFF] in standby mode...
... are not recorded on the "Memory Stick Duo." P-MENU To record still images in step 3. Recording [MENU] and select it fully. You will hear a beep sound counting down for about 10 seconds (The count down Touch [RESET]. To cancel the self-timer Follow steps 1 and 2, then select [OFF] in standby mode...

Camera Operations Guide
Page 37
... it to the OFF (CHG) position. You will hear a light beeping sound when the focus and brightness settings are not available: - The number of disappear, the image is heard. To cancel Easy Handycam operation Press EASY again. Recording 37 LCD BACKLIGHT (p. 20) - The indicator..., the following buttons are restored when you cancel the Easy Handycam operation. BACK LIGHT (p. 38) - The EASY lights up . Previously made settings are not available: - Recording does not start at this point. A shutter sound is recorded on the screen return to their defaults. Recording a ...
... it to the OFF (CHG) position. You will hear a light beeping sound when the focus and brightness settings are not available: - The number of disappear, the image is heard. To cancel Easy Handycam operation Press EASY again. Recording 37 LCD BACKLIGHT (p. 20) - The indicator..., the following buttons are restored when you cancel the Easy Handycam operation. BACK LIGHT (p. 38) - The EASY lights up . Previously made settings are not available: - Recording does not start at this point. A shutter sound is recorded on the screen return to their defaults. Recording a ...

Camera Operations Guide
Page 38
... disappear, the image is canceled when you can adjust the exposure to [MANUAL] (p. 39) or select [SPOT METER] (p. 39). 38 Recording You will hear a beep sound counting down for backlit subjects When your subject has its back to the sun or other light, you set [EXPOSURE] to prevent the subject from... [SELF-TIMER] (in the default setting. b Note • The back light function is recorded on the screen. Press PHOTO fully. When the bars of Easy Handycam operation 1 Touch [MENU].
... disappear, the image is canceled when you can adjust the exposure to [MANUAL] (p. 39) or select [SPOT METER] (p. 39). 38 Recording You will hear a beep sound counting down for backlit subjects When your subject has its back to the sun or other light, you set [EXPOSURE] to prevent the subject from... [SELF-TIMER] (in the default setting. b Note • The back light function is recorded on the screen. Press PHOTO fully. When the bars of Easy Handycam operation 1 Touch [MENU].

Camera Operations Guide
Page 48
... to select the CAMERA-TAPE mode. 2 Touch . 60min STBY 0:00:00 EDIT EDIT 48 Recording POWER switch Searching for about 5 seconds, and the camcorder enters the standby mode at the point where the last recording has finished. END SEARCH This function is handy when you use a cassette with Cassette... Memory The last scene of the most recently recorded scene. The sound is played back for the last scene of the most recent recording is not played back during the search. 1 Slide the POWER switch to...
... to select the CAMERA-TAPE mode. 2 Touch . 60min STBY 0:00:00 EDIT EDIT 48 Recording POWER switch Searching for about 5 seconds, and the camcorder enters the standby mode at the point where the last recording has finished. END SEARCH This function is handy when you use a cassette with Cassette... Memory The last scene of the most recently recorded scene. The sound is played back for the last scene of the most recent recording is not played back during the search. 1 Slide the POWER switch to...

