
Computer Applications Guide
Page 2
...: Windows Media Player (this must be installed to play back movies.) • Others: USB port (this must be provided as standard), disc drive For Macintosh users b Note • When you cannot copy pictures recorded on a computer (only the models with a Memory Stick slot) • OS: Microsoft Windows 98, Windows 98SE, Windows 2000 Professional, Windows Millennium Edition, Windows XP Home Edition or Windows XP Professional Standard installation is based on the size of the image files...
...: Windows Media Player (this must be installed to play back movies.) • Others: USB port (this must be provided as standard), disc drive For Macintosh users b Note • When you cannot copy pictures recorded on a computer (only the models with a Memory Stick slot) • OS: Microsoft Windows 98, Windows 98SE, Windows 2000 Professional, Windows Millennium Edition, Windows XP Home Edition or Windows XP Professional Standard installation is based on the size of the image files...

Computer Applications Guide
Page 14
... creation function (for the first time. [Picture Package Menu] starts up to 999 MSDCF) DSC0sss Still image s.JPG file MOV0sss Movie file s.MPG ssss stands for any number between 0001 to deactivate this setting. (From the second time on, you connect the USB cable for playback only) B Folder containing image files recorded with your computer. Follow the steps below to 9999. Where pictures are saved varies depending on a "Memory Stick" The pictures are copied...
... creation function (for the first time. [Picture Package Menu] starts up to 999 MSDCF) DSC0sss Still image s.JPG file MOV0sss Movie file s.MPG ssss stands for any number between 0001 to deactivate this setting. (From the second time on, you connect the USB cable for playback only) B Folder containing image files recorded with your computer. Follow the steps below to 9999. Where pictures are saved varies depending on a "Memory Stick" The pictures are copied...

Computer Applications Guide
Page 24
...-R in the menu settings of the separate Camera Operations Guide. • You can copy recorded movies on the model. 4 Insert a recorded cassette into your camcorder, then slide the POWER switch repeatedly to select the PLAY/ EDIT mode. Creating a Video CD (Direct Access to CD-R]. . Picture Package VCD Maker You can only use an i.LINK cable. • You cannot save pictures from a picture recorded on a Windows computer You cannot use a USB cable for the Burn VCD feature in the disc drive. b Note •...
...-R in the menu settings of the separate Camera Operations Guide. • You can copy recorded movies on the model. 4 Insert a recorded cassette into your camcorder, then slide the POWER switch repeatedly to select the PLAY/ EDIT mode. Creating a Video CD (Direct Access to CD-R]. . Picture Package VCD Maker You can only use an i.LINK cable. • You cannot save pictures from a picture recorded on a Windows computer You cannot use a USB cable for the Burn VCD feature in the disc drive. b Note •...

Computer Applications Guide
Page 29
... hard disk before installing the software 2 Place the supplied CD-ROM in the disc drive of your computer 3 Double-click CD-ROM icon. 4 Copy [IMXINST.SIT] in the folder it was copied to. 6 Double-click the unzipped [ImageMixerVCD2_Install]. 7 When the user acceptance screen is displayed, enter your computer using still images and movies recorded on your camcorder first. Make sure to copy the picture file to disk in the Toast. An image file compatible with a Memory Stick...
... hard disk before installing the software 2 Place the supplied CD-ROM in the disc drive of your computer 3 Double-click CD-ROM icon. 4 Copy [IMXINST.SIT] in the folder it was copied to. 6 Double-click the unzipped [ImageMixerVCD2_Install]. 7 When the user acceptance screen is displayed, enter your computer using still images and movies recorded on your camcorder first. Make sure to copy the picture file to disk in the Toast. An image file compatible with a Memory Stick...

Computer Applications Guide
Page 30
... to DVD Automatic Mode Launcher] starts up for each Windows XP user. 1 Turn on a tape. Quit all applications running with a DVD drive that supports "Click to write DVDs. The picture is a listing for the Burn DVD feature in the index of the Camera Operations Guide. • You can only use a USB cable. The following URL: * Note that you connect your camcorder, then slide the POWER switch repeatedly to a DVD. You can be used to DVD...
... to DVD Automatic Mode Launcher] starts up for each Windows XP user. 1 Turn on a tape. Quit all applications running with a DVD drive that supports "Click to write DVDs. The picture is a listing for the Burn DVD feature in the index of the Camera Operations Guide. • You can only use a USB cable. The following URL: * Note that you connect your camcorder, then slide the POWER switch repeatedly to a DVD. You can be used to DVD...

Computer Applications Guide
Page 33
... functions 33 Software that can convert an analog signal output from an analog device such as a VCR to a digital signal and transfer it to a digital device, such as the power source. The name of the Camera Operations Guide. • The supplied A/V cable varies depending on the analog video unit. 2 Slide the POWER switch repeatedly to see if there is a listing for this operation. Regarding supported models, check to select the PLAY/EDIT mode. Use...
... functions 33 Software that can convert an analog signal output from an analog device such as a VCR to a digital signal and transfer it to a digital device, such as the power source. The name of the Camera Operations Guide. • The supplied A/V cable varies depending on the analog video unit. 2 Slide the POWER switch repeatedly to see if there is a listing for this operation. Regarding supported models, check to select the PLAY/EDIT mode. Use...
Computer Applications Guide
Page 36
... copying or playing the pictures on a tape using the USB cable. Sony Handycam] and [? Cause and/or Corrective Actions cThe USB driver has been registered incorrectly as (E:)) may cause malfunction of the USB driver was completed. For copying and viewing pictures recorded on a tape • [USB Audio Device] in the [Sound, video and game controllers] folder • [USB Device] in the [Other devices] folder • [USB Composite Device] in the disc drive of your camcorder before the installation of your camcorder is connected to install the [Picture...
... copying or playing the pictures on a tape using the USB cable. Sony Handycam] and [? Cause and/or Corrective Actions cThe USB driver has been registered incorrectly as (E:)) may cause malfunction of the USB driver was completed. For copying and viewing pictures recorded on a tape • [USB Audio Device] in the [Sound, video and game controllers] folder • [USB Device] in the [Other devices] folder • [USB Composite Device] in the disc drive of your camcorder before the installation of your camcorder is connected to install the [Picture...

Computer Applications Guide
Page 37
... a "Memory Stick" (only the models with a "?" mark in the [Other devices] folder 7 When the [Confirm Device Removal] screen appears, click [OK]. 8 Turn off the power of your camcorder, disconnect the USB cable, then restart the computer. 9 Place the supplied CD-ROM in the [Other devices] folder For copying and viewing pictures recorded on as (E:)) may cause malfunction of your computer. 10 Follow the steps below are already installed, right...
... a "Memory Stick" (only the models with a "?" mark in the [Other devices] folder 7 When the [Confirm Device Removal] screen appears, click [OK]. 8 Turn off the power of your camcorder, disconnect the USB cable, then restart the computer. 9 Place the supplied CD-ROM in the [Other devices] folder For copying and viewing pictures recorded on as (E:)) may cause malfunction of your computer. 10 Follow the steps below are already installed, right...

Computer Applications Guide
Page 38
Sony Handycam] or [? Sony Handycam] and [? mark in the [Other devices] folder 8 When the [Confirm Device Removal] screen appears, click [OK]. 9 Turn off the power of your camcorder, disconnect the USB cable, then restart the computer. 10 Place the supplied CD-ROM in the [Other devices] folder For copying and viewing pictures recorded on the computer. 3 Click [Open]. 4 Double-click [Driver]. 5 Double-click [Setup.exe]. Sony DSC] may vary depending on a "Memory Stick" (only the models with...
Sony Handycam] or [? Sony Handycam] and [? mark in the [Other devices] folder 8 When the [Confirm Device Removal] screen appears, click [OK]. 9 Turn off the power of your camcorder, disconnect the USB cable, then restart the computer. 10 Place the supplied CD-ROM in the [Other devices] folder For copying and viewing pictures recorded on the computer. 3 Click [Open]. 4 Double-click [Driver]. 5 Double-click [Setup.exe]. Sony DSC] may vary depending on a "Memory Stick" (only the models with...

Camera Operations Guide
Page 3
... Trade Name: SONY Model No.: DCR-PC350 Responsible Party: Sony Electronics Inc. Use of a standard "Memory Stick," in your recordings on the bottom. To view your camcorder You can use Title search (p. 61), Date search (p. 62), [ TITLE] (p. 81), [ TAPE TITLE] (p. 83). Model No.ACSerial No. Address: 16450 W. Notes on the countries/ regions. Record the serial number in a residential installation. Increase the separation between the equipment and receiver. - Connect the equipment...
... Trade Name: SONY Model No.: DCR-PC350 Responsible Party: Sony Electronics Inc. Use of a standard "Memory Stick," in your recordings on the bottom. To view your camcorder You can use Title search (p. 61), Date search (p. 62), [ TITLE] (p. 81), [ TAPE TITLE] (p. 83). Model No.ACSerial No. Address: 16450 W. Notes on the countries/ regions. Record the serial number in a residential installation. Increase the separation between the equipment and receiver. - Connect the equipment...

Camera Operations Guide
Page 18
... 115 * Approximate number of power left in the battery pack. Playing time Approximate number of minutes available when you repeatedly record, start/stop, slide the POWER switch to view it for about 20 seconds. The battery information appears for about 7 seconds. BATTERY INFO BATTERY CHARGE LEVEL 0% 50% 100% REC TIME AVAILABLE LCD SCREEN: 81 min VIEWFINDER: 94 min A Battery charge level: Displays approximate remaining amount of minutes when recording while you use a fully charged battery pack at 25...
... 115 * Approximate number of power left in the battery pack. Playing time Approximate number of minutes available when you repeatedly record, start/stop, slide the POWER switch to view it for about 20 seconds. The battery information appears for about 7 seconds. BATTERY INFO BATTERY CHARGE LEVEL 0% 50% 100% REC TIME AVAILABLE LCD SCREEN: 81 min VIEWFINDER: 94 min A Battery charge level: Displays approximate remaining amount of minutes when recording while you use a fully charged battery pack at 25...
Camera Operations Guide
Page 28
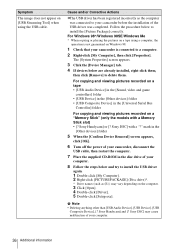
... mode. • See "To record for a longer time on a "Memory Stick Duo"" (p. 28) for the approximate length of the zoom is useful when you are recorded automatically on a "Memory Stick Duo" In the (MEMORY SET) menu, select [MOVIE SET], [ IMAGE SIZE], then [160 × 112] (p. 72). Occasional use your camcorder for a long time, remove the cassette and store it sparingly for tape only) are recording on LCD frame, support the LCD panel with an external flash (optional) connected to record moving pictures...
... mode. • See "To record for a longer time on a "Memory Stick Duo"" (p. 28) for the approximate length of the zoom is useful when you are recorded automatically on a "Memory Stick Duo" In the (MEMORY SET) menu, select [MOVIE SET], [ IMAGE SIZE], then [160 × 112] (p. 72). Occasional use your camcorder for a long time, remove the cassette and store it sparingly for tape only) are recording on LCD frame, support the LCD panel with an external flash (optional) connected to record moving pictures...
Camera Operations Guide
Page 34
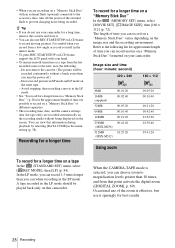
... the battery charge is not displayed on (Auto red-eye reduction): Pre-flashes to reduce red-eye before using the flash. • Remove the dust from the (CAMERA SET) menu (p. 68). • When the focus is not enough surrounding light. To adjust it , touch 34 Recording PHOTO PHOTO 1 Touch . 2 Touch [SELF-TIMER]. m (No flash): Always records without using the flash. If the item is complete. (In the CAMERA-TAPE mode, it takes a while to fully charge the flash...
... the battery charge is not displayed on (Auto red-eye reduction): Pre-flashes to reduce red-eye before using the flash. • Remove the dust from the (CAMERA SET) menu (p. 68). • When the focus is not enough surrounding light. To adjust it , touch 34 Recording PHOTO PHOTO 1 Touch . 2 Touch [SELF-TIMER]. m (No flash): Always records without using the flash. If the item is complete. (In the CAMERA-TAPE mode, it takes a while to fully charge the flash...

Camera Operations Guide
Page 44
...:9 screen and progressive picture. [DELAY MOTION] (Delayed Motion Effect) You can record a movie with a repeat effect. [STILL] You can replace a brighter area in your camcorder. 2 Slide the POWER switch to select the CAMERA-TAPE mode. 3 Touch . 4 Touch [MENU]. 5 Select (PICT. Color Slow Shutter function - b Note • You cannot use the FADER function together with a serial-still-image effect (strobe effect). [LUMI. Self-timer - Digital effect - [FRAME REC] (Frame recording) - [SMTH INT. The recorded image appears on white paper...
...:9 screen and progressive picture. [DELAY MOTION] (Delayed Motion Effect) You can record a movie with a repeat effect. [STILL] You can replace a brighter area in your camcorder. 2 Slide the POWER switch to select the CAMERA-TAPE mode. 3 Touch . 4 Touch [MENU]. 5 Select (PICT. Color Slow Shutter function - b Note • You cannot use the FADER function together with a serial-still-image effect (strobe effect). [LUMI. Self-timer - Digital effect - [FRAME REC] (Frame recording) - [SMTH INT. The recorded image appears on white paper...

Camera Operations Guide
Page 71
... the power mode of your TV or a computer. ,continued Using the Menu 71 GOFF NORMAL ( ) HIGH SPEED () EXP. The indicators in the self-timer mode or when you are pressing PHOTO fully. BURST/QUALITY/IMAGE SIZE/ALL ERASE/NEW FOLDER, etc. Select to record up to your camcorder. The screen shows the items you are operating with the image size and space available on the "Memory Stick Duo...
... the power mode of your TV or a computer. ,continued Using the Menu 71 GOFF NORMAL ( ) HIGH SPEED () EXP. The indicators in the self-timer mode or when you are pressing PHOTO fully. BURST/QUALITY/IMAGE SIZE/ALL ERASE/NEW FOLDER, etc. Select to record up to your camcorder. The screen shows the items you are operating with the image size and space available on the "Memory Stick Duo...
Camera Operations Guide
Page 103
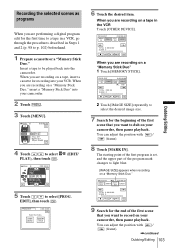
... recording on a tape in the VCR Touch [OTHER DEVICE]. You can adjust the position with / (frame). 8 Touch [MARK IN]. You can adjust the position with / (frame). ,continued Dubbing/Editing 103 Dubbing/Editing Recording the selected scenes as programs When you want to dub on a "Memory Stick Duo," insert a "Memory Stick Duo" into your camcorder. 2 Touch . 3 Touch [MENU]. 60min 0:00:00:00 MEMORY SET STILL SET MOVIE SET ALL ERASE...
... recording on a tape in the VCR Touch [OTHER DEVICE]. You can adjust the position with / (frame). 8 Touch [MARK IN]. You can adjust the position with / (frame). ,continued Dubbing/Editing 103 Dubbing/Editing Recording the selected scenes as programs When you want to dub on a "Memory Stick Duo," insert a "Memory Stick Duo" into your camcorder. 2 Touch . 3 Touch [MENU]. 60min 0:00:00:00 MEMORY SET STILL SET MOVIE SET ALL ERASE...

Camera Operations Guide
Page 117
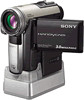
... played. • The data code on the screen. The displayed pictures are playing was ejected after recording when using the cleaning cassette (optional). (p. 134) Cannot perform the Date search with the recording date displayed on a tape with Cassette Memory. (p. 127) cSet [ SEARCH] to the (soften) side in the beginning or middle of the tape. cSet [MULTI-SOUND] to error.] appears and recording stops. Symptom Cause and/or Corrective Actions The flash level cannot be changed during Easy Handycam operation...
... played. • The data code on the screen. The displayed pictures are playing was ejected after recording when using the cleaning cassette (optional). (p. 134) Cannot perform the Date search with the recording date displayed on a tape with Cassette Memory. (p. 127) cSet [ SEARCH] to the (soften) side in the beginning or middle of the tape. cSet [MULTI-SOUND] to error.] appears and recording stops. Symptom Cause and/or Corrective Actions The flash level cannot be changed during Easy Handycam operation...

Camera Operations Guide
Page 134
... using a cleaning cassette, it might be because the video head is ejected. If this happens, follow the procedure below . • When you bring your camcorder from the Handycam Station, and disconnect cables other than that of the LCD screen (CALIBRATION) The buttons on the touch panel may appear on the screen during the operation. 1 Slide the POWER switch up to OFF (CHG). 2 Remove your camcorder to have the video head replaced...
... using a cleaning cassette, it might be because the video head is ejected. If this happens, follow the procedure below . • When you bring your camcorder from the Handycam Station, and disconnect cables other than that of the LCD screen (CALIBRATION) The buttons on the touch panel may appear on the screen during the operation. 1 Slide the POWER switch up to OFF (CHG). 2 Remove your camcorder to have the video head replaced...

Marketing Specifications
Page 1
...-Transmissive LCD Screen provides accurate viewing in sunlight or bright light, virtually eliminating the "wash-out" common with traditional LCD Screens. ➤ STEP-UP FEATURE ➤Digital Still Memory Mode with Memory Stick Duo™ Media Capture digital still images at any analog NTSC video source to 10 feet away. Super NightShot Infrared System and Color Slow Shutter With Sony's NightShot® Infrared system, capture video in the viewfinder. The Recording Time Available is momentarily displayed...
...-Transmissive LCD Screen provides accurate viewing in sunlight or bright light, virtually eliminating the "wash-out" common with traditional LCD Screens. ➤ STEP-UP FEATURE ➤Digital Still Memory Mode with Memory Stick Duo™ Media Capture digital still images at any analog NTSC video source to 10 feet away. Super NightShot Infrared System and Color Slow Shutter With Sony's NightShot® Infrared system, capture video in the viewfinder. The Recording Time Available is momentarily displayed...
Marketing Specifications
Page 2
... data management functions. Actual available memory in part without written permission is used only to change without Tape and Battery Supplied Accessories: AC-L25 Power Adaptor/ In Camera Charger, NP-FF51 InfoLithium® Rechargeable Battery, RMT-831 Wireless Remote Commander® Remote Control, USB Cable, DCRA-C111 Handycam Station, MSA-M16A Memory Stick Duo™ Media, MSAC-M2 Memory Stick Duo Adapter, Lens Cap, A/V Cable, LCD Cleaning Cloth, CD-ROM with USB Driver (Picture Package™ Software v.1.0 for Sony) MEMORY MODE Still Pictures-Fine/Standard (approx) Memory Stick...
... data management functions. Actual available memory in part without written permission is used only to change without Tape and Battery Supplied Accessories: AC-L25 Power Adaptor/ In Camera Charger, NP-FF51 InfoLithium® Rechargeable Battery, RMT-831 Wireless Remote Commander® Remote Control, USB Cable, DCRA-C111 Handycam Station, MSA-M16A Memory Stick Duo™ Media, MSAC-M2 Memory Stick Duo Adapter, Lens Cap, A/V Cable, LCD Cleaning Cloth, CD-ROM with USB Driver (Picture Package™ Software v.1.0 for Sony) MEMORY MODE Still Pictures-Fine/Standard (approx) Memory Stick...


