
Computer Applications Guide
Page 2
... Professional, Windows Millennium Edition, Windows XP Home Edition or Windows XP Professional Standard installation is required. You cannot hear sound if your camcorder to a Macintosh computer using ImageMixer VCD2 • OS: Mac OS X (v10.1.5 or later) Standard installation is required. You ...: QuickTime 4.0 or later (this must be installed to play back movies.) • Others: USB port (this must be provided as standard), DV Interface (IEEE1394, i.LINK) (to have DirectX installed.) Windows Media Player 7.0 or later Macromedia Flash Player 6.0 or later • Sound system:...
... Professional, Windows Millennium Edition, Windows XP Home Edition or Windows XP Professional Standard installation is required. You cannot hear sound if your camcorder to a Macintosh computer using ImageMixer VCD2 • OS: Mac OS X (v10.1.5 or later) Standard installation is required. You ...: QuickTime 4.0 or later (this must be installed to play back movies.) • Others: USB port (this must be provided as standard), DV Interface (IEEE1394, i.LINK) (to have DirectX installed.) Windows Media Player 7.0 or later Macromedia Flash Player 6.0 or later • Sound system:...

Computer Applications Guide
Page 15
... on all the recommended environments. Using the i.LINK cable (optional) to DV Interface to i.LINK (IEEE1394) connector i.LINK cable (optional) ,continued Connecting to a Windows computer task tray 2 Click [Safely remove Sony Camcorder] ([Unplug or eject hardware] in Windows 2000/Windows Me). If [USB... MODE] does not appear on the task tray. Recommended connection Connect as standard equipment, leave them connected and connect the camcorder to an available USB jack with...
... on all the recommended environments. Using the i.LINK cable (optional) to DV Interface to i.LINK (IEEE1394) connector i.LINK cable (optional) ,continued Connecting to a Windows computer task tray 2 Click [Safely remove Sony Camcorder] ([Unplug or eject hardware] in Windows 2000/Windows Me). If [USB... MODE] does not appear on the task tray. Recommended connection Connect as standard equipment, leave them connected and connect the camcorder to an available USB jack with...

Computer Applications Guide
Page 16
... location. To disconnect the i.LINK cable Turn off the power of the DV Interface varies depending on the model. For details on the Handycam Station. The location of the camcorder and disconnect the i.LINK cable from the camcorder and computer. 16 Connecting to a Windows computer z Tip • You...or the operating instructions of that can read video signals to the separate Camera Operations Guide supplied with the Handycam Station, connect the i.LINK cable to the DV Interface on the operation of other image editing software that software. Refer to edit the recorded pictures.
... location. To disconnect the i.LINK cable Turn off the power of the DV Interface varies depending on the model. For details on the Handycam Station. The location of the camcorder and disconnect the i.LINK cable from the camcorder and computer. 16 Connecting to a Windows computer z Tip • You...or the operating instructions of that can read video signals to the separate Camera Operations Guide supplied with the Handycam Station, connect the i.LINK cable to the DV Interface on the operation of other image editing software that software. Refer to edit the recorded pictures.

Computer Applications Guide
Page 30
... operation requirements, visit the following procedures describe how to see if there is a listing for your camcorder is set up . Korea http://scs.sony.co.kr/ - z Tips • After you need the computer with "Click to DV Interface b Notes • Some models are not compatible for this operation. Regarding supported models, check to...
... operation requirements, visit the following procedures describe how to see if there is a listing for your camcorder is set up . Korea http://scs.sony.co.kr/ - z Tips • After you need the computer with "Click to DV Interface b Notes • Some models are not compatible for this operation. Regarding supported models, check to...

Computer Applications Guide
Page 32
... • You may not be able to the computer. • The DVD is canceled. When [A/V t DV OUT] in a format other than Digital 8 format. 32 Other functions For SEL/PUSH EXEC dial models Press BURN DVD/VCD of your camcorder while [WRITING] or [CONVERTING] is displayed. • When any of the following situations: - b Notes...
... • You may not be able to the computer. • The DVD is canceled. When [A/V t DV OUT] in a format other than Digital 8 format. 32 Other functions For SEL/PUSH EXEC dial models Press BURN DVD/VCD of your camcorder while [WRITING] or [CONVERTING] is displayed. • When any of the following situations: - b Notes...

Computer Applications Guide
Page 33
...Other functions 33 Regarding supported models, check to see if there is a listing for this operation. Refer to a digital device, such as a computer, via your camcorder with the operations guide of the analog video unit You can capture video signals must be installed on the model. Software... signal output from an analog device such as the power source. Use the supplied AC Adaptor as a VCR to a digital signal and transfer it to the separate Camera Operations Guide supplied with your camcorder - Digital convert function DV Interface Other functions to select the PLAY/EDIT mode.
...Other functions 33 Regarding supported models, check to see if there is a listing for this operation. Refer to a digital device, such as a computer, via your camcorder with the operations guide of the analog video unit You can capture video signals must be installed on the model. Software... signal output from an analog device such as the power source. Use the supplied AC Adaptor as a VCR to a digital signal and transfer it to the separate Camera Operations Guide supplied with your camcorder - Digital convert function DV Interface Other functions to select the PLAY/EDIT mode.

Camera Operations Guide
Page 3
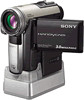
...and (2) this product, you can use in order to comply with the limits for a Class B digital device, pursuant to the copyright laws. ,continued 3 Increase the separation between the equipment and receiver....DCR-PC350 is indicated on the DV format. b Note: This equipment has been tested and found to comply with the limits for the FCC related matters only. The mark is to radio communications. To view your camcorder You can use Note on a TV, you call : Sony...the U.S.A. Use of mini DV cassettes with Handycam Station Model DCRA-C111 and AC Power Adaptor Model AC-L25A/L25B.
...and (2) this product, you can use in order to comply with the limits for a Class B digital device, pursuant to the copyright laws. ,continued 3 Increase the separation between the equipment and receiver....DCR-PC350 is indicated on the DV format. b Note: This equipment has been tested and found to comply with the limits for the FCC related matters only. The mark is to radio communications. To view your camcorder You can use Note on a TV, you call : Sony...the U.S.A. Use of mini DV cassettes with Handycam Station Model DCRA-C111 and AC Power Adaptor Model AC-L25A/L25B.

Camera Operations Guide
Page 22
...cassette with / , then touch . OPEN/EJECT lever Lid The cassette compartment automatically comes out and opens up . This may cause a malfunction of your camcorder. 1 Slide the OPEN/EJECT lever in the same way as write- For midnight, set it to move. b Note • Do not force ... compartment. CLOCK SET -:--:-- protection), see page 127. 4 Touch [MENU]. 60min -:--:-- DATE 2004Y JAN M 1D 12: 00 AM OK You can use mini DV cassettes only. CAMERA SET PROGRAM AE SPOT METER EXPOSURE OK 5 Select (TIME/LANGU.) with / , then touch . DATE 2004 Y JAN M 1D 12:...
...cassette with / , then touch . OPEN/EJECT lever Lid The cassette compartment automatically comes out and opens up . This may cause a malfunction of your camcorder. 1 Slide the OPEN/EJECT lever in the same way as write- For midnight, set it to move. b Note • Do not force ... compartment. CLOCK SET -:--:-- protection), see page 127. 4 Touch [MENU]. 60min -:--:-- DATE 2004Y JAN M 1D 12: 00 AM OK You can use mini DV cassettes only. CAMERA SET PROGRAM AE SPOT METER EXPOSURE OK 5 Select (TIME/LANGU.) with / , then touch . DATE 2004 Y JAN M 1D 12:...

Camera Operations Guide
Page 52
...] effects when viewing recorded pictures. z Tip • You cannot copy a picture played back with effects added to a tape with Digital effects via the DV Interface. Also, you cannot output pictures edited with your camcorder, but you want to add the effect to 4, then select [OFF] in other than [DELAY MOTION] on each effect...
...] effects when viewing recorded pictures. z Tip • You cannot copy a picture played back with effects added to a tape with Digital effects via the DV Interface. Also, you cannot output pictures edited with your camcorder, but you want to add the effect to 4, then select [OFF] in other than [DELAY MOTION] on each effect...

Camera Operations Guide
Page 57
....APPLI.), then [PB ZOOM] by touching / and touch . You can also display the recorded date and the name of the folder in your camcorder. • You cannot magnify externally input pictures. Power zoom lever POWER switch Zoom buttons on the screen. Tape playback zoom/Memory playback zoom You can... centered at the point you touched on the screen. When you touch another place, the point you cannot output the magnified pictures via the DV Interface. ,continued Playback 57 Also, you touched becomes the center. 6 Adjust the zoom ratio using the power zoom lever. You can select...
....APPLI.), then [PB ZOOM] by touching / and touch . You can also display the recorded date and the name of the folder in your camcorder. • You cannot magnify externally input pictures. Power zoom lever POWER switch Zoom buttons on the screen. Tape playback zoom/Memory playback zoom You can... centered at the point you touched on the screen. When you touch another place, the point you cannot output the magnified pictures via the DV Interface. ,continued Playback 57 Also, you touched becomes the center. 6 Adjust the zoom ratio using the power zoom lever. You can select...
Camera Operations Guide
Page 60
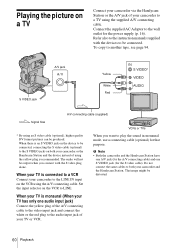
... to the audio input jack of your TV or VCR. 60 Playback Playing the picture on a TV Connect your camcorder via the Handycam Station or the A/V jack of your camcorder to another tape, see page 94. The image might be output when you want to the wall outlet for the... the device instead of using the A/V connecting cable. b Note • Both the camcorder and the Handycam Station have one A/V jack (for the power supply (p. 16). To copy to a TV using an S video cable (optional), higher quality DV format pictures can be connected. A/V jack S VIDEO jack IN Yellow White Red A/V ...
... to the audio input jack of your TV or VCR. 60 Playback Playing the picture on a TV Connect your camcorder via the Handycam Station or the A/V jack of your camcorder to another tape, see page 94. The image might be output when you want to the wall outlet for the... the device instead of using the A/V connecting cable. b Note • Both the camcorder and the Handycam Station have one A/V jack (for the power supply (p. 16). To copy to a TV using an S video cable (optional), higher quality DV format pictures can be connected. A/V jack S VIDEO jack IN Yellow White Red A/V ...
Camera Operations Guide
Page 76
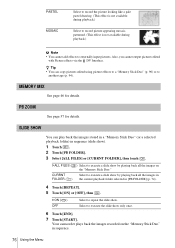
...playing back all the images on the "Memory Stick Duo" in [PB FOLDER] (p. 74). 4 Touch [REPEAT]. 5 Touch [ON] or [OFF], then . Your camcorder plays back the images recorded on the "Memory Stick Duo." Select to repeat the slide show only once. 6 Touch [END]. 7 Touch [START]. PB ZOOM See... page 57 for details. Select to another tape (p. 94). Also, you cannot output pictures edited with Picture effects via the DV Interface. SLIDE SHOW You can copy pictures edited using picture effects to a "Memory Stick Duo" (p. 96) or to execute the slide show . MEMORY...
...playing back all the images on the "Memory Stick Duo" in [PB FOLDER] (p. 74). 4 Touch [REPEAT]. 5 Touch [ON] or [OFF], then . Your camcorder plays back the images recorded on the "Memory Stick Duo." Select to repeat the slide show only once. 6 Touch [END]. 7 Touch [START]. PB ZOOM See... page 57 for details. Select to another tape (p. 94). Also, you cannot output pictures edited with Picture effects via the DV Interface. SLIDE SHOW You can copy pictures edited using picture effects to a "Memory Stick Duo" (p. 96) or to execute the slide show . MEMORY...

Camera Operations Guide
Page 84
... cannot add sound on the tape recorded in the LP mode. • If you record in the LP mode on the power mode of Sony Excellence/Master mini DV cassette is selected. MULTI-SOUND You can select how to play back a stereo tape with the left channel sound or a dual sound track..., see "Selecting menu items" (p. 63). The default settings are marked with sub sound. 84 Using the Menu Select to play back the tape on other camcorders or VCRs. • When you can select the items listed below on the STANDARD SET menu. Unavailable items will be interrupted when you play back...
... cannot add sound on the tape recorded in the LP mode. • If you record in the LP mode on the power mode of Sony Excellence/Master mini DV cassette is selected. MULTI-SOUND You can select how to play back a stereo tape with the left channel sound or a dual sound track..., see "Selecting menu items" (p. 63). The default settings are marked with sub sound. 84 Using the Menu Select to play back the tape on other camcorders or VCRs. • When you can select the items listed below on the STANDARD SET menu. Unavailable items will be interrupted when you play back...
Camera Operations Guide
Page 86
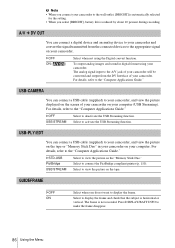
... frame disappear. 86 Using the Menu A/V c DV OUT You can connect a digital device and an analog device to your camcorder and convert the signal transmitted from the connected devices to the A/V jack of your camcorder will be converted and output from the DV Interface of your camcorder on your camcorder. USB-CAMERA You can connect a USB cable...
... frame disappear. 86 Using the Menu A/V c DV OUT You can connect a digital device and an analog device to your camcorder and convert the signal transmitted from the connected devices to the A/V jack of your camcorder will be converted and output from the DV Interface of your camcorder on your camcorder. USB-CAMERA You can connect a USB cable...

Camera Operations Guide
Page 93
... and the red (right channel) or the white (left channel) plug to the audio jack on the VCR or the TV. • Both the camcorder and the Handycam Station have one A/V jack (for the A/V connecting cable) and one S VIDEO jack (for the S video cable). The audio will not be output...) White Red VCRs or TVs * By using an S video cable (optional), higher quality DV format pictures can be connected, connecting the S video cable (optional) to the S VIDEO jacks on both your camcorder or the Handycam Station and the device instead of using the supplied AC Adaptor during the operation. You can...
... and the red (right channel) or the white (left channel) plug to the audio jack on the VCR or the TV. • Both the camcorder and the Handycam Station have one A/V jack (for the A/V connecting cable) and one S VIDEO jack (for the S video cable). The audio will not be output...) White Red VCRs or TVs * By using an S video cable (optional), higher quality DV format pictures can be connected, connecting the S video cable (optional) to the S VIDEO jacks on both your camcorder or the Handycam Station and the device instead of using the supplied AC Adaptor during the operation. You can...

Camera Operations Guide
Page 94
...VCR has an input selector, set it to the input mode. 3 Prepare your camcorder, and record it on your camcorder for details. 5 When the dubbing is connected to the VCR via the DV Interface, you cannot record the picture and sound separately. Refer to the operating instructions ... VCR. The image might be output via the DV Interface. connect the same cables to both your camcorder and the VCR. For details, see page 132. b Note • When your camcorder is finished, stop your camcorder and the Handycam Station. EFFECT] p. 75), Digital effect (p. 44, 52), or Playback zoom (p....
...VCR has an input selector, set it to the input mode. 3 Prepare your camcorder, and record it on your camcorder for details. 5 When the dubbing is connected to the VCR via the DV Interface, you cannot record the picture and sound separately. Refer to the operating instructions ... VCR. The image might be output via the DV Interface. connect the same cables to both your camcorder and the VCR. For details, see page 132. b Note • When your camcorder is finished, stop your camcorder and the Handycam Station. EFFECT] p. 75), Digital effect (p. 44, 52), or Playback zoom (p....

Camera Operations Guide
Page 120
... signal has been interrupted or cut. cEnter a title if there is not a Sony product via an i.LINK cable, select [IR] in the beginning or middle of "Step 1: Preparing your camcorder and the Handycam Station. Digital program editing on the tape. • You cannot record or a distorted picture ...may be recorded if the tape has tape to a DV device that does not support [IR SETUP] codes, a DVD recorder...
... signal has been interrupted or cut. cEnter a title if there is not a Sony product via an i.LINK cable, select [IR] in the beginning or middle of "Step 1: Preparing your camcorder and the Handycam Station. Digital program editing on the tape. • You cannot record or a distorted picture ...may be recorded if the tape has tape to a DV device that does not support [IR SETUP] codes, a DVD recorder...

Camera Operations Guide
Page 127
... used EDIT SEARCH. You have ejected the cassette during recording. - When you record using a digital video camera recorder that contains copyright control signals for use on your camcorder that does not support Cassette Memory, on a tape already recorded on using the Cassette Memory require... successive signals recorded on use the mini DV format cassette only. Cassettes with the mark. If there...
... used EDIT SEARCH. You have ejected the cassette during recording. - When you record using a digital video camera recorder that contains copyright control signals for use on your camcorder that does not support Cassette Memory, on a tape already recorded on using the Cassette Memory require... successive signals recorded on use the mini DV format cassette only. Cassettes with the mark. If there...

Camera Operations Guide
Page 136
...Quantization: 12 bits (Fs 32 kHz, stereo 1, stereo 2), 16 bits (Fs 48 kHz, stereo) Video signal NTSC color, EIA standards Usable cassette Mini DV cassette with the mark printed Tape speed SP: Approx. 18.81 mm/s LP: Approx. 12.56 mm/s Recording/playback time (using a DVM60 cassette) ...Carl Zeiss Vario-Sonnar T* Combined power zoom lens Filter diameter: 30 mm (1 3/16 in this format can have additional information such as your camcorder's setting information at the time of the finder lens block using a screwdriver. 2Remove the finder lens block. 3 Remove dust from the finder lens...
...Quantization: 12 bits (Fs 32 kHz, stereo 1, stereo 2), 16 bits (Fs 48 kHz, stereo) Video signal NTSC color, EIA standards Usable cassette Mini DV cassette with the mark printed Tape speed SP: Approx. 18.81 mm/s LP: Approx. 12.56 mm/s Recording/playback time (using a DVM60 cassette) ...Carl Zeiss Vario-Sonnar T* Combined power zoom lens Filter diameter: 30 mm (1 3/16 in this format can have additional information such as your camcorder's setting information at the time of the finder lens block using a screwdriver. 2Remove the finder lens block. 3 Remove dust from the finder lens...

Camera Operations Guide
Page 143
b Note • The Strap Belt may detach accidentally if not attached properly. To attach the Strap Belt Insert the Strap Belt attachment to use the USB connection. C A/V jack (p. 60, 93, 105) D S VIDEO jack E DC IN jack (p. 16) F DV Interface jack (p. 93) G (USB) jack 3 4 5 6 7 Quick Reference 143 z Tip • The length of the Strap Belt is adjustable. (p. 4) Quick Reference Handycam Station 1 2 A Interface connector B (USB) ON/OFF switch Set the (USB) ON/OFF switch to ON to your camcorder and move it in the direction of the arrow until it clicks and is locked.
b Note • The Strap Belt may detach accidentally if not attached properly. To attach the Strap Belt Insert the Strap Belt attachment to use the USB connection. C A/V jack (p. 60, 93, 105) D S VIDEO jack E DC IN jack (p. 16) F DV Interface jack (p. 93) G (USB) jack 3 4 5 6 7 Quick Reference 143 z Tip • The length of the Strap Belt is adjustable. (p. 4) Quick Reference Handycam Station 1 2 A Interface connector B (USB) ON/OFF switch Set the (USB) ON/OFF switch to ON to your camcorder and move it in the direction of the arrow until it clicks and is locked.


