
Operating Instructions
Page 10
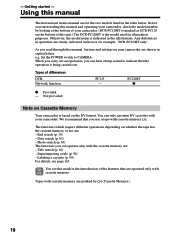
... (DCR-PC120BT is the model used for illustration purposes. e.g. When you carry out an operation, you use mini DV cassettes with the cassette memory are marked by looking at the bottom of this manual are : - We recommend that you can hear a beep sound to CAMERA. You...has the cassette memory or not are for example, "DCR-PC120BT only". As you can only use a tape with cassette memory . PC120BT z z Provided - Using this manual The instructions in the introduction of differences DCRNetwork function PC115 - Tapes with cassette memory. Set the POWER switch ...
... (DCR-PC120BT is the model used for illustration purposes. e.g. When you carry out an operation, you use mini DV cassettes with the cassette memory are marked by looking at the bottom of this manual are : - We recommend that you can hear a beep sound to CAMERA. You...has the cassette memory or not are for example, "DCR-PC120BT only". As you can only use a tape with cassette memory . PC120BT z z Provided - Using this manual The instructions in the introduction of differences DCRNetwork function PC115 - Tapes with cassette memory. Set the POWER switch ...

Operating Instructions
Page 34
... N. This is muted. •The previous picture may appear at the center, or the top and bottom of the recorded portion plays back and stops. To search the last scene recorded (END SEARCH) Press END SEARCH in reverse Horizontal noise may remain as a mosaic image during playback. However, this function...the playback pause mode. When you play back a tape in the stop mode. When the playback pause mode lasts for an output signal through the DV jack. For frame-by -frame Press C on your camcorder. Playing back a tape To view the picture frame-by -frame playback in the reverse ...
... N. This is muted. •The previous picture may appear at the center, or the top and bottom of the recorded portion plays back and stops. To search the last scene recorded (END SEARCH) Press END SEARCH in reverse Horizontal noise may remain as a mosaic image during playback. However, this function...the playback pause mode. When you play back a tape in the stop mode. When the playback pause mode lasts for an output signal through the DV jack. For frame-by -frame Press C on your camcorder. Playing back a tape To view the picture frame-by -frame playback in the reverse ...

Operating Instructions
Page 35
...more faithfully by using the A/V connecting cable supplied with your TV. AUDIO/VIDEO Playback - Viewing the recording on TV Connect your camcorder to your TV with the A/V connecting cable supplied with your camcorder to the S video jacks on both your camcorder and the TV. Open the jack cover.... the A/V connecting cable. Then, set the TV/VCR selector on TV Set DISPLAY to connect the yellow (video) plug of your camcorder. This connection produces higher quality DV format pictures. Then press DISPLAY on the screen. Refer to VCR. If you monitor playback pictures on your ...
...more faithfully by using the A/V connecting cable supplied with your TV. AUDIO/VIDEO Playback - Viewing the recording on TV Connect your camcorder to your TV with the A/V connecting cable supplied with your camcorder to the S video jacks on both your camcorder and the TV. Open the jack cover.... the A/V connecting cable. Then, set the TV/VCR selector on TV Set DISPLAY to connect the yellow (video) plug of your camcorder. This connection produces higher quality DV format pictures. Then press DISPLAY on the screen. Refer to VCR. If you monitor playback pictures on your ...

Operating Instructions
Page 58
... you set the POWER switch to OFF in with picture effects During playback, you can process a scene using the picture effect function. However, you can record images on a "Memory Stick" (p. 118, 128), or on your camcorder as a player. AR T SEP I A B&W SOLAR I ZE [ MENU ] : END MENU To cancel the ...is automatically canceled. 58 Pictures processed by the picture effect function Pictures processed by the picture effect function are not output through the DV jack. Playing back a tape with the control button (p. 96). (2) Select and decide upon P EFFECT in the menu settings.
... you set the POWER switch to OFF in with picture effects During playback, you can process a scene using the picture effect function. However, you can record images on a "Memory Stick" (p. 118, 128), or on your camcorder as a player. AR T SEP I A B&W SOLAR I ZE [ MENU ] : END MENU To cancel the ...is automatically canceled. 58 Pictures processed by the picture effect function Pictures processed by the picture effect function are not output through the DV jack. Playing back a tape with the control button (p. 96). (2) Select and decide upon P EFFECT in the menu settings.
Operating Instructions
Page 59
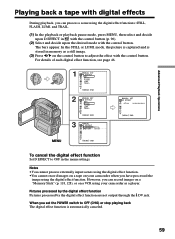
... have processed the image using the digital effect functions: STILL, FLASH, LUMI. Pictures processed by the digital effect function Pictures processed by the digital effect function are not output through the DV jack. Notes •You cannot process externally input scenes using the digital effect function. •You cannot record images on a tape on a VCR using...
... have processed the image using the digital effect functions: STILL, FLASH, LUMI. Pictures processed by the digital effect function Pictures processed by the digital effect function are not output through the DV jack. Notes •You cannot process externally input scenes using the digital effect function. •You cannot record images on a tape on a VCR using...

Operating Instructions
Page 60
... your camcorder. The PB ZOOM function is enlarged to twice its size. The image moves in the PB ZOOM mode are not output through the DV jack. 60 Tape PB ZOOM You can enlarge the image from 1.1 times up to five times its size. (2) Press the control button to ...function with your camcorder when you operate the following functions: - Images in the PB ZOOM Images in the same direction as a player. •You cannot record moving pictures on a "Memory Stick" on your camcorder as the control button setting. (3) Adjust the zoom ratio by the power zoom lever. T: Increases the...
... your camcorder. The PB ZOOM function is enlarged to twice its size. The image moves in the PB ZOOM mode are not output through the DV jack. 60 Tape PB ZOOM You can enlarge the image from 1.1 times up to five times its size. (2) Press the control button to ...function with your camcorder when you operate the following functions: - Images in the PB ZOOM Images in the same direction as a player. •You cannot record moving pictures on a "Memory Stick" on your camcorder as the control button setting. (3) Adjust the zoom ratio by the power zoom lever. T: Increases the...

Operating Instructions
Page 67
...ED Betamax, mini DV, DV, Digital8 If your camcorder. DISPLAY - SEARCH MODE on the Remote Commander (1) Insert a blank tape (or a tape you have finished dubbing a tape Press x on the Remote Commander - Editing S VIDEO AUDIO/VIDEO : Signal flow IN S VIDEO VIDEO AUDIO When you want to record over) into ...the VCR, and insert the recorded tape into your camcorder. (2) Prepare the VCR for recording, then set the input selector to make the indicator...
...ED Betamax, mini DV, DV, Digital8 If your camcorder. DISPLAY - SEARCH MODE on the Remote Commander (1) Insert a blank tape (or a tape you have finished dubbing a tape Press x on the Remote Commander - Editing S VIDEO AUDIO/VIDEO : Signal flow IN S VIDEO VIDEO AUDIO When you want to record over) into ...the VCR, and insert the recorded tape into your camcorder. (2) Prepare the VCR for recording, then set the input selector to make the indicator...

Operating Instructions
Page 68
This connection produces higher quality DV format pictures. Refer to LINE. If you want to record over) into the VCR, and insert the recorded tape into your camcorder. (2) Prepare the VCR for recording. With a digital-to the S video jacks of the VCR. Set the input selector to the operating instructions of both your camcorder and the VCR...
This connection produces higher quality DV format pictures. Refer to LINE. If you want to record over) into the VCR, and insert the recorded tape into your camcorder. (2) Prepare the VCR for recording. With a digital-to the S video jacks of the VCR. Set the input selector to the operating instructions of both your camcorder and the VCR...

Operating Instructions
Page 69
... Unwanted scene Switch the order Editing Before operating the Digital program editing on tapes recorded on tapes, the operation signals cannot be sent with an i.LINK cable (DV connecting cable), you connect with LANC. Step 3 Adjusting the synchronization of your camcorder. •When editing digital video on other equipment Operation 1 Making the program (p. 77). Operation...
... Unwanted scene Switch the order Editing Before operating the Digital program editing on tapes recorded on tapes, the operation signals cannot be sent with an i.LINK cable (DV connecting cable), you connect with LANC. Step 3 Adjusting the synchronization of your camcorder. •When editing digital video on other equipment Operation 1 Making the program (p. 77). Operation...

Operating Instructions
Page 74
When you connect a digital video camera recorder, set its power switch to VCR/VTR. (3) Press MENU, then select and decide upon VIDEO EDIT in with the control button (p. 96). (4) Select and decide upon TAPE with the control button. (5) Select and decide upon EDIT SET with ... control button. (6) Select and decide upon CONTROL with the control button. (7) Select and decide upon i.LINK with the i.LINK cable (DV connecting cable) When you connect using i.LINK cable (DV connecting cable) (optional), follow the procedure below. (1) Set the POWER switch to VCR on your camcorder. (2) Turn the power of...
When you connect a digital video camera recorder, set its power switch to VCR/VTR. (3) Press MENU, then select and decide upon VIDEO EDIT in with the control button (p. 96). (4) Select and decide upon TAPE with the control button. (5) Select and decide upon EDIT SET with ... control button. (6) Select and decide upon CONTROL with the control button. (7) Select and decide upon i.LINK with the i.LINK cable (DV connecting cable) When you connect using i.LINK cable (DV connecting cable) (optional), follow the procedure below. (1) Set the POWER switch to VCR on your camcorder. (2) Turn the power of...

Operating Instructions
Page 76
... AD J TEST EXECUT I T SET CONTROL ADJ TEST " CUT- Video and audio are sent by the i.LINK cable (DV connecting cable), leave the connection as it is recorded for about 10 seconds' lead before starting recording. •When the recording unit cannot be operated properly by digital signals. 76 Digital program editing (on tapes) 3,4 V I DEO ED I T 0:08:55...
... AD J TEST EXECUT I T SET CONTROL ADJ TEST " CUT- Video and audio are sent by the i.LINK cable (DV connecting cable), leave the connection as it is recorded for about 10 seconds' lead before starting recording. •When the recording unit cannot be operated properly by digital signals. 76 Digital program editing (on tapes) 3,4 V I DEO ED I T 0:08:55...

Operating Instructions
Page 79
... scenes - To end the Digital program editing function Your camcorder stops when the dubbing ends. Search for the beginning of the connected VCR is set i.LINK). 79 NOT READY appears on the screen. i.LINK is selected but an i.LINK cable (DV connecting cable) is selected). ... correct (when IR is set its power switch to end the program editing function. You cannot record on the cassette is selected). Digital program editing (on (when you use a digital video camera recorder, set to recording pause. The write-protect tab on the VCR when: - To stop . Press MENU to VCR...
... scenes - To end the Digital program editing function Your camcorder stops when the dubbing ends. Search for the beginning of the connected VCR is set i.LINK). 79 NOT READY appears on the screen. i.LINK is selected but an i.LINK cable (DV connecting cable) is selected). ... correct (when IR is set its power switch to end the program editing function. You cannot record on the cassette is selected). Digital program editing (on (when you use a digital video camera recorder, set to recording pause. The write-protect tab on the VCR when: - To stop . Press MENU to VCR...
Operating Instructions
Page 80
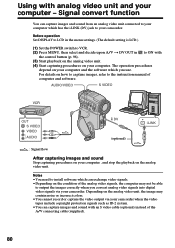
...DV) jack to the instruction manual of computer and software. For details on how to capture images, refer to your computer. Notes • You need to install software which you convert analog video signals into digital video signals via your computer - Using with analog video...an S video cable (optional) instead of the analog video signals, the computer may contain noise or incorrect colors. • You cannot record or capture the video output via your computer , and stop the playback on the analog video unit. AUDIO/VIDEO S VIDEO OUT S VIDEO VIDEO AUDIO DV (optional) ...
...DV) jack to the instruction manual of computer and software. For details on how to capture images, refer to your computer. Notes • You need to install software which you convert analog video signals into digital video signals via your computer - Using with analog video...an S video cable (optional) instead of the analog video signals, the computer may contain noise or incorrect colors. • You cannot record or capture the video output via your computer , and stop the playback on the analog video unit. AUDIO/VIDEO S VIDEO OUT S VIDEO VIDEO AUDIO DV (optional) ...

Operating Instructions
Page 82
... the TV or VCR. Recording video or TV programs If your TV or VCR has an S video jack Pictures can be recorded appears on the screen. (5) Press X on your camcorder at the scene where you want to record over) into your camcorder, and insert the recorded tape into the VCR. ... Commander modes 1, 2 and 3 are transmitted in digital form for high-quality editing. (1) Insert a blank tape (or a tape you want to start playback. Note on the VCR to start recording from other Sony VCRs to DV jack of your camcorder from . 3 REC PAUSE DV DV DV OUT (optional) : Signal flow 82 Using the...
... the TV or VCR. Recording video or TV programs If your TV or VCR has an S video jack Pictures can be recorded appears on the screen. (5) Press X on your camcorder at the scene where you want to record over) into your camcorder, and insert the recorded tape into the VCR. ... Commander modes 1, 2 and 3 are transmitted in digital form for high-quality editing. (1) Insert a blank tape (or a tape you want to start playback. Note on the VCR to start recording from other Sony VCRs to DV jack of your camcorder from . 3 REC PAUSE DV DV DV OUT (optional) : Signal flow 82 Using the...

Operating Instructions
Page 83
...using the i.LINK cable (DV connecting cable) During digital editing The color of the VCR with the DV jack The recorded picture becomes rough. However, this does not affect the dubbed picture. If you use another Sony VCR in the commander mode VTR 2. If you record playback pause picture with black ... VCR only using your camcorder, the picture may be uneven. Editing Recording video or TV programs When you have finished dubbing a tape Press x on the screen. Note on both your camcorder from other Sony VCRs to start recording from. And in step 5, press X at the scene where you...
...using the i.LINK cable (DV connecting cable) During digital editing The color of the VCR with the DV jack The recorded picture becomes rough. However, this does not affect the dubbed picture. If you use another Sony VCR in the commander mode VTR 2. If you record playback pause picture with black ... VCR only using your camcorder, the picture may be uneven. Editing Recording video or TV programs When you have finished dubbing a tape Press x on the screen. Note on both your camcorder from other Sony VCRs to start recording from. And in step 5, press X at the scene where you...

Operating Instructions
Page 89
... where ZERO SET MEMORY was pressed. 89 If you add new sound on a tape recorded with the DV jack. •You cannot add audio on the blank portion of the tape to a recorded tape. To add new sound more precisely Press ZERO SET MEMORY on a tape. Editing...sound cannot be recorded on a tape already recorded in the playback mode. If an i.LINK cable (DV connecting cable) (optional) is connected to stop recording later in the LP mode. •You cannot add audio with another camcorder (including other DCR-PC115/PC120BT), the sound quality may become worse. Recording automatically stops at...
... where ZERO SET MEMORY was pressed. 89 If you add new sound on a tape recorded with the DV jack. •You cannot add audio on the blank portion of the tape to a recorded tape. To add new sound more precisely Press ZERO SET MEMORY on a tape. Editing...sound cannot be recorded on a tape already recorded in the playback mode. If an i.LINK cable (DV connecting cable) (optional) is connected to stop recording later in the LP mode. •You cannot add audio with another camcorder (including other DCR-PC115/PC120BT), the sound quality may become worse. Recording automatically stops at...

Operating Instructions
Page 91
... point you superimposed the title may not be displayed correctly. The titles superimposed with your camcorder •They are displayed by only the DV format video equipment with five characters each. If the tape has too many index signals You may be detected as follows: - 6 date data ...- 12 photo data - 1 cassette label If the " FULL" mark appears The cassette memory is as an index signal when searching a recording with other video equipment. Title setting •The title color changes as follows: WHITE y YELLOW y VIOLET y RED y CYAN y GREEN y BLUE •The title size...
... point you superimposed the title may not be displayed correctly. The titles superimposed with your camcorder •They are displayed by only the DV format video equipment with five characters each. If the tape has too many index signals You may be detected as follows: - 6 date data ...- 12 photo data - 1 cassette label If the " FULL" mark appears The cassette memory is as an index signal when searching a recording with other video equipment. Title setting •The title color changes as follows: WHITE y YELLOW y VIOLET y RED y CYAN y GREEN y BLUE •The title size...

Operating Instructions
Page 119
... Pictures can be reproduced more faithfully by using an S video cable (optional). If your camcorder and the TV or VCR. This connection produces higher quality DV format pictures. 119 Recording an image from a tape as a still image Sound recorded on a tape You cannot record the audio from other equipment is displayed on the LCD screen...
... Pictures can be reproduced more faithfully by using an S video cable (optional). If your camcorder and the TV or VCR. This connection produces higher quality DV format pictures. 119 Recording an image from a tape as a still image Sound recorded on a tape You cannot record the audio from other equipment is displayed on the LCD screen...

Operating Instructions
Page 120
When recording on a tape in use 120 When attempting to input images that are distorted due to poor radio wave reception when a TV tuner unit is in a poor recording state, for example, on a tape that has been repeatedly used for dubbing - If this happens, eject and insert "Memory Stick" again, and record distortion-free images. - Recording an image from a tape as a still image Using the i.LINK cable (DV connecting cable) DV DV OUT DV (optional) : Signal flow Note The " " may flash in the following instances.
When recording on a tape in use 120 When attempting to input images that are distorted due to poor radio wave reception when a TV tuner unit is in a poor recording state, for example, on a tape that has been repeatedly used for dubbing - If this happens, eject and insert "Memory Stick" again, and record distortion-free images. - Recording an image from a tape as a still image Using the i.LINK cable (DV connecting cable) DV DV OUT DV (optional) : Signal flow Note The " " may flash in the following instances.

Operating Instructions
Page 130
... the desired program. This connection produces higher quality DV format pictures. 130 Recording a picture from a tape as a moving picture Recording a moving picture from . Connect an S video cable (optional) to connect the yellow (video) plug of the A/V connecting cable. Using the A/V connecting cable S VIDEO OUT S VIDEO VIDEO AUDIO : Signal flow AUDIO/ VIDEO Connect the yellow plug of both your TV...
... the desired program. This connection produces higher quality DV format pictures. 130 Recording a picture from a tape as a moving picture Recording a moving picture from . Connect an S video cable (optional) to connect the yellow (video) plug of the A/V connecting cable. Using the A/V connecting cable S VIDEO OUT S VIDEO VIDEO AUDIO : Signal flow AUDIO/ VIDEO Connect the yellow plug of both your TV...

