MovieShaker v3.1 Operating Instructions
Page 8
... time-consuming. • RealProducer 8.5 Basic is a CD disc. • Running MovieShaker with MICROMV devices (Be sure to read this.)" of the computer settings. To reduce the occurrence of this case, exit MovieShaker and stop using an i.LINK or USB cable may occur if a heavy load is time-consuming to complete. Check the remaining...
... time-consuming. • RealProducer 8.5 Basic is a CD disc. • Running MovieShaker with MICROMV devices (Be sure to read this.)" of the computer settings. To reduce the occurrence of this case, exit MovieShaker and stop using an i.LINK or USB cable may occur if a heavy load is time-consuming to complete. Check the remaining...
Computer Applications Guide
Page 2
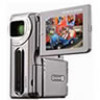
... Hard disk: Available memory required for Sony When viewing pictures recorded on a tape on a computer b Note • When you connect your camcorder is necessary to a computer (Windows ... DirectX 8.0a or later (This product is based on a tape or "Memory Stick" using a USB cable, you need a CD-R drive to create a Video CD.) 2 The software used differs depending on...or less.) • Others: USB port (this first • For camera operations, read the separate Camera Operations Guide supplied with your camcorder. • If your camcorder is a MICROMV format model • When editing...
... Hard disk: Available memory required for Sony When viewing pictures recorded on a tape on a computer b Note • When you connect your camcorder is necessary to a computer (Windows ... DirectX 8.0a or later (This product is based on a tape or "Memory Stick" using a USB cable, you need a CD-R drive to create a Video CD.) 2 The software used differs depending on...or less.) • Others: USB port (this first • For camera operations, read the separate Camera Operations Guide supplied with your camcorder. • If your camcorder is a MICROMV format model • When editing...
Computer Applications Guide
Page 4
...to editing pictures on a computer 6 Features ...6 Overview of the preparation 7 Step 1: Installing the USB driver on a computer 8 Step 2: Installing the image editor software (ImageMixer Ver.1.5 for Sony to a "Memory Stick" ......... 29 Connecting to a computer 32 Copying pictures recorded on a computer...Copying pictures edited on ImageMixer Ver.1.5 for Sony 9 Step 3: Installing the image exchange software (Image Transfer 11 Step 4: Connecting your camcorder to a computer 13 Connecting with the USB cable (supplied 14 Connecting with an i.LINK cable (optional) (DV format models only ...
...to editing pictures on a computer 6 Features ...6 Overview of the preparation 7 Step 1: Installing the USB driver on a computer 8 Step 2: Installing the image editor software (ImageMixer Ver.1.5 for Sony to a "Memory Stick" ......... 29 Connecting to a computer 32 Copying pictures recorded on a computer...Copying pictures edited on ImageMixer Ver.1.5 for Sony 9 Step 3: Installing the image exchange software (Image Transfer 11 Step 4: Connecting your camcorder to a computer 13 Connecting with the USB cable (supplied 14 Connecting with an i.LINK cable (optional) (DV format models only ...
Computer Applications Guide
Page 7
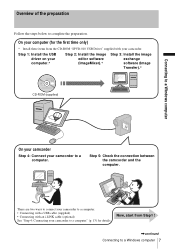
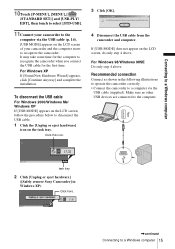
...Follow the steps below to a Windows computer 7 Now, start from the CD-ROM "SPVD-010 USB Driver" supplied with an i.LINK cable (optional) See "Step 4: Connecting your camcorder to a computer" (p. 13) for the first time only) * Install these items from Step1 ... software (Image Transfer).* CD-ROM (supplied) Connecting to a Windows computer On your camcorder Step 4: Connect your camcorder to a computer. On your camcorder. There are two ways to connect your camcorder to a computer. • Connecting with a USB cable (supplied) • Connecting with your computer (for details.
...Follow the steps below to a Windows computer 7 Now, start from the CD-ROM "SPVD-010 USB Driver" supplied with an i.LINK cable (optional) See "Step 4: Connecting your camcorder to a computer" (p. 13) for the first time only) * Install these items from Step1 ... software (Image Transfer).* CD-ROM (supplied) Connecting to a Windows computer On your camcorder Step 4: Connect your camcorder to a computer. On your camcorder. There are two ways to connect your camcorder to a computer. • Connecting with a USB cable (supplied) • Connecting with your computer (for details.
Computer Applications Guide
Page 8
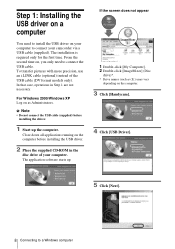
...2 Place the supplied CD-ROM in Step 1 are not necessary. To transfer pictures with more precision, use an i.LINK cable (optional) instead of your camcorder via a USB cable (supplied). The application software starts up the computer. If the screen does not appear 1 Double-click [My Computer]. 2 ... on as (E:)) may vary depending on the computer. 3 Click [Handycam]. 4 Click [USB Driver]. 5 Click [Next]. 8 Connecting to connect the USB cable. In that case, operations in the disc drive of the USB cable (DV format models only). Close down all applications running on the ...
...2 Place the supplied CD-ROM in Step 1 are not necessary. To transfer pictures with more precision, use an i.LINK cable (optional) instead of your camcorder via a USB cable (supplied). The application software starts up the computer. If the screen does not appear 1 Double-click [My Computer]. 2 ... on as (E:)) may vary depending on the computer. 3 Click [Handycam]. 4 Click [USB Driver]. 5 Click [Next]. 8 Connecting to connect the USB cable. In that case, operations in the disc drive of the USB cable (DV format models only). Close down all applications running on the ...
Computer Applications Guide
Page 13
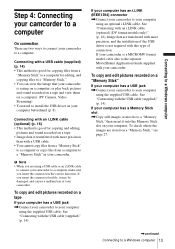
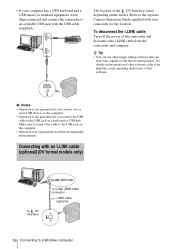
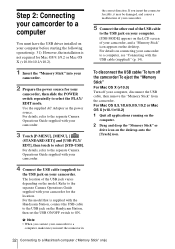
... damaged, and causes a malfunction of your camcorder. Connecting with a USB cable (supplied) (p. 14) • This method is good for editing, and copying files to a "Memory Stick." • You can view the image that your camcorder is transferred with more precision, and the installation of the USB driver is a MICROMV format model, refer also to the separate...
... damaged, and causes a malfunction of your camcorder. Connecting with a USB cable (supplied) (p. 14) • This method is good for editing, and copying files to a "Memory Stick." • You can view the image that your camcorder is transferred with more precision, and the installation of the USB driver is a MICROMV format model, refer also to the separate...
Computer Applications Guide
Page 14
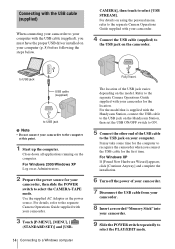
... Operations Guide supplied with the Handycam Station, connect the USB cable to the USB jack on the Handycam Station, then set the USB ON/OFF switch to ON. 5 Connect the other end of the USB cable to the USB jack on your computer. It may take some time for the computer to recognize the camcorder when you must have the...
... Operations Guide supplied with the Handycam Station, connect the USB cable to the USB jack on the Handycam Station, then set the USB ON/OFF switch to ON. 5 Connect the other end of the USB cable to the USB jack on your computer. It may take some time for the computer to recognize the camcorder when you must have the...
Computer Applications Guide
Page 15
...the installation. task tray 2 Click [Unplug or eject hardware] ([Safely remove Sony Camcorder] in the following illustrations to operate the camcorder correctly. • Connect the camcorder to a computer via the USB cable (p. 14). [USB MODE] appears on the task tray. Connecting to a Windows computer 10Touch [P-MENU... 4 above . Click here. ,continued Connecting to recognize the camcorder when you connect the USB cable for the first time. Click this icon. 3 Click [OK]. 4 Disconnect the USB cable from the camcorder and computer. For Windows 98/Windows 98SE Do only step 4...
...the installation. task tray 2 Click [Unplug or eject hardware] ([Safely remove Sony Camcorder] in the following illustrations to operate the camcorder correctly. • Connect the camcorder to a computer via the USB cable (p. 14). [USB MODE] appears on the task tray. Connecting to a Windows computer 10Touch [P-MENU... 4 above . Click here. ,continued Connecting to recognize the camcorder when you connect the USB cable for the first time. Click this icon. 3 Click [OK]. 4 Disconnect the USB cable from the camcorder and computer. For Windows 98/Windows 98SE Do only step 4...
Computer Applications Guide
Page 16
... as standard equipment, leave them connected and connect the camcorder to the computer. • Operation is not guaranteed on a keyboard or USB hub. b Notes • Operation is not guaranteed if you connect two or more USB devices to an available USB jack with the USB cable (supplied). Refer to the separate Camera Operations Guide supplied with...
... as standard equipment, leave them connected and connect the camcorder to the computer. • Operation is not guaranteed on a keyboard or USB hub. b Notes • Operation is not guaranteed if you connect two or more USB devices to an available USB jack with the USB cable (supplied). Refer to the separate Camera Operations Guide supplied with...

Computer Applications Guide
Page 17
Before following the procedure below , start up ImageMixer Ver.1.5 for Sony and check the connection. This operation is not necessary when connecting the camcorder to the computer via a USB cable, or click (DV Camcorder Capture Mode) if you are connecting ,continued Connecting to a Windows computer 17 For details, refer to the separate Camera Operations Guide supplied...
Before following the procedure below , start up ImageMixer Ver.1.5 for Sony and check the connection. This operation is not necessary when connecting the camcorder to the computer via a USB cable, or click (DV Camcorder Capture Mode) if you are connecting ,continued Connecting to a Windows computer 17 For details, refer to the separate Camera Operations Guide supplied...
Computer Applications Guide
Page 19
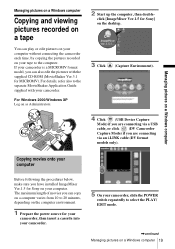
....3.1 for Sony on the desktop. 3 Click (Capture Environment). 4 Click (USB Device Capture Mode) if you are connecting via a USB cable, or click (DV Camcorder Capture Mode) if you are connecting via an i.LINK cable (DV format models only). Copying movies onto your computer Before following the procedures below, make sure you have installed ImageMixer Ver.1.5 for MICROMV...
....3.1 for Sony on the desktop. 3 Click (Capture Environment). 4 Click (USB Device Capture Mode) if you are connecting via a USB cable, or click (DV Camcorder Capture Mode) if you are connecting via an i.LINK cable (DV format models only). Copying movies onto your computer Before following the procedures below, make sure you have installed ImageMixer Ver.1.5 for MICROMV...

Computer Applications Guide
Page 23
... Internet. For details, refer to the separate Camera Operations Guide supplied with your camcorder. 6 Connect your camcorder to store the data on a Windows computer 23 You do not need to the computer via a USB cable (supplied), you have installed ImageMixer Ver.1.5 for Sony] on the computer screen. Managing pictures on a Windows computer Viewing pictures on...
... Internet. For details, refer to the separate Camera Operations Guide supplied with your camcorder. 6 Connect your camcorder to store the data on a Windows computer 23 You do not need to the computer via a USB cable (supplied), you have installed ImageMixer Ver.1.5 for Sony] on the computer screen. Managing pictures on a Windows computer Viewing pictures on...

Computer Applications Guide
Page 25
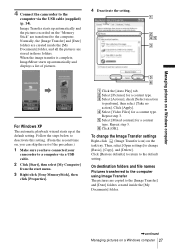
...]. a computer equipped with each player for the [Location of the image that point is imported to the buffer via the USB cable (supplied) (p. 14). 7 Place a new CD-R in one of Windows Media Player do not work folder] on the [Option] screen. • Once you have created...more than about 6GB) for details. - You cannot use a CD-RW. 8 Click [Start]. a computer equipped with a DVD drive and software compatible with your camcorder. 5 Search for the point on the computer screen. The tape starts playing and the picture is written on the computer environment, including such factors as...
...]. a computer equipped with each player for the [Location of the image that point is imported to the buffer via the USB cable (supplied) (p. 14). 7 Place a new CD-R in one of Windows Media Player do not work folder] on the [Option] screen. • Once you have created...more than about 6GB) for details. - You cannot use a CD-RW. 8 Click [Start]. a computer equipped with a DVD drive and software compatible with your camcorder. 5 Search for the point on the computer screen. The tape starts playing and the picture is written on the computer environment, including such factors as...
Computer Applications Guide
Page 27
... to the default setting. E Select [Mixed content] for a content type. Managing pictures on a Windows computer 4 Connect the camcorder to the computer via a USB cable. 2 Click [Start], then select [My Computer] from the start menu. 3 Right-click [Sony MemoryStick], then click [Properties]. 4 Deactivate the setting. For Windows XP The automatic playback wizard starts up automatically...
... to the default setting. E Select [Mixed content] for a content type. Managing pictures on a Windows computer 4 Connect the camcorder to the computer via a USB cable. 2 Click [Start], then select [My Computer] from the start menu. 3 Right-click [Sony MemoryStick], then click [Properties]. 4 Deactivate the setting. For Windows XP The automatic playback wizard starts up automatically...

Computer Applications Guide
Page 29
...pictures edited on ImageMixer Ver.1.5 for Sony to the on-line help for Sony (p. 22). z Tip • Refer to a "Memory Stick," and use them as materials for MEMORY MIX on ImageMixer Ver.1.5 for detailed operating instructions on your camcorder to the album. Refer to the ... computer The edited still image is added to the computer via the USB cable (supplied) (p. 14). Click [Cancel] if Image Transfer starts up the computer, then double- Managing pictures on MEMORY MIX. 1 Insert a "Memory Stick" into your camcorder. 4 Start up automatically. 7 Click the [MEMORY MIX] album....
...pictures edited on ImageMixer Ver.1.5 for Sony to the on-line help for Sony (p. 22). z Tip • Refer to a "Memory Stick," and use them as materials for MEMORY MIX on ImageMixer Ver.1.5 for detailed operating instructions on your camcorder to the album. Refer to the ... computer The edited still image is added to the computer via the USB cable (supplied) (p. 14). Click [Cancel] if Image Transfer starts up the computer, then double- Managing pictures on MEMORY MIX. 1 Insert a "Memory Stick" into your camcorder. 4 Start up automatically. 7 Click the [MEMORY MIX] album....
Computer Applications Guide
Page 32
... [Trash] icon. 32 Connecting to ON. Step 2: Connecting your camcorder to a computer You must have the USB driver installed on your camcorder. However, the installation is supplied with the Handycam Station, connect the USB cable to the USB jack on connecting your camcorder. 3 Touch [P-MENU], [MENU], [ (STANDARD SET)] and [USB-PLY/ EDT], then touch to a computer, see "Connecting with...
... [Trash] icon. 32 Connecting to ON. Step 2: Connecting your camcorder to a computer You must have the USB driver installed on your camcorder. However, the installation is supplied with the Handycam Station, connect the USB cable to the USB jack on connecting your camcorder. 3 Touch [P-MENU], [MENU], [ (STANDARD SET)] and [USB-PLY/ EDT], then touch to a computer, see "Connecting with...

Computer Applications Guide
Page 38
...], then touch to the separate Camera Operations Guide supplied with your camcorder and computer for Sony] displayed on the desktop. 4 Click (Preference), check [Capture using the A/V connecting cable (supplied). For details, refer to select [ON]. click [ImageMixer Ver.1.5 for converting signals. Click (USB Device Capture Mode) in the correct direction. 1 Start up the computer...
...], then touch to the separate Camera Operations Guide supplied with your camcorder and computer for Sony] displayed on the desktop. 4 Click (Preference), check [Capture using the A/V connecting cable (supplied). For details, refer to select [ON]. click [ImageMixer Ver.1.5 for converting signals. Click (USB Device Capture Mode) in the correct direction. 1 Start up the computer...

Computer Applications Guide
Page 39
... details, refer to the separate Camera Operations Guide supplied with copyright protection signals to a computer. • You can use a USB cable instead of the cable vary depending on the VCR (analog equipment). 11Click (Capture) at the point you want to stop copying. Note, however, that... your camcorder. (red) turns to a computer. Other functions 39 8 Click Capture). (Motion Picture 12Click (Stop) at the point you want to start copying. b Notes • You may lack the smoothness. • The location of the USB jack and the shape of an i.LINK cable (optional...
... details, refer to the separate Camera Operations Guide supplied with copyright protection signals to a computer. • You can use a USB cable instead of the cable vary depending on the VCR (analog equipment). 11Click (Capture) at the point you want to stop copying. Note, however, that... your camcorder. (red) turns to a computer. Other functions 39 8 Click Capture). (Motion Picture 12Click (Stop) at the point you want to start copying. b Notes • You may lack the smoothness. • The location of the USB jack and the shape of an i.LINK cable (optional...

Computer Applications Guide
Page 40
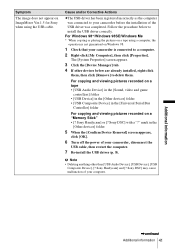
... to ON. You cannot view the pictures recorded on a tape on the computer. Connect the camcorder and the computer using the USB cable. cFor the model that is supplied with the Handycam Station, set the USB ON/OFF switch to the camcorder firmly. cInsert the "Memory Stick" firmly. Additional information Troubleshooting Symptom Cause and/or Corrective...
... to ON. You cannot view the pictures recorded on a tape on the computer. Connect the camcorder and the computer using the USB cable. cFor the model that is supplied with the Handycam Station, set the USB ON/OFF switch to the camcorder firmly. cInsert the "Memory Stick" firmly. Additional information Troubleshooting Symptom Cause and/or Corrective...
Computer Applications Guide
Page 41
...1 Check that your computer. Sony Handycam] or [? Sony Handycam] and [? Cause and/or Corrective Actions cThe USB driver has been registered incorrectly as the computer was completed. For copying and viewing pictures recorded on a tape • [USB Audio Device] in the [... pictures recorded on a tape using the USB cable. Sony DSC] may cause malfunction of your camcorder is connected to your camcorder before the installation of your camcorder, disconnect the USB cable, then restart the computer. 7 Re-install the USB driver (p. 8). Sony DSC] with a "?" The [System Properties...
...1 Check that your computer. Sony Handycam] or [? Sony Handycam] and [? Cause and/or Corrective Actions cThe USB driver has been registered incorrectly as the computer was completed. For copying and viewing pictures recorded on a tape • [USB Audio Device] in the [... pictures recorded on a tape using the USB cable. Sony DSC] may cause malfunction of your camcorder is connected to your camcorder before the installation of your camcorder, disconnect the USB cable, then restart the computer. 7 Re-install the USB driver (p. 8). Sony DSC] with a "?" The [System Properties...


