Operating Guide
Page 6
...been tested and found to be used with the Handycam Station Model DCRA-C151 and AC Adaptor Model AC-L25A/L25B. • DCR-HC96 is supplied with two kinds of operation guides....is no guarantee that interference will not occur in a particular installation. Notes on use Your camcorder is to Subpart B of Part 15 of the following two conditions: (1) This device ... Record the serial number in accordance with Part 15 of Conformity Trade Name: SONY Model No.: DCR-HC96 Responsible Party: Sony Electronics Inc. Model No. ACNo. CAUTION You are designed to provide reasonable protection...
...been tested and found to be used with the Handycam Station Model DCRA-C151 and AC Adaptor Model AC-L25A/L25B. • DCR-HC96 is supplied with two kinds of operation guides....is no guarantee that interference will not occur in a particular installation. Notes on use Your camcorder is to Subpart B of Part 15 of the following two conditions: (1) This device ... Record the serial number in accordance with Part 15 of Conformity Trade Name: SONY Model No.: DCR-HC96 Responsible Party: Sony Electronics Inc. Model No. ACNo. CAUTION You are designed to provide reasonable protection...

Operating Guide
Page 7
... (DCR-HC96) • The camcorder is not available under the current recording or playback conditions. When using a "Memory Stick Duo" with "Memory Stick" compatible equipment Be sure to insert the "Memory Stick Duo" into the Handycam Station or remove the camcorder from it in your camcorder There are two sizes of your camcorder. • For DCR-HC46/HC96: Disconnect...
... (DCR-HC96) • The camcorder is not available under the current recording or playback conditions. When using a "Memory Stick Duo" with "Memory Stick" compatible equipment Be sure to insert the "Memory Stick Duo" into the Handycam Station or remove the camcorder from it in your camcorder There are two sizes of your camcorder. • For DCR-HC46/HC96: Disconnect...
Operating Guide
Page 9
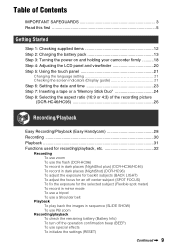
... Getting Started Step 1: Checking supplied items 12 Step 2: Charging the battery pack 13 Step 3: Turning the power on and holding your camcorder firmly ..........18 Step 4: Adjusting the LCD panel and viewfinder 20 Step 5: Using the touch panel 21 Changing the language setting 21 Checking ...4:3) of the recording picture (DCR-HC46/HC96 26 Recording/Playback Easy Recording/Playback (Easy Handycam 28 Recording 30 Playback 31 Functions used for recording/playback, etc 32 Recording To use zoom To use the flash (DCR-HC96) To record in dark places (NightShot plus) (DCR-HC36/HC46) To record in...
... Getting Started Step 1: Checking supplied items 12 Step 2: Charging the battery pack 13 Step 3: Turning the power on and holding your camcorder firmly ..........18 Step 4: Adjusting the LCD panel and viewfinder 20 Step 5: Using the touch panel 21 Changing the language setting 21 Checking ...4:3) of the recording picture (DCR-HC46/HC96 26 Recording/Playback Easy Recording/Playback (Easy Handycam 28 Recording 30 Playback 31 Functions used for recording/playback, etc 32 Recording To use zoom To use the flash (DCR-HC96) To record in dark places (NightShot plus) (DCR-HC36/HC46) To record in...

Operating Guide
Page 12
...in the parentheses indicates the number of the Grip belt, as illustrated below, using the strap. Handycam Station (1) (DCR-HC46/HC96) (p. 13) Rechargeable battery pack (1) (p. 13, 126) NP-FP30 (DCR-HC36) NP-FP50 (DCR-HC46/HC96) Wireless Remote Commander (1) (p. 40) A button-type lithium battery is already installed. Getting ...Duo" are not supplied. See page 6, 123, 124, for compatible cassettes and "Memory Stick Duo" for your camcorder. AC Adaptor (1) (p. 13) USB cable (1) (p. 82, 86) Lens cap (1) (DCR-HC36/HC46) (p. 18, 28, 30) Power cord (1) (p. 13) • To attach the lens cap ...
...in the parentheses indicates the number of the Grip belt, as illustrated below, using the strap. Handycam Station (1) (DCR-HC46/HC96) (p. 13) Rechargeable battery pack (1) (p. 13, 126) NP-FP30 (DCR-HC36) NP-FP50 (DCR-HC46/HC96) Wireless Remote Commander (1) (p. 40) A button-type lithium battery is already installed. Getting ...Duo" are not supplied. See page 6, 123, 124, for compatible cassettes and "Memory Stick Duo" for your camcorder. AC Adaptor (1) (p. 13) USB cable (1) (p. 82, 86) Lens cap (1) (DCR-HC36/HC46) (p. 18, 28, 30) Power cord (1) (p. 13) • To attach the lens cap ...
Operating Guide
Page 13
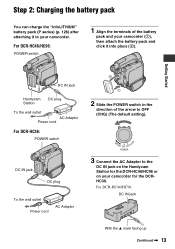
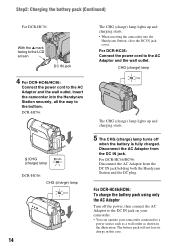
...mark facing up Continued , 13 For DCR-HC46/HC96: POWER switch 1 Align the terminals of the arrow to your camcorder. DC IN jack DC plug To the wall outlet Power cord AC Adaptor 3 Connect the AC Adaptor to the DC IN jack on the Handycam Station for the DCRHC36. Getting Started ...DC IN jack Handycam Station DC plug To the wall outlet AC Adaptor Power cord For DCR-HC36: POWER switch 2 1 2 Slide the POWER switch in the direction of the battery pack and your camcorder for the DCR-HC46/HC96 or on your camcorder (1), then attach the battery pack and...
...mark facing up Continued , 13 For DCR-HC46/HC96: POWER switch 1 Align the terminals of the arrow to your camcorder. DC IN jack DC plug To the wall outlet Power cord AC Adaptor 3 Connect the AC Adaptor to the DC IN jack on the Handycam Station for the DCRHC36. Getting Started ...DC IN jack Handycam Station DC plug To the wall outlet AC Adaptor Power cord For DCR-HC36: POWER switch 2 1 2 Slide the POWER switch in the direction of the battery pack and your camcorder for the DCR-HC46/HC96 or on your camcorder (1), then attach the battery pack and...
Operating Guide
Page 14
For DCR-HC46/HC96: To charge the battery pack using only the AC Adaptor Turn off when the battery is fully charged. Disconnect the AC Adaptor from the DC IN jack holding both the Handycam Station and the DC plug. Insert the camcorder into the Handycam Station, close the DC IN jack ... the camcorder into the Handycam Station securely, all the way to a power source such as a wall outlet as shown in this case. The battery pack will not lose its charge in the illustration. For DCR-HC46/HC96: Disconnect the AC Adaptor from the DC IN jack. DCR-HC96: /CHG (charge) lamp DCR-HC46:...
For DCR-HC46/HC96: To charge the battery pack using only the AC Adaptor Turn off when the battery is fully charged. Disconnect the AC Adaptor from the DC IN jack holding both the Handycam Station and the DC plug. Insert the camcorder into the Handycam Station, close the DC IN jack ... the camcorder into the Handycam Station securely, all the way to a power source such as a wall outlet as shown in this case. The battery pack will not lose its charge in the illustration. For DCR-HC46/HC96: Disconnect the AC Adaptor from the DC IN jack. DCR-HC96: /CHG (charge) lamp DCR-HC46:...
Operating Guide
Page 15
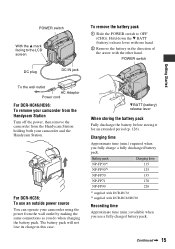
...pack will not lose its charge in the direction of the arrow with DCR-HC46/HC96 Recording time Approximate time (min.) available when you use an outside power source You can operate your camcorder and the Handycam Station. Charging time Approximate time (min.) required when you do when ... 1 Getting Started To the wall outlet AC Adaptor Power cord For DCR-HC46/HC96: To remove your camcorder from the Handycam Station Turn off the power, then remove the camcorder from the Handycam Station holding both your camcorder using the power from the wall outlet by making the same connections as...
...pack will not lose its charge in the direction of the arrow with DCR-HC46/HC96 Recording time Approximate time (min.) available when you use an outside power source You can operate your camcorder and the Handycam Station. Charging time Approximate time (min.) required when you do when ... 1 Getting Started To the wall outlet AC Adaptor Power cord For DCR-HC46/HC96: To remove your camcorder from the Handycam Station Turn off the power, then remove the camcorder from the Handycam Station holding both your camcorder using the power from the wall outlet by making the same connections as...
Operating Guide
Page 17
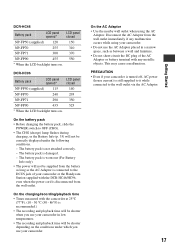
On the AC Adaptor • Use the nearby wall outlet when using your camcorder. This may cause a malfunction. PRECAUTION • Even if your camcorder or the Handycam Station supplied with any malfunction occurs while using the AC Adaptor. The battery pack is still supplied to it while ... use the AC Adaptor placed in low temperatures. • The recording and playback time will be correctly displayed under the following conditions. - DCR-HC96 Battery pack LCD panel opened * LCD panel closed NP-FP50 (supplied) 115 140 NP-FP70 240 295 NP-FP71 290 350 NP-FP90 ...
On the AC Adaptor • Use the nearby wall outlet when using your camcorder. This may cause a malfunction. PRECAUTION • Even if your camcorder or the Handycam Station supplied with any malfunction occurs while using the AC Adaptor. The battery pack is still supplied to it while ... use the AC Adaptor placed in low temperatures. • The recording and playback time will be correctly displayed under the following conditions. - DCR-HC96 Battery pack LCD panel opened * LCD panel closed NP-FP50 (supplied) 115 140 NP-FP70 240 295 NP-FP71 290 350 NP-FP90 ...

Operating Guide
Page 21
.... Then, touch the buttons displayed on the LCD screen. 1 Touch . 6 0 min MENU 1/3 TELE MACRO SPOT FOCUS -:--:-- DISP/BATT INFO DCR-HC36/ HC46 DCR-HC96 Touch the button on the LCD screen. • Perform the same actions as time code) on the LCD screen, but this is not a malfunction...touch panel. These dots are not recorded. Continued , 21 Place your hand on the settings. DISP GUIDE EXPOSURE FADER Touch [MENU] during Easy Handycam operation (p. 28). 2 Touch [DISP GUIDE]. DISP GUIDE END The indicators vary depending on the rear side of each indicator (p. 38) that ...
.... Then, touch the buttons displayed on the LCD screen. 1 Touch . 6 0 min MENU 1/3 TELE MACRO SPOT FOCUS -:--:-- DISP/BATT INFO DCR-HC36/ HC46 DCR-HC96 Touch the button on the LCD screen. • Perform the same actions as time code) on the LCD screen, but this is not a malfunction...touch panel. These dots are not recorded. Continued , 21 Place your hand on the settings. DISP GUIDE EXPOSURE FADER Touch [MENU] during Easy Handycam operation (p. 28). 2 Touch [DISP GUIDE]. DISP GUIDE END The indicators vary depending on the rear side of each indicator (p. 38) that ...
Operating Guide
Page 23
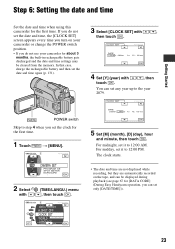
...Touch 6 0 min t [MENU]. -:--:-- The clock starts. • The date and time are not displayed while recording, but they are automatically recorded on your camcorder for the first time. CLOCK SET -:--:-- DISP OUTPUT MENU ROTATE A. For midday, set it to step 4 when you set only [DATE/TIME])). 23 SHUT OFF... appears every time you turn on the tape, and can be displayed during playback (see page 67 for [DATA CODE] (During Easy Handycam operation, you do not use your camcorder or change the POWER switch position. • If you can set the date and time again (p. 131).
...Touch 6 0 min t [MENU]. -:--:-- The clock starts. • The date and time are not displayed while recording, but they are automatically recorded on your camcorder for the first time. CLOCK SET -:--:-- DISP OUTPUT MENU ROTATE A. For midday, set it to step 4 when you set only [DATE/TIME])). 23 SHUT OFF... appears every time you turn on the tape, and can be displayed during playback (see page 67 for [DATA CODE] (During Easy Handycam operation, you do not use your camcorder or change the POWER switch position. • If you can set the date and time again (p. 131).
Operating Guide
Page 24
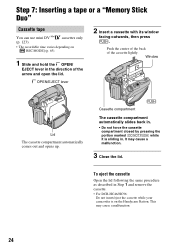
... (p. 123). • The recordable time varies depending on the Handycam Station. To eject the cassette Open the lid following the same procedure as described in Step 1 and remove the cassette. • For DCR-HC46/HC96: Do not insert/eject the cassette while your camcorder is sliding in the direction of the cassette lightly. OPEN...
... (p. 123). • The recordable time varies depending on the Handycam Station. To eject the cassette Open the lid following the same procedure as described in Step 1 and remove the cassette. • For DCR-HC46/HC96: Do not insert/eject the cassette while your camcorder is sliding in the direction of the cassette lightly. OPEN...

Operating Guide
Page 28
...which frees you from detailed adjustments. F C Movies 1 Slide the POWER switch E to record. Recording/Playback Easy Recording/Playback (Easy Handycam) With this Easy Handycam operation, most of the camera settings are recorded in [FINE] quality on the CAMERA-TAPE lamp. appears on the screen B. 3... for easy viewing. DCR-HC36/HC46: Remove the lens cap (p. 18). To stop recording, press F again. 2 Press EASY A. to OFF (CHG), slide it while pressing the green button. Still images (4:3) 1 Slide the POWER switch E to [REC]. DCR-HC36: B A DCR-HC36/ HC46 DCR-HC96 D E If the...
...which frees you from detailed adjustments. F C Movies 1 Slide the POWER switch E to record. Recording/Playback Easy Recording/Playback (Easy Handycam) With this Easy Handycam operation, most of the camera settings are recorded in [FINE] quality on the CAMERA-TAPE lamp. appears on the screen B. 3... for easy viewing. DCR-HC36/HC46: Remove the lens cap (p. 18). To stop recording, press F again. 2 Press EASY A. to OFF (CHG), slide it while pressing the green button. Still images (4:3) 1 Slide the POWER switch E to [REC]. DCR-HC36: B A DCR-HC36/ HC46 DCR-HC96 D E If the...

Operating Guide
Page 29
.... x Unavailable buttons during Easy Handycam During Easy Handycam operation, the following buttons are unavailable, since the items are attempted. • BACK LIGHT button (p. 33) • PHOTO button (in the CAMERA-TAPE mode) (p. 30) • REC START/STOP button (in the CAMERA-MEMORY mode) (p. 30). • For DCR-HC46/HC96: Pressing and holding DISP/BATT...
.... x Unavailable buttons during Easy Handycam During Easy Handycam operation, the following buttons are unavailable, since the items are attempted. • BACK LIGHT button (p. 33) • PHOTO button (in the CAMERA-TAPE mode) (p. 30) • REC START/STOP button (in the CAMERA-MEMORY mode) (p. 30). • For DCR-HC46/HC96: Pressing and holding DISP/BATT...

Operating Guide
Page 40
.../STOP (p. 28, 30) H Power zoom (p. 32, 34) I DISPLAY (p. 21) J Memory control buttons (Index*2, -/+, Memory playback) (p. 31) *1 Not available during Easy Handycam operation with the POWER switch is reset to operate your camcorder (p. 35). • To change the battery, see page 131. The tape counter is set to CAMERATAPE. 40 *2 Not available during...
.../STOP (p. 28, 30) H Power zoom (p. 32, 34) I DISPLAY (p. 21) J Memory control buttons (Index*2, -/+, Memory playback) (p. 31) *1 Not available during Easy Handycam operation with the POWER switch is reset to operate your camcorder (p. 35). • To change the battery, see page 131. The tape counter is set to CAMERATAPE. 40 *2 Not available during...
Operating Guide
Page 42
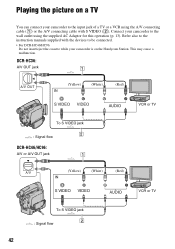
This may cause a malfunction. Playing the picture on the Handycam Station. Connect your camcorder to be connected. • For DCR-HC46/HC96: Do not insert/eject the cassette while your camcorder is on a TV You can connect your camcorder to the wall outlet using the A/V connecting cable (1) or the ... input jack of a TV or a VCR using the supplied AC Adaptor for this operation (p. 13). DCR-HC36: A/V OUT jack 1 A/V OUT (Yellow) (White) (Red) VCR or TV To S VIDEO jack 2 : Signal flow DCR-HC46/HC96: A/V or A/V OUT jack 1 A/V (Yellow) (White) (Red) VCR or TV To S ...
This may cause a malfunction. Playing the picture on the Handycam Station. Connect your camcorder to be connected. • For DCR-HC46/HC96: Do not insert/eject the cassette while your camcorder is on a TV You can connect your camcorder to the wall outlet using the A/V connecting cable (1) or the ... input jack of a TV or a VCR using the supplied AC Adaptor for this operation (p. 13). DCR-HC36: A/V OUT jack 1 A/V OUT (Yellow) (White) (Red) VCR or TV To S VIDEO jack 2 : Signal flow DCR-HC46/HC96: A/V or A/V OUT jack 1 A/V (Yellow) (White) (Red) VCR or TV To S ...
Operating Guide
Page 43
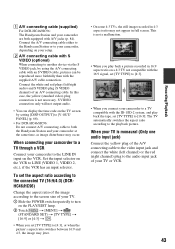
... the input selector on the VCR to your camcorder, depending on the VCR. When your TV is not necessary. A A/V connecting cable (supplied) For DCR-HC46/HC96: The Handycam Station and your camcorder are both the Handycam Station and your camcorder at the same time, as image disturbance may... not appear in full screen. Connect the A/V connecting cable either to the Handycam Station or to LINE (VIDEO 1, ...
... the input selector on the VCR to your camcorder, depending on the VCR. When your TV is not necessary. A A/V connecting cable (supplied) For DCR-HC46/HC96: The Handycam Station and your camcorder are both the Handycam Station and your camcorder at the same time, as image disturbance may... not appear in full screen. Connect the A/V connecting cable either to the Handycam Station or to LINE (VIDEO 1, ...
Operating Guide
Page 45
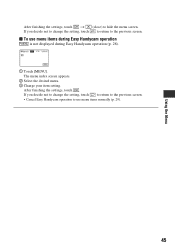
If you decide not to change the setting, touch to return to the previous screen. • Cancel Easy Handycam operation to use menu items during Easy Handycam operation is not displayed during Easy Handycam operation (p. 28). 60min EASY STBY MENU 1 Touch [MENU]. After finishing the settings, touch . The menu index screen appears. 2 Select the...
If you decide not to change the setting, touch to return to the previous screen. • Cancel Easy Handycam operation to use menu items during Easy Handycam operation is not displayed during Easy Handycam operation (p. 28). 60min EASY STBY MENU 1 Touch [MENU]. After finishing the settings, touch . The menu index screen appears. 2 Select the...
Operating Guide
Page 46
... (p. 55) STILL SET - NEW FOLDER - z - z - AUTO AUTO - z z z z - TAPE CAMERA SET menu (p. 49) PROGRAM AE z SPOT METER z EXPOSURE z WHITE BAL. z - AUTO - z z SERIES z z - MEMORY PLAY/EDIT Easy Handycam z - FILE NO. - PB FOLDER - z - z - FORMAT - REC FOLDER - z - z - - - - - - - - - z -*6 46 MOVIE SET - z - z - - - z - - - ON OFF - z - AUTO OFF *6/OFF OFF OFF ON OFF OFF z*5 OFF 4:3 ON OFF z z OFF*4/FINE...
... (p. 55) STILL SET - NEW FOLDER - z - z - AUTO AUTO - z z z z - TAPE CAMERA SET menu (p. 49) PROGRAM AE z SPOT METER z EXPOSURE z WHITE BAL. z - AUTO - z z SERIES z z - MEMORY PLAY/EDIT Easy Handycam z - FILE NO. - PB FOLDER - z - z - FORMAT - REC FOLDER - z - z - - - - - - - - - z -*6 46 MOVIE SET - z - z - - - z - - - ON OFF - z - AUTO OFF *6/OFF OFF OFF ON OFF OFF z*5 OFF 4:3 ON OFF z z OFF*4/FINE...
Operating Guide
Page 47
...) FADER z SLIDE SHOW - DEMO MODE z PictBridge PRINT - USB SELECT - END SEARCH z MEMORY PLAY/EDIT - - - z - EFFECT z FRAME REC*1 z SMTH INT.REC*4 z INT.REC-STL - z - z - - - - z - - - - z - z - z - z *1 DCR-HC96 *2 DCR-HC36/HC46 *3 DCR-HC36 *4 DCR-HC46/HC96 *5 Cannot be operated in the CAMERA-TAPE mode. *6 The setting value before entering Easy Handycam operation will be retained. z Using the Menu Continued , 47
...) FADER z SLIDE SHOW - DEMO MODE z PictBridge PRINT - USB SELECT - END SEARCH z MEMORY PLAY/EDIT - - - z - EFFECT z FRAME REC*1 z SMTH INT.REC*4 z INT.REC-STL - z - z - - - - z - - - - z - z - z - z *1 DCR-HC96 *2 DCR-HC36/HC46 *3 DCR-HC36 *4 DCR-HC46/HC96 *5 Cannot be operated in the CAMERA-TAPE mode. *6 The setting value before entering Easy Handycam operation will be retained. z Using the Menu Continued , 47

Operating Guide
Page 48
... (p. 65) REC MODE z AUDIO MODE z VOLUME - DISP GUIDE z z z GUIDEFRAME*1 z z - menu (p. 69) CLOCK SET z z z WORLD TIME z z z LANGUAGE z z z *1 DCR-HC96 *2 DCR-HC36/HC46 *3 DCR-HC36 *4 DCR-HC46/HC96 *5 Cannot be operated in the CAMERA-TAPE mode. *6 The setting value before entering Easy Handycam operation will be retained. z*1 - z - - z REMAINING z - z -*6 -*6 48 z TV TYPE*4 z z z USB CAMERA z - - BEEP z z z DISP OUTPUT z z z MENU ROTATE z z z A.SHUT...
... (p. 65) REC MODE z AUDIO MODE z VOLUME - DISP GUIDE z z z GUIDEFRAME*1 z z - menu (p. 69) CLOCK SET z z z WORLD TIME z z z LANGUAGE z z z *1 DCR-HC96 *2 DCR-HC36/HC46 *3 DCR-HC36 *4 DCR-HC46/HC96 *5 Cannot be operated in the CAMERA-TAPE mode. *6 The setting value before entering Easy Handycam operation will be retained. z*1 - z - - z REMAINING z - z -*6 -*6 48 z TV TYPE*4 z z z USB CAMERA z - - BEEP z z z DISP OUTPUT z z z MENU ROTATE z z z A.SHUT...


