Operating Guide
Page 4
... and refer servicing to qualified service personnel. Adjust only those controls that the set . - Replacement parts When replacement parts are required, be sure the service technician has used replacement parts specified by the manufacturer) to normal operation. - Improper adjustment of time, unplug it is damaged or frayed. - If the set from the wall outlet and disconnect the antenna or cable system. Service Damage Requiring Service Unplug the set does not operate normally...
... and refer servicing to qualified service personnel. Adjust only those controls that the set . - Replacement parts When replacement parts are required, be sure the service technician has used replacement parts specified by the manufacturer) to normal operation. - Improper adjustment of time, unplug it is damaged or frayed. - If the set from the wall outlet and disconnect the antenna or cable system. Service Damage Requiring Service Unplug the set does not operate normally...
Operating Guide
Page 6
... different from that to Subpart B of Part 15 of operation guides. - Consult the dealer or an experienced radio/TV technician for a digital device pursuant to which can be used with the Handycam Station Model DCRA-C151 and AC Adaptor Model AC-L25A/L25B. • DCR-HC96 is supplied with Cassette Memory are located on , the user is connected. - Operation is no guarantee that any interference received...
... different from that to Subpart B of Part 15 of operation guides. - Consult the dealer or an experienced radio/TV technician for a digital device pursuant to which can be used with the Handycam Station Model DCRA-C151 and AC Adaptor Model AC-L25A/L25B. • DCR-HC96 is supplied with Cassette Memory are located on , the user is connected. - Operation is no guarantee that any interference received...
Operating Guide
Page 8
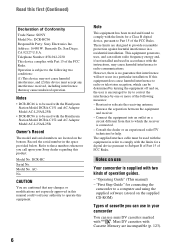
... lens to a malfunction of time may cause malfunctions. • Do not aim at dusk. To view your camcorder if necessary (p. 69). • The illustrations used on this manual are based on a TV, you need an NTSC system-based TV. 8 • Television programs, films, video tapes, and other materials may be contrary to change without any way. Change the screen language before using your recordings on the model DCR-HC96...
... lens to a malfunction of time may cause malfunctions. • Do not aim at dusk. To view your camcorder if necessary (p. 69). • The illustrations used on this manual are based on a TV, you need an NTSC system-based TV. 8 • Television programs, films, video tapes, and other materials may be contrary to change without any way. Change the screen language before using your recordings on the model DCR-HC96...
Operating Guide
Page 9
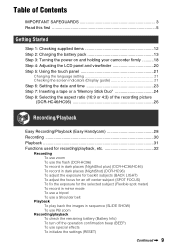
... Changing the language setting 21 Checking the screen indicators (Display guide 21 Step 6: Setting the date and time 23 Step 7: Inserting a tape or a "Memory Stick Duo 24 Step 8: Selecting the aspect ratio (16:9 or 4:3) of the recording picture (DCR-HC46/HC96 26 Recording/Playback Easy Recording/Playback (Easy Handycam 28 Recording 30 Playback 31 Functions used for recording/playback, etc 32 Recording To use zoom To use the flash (DCR-HC96) To record in dark places (NightShot plus) (DCR-HC36/HC46) To record in dark places (NightShot) (DCR-HC96) To adjust...
... Changing the language setting 21 Checking the screen indicators (Display guide 21 Step 6: Setting the date and time 23 Step 7: Inserting a tape or a "Memory Stick Duo 24 Step 8: Selecting the aspect ratio (16:9 or 4:3) of the recording picture (DCR-HC46/HC96 26 Recording/Playback Easy Recording/Playback (Easy Handycam 28 Recording 30 Playback 31 Functions used for recording/playback, etc 32 Recording To use zoom To use the flash (DCR-HC96) To record in dark places (NightShot plus) (DCR-HC36/HC46) To record in dark places (NightShot) (DCR-HC96) To adjust...

Operating Guide
Page 35
.... J Recording lamp (DCR-HC96) The recording lamp lights up to operate your camcorder. Remaining battery (approx.) Other part names and functions I Remote sensor Point the Remote Commander (p. 40) towards the remote sensor to 20 seconds by pressing DISP/BATT INFO again while the battery information is low. K Internal stereo microphone For DCR-HC96: An Active Interface Shoe compatible microphone will take precedence when connected (p. 78). Recording/playback To check the remaining battery (Battery Info qd Set the POWER switch...
.... J Recording lamp (DCR-HC96) The recording lamp lights up to operate your camcorder. Remaining battery (approx.) Other part names and functions I Remote sensor Point the Remote Commander (p. 40) towards the remote sensor to 20 seconds by pressing DISP/BATT INFO again while the battery information is low. K Internal stereo microphone For DCR-HC96: An Active Interface Shoe compatible microphone will take precedence when connected (p. 78). Recording/playback To check the remaining battery (Battery Info qd Set the POWER switch...

Operating Guide
Page 36
... [REC] (recording)) D Recording: Tape counter (hour: minute: second) Playback: Tape counter (hour: minute: second)/Time code (hour: minute: second: frame) E Recording capacity of the tape (approx.) (68) F END SEARCH/EDIT SEARCH/Rec review display switch button (39) G Personal Menu button (44) In the CAMERA-MEMORY mode A B C D E P-MENU qs 7 H Recording folder (59) I Image size (26, 56) (DCR-HC46/HC96) J Quality ( or ) (56) K "Memory Stick Duo" indicator and the number of images that can check them as [DATA CODE] during recording and the camera setting data will be recorded automatically...
... [REC] (recording)) D Recording: Tape counter (hour: minute: second) Playback: Tape counter (hour: minute: second)/Time code (hour: minute: second: frame) E Recording capacity of the tape (approx.) (68) F END SEARCH/EDIT SEARCH/Rec review display switch button (39) G Personal Menu button (44) In the CAMERA-MEMORY mode A B C D E P-MENU qs 7 H Recording folder (59) I Image size (26, 56) (DCR-HC46/HC96) J Quality ( or ) (56) K "Memory Stick Duo" indicator and the number of images that can check them as [DATA CODE] during recording and the camera setting data will be recorded automatically...

Operating Guide
Page 40
...:00 P-MENU If the tape counter is set memory) 1 During playback, press ZERO SET MEMORY 5 at a point you want to operate your camcorder (p. 35). • To change the battery, see page 131. B SEARCH M. (p. 41)*2 C . >*2 D Video control buttons (Rewind, Playback, Fast-forward, Pause, Stop, Slow) (p. 31) E ZERO SET MEMORY*2 F Transmitter G REC START/STOP (p. 28, 30) H Power zoom (p. 32, 34) I DISPLAY (p. 21) J Memory control buttons (Index*2, -/+, Memory playback) (p. 31) *1 Not available during Easy Handycam operation with the POWER switch is not displayed, press DISPLAY 9. 2 Press STOP...
...:00 P-MENU If the tape counter is set memory) 1 During playback, press ZERO SET MEMORY 5 at a point you want to operate your camcorder (p. 35). • To change the battery, see page 131. B SEARCH M. (p. 41)*2 C . >*2 D Video control buttons (Rewind, Playback, Fast-forward, Pause, Stop, Slow) (p. 31) E ZERO SET MEMORY*2 F Transmitter G REC START/STOP (p. 28, 30) H Power zoom (p. 32, 34) I DISPLAY (p. 21) J Memory control buttons (Index*2, -/+, Memory playback) (p. 31) *1 Not available during Easy Handycam operation with the POWER switch is not displayed, press DISPLAY 9. 2 Press STOP...
Operating Guide
Page 61
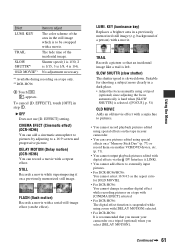
...; Adjust the focus manually using a tripod (optional) since adjusting the focus automatically is hard when [SLOW SHUTTR] is to a 16:9 screen and progressive picture. No adjustment necessary. *1 Available during recording on a tape only. *2 DCR-HC96 3 Touch . DELAY MOTION (Delay motion) (DCR-HC96) You can save pictures edited using special effects on a "Memory Stick Duo" (p. 77) or record them on another digital effect while recording pictures on a tape with [CINEMA EFECT] selected. • For DCR-HC96: The digital effect function is suspended while using special...
...; Adjust the focus manually using a tripod (optional) since adjusting the focus automatically is hard when [SLOW SHUTTR] is to a 16:9 screen and progressive picture. No adjustment necessary. *1 Available during recording on a tape only. *2 DCR-HC96 3 Touch . DELAY MOTION (Delay motion) (DCR-HC96) You can save pictures edited using special effects on a "Memory Stick Duo" (p. 77) or record them on another digital effect while recording pictures on a tape with [CINEMA EFECT] selected. • For DCR-HC96: The digital effect function is suspended while using special...

Operating Guide
Page 62
... recording) (DCR-HC96) You can add special effects to a picture during playback. • You can save pictures edited using the supplied AC Adaptor for this operation. [a]: Recording [b]: Interval 1 Touch t / to select a desired interval time (1 to the wall outlet using special effects on a "Memory Stick Duo" (p. 77) or record them in memory until it has stored several frames. Recording starts and z changes to prevent camera shake. 1 Touch [ON] ( ) t t . 2 Press REC START/STOP...
... recording) (DCR-HC96) You can add special effects to a picture during playback. • You can save pictures edited using the supplied AC Adaptor for this operation. [a]: Recording [b]: Interval 1 Touch t / to select a desired interval time (1 to the wall outlet using special effects on a "Memory Stick Duo" (p. 77) or record them in memory until it has stored several frames. Recording starts and z changes to prevent camera shake. 1 Touch [ON] ( ) t t . 2 Press REC START/STOP...
Operating Guide
Page 67
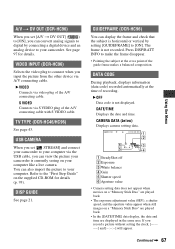
VIDEO INPUT (DCR-HC96) Selects the video plug to connect when you record a picture without setting the clock and [--:--:--] will appear. TV TYPE (DCR-HC46/HC96) See page 43. DATE/TIME Displays the date and time. If you input the picture from the other device via A/V connecting cable. DISP GUIDE See page 21. Continued , 67 Using the Menu A/V t DV OUT (DCR-HC96) When you set [ STREAM] and connect your camcorder to your computer via the USB cable, you can convert analog signals to digital by...
VIDEO INPUT (DCR-HC96) Selects the video plug to connect when you record a picture without setting the clock and [--:--:--] will appear. TV TYPE (DCR-HC46/HC96) See page 43. DATE/TIME Displays the date and time. If you input the picture from the other device via A/V connecting cable. DISP GUIDE See page 21. Continued , 67 Using the Menu A/V t DV OUT (DCR-HC96) When you set [ STREAM] and connect your camcorder to your computer via the USB cable, you can convert analog signals to digital by...

Operating Guide
Page 68
... your camcorder for a picture recorded using a flash. REMOTE CTRL (Remote control) The default setting is [ON]) (p. 35). REMAINING B AUTO Displays the remaining tape indicator for about 8 seconds in situations such as the time code on the TV screen, LCD screen, and in the viewfinder. OPPOSITE Scrolls the menu items upwards by touching . REC LAMP (Recording lamp) (DCR-HC96) The camera recording lamp will not light up during recording when you set the POWER switch to PLAY/ EDIT or CAMERA-TAPE with a cassette inserted...
... your camcorder for a picture recorded using a flash. REMOTE CTRL (Remote control) The default setting is [ON]) (p. 35). REMAINING B AUTO Displays the remaining tape indicator for about 8 seconds in situations such as the time code on the TV screen, LCD screen, and in the viewfinder. OPPOSITE Scrolls the menu items upwards by touching . REC LAMP (Recording lamp) (DCR-HC96) The camera recording lamp will not light up during recording when you set the POWER switch to PLAY/ EDIT or CAMERA-TAPE with a cassette inserted...

Operating Guide
Page 79
... of the cassette is set the end point for fixing the installed external microphone (optional) securely. Sound you want to SAVE (p. 123). - Dubbing/Editing - Recording sound Insert a recorded cassette into your camcorder (p. 122). - After step 2 to turn on the Handycam Station. To connect, press down . • When you dub audio on a tape recorded on other device. When the write-protect tab of your camcorder beforehand. 1 Slide the POWER switch repeatedly to 4, the recording stops automatically...
... of the cassette is set the end point for fixing the installed external microphone (optional) securely. Sound you want to SAVE (p. 123). - Dubbing/Editing - Recording sound Insert a recorded cassette into your camcorder (p. 122). - After step 2 to turn on the Handycam Station. To connect, press down . • When you dub audio on a tape recorded on other device. When the write-protect tab of your camcorder beforehand. 1 Slide the POWER switch repeatedly to 4, the recording stops automatically...
Operating Guide
Page 93
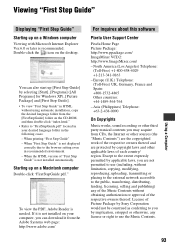
....adobe.com/ For inquires about this software Pixela User Support Center Pixela Home Page Picture Package: http://www.ppackage.com/ ImageMixer VCD2: http://www.ImageMixer.com/ - To view the PDF, Adobe Reader is not displayed correctly due to use (including, without using automatic installation, copy the desired language folder from the [FirstStepGuide] folder on your desired language folder in recommended environment. - When the...
....adobe.com/ For inquires about this software Pixela User Support Center Pixela Home Page Picture Package: http://www.ppackage.com/ ImageMixer VCD2: http://www.ImageMixer.com/ - To view the PDF, Adobe Reader is not displayed correctly due to use (including, without using automatic installation, copy the desired language folder from the [FirstStepGuide] folder on your desired language folder in recommended environment. - When the...
Operating Guide
Page 99
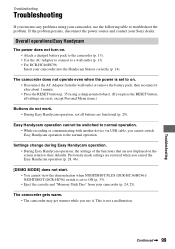
... operate even when the power is set to troubleshoot the problem. Previously made settings are functional (p. 29). Continued , 99 Troubleshooting Settings change during Easy Handycam operation. • During Easy Handycam operation, the settings of the functions that are not displayed on the screen return to a wall outlet (p. 13). • For DCR-HC46/HC96: Insert your camcorder (p. 24, 25). Easy Handycam operation cannot be switched to normal operation. • While recording or communicating with another device via USB cable, you use...
... operate even when the power is set to troubleshoot the problem. Previously made settings are functional (p. 29). Continued , 99 Troubleshooting Settings change during Easy Handycam operation. • During Easy Handycam operation, the settings of the functions that are not displayed on the screen return to a wall outlet (p. 13). • For DCR-HC46/HC96: Insert your camcorder (p. 24, 25). Easy Handycam operation cannot be switched to normal operation. • While recording or communicating with another device via USB cable, you use...

Operating Guide
Page 107
...; Clean the head using the cleaning cassette (optional) (p. 129). The displayed pictures are playing was recorded without setting the date and time. • A blank section on the tape is displayed on the screen. • The tape you are also connected (p. 42). "---" is being played. • The data code on a computer (In this case, the file name flashes). Your camcorder is displayed on the screen. • The tape you are using an S VIDEO plug, make sure the red and white plugs of your camcorder (NTSC...
...; Clean the head using the cleaning cassette (optional) (p. 129). The displayed pictures are playing was recorded without setting the date and time. • A blank section on the tape is displayed on the screen. • The tape you are also connected (p. 42). "---" is being played. • The data code on a computer (In this case, the file name flashes). Your camcorder is displayed on the screen. • The tape you are using an S VIDEO plug, make sure the red and white plugs of your camcorder (NTSC...
Operating Guide
Page 113
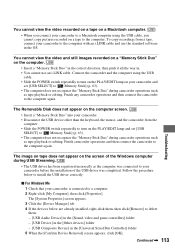
... [Universal Serial Bus Controller] folder 5 When the [Confirm Device Removal] screen appears, click [OK]. Finish any camcorder operations and then connect the camcorder to the computer with an i.LINK cable and use an i.LINK cable. Troubleshooting You cannot view the video recorded on a tape on a Macintosh computer. • When you connect your camcorder to a Macintosh computer using the USB cable. • Slide the POWER switch repeatedly to turn on the PLAY/EDIT lamp and set [USB SELECT] to [ Memory Stick...
... [Universal Serial Bus Controller] folder 5 When the [Confirm Device Removal] screen appears, click [OK]. Finish any camcorder operations and then connect the camcorder to the computer with an i.LINK cable and use an i.LINK cable. Troubleshooting You cannot view the video recorded on a tape on a Macintosh computer. • When you connect your camcorder to a Macintosh computer using the USB cable. • Slide the POWER switch repeatedly to turn on the PLAY/EDIT lamp and set [USB SELECT] to [ Memory Stick...
Operating Guide
Page 114
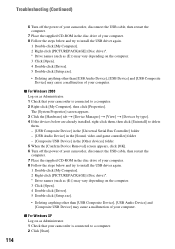
...] t [View] t [Devices by type]. 4 If the devices below are already installed, right-click them, then click [Uninstall] to delete them. - [USB Composite Device] in the [Universal Serial Bus Controller] folder - [USB Audio Device] in the [Sound, video and game controller] folder - [Composite USB Device] in the [Other devices] folder 5 When the [Confirm Device Removal] screen appears, click [OK]. 6 Turn off the power of your camcorder, disconnect the USB cable, then restart the computer. 7 Place the supplied CD-ROM...
...] t [View] t [Devices by type]. 4 If the devices below are already installed, right-click them, then click [Uninstall] to delete them. - [USB Composite Device] in the [Universal Serial Bus Controller] folder - [USB Audio Device] in the [Sound, video and game controller] folder - [Composite USB Device] in the [Other devices] folder 5 When the [Confirm Device Removal] screen appears, click [OK]. 6 Turn off the power of your camcorder, disconnect the USB cable, then restart the computer. 7 Place the supplied CD-ROM...

Operating Guide
Page 115
... [Open]. 4 Double-click [Driver]. 5 Double-click [Setup.exe]. • Deleting anything other than [USB Composite Device], [USB Audio Device] and [USB Device] may take some time until the drive is recognized. 3 Double-click the desired image file. [Cannot start or cancel the Easy Handycam settings while the USB cable is connected to the Windows computer via a USB cable. • Change the settings for the newly recognized drive [Removable Disk]. It may cause a malfunction of your camcorder, disconnect the USB cable, then...
... [Open]. 4 Double-click [Driver]. 5 Double-click [Setup.exe]. • Deleting anything other than [USB Composite Device], [USB Audio Device] and [USB Device] may take some time until the drive is recognized. 3 Double-click the desired image file. [Cannot start or cancel the Easy Handycam settings while the USB cable is connected to the Windows computer via a USB cable. • Change the settings for the newly recognized drive [Removable Disk]. It may cause a malfunction of your camcorder, disconnect the USB cable, then...
Operating Guide
Page 124
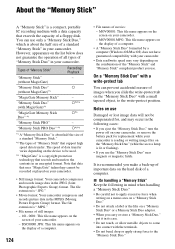
...replacement while your camcorder. You can prevent accidental erasure of your camcorder. However, appearance on your camcorder. - a*2*3 *1 A "Memory Stick Duo" is about half the size of a standard "Memory Stick." *2 The types of "Memory Stick Duo" in the MPEG (Moving Picture Experts Group) format. On a "Memory Stick Duo" with MagicGate)*1 "MagicGate Memory Stick Duo" *1 "Memory Stick PRO" "Memory Stick PRO Duo" *1 Recording/ Playback - The file extension is ".JPG." • Movie format: Your camcorder compresses and records picture data in your camcorder. - The speed of data...
...replacement while your camcorder. You can prevent accidental erasure of your camcorder. However, appearance on your camcorder. - a*2*3 *1 A "Memory Stick Duo" is about half the size of a standard "Memory Stick." *2 The types of "Memory Stick Duo" in the MPEG (Moving Picture Experts Group) format. On a "Memory Stick Duo" with MagicGate)*1 "MagicGate Memory Stick Duo" *1 "Memory Stick PRO" "Memory Stick PRO Duo" *1 Recording/ Playback - The file extension is ".JPG." • Movie format: Your camcorder compresses and records picture data in your camcorder. - The speed of data...
Operating Guide
Page 137
... (Audio dubbing 79 AUDIO MIX 66, 80 AUDIO MODE 65 AUTO SHUTTER 51 B B&W 62 BACK LIGHT 33, 105 BATT (battery) release lever 15 Battery BATT INFO (Battery info 35 Charging time 15 Playing time 16 Recording time 15 Remaining battery .........35 BEACH&SKI 49 BEEP 68 BLACK FADER 59 BURN DVD 65, 94 BURN VCD 64 BURST 55 Button-type lithium battery 131 C CALIBRATION 130 CAMERA DATA 67 CAMERA SET menu........... 49 Cassette 24, 123 Cassette compartment ... 24 Insert/Eject...
... (Audio dubbing 79 AUDIO MIX 66, 80 AUDIO MODE 65 AUTO SHUTTER 51 B B&W 62 BACK LIGHT 33, 105 BATT (battery) release lever 15 Battery BATT INFO (Battery info 35 Charging time 15 Playing time 16 Recording time 15 Remaining battery .........35 BEACH&SKI 49 BEEP 68 BLACK FADER 59 BURN DVD 65, 94 BURN VCD 64 BURST 55 Button-type lithium battery 131 C CALIBRATION 130 CAMERA DATA 67 CAMERA SET menu........... 49 Cassette 24, 123 Cassette compartment ... 24 Insert/Eject...


