Operating Guide
Page 3
... not likely to be equipped with a cloth or other ). Overloading Do not overload wall outlets, extension cords or convenience receptacles beyond their capacity, since this manual for example, near a swimming pool, etc. Power-Cord Protection Route the power cord so that could result in the operating instructions and adhere to the...
... not likely to be equipped with a cloth or other ). Overloading Do not overload wall outlets, extension cords or convenience receptacles beyond their capacity, since this manual for example, near a swimming pool, etc. Power-Cord Protection Route the power cord so that could result in the operating instructions and adhere to the...
Operating Guide
Page 5
...16450 W. Operation is subject to the following two conditions: (1) This device may not cause harmful interference, and (2) this manual thoroughly, and retain it for the FCC related matters only. For more information regarding recycling of the FCC Rules. Bernardo Dr...this product, you . Regulatory Information Declaration of Conformity Trade Name: SONY Model No.: DCR-HC46 Responsible Party: Sony Electronics Inc. Declaration of Conformity Trade Name: SONY Model No.: DCR-HC36 Responsible Party: Sony Electronics Inc. Telephone Number: 858-942-2230 This device complies with...
...16450 W. Operation is subject to the following two conditions: (1) This device may not cause harmful interference, and (2) this manual thoroughly, and retain it for the FCC related matters only. For more information regarding recycling of the FCC Rules. Bernardo Dr...this product, you . Regulatory Information Declaration of Conformity Trade Name: SONY Model No.: DCR-HC46 Responsible Party: Sony Electronics Inc. Declaration of Conformity Trade Name: SONY Model No.: DCR-HC36 Responsible Party: Sony Electronics Inc. Telephone Number: 858-942-2230 This device complies with...
Operating Guide
Page 6
... and (2) this device must be used in this manual could void your Sony dealer regarding this product. Address: 16450 W. Telephone ... comply with the Handycam Station Model DCRA-C151 and AC Adaptor Model AC-L25A/L25B. • DCR-HC96 is to a computer...SONY Model No.: DCR-HC96 Responsible Party: Sony Electronics Inc. Model No. ACNo. The supplied interface cable must accept any changes or modifications not expressly approved in accordance with two kinds of FCC Rules. "First Step Guide" for help. Consult the dealer or an experienced radio/TV technician for connecting the camcorder...
... and (2) this device must be used in this manual could void your Sony dealer regarding this product. Address: 16450 W. Telephone ... comply with the Handycam Station Model DCRA-C151 and AC Adaptor Model AC-L25A/L25B. • DCR-HC96 is to a computer...SONY Model No.: DCR-HC96 Responsible Party: Sony Electronics Inc. Model No. ACNo. The supplied interface cable must accept any changes or modifications not expressly approved in accordance with two kinds of FCC Rules. "First Step Guide" for help. Consult the dealer or an experienced radio/TV technician for connecting the camcorder...
Operating Guide
Page 8
...language before using your camcorder if necessary (p. 69)....DCR-HC96. To view your camcorder to a malfunction of the camcorder, storage media, etc. • TV color systems differ depending on this manual...DCR-HC96: The lens for video cameras and offers a quality typical of a Carl Zeiss lens. The model name is equipped with a Carl Zeiss lens, which was developed jointly by Carl Zeiss, in this manual... • The images of the LCD screen and the viewfinder used for effective use. It adopts the MTF measurement system for your camcorder... About this manual for illustration ...
...language before using your camcorder if necessary (p. 69)....DCR-HC96. To view your camcorder to a malfunction of the camcorder, storage media, etc. • TV color systems differ depending on this manual...DCR-HC96: The lens for video cameras and offers a quality typical of a Carl Zeiss lens. The model name is equipped with a Carl Zeiss lens, which was developed jointly by Carl Zeiss, in this manual... • The images of the LCD screen and the viewfinder used for effective use. It adopts the MTF measurement system for your camcorder... About this manual for illustration ...
Operating Guide
Page 10
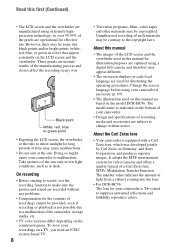
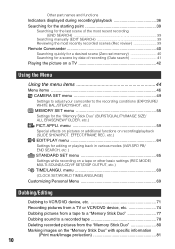
... during recording/playback 36 Searching for the starting point 39 Searching for the last scene of the most recent recording (END SEARCH 39 Searching manually (EDIT SEARCH 39 Reviewing the most recently recorded scenes (Rec review 39 Remote Commander 40 Searching quickly for a desired scene (Zero set ...Playing the picture on a TV 42 Using the Menu Using the menu items 44 Menu items 46 CAMERA SET menu 49 Settings to adjust your camcorder to a recorded tape 78 Deleting recorded pictures from the "Memory Stick Duo 80 Marking images on recording/playback (SLIDE SHOW/PICT. EFFECT/FRAME...
... during recording/playback 36 Searching for the starting point 39 Searching for the last scene of the most recent recording (END SEARCH 39 Searching manually (EDIT SEARCH 39 Reviewing the most recently recorded scenes (Rec review 39 Remote Commander 40 Searching quickly for a desired scene (Zero set ...Playing the picture on a TV 42 Using the Menu Using the menu items 44 Menu items 46 CAMERA SET menu 49 Settings to adjust your camcorder to a recorded tape 78 Deleting recorded pictures from the "Memory Stick Duo 80 Marking images on recording/playback (SLIDE SHOW/PICT. EFFECT/FRAME...

Operating Guide
Page 12
... camcorder. The number in the parentheses indicates the number of the Grip belt, as illustrated below, using the strap. Handycam Station (1) (DCR-HC46/HC96) (p. 13) Rechargeable battery pack (1) (p. 13, 126) NP-FP30 (DCR-HC36) NP-FP50 (DCR-HC46/HC96)... Wireless Remote Commander (1) (p. 40) A button-type lithium battery is already installed. A/V connecting cable (1) (p. 42, 74, 97) CD-ROM "Picture Package Ver.1.5.1" (1) (p. 86) Operating Guide (This manual...
... camcorder. The number in the parentheses indicates the number of the Grip belt, as illustrated below, using the strap. Handycam Station (1) (DCR-HC46/HC96) (p. 13) Rechargeable battery pack (1) (p. 13, 126) NP-FP30 (DCR-HC36) NP-FP50 (DCR-HC46/HC96)... Wireless Remote Commander (1) (p. 40) A button-type lithium battery is already installed. A/V connecting cable (1) (p. 42, 74, 97) CD-ROM "Picture Package Ver.1.5.1" (1) (p. 86) Operating Guide (This manual...
Operating Guide
Page 22
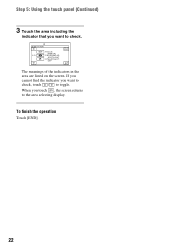
If you cannot find the indicator you want to check, touch / to toggle. Step 5: Using the touch panel (Continued) 3 Touch the area including the indicator that you want to check. To finish the operation Touch [END]. 22 DISP GUIDE 1/2 FOCUS: MANUAL PROGRAM AE: SPOTLIGHT STEADYSHOT: OFF END The meanings of the indicators in the area are listed on the screen. When you touch , the screen returns to the area selecting display.
If you cannot find the indicator you want to check, touch / to toggle. Step 5: Using the touch panel (Continued) 3 Touch the area including the indicator that you want to check. To finish the operation Touch [END]. 22 DISP GUIDE 1/2 FOCUS: MANUAL PROGRAM AE: SPOTLIGHT STEADYSHOT: OFF END The meanings of the indicators in the area are listed on the screen. When you touch , the screen returns to the area selecting display.

Operating Guide
Page 33
...BACK LIGHT 6 to display .. Therefore, do not cover the infrared port 1 with your fingers or other objects. To record in dark places (NightShot) (DCR-HC96 8 Set the NIGHTSHOT switch 8 to ON. ( and ["NIGHTSHOT"] appear.) • To record an image brighter, use infrared light. This may cause... a malfunction. Remove the conversion lens (optional) if it is attached. • Adjust the focus manually ([FOCUS], p. 51) when it is complete (In the CAMERA-TAPE mode, it . This may cause a malfunction. To record an image ...
...BACK LIGHT 6 to display .. Therefore, do not cover the infrared port 1 with your fingers or other objects. To record in dark places (NightShot) (DCR-HC96 8 Set the NIGHTSHOT switch 8 to ON. ( and ["NIGHTSHOT"] appear.) • To record an image brighter, use infrared light. This may cause... a malfunction. Remove the conversion lens (optional) if it is attached. • Adjust the focus manually ([FOCUS], p. 51) when it is complete (In the CAMERA-TAPE mode, it . This may cause a malfunction. To record an image ...
Operating Guide
Page 38
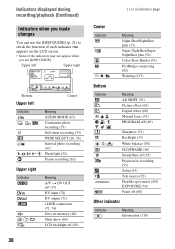
.../Super NightShot plus (52) Color Slow Shutter (53) PictBridge connecting (82) Warning (117) Bottom Indicator 9 Meaning AE SHIFT (51) Picture effect (62) Digital effect (60) Manual focus (51) PROGRAM AE (49) . n Sharpness (51) Backlight (33) White balance (50) FLD/FRAME (56) SteadyShot off (55) Progressive recording (55) Zebra (53) Tele macro...
.../Super NightShot plus (52) Color Slow Shutter (53) PictBridge connecting (82) Warning (117) Bottom Indicator 9 Meaning AE SHIFT (51) Picture effect (62) Digital effect (60) Manual focus (51) PROGRAM AE (49) . n Sharpness (51) Backlight (33) White balance (50) FLD/FRAME (56) SteadyShot off (55) Progressive recording (55) Zebra (53) Tele macro...

Operating Guide
Page 39
... last scene of the most recent recording is played back for about 2 seconds of the most recently recorded scene are played back. Searching manually (EDIT SEARCH) You can view about 5 seconds, and the camcorder enters the standby mode at the point where you want the recording to the standby. 39 Then, your... camcorder is not played back during the search. 1 Touch . 6 0 min STBY 0:00:00 EDIT 2 Touch and hold (to go backward)/ (to cancel the operation. Touch t 6 0 min . ...
... last scene of the most recent recording is played back for about 2 seconds of the most recently recorded scene are played back. Searching manually (EDIT SEARCH) You can view about 5 seconds, and the camcorder enters the standby mode at the point where you want the recording to the standby. 39 Then, your... camcorder is not played back during the search. 1 Touch . 6 0 min STBY 0:00:00 EDIT 2 Touch and hold (to go backward)/ (to cancel the operation. Touch t 6 0 min . ...
Operating Guide
Page 42
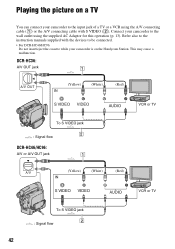
Refer also to the instruction manuals supplied with S VIDEO (2). Connect your camcorder to be connected. • For DCR-HC46/HC96: Do not insert/eject the cassette while your camcorder to the input jack of a TV or a VCR using the A/V connecting cable (1) ...DCR-HC36: A/V OUT jack 1 A/V OUT (Yellow) (White) (Red) VCR or TV To S VIDEO jack 2 : Signal flow DCR-HC46/HC96: A/V or A/V OUT jack 1 A/V (Yellow) (White) (Red) VCR or TV To S VIDEO jack 2 : Signal flow 42 This may cause a malfunction. Playing the picture on a TV You can connect your camcorder is on the Handycam...
Refer also to the instruction manuals supplied with S VIDEO (2). Connect your camcorder to be connected. • For DCR-HC46/HC96: Do not insert/eject the cassette while your camcorder to the input jack of a TV or a VCR using the A/V connecting cable (1) ...DCR-HC36: A/V OUT jack 1 A/V OUT (Yellow) (White) (Red) VCR or TV To S VIDEO jack 2 : Signal flow DCR-HC46/HC96: A/V or A/V OUT jack 1 A/V (Yellow) (White) (Red) VCR or TV To S VIDEO jack 2 : Signal flow 42 This may cause a malfunction. Playing the picture on a TV You can connect your camcorder is on the Handycam...
Operating Guide
Page 50
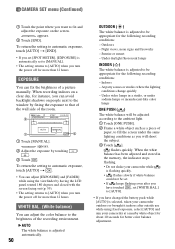
... To return the setting to automatic exposure, touch [AUTO] t [END]. • If you set [SPOT METER], [EXPOSURE] is selected, taken your camcorder outdoors or brought it indoors after you will be appropriate for more than 12 hours. To return the setting to automatic exposure, touch [AUTO] t ....AUTO] when you want to fix and adjust the exposure on people next to the window by fixing the exposure to the brightness of a picture manually. Indoors - CAMERA SET menu (Continued) 1 Touch the point where you turn the power off for the following recording conditions: - appears. ...
... To return the setting to automatic exposure, touch [AUTO] t [END]. • If you set [SPOT METER], [EXPOSURE] is selected, taken your camcorder outdoors or brought it indoors after you will be appropriate for more than 12 hours. To return the setting to automatic exposure, touch [AUTO] t ....AUTO] when you want to fix and adjust the exposure on people next to the window by fixing the exposure to the brightness of a picture manually. Indoors - CAMERA SET menu (Continued) 1 Touch the point where you turn the power off for the following recording conditions: - appears. ...
Operating Guide
Page 51
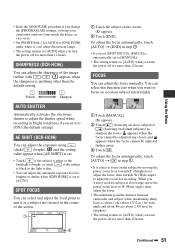
... the image outline with / . and the setting value appear when [AE SHIFT] is set to [MANUAL]. • The setting returns to [AUTO] when you turn the power off for more than 12 hours. SHARPNESS (DCR-HC96) You can adjust the exposure using (dark)/ (bright). FOCUS You can select and adjust the focal... subject while maintaining sharp focus is dim. • Redo the [ONE PUSH] procedure if you change the [PROGRAM AE] settings, or bring your camcorder outdoors from inside the house, or vice versa. • Set [WHITE BAL.] to [AUTO] or [ONE PUSH] under white or cool white fluorescent lamps. &#...
... the image outline with / . and the setting value appear when [AE SHIFT] is set to [MANUAL]. • The setting returns to [AUTO] when you turn the power off for more than 12 hours. SHARPNESS (DCR-HC96) You can adjust the exposure using (dark)/ (bright). FOCUS You can select and adjust the focal... subject while maintaining sharp focus is dim. • Redo the [ONE PUSH] procedure if you change the [PROGRAM AE] settings, or bring your camcorder outdoors from inside the house, or vice versa. • Set [WHITE BAL.] to [AUTO] or [ONE PUSH] under white or cool white fluorescent lamps. &#...
Operating Guide
Page 52
... objects (p. 33). • Remove the conversion lens (optional) if it is attached. • Adjust the focus manually ([FOCUS], p. 51) when it is compatible with your camcorder changes depending on the screen. SUPER NS (Super NightShot) (DCR-HC96) The picture will be difficult and can prevent redeye by activating the flash before recording. 52 Set...
... objects (p. 33). • Remove the conversion lens (optional) if it is attached. • Adjust the focus manually ([FOCUS], p. 51) when it is compatible with your camcorder changes depending on the screen. SUPER NS (Super NightShot) (DCR-HC96) The picture will be difficult and can prevent redeye by activating the flash before recording. 52 Set...
Operating Guide
Page 53
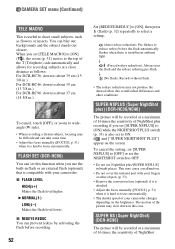
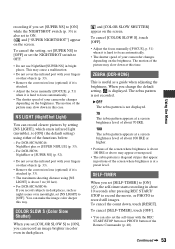
...[SELF-TIMER], touch [OFF]. • You can record an image brighter in color even in dark places. Continued , 53 Using the Menu For DCR-HC96: NightShot or [SUPER NS] (p. 52). • Do not cover the infrared port with the REC START/STOP button or PHOTO button of the Remote... Commander (p. 40). To cancel [COLOR SLOW S], touch [OFF]. • Adjust the focus manually ([FOCUS], p. 51) when it is hard to focus automatically. • The shutter speed of your camcorder changes depending on the brightness. This may slow down , touch [RESET]. You can record clearer pictures by...
...[SELF-TIMER], touch [OFF]. • You can record an image brighter in color even in dark places. Continued , 53 Using the Menu For DCR-HC96: NightShot or [SUPER NS] (p. 52). • Do not cover the infrared port with the REC START/STOP button or PHOTO button of the Remote... Commander (p. 40). To cancel [COLOR SLOW S], touch [OFF]. • Adjust the focus manually ([FOCUS], p. 51) when it is hard to focus automatically. • The shutter speed of your camcorder changes depending on the brightness. This may slow down , touch [RESET]. You can record clearer pictures by...
Operating Guide
Page 61
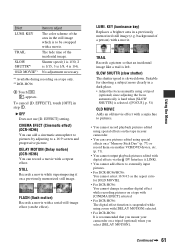
... subject more clearly in a dark place. • Adjust the focus manually using special effects on a tripod (optional) when you mount your camcorder. • You can record a movie with [DELAY MOTION] selected. • For DCR-HC96: It is recommended that an incidental image like a trail is 1/4). Shutter...Suitable for [OLD MOVIE]. • For DCR-HC96: You cannot change to adjust The color scheme of the area in your camcorder on the tape in the still image which is slowed down. CINEMA EFECT (Cinematic effect) (DCR-HC96) You can add a cinematic atmosphere to ...
... subject more clearly in a dark place. • Adjust the focus manually using special effects on a tripod (optional) when you mount your camcorder. • You can record a movie with [DELAY MOTION] selected. • For DCR-HC96: It is recommended that an incidental image like a trail is 1/4). Shutter...Suitable for [OLD MOVIE]. • For DCR-HC96: You cannot change to adjust The color scheme of the area in your camcorder on the tape in the still image which is slowed down. CINEMA EFECT (Cinematic effect) (DCR-HC96) You can add a cinematic atmosphere to ...
Operating Guide
Page 63
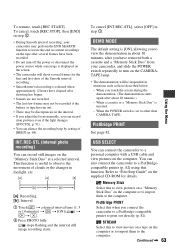
...There may be suspended in the interval. • If you adjust the focus manually, you touch the screen during the demonstration. (The demonstration starts again after about 10 minutes, after you connect the camcorder to a PictBridge-compatible printer to a personal computer with a USB cable and ...the POWER switch is useful to the computer. This function is set to view pictures on a "Memory Stick Duo" on the screen. • The camcorder will be discrepancies in situations such as those described below. - To cancel [INT.REC-STL], select [OFF] in daylight, etc. [a]: Recording [b]:...
...There may be suspended in the interval. • If you adjust the focus manually, you touch the screen during the demonstration. (The demonstration starts again after about 10 minutes, after you connect the camcorder to a PictBridge-compatible printer to a personal computer with a USB cable and ...the POWER switch is useful to the computer. This function is set to view pictures on a "Memory Stick Duo" on the screen. • The camcorder will be discrepancies in situations such as those described below. - To cancel [INT.REC-STL], select [OFF] in daylight, etc. [a]: Recording [b]:...
Operating Guide
Page 71
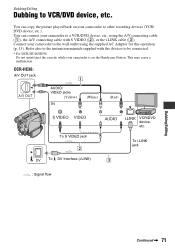
... (VCR/ DVD device, etc.). Refer also to be connected. • For DCR-HC46/HC96: Do not insert/eject the cassette while your camcorder is on the Handycam Station. You can connect your camcorder to VCR/DVD device, etc. To i.LINK jack Dubbing/Editing Continued , 71 ...You can copy the picture played back on your camcorder to the wall outlet using the A/V connecting cable (1), the A/V connecting cable with the devices to the instruction manuals...
... (VCR/ DVD device, etc.). Refer also to be connected. • For DCR-HC46/HC96: Do not insert/eject the cassette while your camcorder is on the Handycam Station. You can connect your camcorder to VCR/DVD device, etc. To i.LINK jack Dubbing/Editing Continued , 71 ...You can copy the picture played back on your camcorder to the wall outlet using the A/V connecting cable (1), the A/V connecting cable with the devices to the instruction manuals...
Operating Guide
Page 74
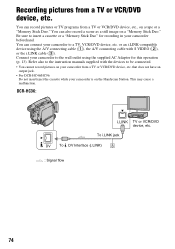
...or VCR/DVD device, etc. that does not have an output jack. • For DCR-HC46/HC96: Do not insert/eject the cassette while your camcorder to insert a cassette or a "Memory Stick Duo" for this operation (p. 13). DCR-HC36: To i.LINK jack DV To DV Interface (i.LINK) 3 : Signal flow TV...instruction manuals supplied with S VIDEO (2), or the i.LINK cable (3). This may cause a malfunction. Be sure to a TV, VCR/DVD device, etc. Recording pictures from a TV or VCR/DVD device, etc., on a tape or a "Memory Stick Duo." You can also record a scene as a still image on the Handycam ...
...or VCR/DVD device, etc. that does not have an output jack. • For DCR-HC46/HC96: Do not insert/eject the cassette while your camcorder to insert a cassette or a "Memory Stick Duo" for this operation (p. 13). DCR-HC36: To i.LINK jack DV To DV Interface (i.LINK) 3 : Signal flow TV...instruction manuals supplied with S VIDEO (2), or the i.LINK cable (3). This may cause a malfunction. Be sure to a TV, VCR/DVD device, etc. Recording pictures from a TV or VCR/DVD device, etc., on a tape or a "Memory Stick Duo." You can also record a scene as a still image on the Handycam ...
Operating Guide
Page 87
This "First Step Guide" describes basic operations, from initial hookup of your camcorder and computer and making settings, to general operation the first time you can refer to on your computer. It is required. CPU: MMX Pentium ... (For using Picture Package OS: Microsoft Windows 2000 Professional, Windows Millennium Edition, Windows XP Home Edition or Windows XP Professional Standard installation is an instruction manual you use the software stored on the size of the software The Help guide explains all software application functions. Using a Computer - For the compatible drive...
This "First Step Guide" describes basic operations, from initial hookup of your camcorder and computer and making settings, to general operation the first time you can refer to on your computer. It is required. CPU: MMX Pentium ... (For using Picture Package OS: Microsoft Windows 2000 Professional, Windows Millennium Edition, Windows XP Home Edition or Windows XP Professional Standard installation is an instruction manual you use the software stored on the size of the software The Help guide explains all software application functions. Using a Computer - For the compatible drive...


