
Operating Guide
Page 4
... personnel under the following the operating instructions. Service Damage Requiring Service Unplug the set from the wall outlet (wall socket) and disconnect the antenna or cable system. When the set exhibits a distinct change in the operating instructions. When the power cord (mains lead) or plug is damaged or frayed. - IMPORTANT SAFEGUARDS...
... personnel under the following the operating instructions. Service Damage Requiring Service Unplug the set from the wall outlet (wall socket) and disconnect the antenna or cable system. When the set exhibits a distinct change in the operating instructions. When the power cord (mains lead) or plug is damaged or frayed. - IMPORTANT SAFEGUARDS...
Operating Guide
Page 6
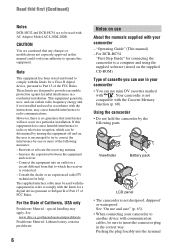
... could void your camcorder to another device with communication cables, be used in accordance with AC Adaptor Model AC-L200/L200B. "Operating Guide" (This manual) - Pushing the plug forcibly into an outlet on , the user is connected. - Read thid first (Continued) Notes DCR-HC52 and DCR-HC54 are to... be sure to insert the connector plug in the correct way. For the State of cassette you can use About the manuals supplied with your camcorder • You can radiate radio frequency energy and, ...
... could void your camcorder to another device with communication cables, be used in accordance with AC Adaptor Model AC-L200/L200B. "Operating Guide" (This manual) - Pushing the plug forcibly into an outlet on , the user is connected. - Read thid first (Continued) Notes DCR-HC52 and DCR-HC54 are to... be sure to insert the connector plug in the correct way. For the State of cassette you can use About the manuals supplied with your camcorder • You can radiate radio frequency energy and, ...
Operating Guide
Page 11
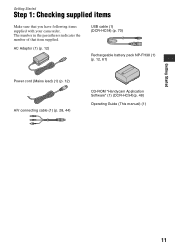
The number in the parentheses indicates the number of that you have following items supplied with your camcorder. Getting Started Step 1: Checking supplied items Make sure that item supplied. AC Adaptor (1) (p. 12) USB cable (1) (DCR-HC54) (p. 70) Rechargeable battery pack NP-FH30 (1) (p. 12, 61) Power cord (Mains lead) (1) (p. 12) A/V connecting cable (1) (p. 28, 44) CD-ROM "Handycam Application Software" (1) (DCR-HC54)(p. 48) Operating Guide (This manual) (1) Getting Started 11
The number in the parentheses indicates the number of that you have following items supplied with your camcorder. Getting Started Step 1: Checking supplied items Make sure that item supplied. AC Adaptor (1) (p. 12) USB cable (1) (DCR-HC54) (p. 70) Rechargeable battery pack NP-FH30 (1) (p. 12, 61) Power cord (Mains lead) (1) (p. 12) A/V connecting cable (1) (p. 28, 44) CD-ROM "Handycam Application Software" (1) (DCR-HC54)(p. 48) Operating Guide (This manual) (1) Getting Started 11
Operating Guide
Page 28
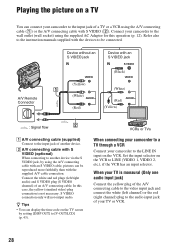
... the LINE IN input on the VCR. S VIDEO connection only will not output audio. z Tips • You can connect your camcorder to be reproduced more faithfully than with an S VIDEO cable, pictures can be connected. Connect the white and red plugs (left channel) or the red (right channel) plug to the audio...
... the LINE IN input on the VCR. S VIDEO connection only will not output audio. z Tips • You can connect your camcorder to be reproduced more faithfully than with an S VIDEO cable, pictures can be connected. Connect the white and red plugs (left channel) or the red (right channel) plug to the audio...
Operating Guide
Page 35
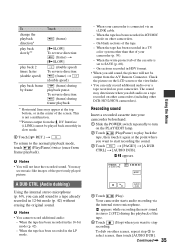
When the tape has been recorded in a TV color system other DCR-HC52/HC54 camcorders). AUDIO DUB 4 Touch (Play). To dub on the PLAY/EDIT lamp. 2 Touch (Play/Pause) to play back frame by frame (frame) [ySLOW] To reverse direction: (... the tape has been recorded in the 16-bit mode (p. 42). - The sound may see mosaic-like images of the tape. - Your camcorder starts audio recording via an i.LINK cable. - appears while recording the new sound in stereo 2 (ST2) during the playback of the tape. 5 Touch (Stop) when you dub audio on...
When the tape has been recorded in a TV color system other DCR-HC52/HC54 camcorders). AUDIO DUB 4 Touch (Play). To dub on the PLAY/EDIT lamp. 2 Touch (Play/Pause) to play back frame by frame (frame) [ySLOW] To reverse direction: (... the tape has been recorded in the 16-bit mode (p. 42). - The sound may see mosaic-like images of the tape. - Your camcorder starts audio recording via an i.LINK cable. - appears while recording the new sound in stereo 2 (ST2) during the playback of the tape. 5 Touch (Stop) when you dub audio on...

Operating Guide
Page 42
... for when you cannot find your camcorder on the LCD screen. • Your camcorder offers [ENG[SIMP]] (simplified English) for about 8 seconds in situations such as those described below . • When you have removed a cassette from your computer (USB Streaming) via the USB cable. See "First Step Guide" in... of your native tongue among the options. See page 29 for details on selecting menu items. USB STREAM (DCR-HC54) You can select the language to be used on your camcorder, and slide the POWER switch repeatedly to 1.5 times the SP mode (Long Play). DEMO MODE The default ...
... for when you cannot find your camcorder on the LCD screen. • Your camcorder offers [ENG[SIMP]] (simplified English) for about 8 seconds in situations such as those described below . • When you have removed a cassette from your computer (USB Streaming) via the USB cable. See "First Step Guide" in... of your native tongue among the options. See page 29 for details on selecting menu items. USB STREAM (DCR-HC54) You can select the language to be used on your camcorder, and slide the POWER switch repeatedly to 1.5 times the SP mode (Long Play). DEMO MODE The default ...
Operating Guide
Page 44
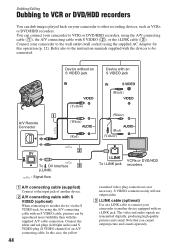
...optional) When connecting to another device via the S VIDEO jack, by using the A/V connecting cable with an S VIDEO cable, pictures can dub images played back on your camcorder to the input jack of an A/V connecting cable. In this operation (p. 12). Device without an S VIDEO jack Device with an S VIDEO...channel) of another device equipped with an i.LINK jack. C i.LINK cable (optional) Use an i.LINK cable to connect your camcorder to other recording devices, such as VCRs or DVD/HDD recorders. Connect your camcorder to VCRs or DVD/HDD recorders, using the supplied AC Adaptor for this...
...optional) When connecting to another device via the S VIDEO jack, by using the A/V connecting cable with an S VIDEO cable, pictures can dub images played back on your camcorder to the input jack of an A/V connecting cable. In this operation (p. 12). Device without an S VIDEO jack Device with an S VIDEO...channel) of another device equipped with an i.LINK jack. C i.LINK cable (optional) Use an i.LINK cable to connect your camcorder to other recording devices, such as VCRs or DVD/HDD recorders. Connect your camcorder to VCRs or DVD/HDD recorders, using the supplied AC Adaptor for this...
Operating Guide
Page 45
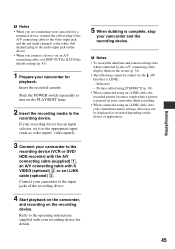
...to the recording device (VCR or DVD/ HDD recorder) with the A/V connecting cable (supplied) 1, an A/V connecting cable with your recording device for playback. Dubbing/Editing b Notes • When you are connecting your camcorder to a monaural device, connect the yellow plug of the recording device. 4 ...using [P EFFECT] (p. 38) • When connected using an i.LINK cable, the recorded picture becomes rough when a picture is complete, stop your camcorder while recording. • When connected using an i.LINK cable, data code (date/time/camera settings data) may not be displayed or ...
...to the recording device (VCR or DVD/ HDD recorder) with the A/V connecting cable (supplied) 1, an A/V connecting cable with your recording device for playback. Dubbing/Editing b Notes • When you are connecting your camcorder to a monaural device, connect the yellow plug of the recording device. 4 ...using [P EFFECT] (p. 38) • When connected using an i.LINK cable, the recorded picture becomes rough when a picture is complete, stop your camcorder while recording. • When connected using an i.LINK cable, data code (date/time/camera settings data) may not be displayed or ...
Operating Guide
Page 46
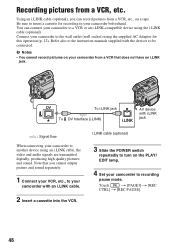
...i.LINK To DV Interface (i.LINK) jack i.LINK : Signal flow When connecting your camcorder beforehand. i.LINK cable (optional) 3 Slide the POWER switch repeatedly to turn on the PLAY/ EDIT lamp. 4 Set your camcorder to insert a cassette for this operation (p. 12). Be sure to recording pause ...mode. Using an i.LINK cable (optional), you cannot output picture and sound separately. 1 Connect your VCR, etc., to your camcorder to be connected. Refer also to the instruction manuals supplied with an i.LINK cable. 2 Insert a cassette into the VCR. Note ...
...i.LINK To DV Interface (i.LINK) jack i.LINK : Signal flow When connecting your camcorder beforehand. i.LINK cable (optional) 3 Slide the POWER switch repeatedly to turn on the PLAY/ EDIT lamp. 4 Set your camcorder to insert a cassette for this operation (p. 12). Be sure to recording pause ...mode. Using an i.LINK cable (optional), you cannot output picture and sound separately. 1 Connect your VCR, etc., to your camcorder to be connected. Refer also to the instruction manuals supplied with an i.LINK cable. 2 Insert a cassette into the VCR. Note ...
Operating Guide
Page 47
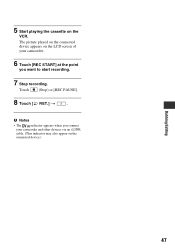
5 Start playing the cassette on the connected device.) Dubbing/Editing 47 b Notes • The indicator appears when you want to start recording. 7 Stop recording. Touch (Stop) or [REC PAUSE]. 8 Touch [ RET.] t . The picture played on the connected device appears on the LCD screen of your camcorder. 6 Touch [REC START] at the point you connect your camcorder and other devices via an i.LINK cable. (This indicator may also appear on the VCR.
5 Start playing the cassette on the connected device.) Dubbing/Editing 47 b Notes • The indicator appears when you want to start recording. 7 Stop recording. Touch (Stop) or [REC PAUSE]. 8 Touch [ RET.] t . The picture played on the connected device appears on the LCD screen of your camcorder. 6 Touch [REC START] at the point you connect your camcorder and other devices via an i.LINK cable. (This indicator may also appear on the VCR.
Operating Guide
Page 49
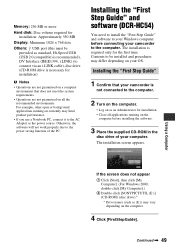
... are not guaranteed on as (E:)) may limit product performance. • If you use a Notebook PC, connect it to connect via an i.LINK cable), disc drive (CD-ROM drive is required only for installation. • Close all the recommended environments. For example, other open or background applications ...computer. 2 Turn on the computer. • Log on a computer environment that your camcorder is not connected to the power saving function of your OS. Installing the "First Step Guide" and software (DCR-HC54) You need to install the "First Step Guide" and software to your Windows ...
... are not guaranteed on as (E:)) may limit product performance. • If you use a Notebook PC, connect it to connect via an i.LINK cable), disc drive (CD-ROM drive is required only for installation. • Close all the recommended environments. For example, other open or background applications ...computer. 2 Turn on the computer. • Log on a computer environment that your camcorder is not connected to the power saving function of your OS. Installing the "First Step Guide" and software (DCR-HC54) You need to install the "First Step Guide" and software to your Windows ...
Operating Guide
Page 55
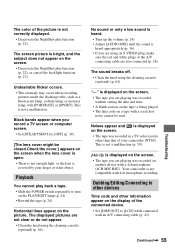
...lines appear on the screen. The displayed pictures are playing was recorded on the PLAY/EDIT lamp (p. 24). • Rewind the tape (p. 24). Your camcorder is not a malfunction. No sound or only a low sound is heard. • Turn up the volume (p. 24). • Adjust [AUDIO MIX]... You cannot play back a tape. • Slide the POWER switch repeatedly to other devices Time code and other than that of the A/V connecting cable are using the cleaning cassette (optional) (p. 64). This is not compatible with [PORTRAIT] or [SPORT]. Noises appear and on the picture. is...
...lines appear on the screen. The displayed pictures are playing was recorded on the PLAY/EDIT lamp (p. 24). • Rewind the tape (p. 24). Your camcorder is not a malfunction. No sound or only a low sound is heard. • Turn up the volume (p. 24). • Adjust [AUDIO MIX]... You cannot play back a tape. • Slide the POWER switch repeatedly to other devices Time code and other than that of the A/V connecting cable are using the cleaning cassette (optional) (p. 64). This is not compatible with [PORTRAIT] or [SPORT]. Noises appear and on the picture. is...
Operating Guide
Page 56
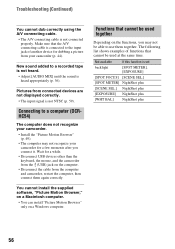
... a while. • Disconnect USB devices other than the keyboard, the mouse, and the camcorder from the (USB) jack on the computer. • Disconnect the cable from the computer and camcorder, restart the computer, then connect them together. Pictures from your camcorder for a few moments after you may not be able to use them again...
... a while. • Disconnect USB devices other than the keyboard, the mouse, and the camcorder from the (USB) jack on the computer. • Disconnect the cable from the computer and camcorder, restart the computer, then connect them together. Pictures from your camcorder for a few moments after you may not be able to use them again...
Operating Guide
Page 61
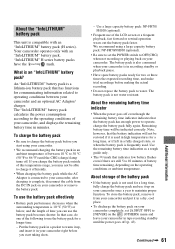
...battery pack faster. The battery pack is an "InfoLITHIUM" battery pack? The battery pack is also consumed when your camcorder. About storage of your camcorder and put it in high temperatures for communicating information related to operating conditions between 10 °C to 30 °...indication will be restored if it efficiently. • When charging the battery pack while the AC Adaptor is complete, disconnect the cable from your camcorder, and displays the remaining battery time in recording standby or playback pause. • Have spare battery packs ready for a longer...
...battery pack faster. The battery pack is an "InfoLITHIUM" battery pack? The battery pack is also consumed when your camcorder. About storage of your camcorder and put it in high temperatures for communicating information related to operating conditions between 10 °C to 30 °...indication will be restored if it efficiently. • When charging the battery pack while the AC Adaptor is complete, disconnect the cable from your camcorder, and displays the remaining battery time in recording standby or playback pause. • Have spare battery packs ready for a longer...
Operating Guide
Page 62
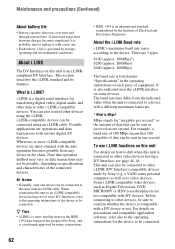
.... • IEEE 1394 is a digital serial interface for the device to other devices using an i.LINK cable. i.LINK is an international standard standardized by Sony (e.g. Mbps stands for the IEEE 1394 data transport bus proposed by Sony, and is a trademark approved by storage, operating and environmental conditions. a VAIO series personal computer) as well... the unit, operation becomes possible from the indicated value when the unit is connected to replace it is probably time to a device with an i.LINK cable.
.... • IEEE 1394 is a digital serial interface for the device to other devices using an i.LINK cable. i.LINK is an international standard standardized by Sony (e.g. Mbps stands for the IEEE 1394 data transport bus proposed by Sony, and is a trademark approved by storage, operating and environmental conditions. a VAIO series personal computer) as well... the unit, operation becomes possible from the indicated value when the unit is connected to replace it is probably time to a device with an i.LINK cable.
Operating Guide
Page 63
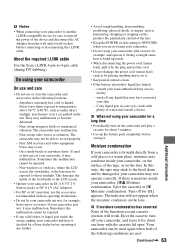
...about one hour with the cassette lid open. If there is brought directly from a cold place to a warm place, moisture may condense inside your camcorder, and leave it for example, and operate it . • Keep metal contacts clean. • If the battery electrolytic liquid has leaked, -...). Eject the cassette, turn off for example, from the wall outlet (wall socket) before connecting or disconnecting the i.LINK cable. About the required i.LINK cable Use the Sony i.LINK 4-pin-to OFF(CHG) when you are met: Continued , 63 Additional Information Near AM receivers and video equipment....
...about one hour with the cassette lid open. If there is brought directly from a cold place to a warm place, moisture may condense inside your camcorder, and leave it for example, and operate it . • Keep metal contacts clean. • If the battery electrolytic liquid has leaked, -...). Eject the cassette, turn off for example, from the wall outlet (wall socket) before connecting or disconnecting the i.LINK cable. About the required i.LINK cable Use the Sony i.LINK 4-pin-to OFF(CHG) when you are met: Continued , 63 Additional Information Near AM receivers and video equipment....
Operating Guide
Page 75
... dubbing 35 AC Adaptor 12 AUDIO MIX 36 AUDIO MODE 42 A.SHUT OFF (Auto shut off 43 A/V connecting cable .....28, 44 B Backlight 23, 54 Battery 12, 61 BEACH 32 BEEP 33 BLACK 33 B&W 38 C ... DISP GUIDE (Display guide 73 DISP OUT (Display output 43 Display indicators 72 Dubbing 44 E Easy Handycam 19, 29 EDITSEARCH 26, 39 END SCH (END SEARCH 26, 54 EXPOSURE 32 F FADER 32 ... G Getting started 11 GUIDEFRAME 43 I INDOOR 33 "InfoLITHIUM" battery pack 61 Install 49 i.LINK 62 i.LINK cable 44, 46 L LANDSCAPE 31 LANGUAGE 42 LCD 43 LCD BRT (LCD bright)....... 34 LCD B.L. (LCD back ...
... dubbing 35 AC Adaptor 12 AUDIO MIX 36 AUDIO MODE 42 A.SHUT OFF (Auto shut off 43 A/V connecting cable .....28, 44 B Backlight 23, 54 Battery 12, 61 BEACH 32 BEEP 33 BLACK 33 B&W 38 C ... DISP GUIDE (Display guide 73 DISP OUT (Display output 43 Display indicators 72 Dubbing 44 E Easy Handycam 19, 29 EDITSEARCH 26, 39 END SCH (END SEARCH 26, 54 EXPOSURE 32 F FADER 32 ... G Getting started 11 GUIDEFRAME 43 I INDOOR 33 "InfoLITHIUM" battery pack 61 Install 49 i.LINK 62 i.LINK cable 44, 46 L LANDSCAPE 31 LANGUAGE 42 LCD 43 LCD BRT (LCD bright)....... 34 LCD B.L. (LCD back ...
Operating Guide
Page 76
Index (Continued) Recording time 14 REMAIN 42 Reversal Playback 35 S S VIDEO cable 28, 44 SCENE SEL 31 Searching for the starting point 26 SEPIA 38 SETUP MENU menu ...........42 SNOW 32 SOLARIZE 38 SP (Standard Play 42 ...
Index (Continued) Recording time 14 REMAIN 42 Reversal Playback 35 S S VIDEO cable 28, 44 SCENE SEL 31 Searching for the starting point 26 SEPIA 38 SETUP MENU menu ...........42 SNOW 32 SOLARIZE 38 SP (Standard Play 42 ...


