
Operating Guide
Page 5
... product, you . Regulatory Information Declaration of rechargeable batteries, call : Sony Customer Information Center 1-800222-SONY (7669). Note DCR-HC48 is subject to the collection and recycling location nearest you may not cause harmful interference, and (2) this equipment. Battery pack This device complies with the Handycam Station Model DCRA-C155 and AC Adaptor Model AC-L200/L200B...
... product, you . Regulatory Information Declaration of rechargeable batteries, call : Sony Customer Information Center 1-800222-SONY (7669). Note DCR-HC48 is subject to the collection and recycling location nearest you may not cause harmful interference, and (2) this equipment. Battery pack This device complies with the Handycam Station Model DCRA-C155 and AC Adaptor Model AC-L200/L200B...

Operating Guide
Page 7
... • Exposing the LCD screen, the viewfinder, or the lens to OFF (CHG) when you insert the camcorder into the Handycam Station or remove the camcorder from it. Take pictures of the manufacturing process and do not affect the recording in color) that is grayed ...cause a malfunction of your camcorder. • Connect the A/V connecting cable to the A/V OUT jack of the Handycam Station when using your camcorder attached to the Handycam Station to output audio and video signals. • Disconnect the AC Adaptor from the Handycam Station holding both the Handycam Station and the DC plug. &#...
... • Exposing the LCD screen, the viewfinder, or the lens to OFF (CHG) when you insert the camcorder into the Handycam Station or remove the camcorder from it. Take pictures of the manufacturing process and do not affect the recording in color) that is grayed ...cause a malfunction of your camcorder. • Connect the A/V connecting cable to the A/V OUT jack of the Handycam Station when using your camcorder attached to the Handycam Station to output audio and video signals. • Disconnect the AC Adaptor from the Handycam Station holding both the Handycam Station and the DC plug. &#...

Operating Guide
Page 11
The number in the parentheses indicates the number of that you have following items supplied with your camcorder. A/V connecting cable (1) (p. 32, 55) USB cable (1) (p. 61) 11 Getting Started Getting Started Step 1: Checking supplied items Make sure that item supplied. AC Adaptor (1) (p. 12) Rechargeable battery pack NP-FH40 (1) (p. 12, 80) Power cord (1) (p. 12) CD-ROM "Handycam Application Software" (1) (p. 63) Operating Guide (This manual) (1) Handycam Station (1) (p. 12, 93) Wireless Remote Commander (1) (p. 93) A button-type lithium battery is already installed.
The number in the parentheses indicates the number of that you have following items supplied with your camcorder. A/V connecting cable (1) (p. 32, 55) USB cable (1) (p. 61) 11 Getting Started Getting Started Step 1: Checking supplied items Make sure that item supplied. AC Adaptor (1) (p. 12) Rechargeable battery pack NP-FH40 (1) (p. 12, 80) Power cord (1) (p. 12) CD-ROM "Handycam Application Software" (1) (p. 63) Operating Guide (This manual) (1) Handycam Station (1) (p. 12, 93) Wireless Remote Commander (1) (p. 93) A button-type lithium battery is already installed.

Operating Guide
Page 12
... pack (H series) (p. 80) after attaching it to your camcorder (1), then attach the battery pack and click it into place (2). 4 Connect the power cord to the AC Adaptor and the wall outlet. 5 Insert the camcorder into the Handycam Station securely, all the way to the bottom. The CHG (charge...) lamp lights up , connect the AC Adaptor to the DC IN jack on the Handycam Station. Remove your camcoder from the Handycam Station. 2 Slide the POWER switch to OFF (...
... pack (H series) (p. 80) after attaching it to your camcorder (1), then attach the battery pack and click it into place (2). 4 Connect the power cord to the AC Adaptor and the wall outlet. 5 Insert the camcorder into the Handycam Station securely, all the way to the bottom. The CHG (charge...) lamp lights up , connect the AC Adaptor to the DC IN jack on the Handycam Station. Remove your camcoder from the Handycam Station. 2 Slide the POWER switch to OFF (...

Operating Guide
Page 13
... 2 PUSH When storing the battery pack Fully discharge the battery before storing it for an extended period (p. 81). POWER switch To remove your camcorder from the Handycam Station Turn off the power, then connect the AC Adaptor to a power source such as a wall outlet as shown in this case. Continued , ...13 Getting Started b Notes • When inserting the camcorder into the Handycam Station, close the DC IN jack cover. • Disconnect the AC Adaptor from the DC IN jack holding both the...
... 2 PUSH When storing the battery pack Fully discharge the battery before storing it for an extended period (p. 81). POWER switch To remove your camcorder from the Handycam Station Turn off the power, then connect the AC Adaptor to a power source such as a wall outlet as shown in this case. Continued , ...13 Getting Started b Notes • When inserting the camcorder into the Handycam Station, close the DC IN jack cover. • Disconnect the AC Adaptor from the DC IN jack holding both the...

Operating Guide
Page 15
... to the year 2079. The battery pack is disconnected from the wall outlet immediately if any year up to the DC IN jack of your camcorder or the Handycam Station, even when the power cord is worn-out (for the first time. This may cause a malfunction. • Even if your... camcorder or change the POWER switch position. On the charging/recording/playback time • Times measured with any metallic objects. On the battery pack • Before ...
... to the year 2079. The battery pack is disconnected from the wall outlet immediately if any year up to the DC IN jack of your camcorder or the Handycam Station, even when the power cord is worn-out (for the first time. This may cause a malfunction. • Even if your... camcorder or change the POWER switch position. On the charging/recording/playback time • Times measured with any metallic objects. On the battery pack • Before ...
Operating Guide
Page 32
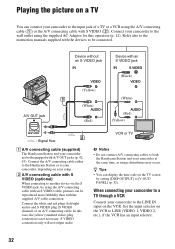
...can be connected. Connect your setup. In this operation (p. 12). Connect the A/V connecting cable either to the Handycam Station or to your camcorder, depending on the VCR. VCR or TV b Notes • Do not connect A/V connecting cables to both ...Red) (White) (Red) (Yellow) A/V OUT 2 : Signal flow A A/V connecting cable (supplied) The Handycam Station and your camcorder are both the Handycam Station and your camcorder to a TV through a VCR Connect your camcorder at the same time, as image disturbance may occur. S VIDEO connection only will not output audio. Connect the...
...can be connected. Connect your setup. In this operation (p. 12). Connect the A/V connecting cable either to the Handycam Station or to your camcorder, depending on the VCR. VCR or TV b Notes • Do not connect A/V connecting cables to both ...Red) (White) (Red) (Yellow) A/V OUT 2 : Signal flow A A/V connecting cable (supplied) The Handycam Station and your camcorder are both the Handycam Station and your camcorder to a TV through a VCR Connect your camcorder at the same time, as image disturbance may occur. S VIDEO connection only will not output audio. Connect the...

Operating Guide
Page 55
... also to the instruction manuals supplied with the supplied A/V cable connection. Connect the A/V connecting cable either to the Handycam Station or to your camcorder, depending on your camcorder to VCRs or DVD/HDD recorders, using the A/V connecting cable (1), the A/V connecting cable with S VIDEO (2),... DV To DV Interface (i.LINK) 3 To i.LINK jack VCRs or DVD/HDD recorders : Signal flow A A/V connecting cable (supplied) The Handycam Station and your camcorder to the wall outlet using the supplied AC Adaptor for this case, the yellow (standard video) plug connection is not necessary.
... also to the instruction manuals supplied with the supplied A/V cable connection. Connect the A/V connecting cable either to the Handycam Station or to your camcorder, depending on your camcorder to VCRs or DVD/HDD recorders, using the A/V connecting cable (1), the A/V connecting cable with S VIDEO (2),... DV To DV Interface (i.LINK) 3 To i.LINK jack VCRs or DVD/HDD recorders : Signal flow A A/V connecting cable (supplied) The Handycam Station and your camcorder to the wall outlet using the supplied AC Adaptor for this case, the yellow (standard video) plug connection is not necessary.

Operating Guide
Page 61
... [DAY&TIME] t . 5 Touch [EXEC] t [YES]. A maximum of 20 copies of copies to be printed. 4 Touch t [END]. Connecting your camcorder and turn on the PLAY/ EDIT lamp. 2 Connect the (USB) jack (p. 93) of models that are not PictBridge compatible. When connection is complete, (PictBridge...Memory Stick Duo" containing still images into your camcorder to a computer. When printing is completed. b Notes • We cannot guarantee the operation of the Handycam Station to the printer using a PictBridge compliant printer without connecting the camcorder to the printer z Tips • You can...
... [DAY&TIME] t . 5 Touch [EXEC] t [YES]. A maximum of 20 copies of copies to be printed. 4 Touch t [END]. Connecting your camcorder and turn on the PLAY/ EDIT lamp. 2 Connect the (USB) jack (p. 93) of models that are not PictBridge compatible. When connection is complete, (PictBridge...Memory Stick Duo" containing still images into your camcorder to a computer. When printing is completed. b Notes • We cannot guarantee the operation of the Handycam Station to the printer using a PictBridge compliant printer without connecting the camcorder to the printer z Tips • You can...

Operating Guide
Page 62
... on the screen. You can print still images without using a computer by the Camera & Imaging Products Association (CIPA). Remove your camcorder. • PictBridge is on again and restart the operation from the Handycam Station. - If you print a still image recorded in a 16:9 (wide) ratio, the left edges of images may be used. •...
... on the screen. You can print still images without using a computer by the Camera & Imaging Products Association (CIPA). Remove your camcorder. • PictBridge is on again and restart the operation from the Handycam Station. - If you print a still image recorded in a 16:9 (wide) ratio, the left edges of images may be used. •...

Operating Guide
Page 67
...wall outlet (p. 12). • Insert your Sony dealer. • Overall operations/Easy Handycam/ Remote Commander 67 • Batteries/Power sources...change during Easy Handycam operation. • During Easy Handycam operation, the settings of the compartment (p. 86). Troubleshooting Continued , 67 Troubleshooting Troubleshooting If you run into the Handycam Station correctly (p. ... [EXPOSURE] - [WHITE BAL.] - [SPOT FOCUS] - [FOCUS] - [AUDIO MIX] The camcorder gets warm. • The camcorder may not function properly. • Insert a fresh battery in the compartment with its +/- If the...
...wall outlet (p. 12). • Insert your Sony dealer. • Overall operations/Easy Handycam/ Remote Commander 67 • Batteries/Power sources...change during Easy Handycam operation. • During Easy Handycam operation, the settings of the compartment (p. 86). Troubleshooting Continued , 67 Troubleshooting Troubleshooting If you run into the Handycam Station correctly (p. ... [EXPOSURE] - [WHITE BAL.] - [SPOT FOCUS] - [FOCUS] - [AUDIO MIX] The camcorder gets warm. • The camcorder may not function properly. • Insert a fresh battery in the compartment with its +/- If the...

Operating Guide
Page 68
...appears on the LCD screen. If the problem persists, disconnect the AC Adaptor from the wall outlet and contact your camcorder into the Handycam Station correctly (p. 12). • The battery charge is being charged. • Slide the POWER switch to OFF (...CHG) (p. 12). • Attach the battery pack to the camcorder correctly (p. 12). • Connect the power cord to check the warning messages (p. 76). Touch to the wall outlet properly. • Insert your Sony...
...appears on the LCD screen. If the problem persists, disconnect the AC Adaptor from the wall outlet and contact your camcorder into the Handycam Station correctly (p. 12). • The battery charge is being charged. • Slide the POWER switch to OFF (...CHG) (p. 12). • Attach the battery pack to the camcorder correctly (p. 12). • Connect the power cord to check the warning messages (p. 76). Touch to the wall outlet properly. • Insert your Sony...

Operating Guide
Page 72
...• The tape was recorded on the picture. Date search does not work correctly. • Be sure to the Handycam Station, close the DC IN jack cover on your camcorder (p. 24). This is not a malfunction. This is not a malfunction (p. 77). is displayed on the screen. &#...the connected device. • Set [DISP OUTPUT] to other devices Pictures output from connected devices on the camcorder, and then fully insert the camcorder into the Handycam Station in a TV color system other information appear on the display of the tape. Dubbing/Editing/Connecting to [LCD...
...• The tape was recorded on the picture. Date search does not work correctly. • Be sure to the Handycam Station, close the DC IN jack cover on your camcorder (p. 24). This is not a malfunction. This is not a malfunction (p. 77). is displayed on the screen. &#...the connected device. • Set [DISP OUTPUT] to other devices Pictures output from connected devices on the camcorder, and then fully insert the camcorder into the Handycam Station in a TV color system other information appear on the display of the tape. Dubbing/Editing/Connecting to [LCD...

Operating Guide
Page 73
... the A/V connecting cable is connected to a computer The computer does not recognize your camcorder. • Install the "Picture Motion Browser" (p. 64). • The computer may not recognize your camcorder and the Handycam Station. Wait for dubbing a picture from your camcorder into the Handycam Station correctly (p. 12). • Disconnect USB devices other than the keyboard, the mouse, and...
... the A/V connecting cable is connected to a computer The computer does not recognize your camcorder. • Install the "Picture Motion Browser" (p. 64). • The computer may not recognize your camcorder and the Handycam Station. Wait for dubbing a picture from your camcorder into the Handycam Station correctly (p. 12). • Disconnect USB devices other than the keyboard, the mouse, and...

Operating Guide
Page 87
... diameter: 30 mm (1 3/16 in this format can have additional information such as your camcorder's setting information at the time of recording. ** The focal length figures are actual figures resulting from wide angle pixel read-out. Handycam Station Input/Output connectors DCRA-C155 Audio/Video output 10-pin connector Video signal: 1 Vp-p, 75...
... diameter: 30 mm (1 3/16 in this format can have additional information such as your camcorder's setting information at the time of recording. ** The focal length figures are actual figures resulting from wide angle pixel read-out. Handycam Station Input/Output connectors DCRA-C155 Audio/Video output 10-pin connector Video signal: 1 Vp-p, 75...

Operating Guide
Page 93
Handycam Station 1 A Interface connector B (USB) jack (61) C DV interface (55, 57) D DC IN jack (12) E A/V OUT jack (32, 55) Quick Reference 23 4 5 Remote Commander 7 1 8 2 3 9 4 5 6 q; A PHOTO button* (20, 23) The on or off. * Not available during Easy Handycam operation with the POWER switch set to operate your camcorder (p. 90). •... using the Remote Commander. • Aim the Remote Commander towards the remote sensor to CAMERATAPE. ** Not available during Easy Handycam operation. 93 B Memory control buttons (Index**, -/+, Memory playback) (21, 27) C SEARCH M.
Handycam Station 1 A Interface connector B (USB) jack (61) C DV interface (55, 57) D DC IN jack (12) E A/V OUT jack (32, 55) Quick Reference 23 4 5 Remote Commander 7 1 8 2 3 9 4 5 6 q; A PHOTO button* (20, 23) The on or off. * Not available during Easy Handycam operation with the POWER switch set to operate your camcorder (p. 90). •... using the Remote Commander. • Aim the Remote Commander towards the remote sensor to CAMERATAPE. ** Not available during Easy Handycam operation. 93 B Memory control buttons (Index**, -/+, Memory playback) (21, 27) C SEARCH M.

Operating Guide
Page 97
...59 DEMO MODE 47 DIGITAL ZOOM 41 DISP GUIDE (Display guide 96 DISP OUTPUT 52 Display indicators 94 DOT FADER 45 Dubbing 55, 59 E Easy Handycam 20, 34 EDIT SEARCH 30 EDIT/PLAY menu 48 END SEARCH 29, 50 EXP.BRKTG (Exposure bracketing 42 EXPOSURE 38 F FADER 44 FILE NO. ...63, 66 FLASH (Flash motion) ........ 46 Flexible spot meter 38 FOCUS 39, 70 FORMAT 43, 79 Frame-by-frame Playback .... 48 G Getting Started 11 H Handycam Station ..........12, 93 I i.LINK 81 i.LINK cable 55, 57 Image protection 60 IMAGE SIZE 42 INDOOR 38 "InfoLITHIUM" battery pack 80 Install 64 INT.REC-STL...
...59 DEMO MODE 47 DIGITAL ZOOM 41 DISP GUIDE (Display guide 96 DISP OUTPUT 52 Display indicators 94 DOT FADER 45 Dubbing 55, 59 E Easy Handycam 20, 34 EDIT SEARCH 30 EDIT/PLAY menu 48 END SEARCH 29, 50 EXP.BRKTG (Exposure bracketing 42 EXPOSURE 38 F FADER 44 FILE NO. ...63, 66 FLASH (Flash motion) ........ 46 Flexible spot meter 38 FOCUS 39, 70 FORMAT 43, 79 Frame-by-frame Playback .... 48 G Getting Started 11 H Handycam Station ..........12, 93 I i.LINK 81 i.LINK cable 55, 57 Image protection 60 IMAGE SIZE 42 INDOOR 38 "InfoLITHIUM" battery pack 80 Install 64 INT.REC-STL...


