
Operating Guide
Page 5
...cause harmful interference, and (2) this manual thoroughly, and retain it for future reference. This equipment generates, uses, and can help preserve our environment by turning the equipment off and on, Continued , 5 Operation is for a Class B digital device, pursuant to the collection and recycling location nearest you have .... You can radiate radio frequency energy and, if not installed and used rechargeable batteries to Part 15 of Conformity Trade Name: SONY Model No.: DCR-HC26 Responsible Party: Sony Electronics Inc. Otherwise, fire or injury may cause undesired operation.
...cause harmful interference, and (2) this manual thoroughly, and retain it for future reference. This equipment generates, uses, and can help preserve our environment by turning the equipment off and on, Continued , 5 Operation is for a Class B digital device, pursuant to the collection and recycling location nearest you have .... You can radiate radio frequency energy and, if not installed and used rechargeable batteries to Part 15 of Conformity Trade Name: SONY Model No.: DCR-HC26 Responsible Party: Sony Electronics Inc. Otherwise, fire or injury may cause undesired operation.
Operating Guide
Page 8
...this first 5 Getting Started Step 1: Checking supplied items 11 Step 2: Charging the battery pack 12 Step 3: Turning the power on and holding your camcorder firmly ......... 15 Step 4: Adjusting the LCD panel and viewfinder 16 Step 5: Using the touch panel 17 Changing... the language setting 17 Checking the screen indicators (Display guide 17 Step 6: Setting the date and time 19 Step 7: Inserting a Cassette 20 Recording/Playback Easy Recording/Playback (Easy Handycam...
...this first 5 Getting Started Step 1: Checking supplied items 11 Step 2: Charging the battery pack 12 Step 3: Turning the power on and holding your camcorder firmly ......... 15 Step 4: Adjusting the LCD panel and viewfinder 16 Step 5: Using the touch panel 17 Changing... the language setting 17 Checking the screen indicators (Display guide 17 Step 6: Setting the date and time 19 Step 7: Inserting a Cassette 20 Recording/Playback Easy Recording/Playback (Easy Handycam...

Operating Guide
Page 13
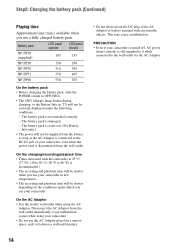
...start/stop, turning the power on/off when the battery is fully charged. Bottom: Recording with viewfinder while the LCD panel closed. * Typical recording time shows the time when you fully charge a fully discharged battery pack. To use an outside power source You can operate your camcorder using the power... All times measured under the following conditions: Top: Recording with the other hand. Disconnect the AC Adaptor from the DC IN jack holding both the camcorder and the DC plug. Disconnect the AC Adaptor from the DC IN jack. Hold down the V BATT(battery) release lever with one hand. ...
...start/stop, turning the power on/off when the battery is fully charged. Bottom: Recording with viewfinder while the LCD panel closed. * Typical recording time shows the time when you fully charge a fully discharged battery pack. To use an outside power source You can operate your camcorder using the power... All times measured under the following conditions: Top: Recording with the other hand. Disconnect the AC Adaptor from the DC IN jack holding both the camcorder and the DC plug. Disconnect the AC Adaptor from the DC IN jack. Hold down the V BATT(battery) release lever with one hand. ...
Operating Guide
Page 14
The battery pack is not attached correctly. - On the AC Adaptor • Use the nearby wall outlet when using your camcorder is turned off, AC power (house current) is recommended.) • The recording and playback time will not be shorter depending on the conditions under the following conditions. - ...
The battery pack is not attached correctly. - On the AC Adaptor • Use the nearby wall outlet when using your camcorder is turned off, AC power (house current) is recommended.) • The recording and playback time will not be shorter depending on the conditions under the following conditions. - ...
Operating Guide
Page 15
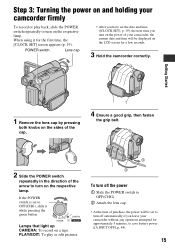
...repeatedly in the direction of the arrow to turn on the respective lamp. Step 3: Turning the power on and holding your camcorder firmly To record or play or edit pictures. 4 1 2 3 To turn off automatically if you turn on the power of your camcorder, the current date and time will be displayed... on a tape. POWER switch Lens cap • After you have set the date and time ([CLOCK SET], p. 19), the next time you leave your camcorder without any operation ...
...repeatedly in the direction of the arrow to turn on the respective lamp. Step 3: Turning the power on and holding your camcorder firmly To record or play or edit pictures. 4 1 2 3 To turn off automatically if you turn on the power of your camcorder, the current date and time will be displayed... on a tape. POWER switch Lens cap • After you have set the date and time ([CLOCK SET], p. 19), the next time you leave your camcorder without any operation ...
Operating Guide
Page 19
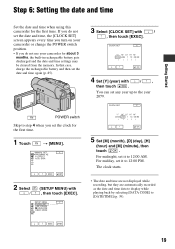
... STREAM LANGUAGE DEMO MODE --:--:-- 3 Select [CLOCK SET] with , then touch [EXEC]. POWER switch Skip to [DATE/TIME] (p. 39). If you do not use your camcorder or change the POWER switch position. • If you set the date and time, the [CLOCK SET] screen appears every time you... turn on your camcorder for the first time. CLOCK SET Y MDHM 2 0 0 6 JAN 1 12 : 0 0 AM OK 4 Set [Y] (year) with / , then touch . For midday, set the date and time again (p. 85...
... STREAM LANGUAGE DEMO MODE --:--:-- 3 Select [CLOCK SET] with , then touch [EXEC]. POWER switch Skip to [DATE/TIME] (p. 39). If you do not use your camcorder or change the POWER switch position. • If you set the date and time, the [CLOCK SET] screen appears every time you... turn on your camcorder for the first time. CLOCK SET Y MDHM 2 0 0 6 JAN 1 12 : 0 0 AM OK 4 Set [Y] (year) with / , then touch . For midday, set the date and time again (p. 85...
Operating Guide
Page 22
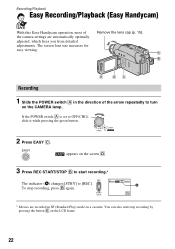
Recording/Playback Easy Recording/Playback (Easy Handycam) With this Easy Handycam operation, most of the arrow repeatedly to turn on the CAMERA lamp. EASY appears on a cassette. If the POWER switch A is set to [REC]. A B E DC Recording 1 Slide the POWER switch A in SP (Standard ...
Recording/Playback Easy Recording/Playback (Easy Handycam) With this Easy Handycam operation, most of the arrow repeatedly to turn on the CAMERA lamp. EASY appears on a cassette. If the POWER switch A is set to [REC]. A B E DC Recording 1 Slide the POWER switch A in SP (Standard ...

Operating Guide
Page 23
...If the POWER switch is set automatically. [Invalid during Easy Handycam operation.] appears if operations not available during Easy Handycam are set to the previous situation. disappears from the screen D. Touch , then touch to turn on the screen D as you want to add any effects... or settings to display adjustable menu settings. x Adjustable menu settings during Easy Handycam During Easy Handycam operation, the following buttons are unavailable, since the items are...
...If the POWER switch is set automatically. [Invalid during Easy Handycam operation.] appears if operations not available during Easy Handycam are set to the previous situation. disappears from the screen D. Touch , then touch to turn on the screen D as you want to add any effects... or settings to display adjustable menu settings. x Adjustable menu settings during Easy Handycam During Easy Handycam operation, the following buttons are unavailable, since the items are...

Operating Guide
Page 24
... heard, and the image is set to check the image (A), then press it while pressing the green button. 2 Start recording. A The indicator (A) changes [STBY] to turn on the CAMERA lamp. Movies Press REC START/STOP A (or B). To stop movie recording Press REC START/STOP again. • appears when the tape photo...
... heard, and the image is set to check the image (A), then press it while pressing the green button. 2 Start recording. A The indicator (A) changes [STBY] to turn on the CAMERA lamp. Movies Press REC START/STOP A (or B). To stop movie recording Press REC START/STOP again. • appears when the tape photo...
Operating Guide
Page 25
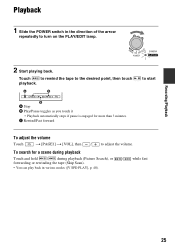
Recording/Playback Playback 1 Slide the POWER switch in various modes ([V SPD PLAY], p. 40). 25 Touch to rewind the tape to turn on the PLAY/EDIT lamp. 2 Start playing back. C Rewind/Fast forward to start To adjust the volume Touch t [PAGE1] t [VOL], then / to adjust the volume. A C B A ...
Recording/Playback Playback 1 Slide the POWER switch in various modes ([V SPD PLAY], p. 40). 25 Touch to rewind the tape to turn on the PLAY/EDIT lamp. 2 Start playing back. C Rewind/Fast forward to start To adjust the volume Touch t [PAGE1] t [VOL], then / to adjust the volume. A C B A ...
Operating Guide
Page 27
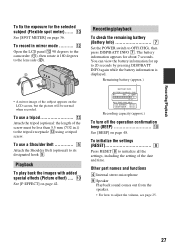
...(approx.) BATTERY INFO BATTERY CHARGE LEVEL 0% 50% 100% REC TIME AVAILABLE LCD SCREEN : 86 min VIEWFINDER : 99 min Recording capacity (approx.) To turn off the operation confirmation beep (BEEP 0 See [BEEP] on page 42. Recording/Playback To fix the exposure for about 7 seconds. qs Open the... LCD panel qs 90 degrees to the camcorder (1), then rotate it 180 degrees to its designated hook 5. Other part names and functions D Internal stereo microphone I Speaker Playback sound comes out from...
...(approx.) BATTERY INFO BATTERY CHARGE LEVEL 0% 50% 100% REC TIME AVAILABLE LCD SCREEN : 86 min VIEWFINDER : 99 min Recording capacity (approx.) To turn off the operation confirmation beep (BEEP 0 See [BEEP] on page 42. Recording/Playback To fix the exposure for about 7 seconds. qs Open the... LCD panel qs 90 degrees to the camcorder (1), then rotate it 180 degrees to its designated hook 5. Other part names and functions D Internal stereo microphone I Speaker Playback sound comes out from...

Operating Guide
Page 34
...) to select the item, then touch [EXEC]. (The process in step 3 and 4 is the same as that in the direction of the arrow repeatedly to turn on a tape PLAY/EDIT lamp: settings for recording on the respective lamp. x To use the operation buttons on [PAGE1]. The menu index screen appears. 2 Select...
...) to select the item, then touch [EXEC]. (The process in step 3 and 4 is the same as that in the direction of the arrow repeatedly to turn on a tape PLAY/EDIT lamp: settings for recording on the respective lamp. x To use the operation buttons on [PAGE1]. The menu index screen appears. 2 Select...
Operating Guide
Page 36
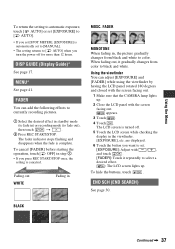
The available functions during Easy Handycam operation are marked with B. Touch here 60min STBY SPOT FOCUS...It is about 1 cm (about 2 5/8 feet) for telephoto. • The setting returns to [ AUTO] when you turn the power off for details on the screen. The indicators in the spotlight on in suitable brightness even when there is automatically set.... To adjust the focus automatically, touch [ AUTO] or set [SPOT FOCUS], [FOCUS] is strong contrast between camcorder and subject while maintaining sharp focus is easier to focus on the subject by moving the power zoom lever towards T...
The available functions during Easy Handycam operation are marked with B. Touch here 60min STBY SPOT FOCUS...It is about 1 cm (about 2 5/8 feet) for telephoto. • The setting returns to [ AUTO] when you turn the power off for details on the screen. The indicators in the spotlight on in suitable brightness even when there is automatically set.... To adjust the focus automatically, touch [ AUTO] or set [SPOT FOCUS], [FOCUS] is strong contrast between camcorder and subject while maintaining sharp focus is easier to focus on the subject by moving the power zoom lever towards T...
Operating Guide
Page 37
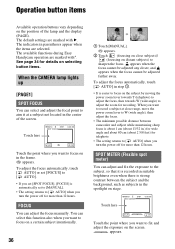
... (END SEARCH) See page 30. To cancel [FADER] before starting the operation, touch [ OFF] in , the picture gradually changes from color to [ AUTO] when you turn the power off . 5 Touch the LCD screen while checking the display in ) or recording mode (to color. The LCD screen is... turned off for more than 12 hours. Using the viewfinder You can add the following effects to currently recording pictures. 1 Select the desired effect in standby ...
... (END SEARCH) See page 30. To cancel [FADER] before starting the operation, touch [ OFF] in , the picture gradually changes from color to [ AUTO] when you turn the power off . 5 Touch the LCD screen while checking the display in ) or recording mode (to color. The LCD screen is... turned off for more than 12 hours. Using the viewfinder You can add the following effects to currently recording pictures. 1 Select the desired effect in standby ...
Operating Guide
Page 38
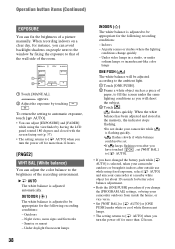
...to automatic exposure, touch [ AUTO]. • You can adjust [EXPOSURE] and [FADER] while using fixed exposure, select [ AUTO] and aim your camcorder at a nearby white object for about 10 seconds for better color balance adjustment. • Redo the [ONE PUSH] procedure if you change quickly - At... party scenes or studios where the lighting conditions change the [PROGRAM AE] settings, or bring your camcorder while is adjusted to be adjusted according to [ AUTO] when you turn the power off for instance, you have changed the battery pack while [ AUTO] is adjusted automatically. When...
...to automatic exposure, touch [ AUTO]. • You can adjust [EXPOSURE] and [FADER] while using fixed exposure, select [ AUTO] and aim your camcorder at a nearby white object for about 10 seconds for better color balance adjustment. • Redo the [ONE PUSH] procedure if you change quickly - At... party scenes or studios where the lighting conditions change the [PROGRAM AE] settings, or bring your camcorder while is adjusted to be adjusted according to [ AUTO] when you turn the power off for instance, you have changed the battery pack while [ AUTO] is adjusted automatically. When...
Operating Guide
Page 42
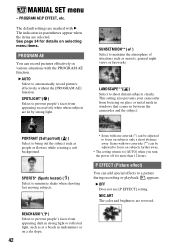
... the subject. SUNSETMOON**( ) Select to minimize shake when shooting fast moving subjects. This setting also prevents your camcorder from focusing on subjects farther away. • The setting returns to [AUTO] when you turn the power off for details on selecting menu items. PROGRAM AE You can record pictures effectively in midsummer or...
... the subject. SUNSETMOON**( ) Select to minimize shake when shooting fast moving subjects. This setting also prevents your camcorder from focusing on subjects farther away. • The setting returns to [AUTO] when you turn the power off for details on selecting menu items. PROGRAM AE You can record pictures effectively in midsummer or...
Operating Guide
Page 45
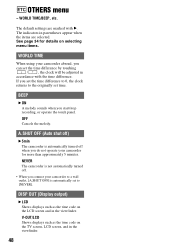
... selected for more than 12 hours. BRIGHT Brightens the LCD screen. • When you connect your camcorder. • The setting returns to outside power sources, [BRIGHT] is automatically selected for the setting. • When you turn the power off for the setting. The indicators in parentheses appear when the items are marked...
... selected for more than 12 hours. BRIGHT Brightens the LCD screen. • When you connect your camcorder. • The setting returns to outside power sources, [BRIGHT] is automatically selected for the setting. • When you turn the power off for the setting. The indicators in parentheses appear when the items are marked...
Operating Guide
Page 47
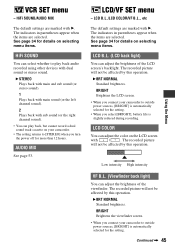
... the Menu REMAIN B AUTO Displays the remaining tape indicator for about 8 seconds in situations such as those described below . • When you set to turn on the CAMERA lamp. • The demonstration will be used on selecting menu items. CLOCK SET See page 19. LANGUAGE You can view the pictures... displayed on the screen of your camcorder on your camcorder, and slide the POWER switch repeatedly to other than CAMERA. 47 CLOCK SET/USB STREAM/LANGUAGE, etc. The indicators in the supplied...
... the Menu REMAIN B AUTO Displays the remaining tape indicator for about 8 seconds in situations such as those described below . • When you set to turn on the CAMERA lamp. • The demonstration will be used on selecting menu items. CLOCK SET See page 19. LANGUAGE You can view the pictures... displayed on the screen of your camcorder on your camcorder, and slide the POWER switch repeatedly to other than CAMERA. 47 CLOCK SET/USB STREAM/LANGUAGE, etc. The indicators in the supplied...
Operating Guide
Page 48
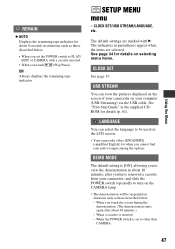
... code on the TV screen, LCD screen, and in the viewfinder. A.SHUT OFF (Auto shut off) B 5min The camcorder is automatically turned off . • When you connect your camcorder for details on the LCD screen and in the viewfinder. 48 V-OUT/LCD Shows displays such as the time code on... selecting menu items. WORLD TIME When using your camcorder abroad, you do not operate your camcorder to a wall outlet, [A.SHUT OFF] is not automatically turned off when you can set the time difference by touching / , the clock will be adjusted in...
... code on the TV screen, LCD screen, and in the viewfinder. A.SHUT OFF (Auto shut off) B 5min The camcorder is automatically turned off . • When you connect your camcorder for details on the LCD screen and in the viewfinder. 48 V-OUT/LCD Shows displays such as the time code on... selecting menu items. WORLD TIME When using your camcorder abroad, you do not operate your camcorder to a wall outlet, [A.SHUT OFF] is not automatically turned off when you can set the time difference by touching / , the clock will be adjusted in...
Operating Guide
Page 50
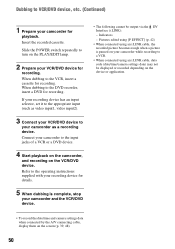
...edited using [P EFFECT] (p. 42) • When connected using an i.LINK cable, the recorded picture becomes rough when a picture is complete, stop your camcorder while recording to a VCR. • When connected using an i.LINK cable, data code (date/time/camera settings data) may not be output via the...device for recording. Insert the recorded cassette. Slide the POWER switch repeatedly to turn on the PLAY/EDIT lamp. 2 Prepare your camcorder to the input jacks of a VCR or a DVD device. 4 Start playback on the camcorder, and recording on the screen (p. 39, 48). 50 If your recording device...
...edited using [P EFFECT] (p. 42) • When connected using an i.LINK cable, the recorded picture becomes rough when a picture is complete, stop your camcorder while recording to a VCR. • When connected using an i.LINK cable, data code (date/time/camera settings data) may not be output via the...device for recording. Insert the recorded cassette. Slide the POWER switch repeatedly to turn on the PLAY/EDIT lamp. 2 Prepare your camcorder to the input jacks of a VCR or a DVD device. 4 Start playback on the camcorder, and recording on the screen (p. 39, 48). 50 If your recording device...


