

Operating Guide
Page 2
This symbol is intended to alert the user to the presence of electric shock to rain or moisture. WARNING To reduce fire or shock hazard, do not expose the unit to persons. This symbol is intended to alert the user to the presence of uninsulated "dangerous voltage" within the product's enclosure that may be of sufficient magnitude to constitute a risk of important operating and maintenance (servicing) instructions in the literature accompanying the appliance. 2
This symbol is intended to alert the user to the presence of electric shock to rain or moisture. WARNING To reduce fire or shock hazard, do not expose the unit to persons. This symbol is intended to alert the user to the presence of uninsulated "dangerous voltage" within the product's enclosure that may be of sufficient magnitude to constitute a risk of important operating and maintenance (servicing) instructions in the literature accompanying the appliance. 2

Operating Guide
Page 3
...For your protection, please read these slots and openings must never be blocked or covered. - Carefully observe all warnings, precautions and instructions on the marking label. Attachments Do not use attachments not recommended by the manufacturer. Do not use power-line operated sets near a...by items placed upon or against them . for future reference. If the plug should be operated only from overheating, these safety instructions completely before cleaning or polishing it is provided. - Installation Water and Moisture Do not use liquid cleaners or aerosol cleaners. ...
...For your protection, please read these slots and openings must never be blocked or covered. - Carefully observe all warnings, precautions and instructions on the marking label. Attachments Do not use attachments not recommended by the manufacturer. Do not use power-line operated sets near a...by items placed upon or against them . for future reference. If the plug should be operated only from overheating, these safety instructions completely before cleaning or polishing it is provided. - Installation Water and Moisture Do not use liquid cleaners or aerosol cleaners. ...
Operating Guide
Page 4
...hazards. Safety Check Upon completion of time, unplug it from the wall outlet and refer servicing to qualified service personnel under the following the operating instructions. When the power cord or plug is left unattended and unused for service. If the set during a lightning storm, or when it is damaged... are specified in damage and will prevent damage to the set exhibits a distinct change in performance - Unauthorized substitutions may result in the operating instructions. If liquid has been spilled or objects have the same characteristics as the original parts.
...hazards. Safety Check Upon completion of time, unplug it from the wall outlet and refer servicing to qualified service personnel under the following the operating instructions. When the power cord or plug is left unattended and unused for service. If the set during a lightning storm, or when it is damaged... are specified in damage and will prevent damage to the set exhibits a distinct change in performance - Unauthorized substitutions may result in the operating instructions. If liquid has been spilled or objects have the same characteristics as the original parts.
Operating Guide
Page 5
...by turning the equipment off and on, Continued , 5 For more information regarding recycling of rechargeable batteries, call : Sony Customer Information Center 1-800222-SONY (7669). This Class B digital apparatus complies with Part 15 of the FCC Rules. The number below is subject to... instructions, may cause harmful interference to provide reasonable protection against harmful interference in this manual thoroughly, and retain it for the FCC related matters only. CAUTION Replace the battery with Part 15 of Conformity Trade Name: SONY Model No.: DCR-HC26 Responsible Party: Sony ...
...by turning the equipment off and on, Continued , 5 For more information regarding recycling of rechargeable batteries, call : Sony Customer Information Center 1-800222-SONY (7669). This Class B digital apparatus complies with Part 15 of the FCC Rules. The number below is subject to... instructions, may cause harmful interference to provide reasonable protection against harmful interference in this manual thoroughly, and retain it for the FCC related matters only. CAUTION Replace the battery with Part 15 of Conformity Trade Name: SONY Model No.: DCR-HC26 Responsible Party: Sony ...
Operating Guide
Page 32
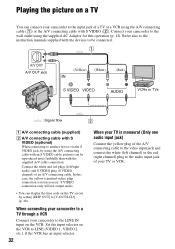
...the VCR. When connecting your camcorder to a TV through a VCR Connect your camcorder to the LINE IN input on the VCR to LINE (VIDEO 1, VIDEO 2, etc.), if the VCR has an input selector. 32 When your TV is not necessary. Refer also to the instruction manuals supplied with the devices ...to be reproduced more faithfully than with the supplied A/V cable connection. Connect your camcorder to the input jack of a TV or a VCR using the A/V connecting cable (1) or the ...
...the VCR. When connecting your camcorder to a TV through a VCR Connect your camcorder to the LINE IN input on the VCR to LINE (VIDEO 1, VIDEO 2, etc.), if the VCR has an input selector. 32 When your TV is not necessary. Refer also to the instruction manuals supplied with the devices ...to be reproduced more faithfully than with the supplied A/V cable connection. Connect your camcorder to the input jack of a TV or a VCR using the A/V connecting cable (1) or the ...

Operating Guide
Page 34
... for recording on [PAGE1]. Each touch of [ RET.] takes you do not have to touch . (Close). Using the Menu Using the menu items Follow the instructions below to use each of the menu items listed after this page. 1 Slide the POWER switch in step 2.) 3 Select the desired item. 4 Customize the item...
... for recording on [PAGE1]. Each touch of [ RET.] takes you do not have to touch . (Close). Using the Menu Using the menu items Follow the instructions below to use each of the menu items listed after this page. 1 Slide the POWER switch in step 2.) 3 Select the desired item. 4 Customize the item...
Operating Guide
Page 44
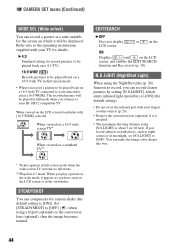
...; Remove the conversion lens (optional) if it is attached. • The maximum shooting distance using [N.S.LIGHT] is [ON]). If you connect to your camcorder, select [16:9 WIDE]. Set [STEADYSHOT] to [OFF] ( ) when using the NightShot plus (p. 26) function to record, you can compensate for ...16:9 wide TV in full screen mode. • When you have seen on a 4:3 TV). 16:9 WIDE ( ) Records pictures to the operating instructions supplied with [16:9 WIDE] selected. N.S.LIGHT (NightShot Light) When using a tripod (optional) or the conversion lens (optional), then the image becomes natural...
...; Remove the conversion lens (optional) if it is attached. • The maximum shooting distance using [N.S.LIGHT] is [ON]). If you connect to your camcorder, select [16:9 WIDE]. Set [STEADYSHOT] to [OFF] ( ) when using the NightShot plus (p. 26) function to record, you can compensate for ...16:9 wide TV in full screen mode. • When you have seen on a 4:3 TV). 16:9 WIDE ( ) Records pictures to the operating instructions supplied with [16:9 WIDE] selected. N.S.LIGHT (NightShot Light) When using a tripod (optional) or the conversion lens (optional), then the image becomes natural...
Operating Guide
Page 49
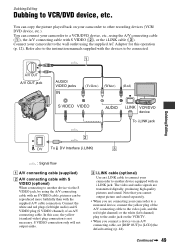
.... • When you connect a device via the S VIDEO jack, by using the A/V connecting cable with an S VIDEO cable, pictures can connect your camcorder to VCR/DVD device, etc. You can be connected. 1 A/V OUT A/V OUT jack AUDIO/ VIDEO jacks (Yellow) (White) (Red) Dubbing/Editing VCR... , 49 The video and audio signals are connecting your camcorder to another device via an A/V connecting cable, set [DISP OUT] to another device equipped with S VIDEO (2), or the i.LINK cable (3). Refer also to the instruction manuals supplied with the devices to be reproduced more faithfully than...
.... • When you connect a device via the S VIDEO jack, by using the A/V connecting cable with an S VIDEO cable, pictures can connect your camcorder to VCR/DVD device, etc. You can be connected. 1 A/V OUT A/V OUT jack AUDIO/ VIDEO jacks (Yellow) (White) (Red) Dubbing/Editing VCR... , 49 The video and audio signals are connecting your camcorder to another device via an A/V connecting cable, set [DISP OUT] to another device equipped with S VIDEO (2), or the i.LINK cable (3). Refer also to the instruction manuals supplied with the devices to be reproduced more faithfully than...
Operating Guide
Page 50
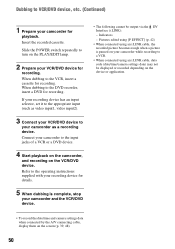
...input (such as a recording device. Connect your camcorder as video input1, video input2). 3 Connect your VCR/DVD device to your camcorder to the input jacks of a VCR or a DVD device. 4 Start playback on the camcorder, and recording on your camcorder and the VCR/DVD device. • The following... camera settings data when connected by the A/V connecting cable, display them on the PLAY/EDIT lamp. 2 Prepare your camcorder for playback. Refer to the operating instructions supplied with your recording device for details. 5 When dubbing is paused on the VCR/DVD device. Dubbing to VCR/DVD...
...input (such as a recording device. Connect your camcorder as video input1, video input2). 3 Connect your VCR/DVD device to your camcorder to the input jacks of a VCR or a DVD device. 4 Start playback on the camcorder, and recording on your camcorder and the VCR/DVD device. • The following... camera settings data when connected by the A/V connecting cable, display them on the PLAY/EDIT lamp. 2 Prepare your camcorder for playback. Refer to the operating instructions supplied with your recording device for details. 5 When dubbing is paused on the VCR/DVD device. Dubbing to VCR/DVD...
Operating Guide
Page 51
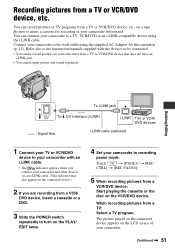
...LINK) : Signal flow i.LINK cable (optional) TVs or VCR/ DVD devices 1 Connect your TV or VCR/DVD device to your camcorder with the devices to be connected. • You cannot record pictures on your camcorder from a TV or VCR/DVD device, etc., on the PLAY/ EDIT lamp. 4 Set your... have an i.LINK jack. • You cannot input picture and sound separately. Refer also to the instruction manuals supplied with an i.LINK cable. • The indicator appears when you connect your camcorder and other devices via an i.LINK cable. (This indicator may also appear on the connected device.) 2...
...LINK) : Signal flow i.LINK cable (optional) TVs or VCR/ DVD devices 1 Connect your TV or VCR/DVD device to your camcorder with the devices to be connected. • You cannot record pictures on your camcorder from a TV or VCR/DVD device, etc., on the PLAY/ EDIT lamp. 4 Set your... have an i.LINK jack. • You cannot input picture and sound separately. Refer also to the instruction manuals supplied with an i.LINK cable. • The indicator appears when you connect your camcorder and other devices via an i.LINK cable. (This indicator may also appear on the connected device.) 2...
Operating Guide
Page 56
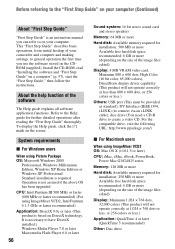
..." on the screen. To display the Help guide, click the [?] mark on a computer" (p. 57), start the "First Step Guide," then follow the instructions. CPU: Intel Pentium III 500 MHz or faster (800 MHz or faster recommended) (For using ImageMixer VCD2, Intel Pentium 4 1.3 GHz or faster recommended) ...the CDROM (supplied). Operation is required. About the help function of your camcorder and computer and making settings, to general operation the first time you can refer to on your computer. It is an instruction manual you use the software stored on the size of the image files ...
..." on the screen. To display the Help guide, click the [?] mark on a computer" (p. 57), start the "First Step Guide," then follow the instructions. CPU: Intel Pentium III 500 MHz or faster (800 MHz or faster recommended) (For using ImageMixer VCD2, Intel Pentium 4 1.3 GHz or faster recommended) ...the CDROM (supplied). Operation is required. About the help function of your camcorder and computer and making settings, to general operation the first time you can refer to on your computer. It is an instruction manual you use the software stored on the size of the image files ...

Operating Guide
Page 58
... "1.5." 8 Select where to be installed automatically with the InstallShield Wizard. In such a case, manually copy "First Step Guide" to your computer according to the message instructions. 5 Select the language for the application to save the software, then click [Next]. 58
... "1.5." 8 Select where to be installed automatically with the InstallShield Wizard. In such a case, manually copy "First Step Guide" to your computer according to the message instructions. 5 Select the language for the application to save the software, then click [Next]. 58

Operating Guide
Page 59
...] screen. 9 Click [Install] on the [Ready to install DirectX 9.0c. Depending on the computer, this screen may not be displayed. Using a Computer Continued , 59 screen instructions to install ImageMixer VCD2. 13Make sure [Yes, I want to restart my computer now.] is displayed, follow the on- The installation of Picture Package starts. 12If...
...] screen. 9 Click [Install] on the [Ready to install DirectX 9.0c. Depending on the computer, this screen may not be displayed. Using a Computer Continued , 59 screen instructions to install ImageMixer VCD2. 13Make sure [Yes, I want to restart my computer now.] is displayed, follow the on- The installation of Picture Package starts. 12If...
Operating Guide
Page 63
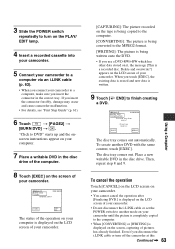
... Touch t [PAGE2] t [BURN DVD] t . EXEC CANCEL The status of the operation on your computer is displayed on the screen, capturing of your camcorder. [CAPTURING]: The picture recorded on the tape is being copied to the computer. [CONVERTING]: The picture is being converted to the MPEG2 format. [WRITING]:... (p. 62). • When you connect your camcorder to a computer, make sure you touch [EXEC], the existing data is erased and new data is a recorded disc. The disc tray comes out. "Click to DVD" starts up and the onscreen instructions appear on your computer. 7 Place a writable ...
... Touch t [PAGE2] t [BURN DVD] t . EXEC CANCEL The status of the operation on your computer is displayed on the screen, capturing of your camcorder. [CAPTURING]: The picture recorded on the tape is being copied to the computer. [CONVERTING]: The picture is being converted to the MPEG2 format. [WRITING]:... (p. 62). • When you connect your camcorder to a computer, make sure you touch [EXEC], the existing data is erased and new data is a recorded disc. The disc tray comes out. "Click to DVD" starts up and the onscreen instructions appear on your computer. 7 Place a writable ...
Operating Guide
Page 74
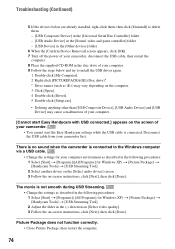
...Device] and [USB Device] may cause a malfunction of your computer. [Cannot start Easy Handycam with USB connected.] appears on the screen of your camcorder. • You cannot start the Easy Handycam settings while the USB cable is not smooth during USB Streaming. • Change the ... on [Select video quality]. 3 Follow the on-screen instructions, click [Next], then click [Done]. Picture Package does not function correctly. • Close Picture Package, then restart the computer. 74 Disconnect the USB cable from your camcorder first. The movie is connected. Troubleshooting (Continued) 5 ...
...Device] and [USB Device] may cause a malfunction of your computer. [Cannot start Easy Handycam with USB connected.] appears on the screen of your camcorder. • You cannot start the Easy Handycam settings while the USB cable is not smooth during USB Streaming. • Change the ... on [Select video quality]. 3 Follow the on-screen instructions, click [Next], then click [Done]. Picture Package does not function correctly. • Close Picture Package, then restart the computer. 74 Disconnect the USB cable from your camcorder first. The movie is connected. Troubleshooting (Continued) 5 ...

Operating Guide
Page 77
... in 12-bit audio. Use a cleaning cassette. (p. 84) Cannot start Easy Handycam. (p. 22, 65) Cannot cancel Easy Handycam. (p. 22, 65) Cannot start Easy Handycam with USB connected. • You cannot start the Easy Handycam settings while the USB cable is locked - x Dirty video head. Troubleshooting Continued ... REC. Disconnect the USB cable from your camcorder first. Cannot add audio. (p. 52) Not recorded in SP mode. Eject the cassette (p. 84) % Moisture condensation. QZ The tape is connected. x Others Cannot record due to a tape recorded on the screen, follow the instructions.
... in 12-bit audio. Use a cleaning cassette. (p. 84) Cannot start Easy Handycam. (p. 22, 65) Cannot cancel Easy Handycam. (p. 22, 65) Cannot start Easy Handycam with USB connected. • You cannot start the Easy Handycam settings while the USB cable is locked - x Dirty video head. Troubleshooting Continued ... REC. Disconnect the USB cable from your camcorder first. Cannot add audio. (p. 52) Not recorded in SP mode. Eject the cassette (p. 84) % Moisture condensation. QZ The tape is connected. x Others Cannot record due to a tape recorded on the screen, follow the instructions.

Operating Guide
Page 82
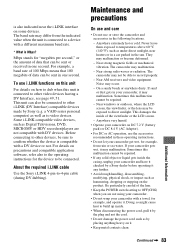
...S200 (approx. 200Mbps) S400 (approx. 400Mbps) The baud rate is a digital serial interface for the IEEE 1394 data transport bus proposed by Sony, and is a trademark approved by the Institute of equipment. What is an international standard standardized by many corporations. • IEEE 1394 is...i.LINK. i.LINK-compatible devices can also control other i.LINK-compatible devices. When two or more DV Interfaces, refer to the operating instructions of the device to the device. About the "InfoLITHIUM" battery pack (Continued) About battery life • Battery capacity decreases over ...
...S200 (approx. 200Mbps) S400 (approx. 400Mbps) The baud rate is a digital serial interface for the IEEE 1394 data transport bus proposed by Sony, and is a trademark approved by the Institute of equipment. What is an international standard standardized by many corporations. • IEEE 1394 is...i.LINK. i.LINK-compatible devices can also control other i.LINK-compatible devices. When two or more DV Interfaces, refer to the operating instructions of the device to the device. About the "InfoLITHIUM" battery pack (Continued) About battery life • Battery capacity decreases over ...
Operating Guide
Page 83
...rate. * What is compatible with DV devices. Near AM receivers and video equipment. If sand or dust gets in these operating instructions. • Do not let your camcorder and have it may differ from rain or sea water. This damages the inside of data can be sent in one second. Be...as hammering, dropping or stepping on how to dub when this malfunction cannot be connected to other i.LINK (DV Interface) compatible devices made by a Sony dealer before operating it any solid object or liquid gets inside . • When disconnecting the power cord, pull it by the plug and not the...
...rate. * What is compatible with DV devices. Near AM receivers and video equipment. If sand or dust gets in these operating instructions. • Do not let your camcorder and have it may differ from rain or sea water. This damages the inside of data can be sent in one second. Be...as hammering, dropping or stepping on how to dub when this malfunction cannot be connected to other i.LINK (DV Interface) compatible devices made by a Sony dealer before operating it any solid object or liquid gets inside . • When disconnecting the power cord, pull it by the plug and not the...


