Operating Guide
Page 1
Digital Video Camera Recorder Operating Guide DCR-DVD92/DVD103/DVD203/ DVD403/DVD602/DVD653/DVD703/ DVD803 2-587-622-13 (1) Enjoying with your DVD Handycam 10 Getting Started 16 Easy Handycam 27 Recording/ Playback 32 Playback on DVD devices 44 Using the Recorded disc 50 Using the Setup items 52 Editing on DVD Handycam 72 Dubbing 78 Using a Computer 82 Troubleshooting 87 Additional Information 105 © 2005 Sony Corporation
Digital Video Camera Recorder Operating Guide DCR-DVD92/DVD103/DVD203/ DVD403/DVD602/DVD653/DVD703/ DVD803 2-587-622-13 (1) Enjoying with your DVD Handycam 10 Getting Started 16 Easy Handycam 27 Recording/ Playback 32 Playback on DVD devices 44 Using the Recorded disc 50 Using the Setup items 52 Editing on DVD Handycam 72 Dubbing 78 Using a Computer 82 Troubleshooting 87 Additional Information 105 © 2005 Sony Corporation
Operating Guide
Page 5
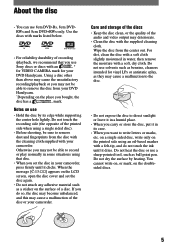
... disc by heating. Do not touch the recording side (the opposite of the disc or your DVD Handycam. Care and storage of the discs • Keep the disc clean, or the quality of ..., put it clicks. Do not heat the disc or use solvents such as benzine, cleaners intended for your camcorder. When the message [C:13:] appears on the LCD screen, open the disc cover and set the...dry cloth. If you use 8cm DVD-Rs, 8cm DVDRWs and 8cm DVD+RWs only. You cannot write on, or mark, on the doublesided discs. 5 About the disc • You can use Sony discs or discs with an * ...
... disc by heating. Do not touch the recording side (the opposite of the disc or your DVD Handycam. Care and storage of the discs • Keep the disc clean, or the quality of ..., put it clicks. Do not heat the disc or use solvents such as benzine, cleaners intended for your camcorder. When the message [C:13:] appears on the LCD screen, open the disc cover and set the...dry cloth. If you use 8cm DVD-Rs, 8cm DVDRWs and 8cm DVD+RWs only. You cannot write on, or mark, on the doublesided discs. 5 About the disc • You can use Sony discs or discs with an * ...
Operating Guide
Page 6
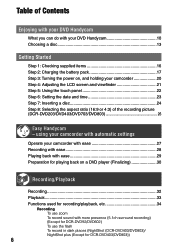
... of Contents Enjoying with your DVD Handycam What you can do with your DVD Handycam 10 Choosing a disc 13 Getting Started Step 1: Checking supplied items 16 Step 2: Charging the battery pack 17 Step 3: Turning the power on, and holding your camcorder with ease 27 Recording with ...Step 7: Inserting a disc 24 Step 8: Selecting the aspect ratio (16:9 or 4:3) of the recording picture (DCR-DVD203/DVD403/DVD703/DVD803 26 Easy Handycam - using your camcorder with more presence (5.1ch surround recording) (Except for DCR-DVD92/DVD602) To use the flash To record in dark places (NightShot...
... of Contents Enjoying with your DVD Handycam What you can do with your DVD Handycam 10 Choosing a disc 13 Getting Started Step 1: Checking supplied items 16 Step 2: Charging the battery pack 17 Step 3: Turning the power on, and holding your camcorder with ease 27 Recording with ...Step 7: Inserting a disc 24 Step 8: Selecting the aspect ratio (16:9 or 4:3) of the recording picture (DCR-DVD203/DVD403/DVD703/DVD803 26 Easy Handycam - using your camcorder with more presence (5.1ch surround recording) (Except for DCR-DVD92/DVD602) To use the flash To record in dark places (NightShot...
Operating Guide
Page 8
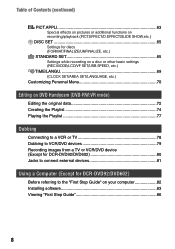
... Menu 70 Editing on DVD Handycam (DVD-RW:VR mode) Editing the original data 72 Creating the Playlist 74 Playing the Playlist 77 Dubbing Connecting to a VCR or TV 78 Dubbing to VCR/DVD devices 79 Recording images from a TV or VCR/DVD device (Except for DCR-DVD92/DVD602 80 Jacks to connect... external devices 81 Using a Computer (Except for DCR-DVD92/DVD602) Before referring to the "First Step Guide" on your computer...
... Menu 70 Editing on DVD Handycam (DVD-RW:VR mode) Editing the original data 72 Creating the Playlist 74 Playing the Playlist 77 Dubbing Connecting to a VCR or TV 78 Dubbing to VCR/DVD devices 79 Recording images from a TV or VCR/DVD device (Except for DCR-DVD92/DVD602 80 Jacks to connect... external devices 81 Using a Computer (Except for DCR-DVD92/DVD602) Before referring to the "First Step Guide" on your computer...
Operating Guide
Page 10
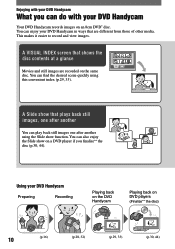
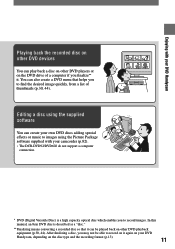
...Slide show on the same disc. Enjoying with your DVD Handycam What you can do with your DVD Handycam in ways that are recorded on a DVD player if you finalize** the disc (p.30, 44). You can enjoy your DVD Handycam Your DVD Handycam records images on DVD players (Finalize** the disc) 10 (p.16) (p.28...VISUAL INDEX screen that plays back still images, one after another using this convenient index (p.29, 33). Using your DVD Handycam Preparing Recording Playing back on the DVD Handycam Playing back on an 8cm DVD* disc. This makes it easier to record and view images.
...Slide show on the same disc. Enjoying with your DVD Handycam What you can do with your DVD Handycam in ways that are recorded on a DVD player if you finalize** the disc (p.30, 44). You can enjoy your DVD Handycam Your DVD Handycam records images on DVD players (Finalize** the disc) 10 (p.16) (p.28...VISUAL INDEX screen that plays back still images, one after another using this convenient index (p.29, 33). Using your DVD Handycam Preparing Recording Playing back on the DVD Handycam Playing back on an 8cm DVD* disc. This makes it easier to record and view images.
Operating Guide
Page 11
... that it . Enjoying with your camcorder (p.82). • The DCR-DVD92/DVD602 do not support a computer connection. * DVD (Digital Versatile Disc) is described as a "disc." ** Finalizing means converting a recorded disc so that helps you to record on it again on your DVD Handycam, depending on other DVD players or on the DVD drive of thumbnails (p.30, 44). In...
... that it . Enjoying with your camcorder (p.82). • The DCR-DVD92/DVD602 do not support a computer connection. * DVD (Digital Versatile Disc) is described as a "disc." ** Finalizing means converting a recorded disc so that helps you to record on it again on your DVD Handycam, depending on other DVD players or on the DVD drive of thumbnails (p.30, 44). In...
Operating Guide
Page 12
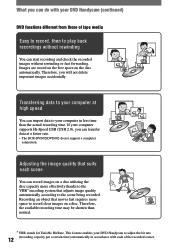
...data to your computer at a faster rate. • The DCR-DVD92/DVD602 do with each scene You can record images on a...forwarding. Adjusting the image quality that suits each of tape media Easy to record, then to your DVD Handycam (continued) DVD functions different from those of the recorded scenes. Images are stored on the free space on a ...disc. Therefore, the available recording time may be shorten than the actual recording time. If your DVD Handycam to the scene being recorded. Recording an object that adjusts image quality automatically according to adjust the bit ...
...data to your computer at a faster rate. • The DCR-DVD92/DVD602 do with each scene You can record images on a...forwarding. Adjusting the image quality that suits each of tape media Easy to record, then to your DVD Handycam (continued) DVD functions different from those of the recorded scenes. Images are stored on the free space on a ...disc. Therefore, the available recording time may be shorten than the actual recording time. If your DVD Handycam to the scene being recorded. Recording an object that adjusts image quality automatically according to adjust the bit ...
Operating Guide
Page 13
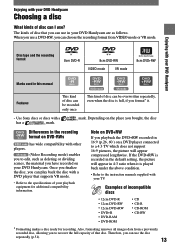
...to recover the full capacity of that disc. mark. Enjoying with your DVD Handycam Disc type and the recording format 8cm DVD-R 8cm DVD-RW VIDEO mode VR mode 8cm DVD+RW Marks used in 16:9 (p.26, 60 ) on DVD-RWs has wide compatibility with your TV. Examples of disc can be ...you format* it. • Use Sony discs or discs with a has a mark. Depending on the place you bought, the disc Differences in the recording format on a DVD player connected to a 4:3 TV which does not support 16:9 pictures, the picture will appear in your DVD Handycam. Once you finalize the disc...
...to recover the full capacity of that disc. mark. Enjoying with your DVD Handycam Disc type and the recording format 8cm DVD-R 8cm DVD-RW VIDEO mode VR mode 8cm DVD+RW Marks used in 16:9 (p.26, 60 ) on DVD-RWs has wide compatibility with your TV. Examples of disc can be ...you format* it. • Use Sony discs or discs with a has a mark. Depending on the place you bought, the disc Differences in the recording format on a DVD player connected to a 4:3 TV which does not support 16:9 pictures, the picture will appear in your DVD Handycam. Once you finalize the disc...
Operating Guide
Page 14
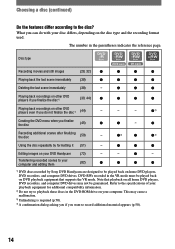
... you if you can do with your computer and editing them (82) 1) DVD discs recorded by Sony DVD Handycam are designed to your disc differs, depending on home DVD players, DVD recorders, and computer DVD drives. DVD-RWs recorded in the parentheses indicates the reference page. Transferring recorded scenes to be guaranteed. What you...
... you if you can do with your computer and editing them (82) 1) DVD discs recorded by Sony DVD Handycam are designed to your disc differs, depending on home DVD players, DVD recorders, and computer DVD drives. DVD-RWs recorded in the parentheses indicates the reference page. Transferring recorded scenes to be guaranteed. What you...
Operating Guide
Page 15
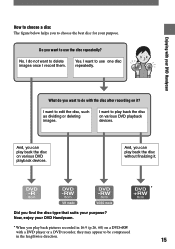
... once I want to use one disc repeatedly. I record them. Do you play back pictures recorded in 16:9 (p.26, 60) on a DVD+RW with a DVD player or a DVD recorder, they may appear to be compressed in the lengthwise direction. 15 I do with the disc after recording on it . * Did you... can play back the disc on various DVD playback devices. No. Now, enjoy your DVD Handycam. * When you want to use the disc repeatedly? Enjoying with your DVD Handycam How to choose a disc The figure below helps you can play back the disc ...
... once I want to use one disc repeatedly. I record them. Do you play back pictures recorded in 16:9 (p.26, 60) on a DVD+RW with a DVD player or a DVD recorder, they may appear to be compressed in the lengthwise direction. 15 I do with the disc after recording on it . * Did you... can play back the disc on various DVD playback devices. No. Now, enjoy your DVD Handycam. * When you want to use the disc repeatedly? Enjoying with your DVD Handycam How to choose a disc The figure below helps you can play back the disc ...
Operating Guide
Page 25
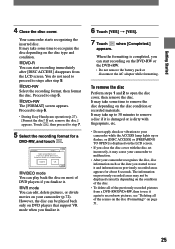
... steps 1 and 2 to step 6. • During Easy Handycam operation (p.27), [Format the disc? Your camcorder starts recognizing the inserted disc. It may take some time to recognize the disc depending on the disc type and condition. DVD-R You can start recording immediately after step 5. DVD-RW Select the recording format, then format...
... steps 1 and 2 to step 6. • During Easy Handycam operation (p.27), [Format the disc? Your camcorder starts recognizing the inserted disc. It may take some time to recognize the disc depending on the disc type and condition. DVD-R You can start recording immediately after step 5. DVD-RW Select the recording format, then format...
Operating Guide
Page 27
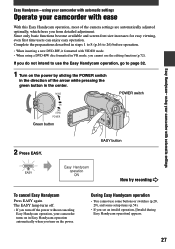
... intend to 26) before operation. • When inserting a new DVD-RW, it formatted with VIDEO mode. • When using a DVD-RW disc formatted in the center. If you from detailed adjustment. using your camcorder with automatic settings Operate your camcorder with ease With this Easy Handycam operation, most of the arrow while pressing the green...
... intend to 26) before operation. • When inserting a new DVD-RW, it formatted with VIDEO mode. • When using a DVD-RW disc formatted in the center. If you from detailed adjustment. using your camcorder with automatic settings Operate your camcorder with ease With this Easy Handycam operation, most of the arrow while pressing the green...
Operating Guide
Page 28
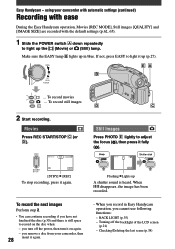
... REC START/STOP (or ). When disappears, the image has been recorded. you remove a disc from your camcorder with automatic settings (continued) Recording with ease During the Easy Handycam operation, Movies [REC MODE], Still images [QUALITY] and [IMAGE SIZE] are recorded with the default settings (p.62, 65... Make sure the EASY lamp lights up (p.27). ... To record movies ... BACK LIGHT (p.35) - using your camcorder, then 28 insert it again. • When you record in Easy Handycam operation, you turn it up in blue.
... REC START/STOP (or ). When disappears, the image has been recorded. you remove a disc from your camcorder with automatic settings (continued) Recording with ease During the Easy Handycam operation, Movies [REC MODE], Still images [QUALITY] and [IMAGE SIZE] are recorded with the default settings (p.62, 65... Make sure the EASY lamp lights up (p.27). ... To record movies ... BACK LIGHT (p.35) - using your camcorder, then 28 insert it again. • When you record in Easy Handycam operation, you turn it up in blue.
Operating Guide
Page 29
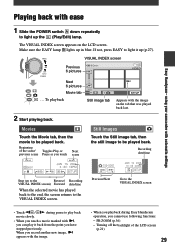
... POWER switch down repeatedly to light up in blue. PB ZOOM (p.36) - Beginning of the LCD screen (p.21) 29 using your camcorder with automatic settings Playing back with , you can play back • When you record another new image, appears with the image ...Play/Edit) lamp. Movies Touch the Movie tab, then the movie to the VISUAL INDEX screen • Touch / movie slowly. Easy Handycam- during Easy Handycam operation, you touch Next scene Still Images Touch the Still image tab, then the still image to the VISUAL INDEX screen. The VISUAL ...
... POWER switch down repeatedly to light up in blue. PB ZOOM (p.36) - Beginning of the LCD screen (p.21) 29 using your camcorder with automatic settings Playing back with , you can play back • When you record another new image, appears with the image ...Play/Edit) lamp. Movies Touch the Movie tab, then the movie to the VISUAL INDEX screen • Touch / movie slowly. Easy Handycam- during Easy Handycam operation, you touch Next scene Still Images Touch the Still image tab, then the still image to the VISUAL INDEX screen. The VISUAL ...
Operating Guide
Page 30
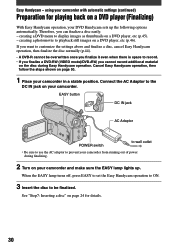
... finalize a disc easily. - Therefore, you cannot record additional material on the disc during finalizing. 2 Turn on a DVD player (Finalizing) With Easy Handycam operation, your camcorder with automatic settings (continued) Preparation for details. 30 using your DVD Handycam sets up . If you want to customize the settings above and finalize a disc, cancel Easy...
... finalize a disc easily. - Therefore, you cannot record additional material on the disc during finalizing. 2 Turn on a DVD player (Finalizing) With Easy Handycam operation, your camcorder with automatic settings (continued) Preparation for details. 30 using your DVD Handycam sets up . If you want to customize the settings above and finalize a disc, cancel Easy...
Operating Guide
Page 31
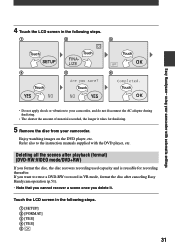
... shorter the amount of material recorded, the longer it . Deleting all the scenes after canceling Easy Handycam operation (p.51). • Note that you cannot recover a scene once you want to reuse a DVD-RW to your camcorder with the DVD player, etc. If you delete it takes for recording thereafter. 4 Touch the LCD screen in...
... shorter the amount of material recorded, the longer it . Deleting all the scenes after canceling Easy Handycam operation (p.51). • Note that you cannot recover a scene once you want to reuse a DVD-RW to your camcorder with the DVD player, etc. If you delete it takes for recording thereafter. 4 Touch the LCD screen in...
Operating Guide
Page 51
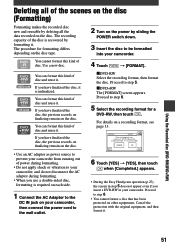
...format this kind of power during formatting. • Do not apply shock or vibration to be formatted into your camcorder. The recording capacity of disc and reuse it . The procedure for a DVD-RW, then touch . For details on the power by formatting it . Proceed to step 6. • You... adaptor as power source to the wall outlet. 6 Touch [YES] [YES], then touch when [Completed.] appears. • During the Easy Handycam operation (p.27), the screen in step 5 does not appear even if you use a double-sided disc, formatting is unfinalized. You can format ...
...format this kind of power during formatting. • Do not apply shock or vibration to be formatted into your camcorder. The recording capacity of disc and reuse it . The procedure for a DVD-RW, then touch . For details on the power by formatting it . Proceed to step 6. • You... adaptor as power source to the wall outlet. 6 Touch [YES] [YES], then touch when [Completed.] appears. • During the Easy Handycam operation (p.27), the screen in step 5 does not appear even if you use a double-sided disc, formatting is unfinalized. You can format ...
Operating Guide
Page 53
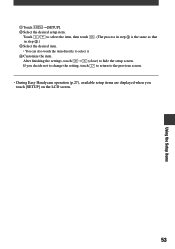
... as that in step .) Select the desired item. • You can also touch the item directly to the previous screen. • During Easy Handycam operation (p.27), available setup items are displayed when you touch [SETUP] on the LCD screen. Using the Setup items 53 If you decide not to...
... as that in step .) Select the desired item. • You can also touch the item directly to the previous screen. • During Easy Handycam operation (p.27), available setup items are displayed when you touch [SETUP] on the LCD screen. Using the Setup items 53 If you decide not to...
Operating Guide
Page 54
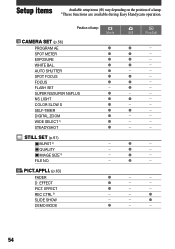
...; − − − − − − − − − − − − 54 Position of a lamp. *These functions are available during Easy Handycam operation. EFFECT PICT.
...; − − − − − − − − − − − − 54 Position of a lamp. *These functions are available during Easy Handycam operation. EFFECT PICT.

Operating Guide
Page 73
... toggles as you press . • A slight difference may occur from the point where you touch and the actual dividing point, as your camcorder selects the dividing point based on DVD Handycam (DVD-RW:VR mode) When you want to be divided. The playback of the selected movie. Adjust the volume Adjusts the dividing point...
... toggles as you press . • A slight difference may occur from the point where you touch and the actual dividing point, as your camcorder selects the dividing point based on DVD Handycam (DVD-RW:VR mode) When you want to be divided. The playback of the selected movie. Adjust the volume Adjusts the dividing point...


