Operating Guide
Page 1
Digital Video Camera Recorder Operating Guide DCR-DVD92/DVD103/DVD203/ DVD403/DVD602/DVD653/DVD703/ DVD803 2-587-622-13 (1) Enjoying with your DVD Handycam 10 Getting Started 16 Easy Handycam 27 Recording/ Playback 32 Playback on DVD devices 44 Using the Recorded disc 50 Using the Setup items 52 Editing on DVD Handycam 72 Dubbing 78 Using a Computer 82 Troubleshooting 87 Additional Information 105 © 2005 Sony Corporation
Digital Video Camera Recorder Operating Guide DCR-DVD92/DVD103/DVD203/ DVD403/DVD602/DVD653/DVD703/ DVD803 2-587-622-13 (1) Enjoying with your DVD Handycam 10 Getting Started 16 Easy Handycam 27 Recording/ Playback 32 Playback on DVD devices 44 Using the Recorded disc 50 Using the Setup items 52 Editing on DVD Handycam 72 Dubbing 78 Using a Computer 82 Troubleshooting 87 Additional Information 105 © 2005 Sony Corporation
Operating Guide
Page 5
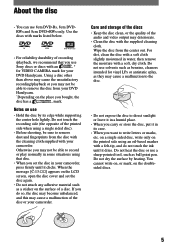
... be able to write letters or marks, etc. Do not use solvents such as benzine, cleaners intended for your camcorder, press firmly until it dries. Wipe the disc from your DVD Handycam. * Depending on the doublesided discs. 5 Do not dry the surface by its case. • When you ... out. Do not touch the recording side (the opposite of the disc or your camcorder. If you set the disc again. • Do not attach any adhesive material such as a sticker on use Sony discs or discs with the supplied cleaning cloth. For dirt, clean the disc with ...
... be able to write letters or marks, etc. Do not use solvents such as benzine, cleaners intended for your camcorder, press firmly until it dries. Wipe the disc from your DVD Handycam. * Depending on the doublesided discs. 5 Do not dry the surface by its case. • When you ... out. Do not touch the recording side (the opposite of the disc or your camcorder. If you set the disc again. • Do not attach any adhesive material such as a sticker on use Sony discs or discs with the supplied cleaning cloth. For dirt, clean the disc with ...
Operating Guide
Page 6
...camcorder 20 Step 4: Adjusting the LCD screen and viewfinder 21 Step 5: Using the touch panel 22 Step 6: Setting the date and time 23 Step 7: Inserting a disc 24 Step 8: Selecting the aspect ratio (16:9 or 4:3) of Contents Enjoying with your DVD Handycam What you can do with your DVD Handycam...17 Step 3: Turning the power on a DVD player (Finalizing 30 Recording/Playback Recording 32 Playback 33 Functions used for recording/playback, etc 34 Recording To use zoom To record sound with more presence (5.1ch surround recording) (Except for DCR-DVD92/DVD602) To use the flash To...
...camcorder 20 Step 4: Adjusting the LCD screen and viewfinder 21 Step 5: Using the touch panel 22 Step 6: Setting the date and time 23 Step 7: Inserting a disc 24 Step 8: Selecting the aspect ratio (16:9 or 4:3) of Contents Enjoying with your DVD Handycam What you can do with your DVD Handycam...17 Step 3: Turning the power on a DVD player (Finalizing 30 Recording/Playback Recording 32 Playback 33 Functions used for recording/playback, etc 34 Recording To use zoom To record sound with more presence (5.1ch surround recording) (Except for DCR-DVD92/DVD602) To use the flash To...
Operating Guide
Page 8
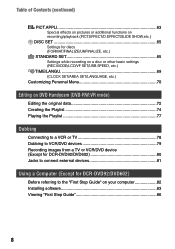
... Menu 70 Editing on DVD Handycam (DVD-RW:VR mode) Editing the original data 72 Creating the Playlist 74 Playing the Playlist 77 Dubbing Connecting to a VCR or TV 78 Dubbing to VCR/DVD devices 79 Recording images from a TV or VCR/DVD device (Except for DCR-DVD92/DVD602 80 Jacks to connect... external devices 81 Using a Computer (Except for DCR-DVD92/DVD602) Before referring to the "First Step Guide" on your computer...
... Menu 70 Editing on DVD Handycam (DVD-RW:VR mode) Editing the original data 72 Creating the Playlist 74 Playing the Playlist 77 Dubbing Connecting to a VCR or TV 78 Dubbing to VCR/DVD devices 79 Recording images from a TV or VCR/DVD device (Except for DCR-DVD92/DVD602 80 Jacks to connect... external devices 81 Using a Computer (Except for DCR-DVD92/DVD602) Before referring to the "First Step Guide" on your computer...
Operating Guide
Page 10
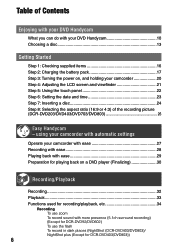
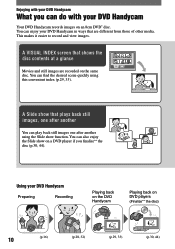
.... You can play back still images one after another using this convenient index (p.29, 33). Using your DVD Handycam Preparing Recording Playing back on the DVD Handycam Playing back on an 8cm DVD* disc. You can enjoy your DVD Handycam in ways that plays back still images, one after another You can also enjoy the Slide show...
.... You can play back still images one after another using this convenient index (p.29, 33). Using your DVD Handycam Preparing Recording Playing back on the DVD Handycam Playing back on an 8cm DVD* disc. You can enjoy your DVD Handycam in ways that plays back still images, one after another You can also enjoy the Slide show...
Operating Guide
Page 11
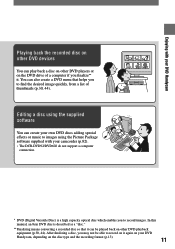
... to images using the Picture Package software supplied with your DVD Handycam Playing back the recorded disc on other DVD devices You can play back a disc on other DVD playback equipment (p.30, 44). Enjoying with your camcorder (p.82). • The DCR-DVD92/DVD602 do not support a computer connection. * DVD (Digital Versatile Disc) is described as a "disc." ** Finalizing means...
... to images using the Picture Package software supplied with your DVD Handycam Playing back the recorded disc on other DVD devices You can play back a disc on other DVD playback equipment (p.30, 44). Enjoying with your camcorder (p.82). • The DCR-DVD92/DVD602 do not support a computer connection. * DVD (Digital Versatile Disc) is described as a "disc." ** Finalizing means...
Operating Guide
Page 12
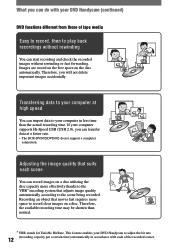
...The DCR-DVD92/DVD602 do with each scene You can transfer data at high speed You can start recording and check the recorded images without rewinding You can import data to play back recordings without rewinding or fast forwarding. If your DVD Handycam (continued) DVD functions ...different from those of the recorded scenes. This feature enables your DVD Handycam to the scene being recorded. Recording an object that adjusts image quality automatically...
...The DCR-DVD92/DVD602 do with each scene You can transfer data at high speed You can start recording and check the recorded images without rewinding You can import data to play back recordings without rewinding or fast forwarding. If your DVD Handycam (continued) DVD functions ...different from those of the recorded scenes. This feature enables your DVD Handycam to the scene being recorded. Recording an object that adjusts image quality automatically...
Operating Guide
Page 13
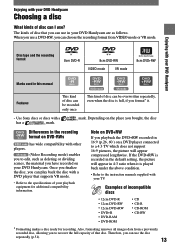
...;nalize the disc, you can use in your DVD Handycam are as deleting or dividing scenes, the material you playback the DVD+RW recorded in 4:3 ratio when it . • Use Sony discs or discs with a has a mark. Note on DVD+RW If you have recorded on a DVD player connected to edit, such as follows. Depending... you to recover the full capacity of that supports VR mode. • Refer to the instruction manuals supplied with your TV. Enjoying with your DVD Handycam Choosing a disc What kinds of disc can be recorded only once This kind of disc can I use? Enjoying with your...
...;nalize the disc, you can use in your DVD Handycam are as deleting or dividing scenes, the material you playback the DVD+RW recorded in 4:3 ratio when it . • Use Sony discs or discs with a has a mark. Note on DVD+RW If you have recorded on a DVD player connected to edit, such as follows. Depending... you to recover the full capacity of that supports VR mode. • Refer to the instruction manuals supplied with your TV. Enjoying with your DVD Handycam Choosing a disc What kinds of disc can be recorded only once This kind of disc can I use? Enjoying with your...
Operating Guide
Page 14
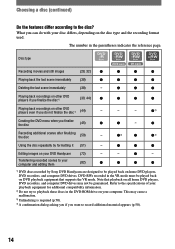
... finalize the disc (45) - Recording additional scenes after finalizing the disc (50) - 3) 4) Using the disc repeatedly by Sony DVD Handycam are designed to the specifications of your computer. Note that supports the VR mode. Choosing a disc (continued) Do the features differ according to... the parentheses indicates the reference page. This may not be played back on your playback equipment for additional compatibility information. 2) Do not try to your DVD Handycam (72) - - -
... finalize the disc (45) - Recording additional scenes after finalizing the disc (50) - 3) 4) Using the disc repeatedly by Sony DVD Handycam are designed to the specifications of your computer. Note that supports the VR mode. Choosing a disc (continued) Do the features differ according to... the parentheses indicates the reference page. This may not be played back on your playback equipment for additional compatibility information. 2) Do not try to your DVD Handycam (72) - - -
Operating Guide
Page 15
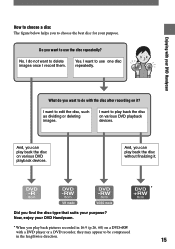
... can play back pictures recorded in 16:9 (p.26, 60) on a DVD+RW with your DVD Handycam How to choose a disc The figure below helps you can play back the disc on various DVD playback devices. Now, enjoy your DVD Handycam. * When you find the disc type that suits your purpose.... I want to play back the disc on it . * Did you play back the disc without finalizing it ? Enjoying with a DVD player or a DVD recorder, they may...
... can play back pictures recorded in 16:9 (p.26, 60) on a DVD+RW with your DVD Handycam How to choose a disc The figure below helps you can play back the disc on various DVD playback devices. Now, enjoy your DVD Handycam. * When you find the disc type that suits your purpose.... I want to play back the disc on it . * Did you play back the disc without finalizing it ? Enjoying with a DVD player or a DVD recorder, they may...
Operating Guide
Page 25
... "Deleting all of the scenes on the disc (Formatting)" on previously recorded areas appears for a DVD-RW, and touch . To remove the disc Perform steps 1 and 2 to step 6. • During Easy Handycam operation (p.27), [Format the disc? The information on previously recorded areas may take some time to...64257;ngerprints, etc. • Do not apply shock or vibration to malfunction. • After your camcorder (p.72). If not, remove the disc.] appears. It may not be played back only on DVD players that support VR mode when you can edit, delete pictures, or divide movies on the...
... "Deleting all of the scenes on the disc (Formatting)" on previously recorded areas appears for a DVD-RW, and touch . To remove the disc Perform steps 1 and 2 to step 6. • During Easy Handycam operation (p.27), [Format the disc? The information on previously recorded areas may take some time to...64257;ngerprints, etc. • Do not apply shock or vibration to malfunction. • After your camcorder (p.72). If not, remove the disc.] appears. It may not be played back only on DVD players that support VR mode when you can edit, delete pictures, or divide movies on the...
Operating Guide
Page 27
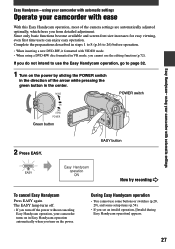
..., go to 26) before operation. • When inserting a new DVD-RW, it formatted with automatic settings Easy Handycam - using your camcorder with VIDEO mode. • When using your camcorder with automatic settings Operate your camcorder turns on the power. Now try recording During Easy Handycam operation • You cannot use the editing function (p.72). Since...
..., go to 26) before operation. • When inserting a new DVD-RW, it formatted with automatic settings Easy Handycam - using your camcorder with VIDEO mode. • When using your camcorder with automatic settings Operate your camcorder turns on the power. Now try recording During Easy Handycam operation • You cannot use the editing function (p.72). Since...
Operating Guide
Page 30
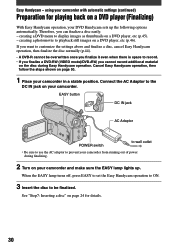
...to display images as thumbnails on a DVD player (Finalizing) With Easy Handycam operation, your DVD Handycam sets up . See "Step7: Inserting a disc" on page 24 for playing back on a DVD player, etc (p.45). - Therefore, you cannot record additional material on your camcorder. EASY button DC IN jack AC ... above and finalize a disc, cancel Easy Handycam operation, then finalize the disc normally (p.44). • A DVD-R cannot be finalized. Cancel Easy Handycam operation, then follow the steps shown on your camcorder and make sure the EASY lamp lights up the ...
...to display images as thumbnails on a DVD player (Finalizing) With Easy Handycam operation, your DVD Handycam sets up . See "Step7: Inserting a disc" on page 24 for playing back on a DVD player, etc (p.45). - Therefore, you cannot record additional material on your camcorder. EASY button DC IN jack AC ... above and finalize a disc, cancel Easy Handycam operation, then finalize the disc normally (p.44). • A DVD-R cannot be finalized. Cancel Easy Handycam operation, then follow the steps shown on your camcorder and make sure the EASY lamp lights up the ...
Operating Guide
Page 31
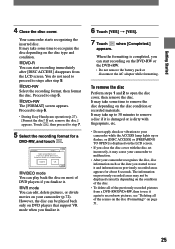
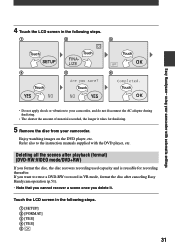
... screen in the following steps. Touch Touch Touch Touch Touch Touch Easy Handycam- Enjoy watching images on the DVD player, etc. using your camcorder. 4 Touch the LCD screen in the following steps. [SETUP] [FORMAT] [YES] ... the disc, the disc recovers recording used capacity and is reusable for finalizing. 5 Remove the disc from your camcorder with the DVD player, etc. Refer also to the instruction manuals supplied with automatic settings • Do not apply shock or vibration to...
... screen in the following steps. Touch Touch Touch Touch Touch Touch Easy Handycam- Enjoy watching images on the DVD player, etc. using your camcorder. 4 Touch the LCD screen in the following steps. [SETUP] [FORMAT] [YES] ... the disc, the disc recovers recording used capacity and is reusable for finalizing. 5 Remove the disc from your camcorder with the DVD player, etc. Refer also to the instruction manuals supplied with automatic settings • Do not apply shock or vibration to...
Operating Guide
Page 51
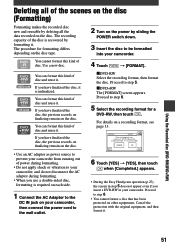
...on the disc. • Use an AC adaptor as power source to prevent your camcorder. Cancel the protection with the original equipment, and then format it . If you insert a DVD-RW in your camcorder from running out of power during formatting. • Do not apply shock or ...vibration to the wall outlet. 6 Touch [YES] [YES], then touch when [Completed.] appears. • During the Easy Handycam operation (p.27), the screen in step ...
...on the disc. • Use an AC adaptor as power source to prevent your camcorder. Cancel the protection with the original equipment, and then format it . If you insert a DVD-RW in your camcorder from running out of power during formatting. • Do not apply shock or ...vibration to the wall outlet. 6 Touch [YES] [YES], then touch when [Completed.] appears. • During the Easy Handycam operation (p.27), the screen in step ...

Operating Guide
Page 73
... toggles as you press . • A slight difference may occur from the point where you touch and the actual dividing point, as your camcorder selects the dividing point based on DVD Handycam (DVD-RW:VR mode) When you touch , the operational buttons below appears. The movie pauses. • If the movie is added in the...
... toggles as you press . • A slight difference may occur from the point where you touch and the actual dividing point, as your camcorder selects the dividing point based on DVD Handycam (DVD-RW:VR mode) When you touch , the operational buttons below appears. The movie pauses. • If the movie is added in the...
Operating Guide
Page 75
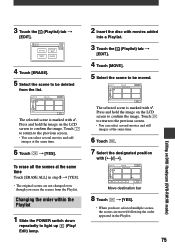
Touch to return to confirm the image. Press and hold the image on DVD Handycam (DVD-RW:VR mode) The selected scene is marked with . Changing the order within the Playlist 1 Slide the POWER switch down repeatedly to confirm ...
Touch to return to confirm the image. Press and hold the image on DVD Handycam (DVD-RW:VR mode) The selected scene is marked with . Changing the order within the Playlist 1 Slide the POWER switch down repeatedly to confirm ...
Operating Guide
Page 77
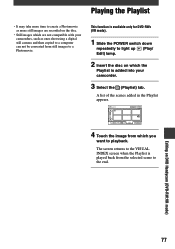
Editing on DVD Handycam (DVD-RW:VR mode) 77 The screen returns to the VISUAL INDEX screen when the Playlist is added into your camcorders, such as more still images are not compatible with your camcorder. 3 Select the (Playlist) tab. This function is available only for DVD-RWs (VR mode). 1 Slide the POWER switch down repeatedly to...
Editing on DVD Handycam (DVD-RW:VR mode) 77 The screen returns to the VISUAL INDEX screen when the Playlist is added into your camcorders, such as more still images are not compatible with your camcorder. 3 Select the (Playlist) tab. This function is available only for DVD-RWs (VR mode). 1 Slide the POWER switch down repeatedly to...

Operating Guide
Page 104
...Handycam operation (p.27) No recording in a Playlist due to recover the data, but they were unsuccessful. 104 Use the AC Adaptor as the power source to prevent the battery from wearing out in the middle of remaining capacity on power again Recovering data vibration Avoid any • Your camcorder... Playlist full • You cannot create the playlist exceeding 999 scenes. • You cannot add still images in Easy Handycam operation (p.27) • The DVD+RW has been finalized. Data protected • The disc has been protected with the copy protection signal. Cannot ...
...Handycam operation (p.27) No recording in a Playlist due to recover the data, but they were unsuccessful. 104 Use the AC Adaptor as the power source to prevent the battery from wearing out in the middle of remaining capacity on power again Recovering data vibration Avoid any • Your camcorder... Playlist full • You cannot create the playlist exceeding 999 scenes. • You cannot add still images in Easy Handycam operation (p.27) • The DVD+RW has been finalized. Data protected • The disc has been protected with the copy protection signal. Cannot ...

Operating Guide
Page 117
... 65 Disc title 46, 65 DISP/BATT INFO.... 21, 22, 37 Display indicators .......... 39, 40 DISP OUTPUT 68 Dubbing 79 DVD menu 45 D.EFFECT (Digital effect 63 E EASY button 27 Easy Handycam operation ... 27 Edit 72 EXPOSURE 57, 94 EXT SUR MIC 66 F FADER 63, 95 FILE NO. (File number) ...... 62 Finalize...
... 65 Disc title 46, 65 DISP/BATT INFO.... 21, 22, 37 Display indicators .......... 39, 40 DISP OUTPUT 68 Dubbing 79 DVD menu 45 D.EFFECT (Digital effect 63 E EASY button 27 Easy Handycam operation ... 27 Edit 72 EXPOSURE 57, 94 EXT SUR MIC 66 F FADER 63, 95 FILE NO. (File number) ...... 62 Finalize...


