
Operating Guide
Page 5
... ("Memory Stick PRO-HG Duo") * You can use in your camcorder • For recording movies, it in your camcorder You can use the following discs only. - 8cm DVD-RW - 8cm DVD+RW - 8cm DVD-R - 8cm DVD+R DL Use the discs with the limits for your camcorder. * Depending on the supplied CD-ROM) (p. 92) Types of... CAMERA) mark for a digital device pursuant to remove the disc from that to which the receiver is recommended that you use in your camcorder with a computer connected (stored on the place you can use Sony discs or discs with "Memory Stick PRO" compatible equipment.
... ("Memory Stick PRO-HG Duo") * You can use in your camcorder • For recording movies, it in your camcorder You can use the following discs only. - 8cm DVD-RW - 8cm DVD+RW - 8cm DVD-R - 8cm DVD+R DL Use the discs with the limits for your camcorder. * Depending on the supplied CD-ROM) (p. 92) Types of... CAMERA) mark for a digital device pursuant to remove the disc from that to which the receiver is recommended that you use in your camcorder with a computer connected (stored on the place you can use Sony discs or discs with "Memory Stick PRO" compatible equipment.

Operating Guide
Page 6
... cause malfunctions. • Do not aim at dusk. These points are effective. to apply mechanical shock or vibration to malfunction. To view your camcorder" (p. 116). • To prevent media from being lost, do not do not affect the recording in low light conditions, such as at ... viewfinder, or the lens to a malfunction of the sun only in any problems. Use a DVD-RW/DVD+RW for trial recording. • Compensation for long periods of your Battery • The camcorder is not available under the current recording or playback conditions. • The LCD screen and the...
... cause malfunctions. • Do not aim at dusk. These points are effective. to apply mechanical shock or vibration to malfunction. To view your camcorder" (p. 116). • To prevent media from being lost, do not do not affect the recording in low light conditions, such as at ... viewfinder, or the lens to a malfunction of the sun only in any problems. Use a DVD-RW/DVD+RW for trial recording. • Compensation for long periods of your Battery • The camcorder is not available under the current recording or playback conditions. • The LCD screen and the...
Operating Guide
Page 7
... type of media you actually see. • Discs in this manual refers to 8cm DVD discs. • In this manual • The operations available depend on -screen displays...fragmentation of data occurs on a "Memory Stick PRO Duo." About the marks used in Germany, and Sony Corporation, and produces superior images. The number value indicates the amount of light from what you can... the screen language before using your images on a TV, you repeat recording/deleting images for your camcorder is equipped with a digital still camera, and may look different from a subject coming into the ...
... type of media you actually see. • Discs in this manual refers to 8cm DVD discs. • In this manual • The operations available depend on -screen displays...fragmentation of data occurs on a "Memory Stick PRO Duo." About the marks used in Germany, and Sony Corporation, and produces superior images. The number value indicates the amount of light from what you can... the screen language before using your images on a TV, you repeat recording/deleting images for your camcorder is equipped with a digital still camera, and may look different from a subject coming into the ...
Operating Guide
Page 8
... adjustments before operating your camcorder 4 Table of Contents 8 Subject examples and solutions ... 10 Enjoying with Your Camcorder Media for your camcorder 11 Using your camcorder 51 Dividing movies 52 Creating the Playlist 53 Dubbing movies to VCR or DVD/HDD recorders 57 Printing still...camcorder 14 " HOME" and " OPTION" - Table of Contents Read this before recording 25 Step 5: Selecting media for movies 26 Step 6: Inserting a disc or a "Memory Stick PRO Duo 27 Recording/Playback Recording and playing back with ease (Easy Handycam operation) ....... 31 Recording 34 Zooming...
... adjustments before operating your camcorder 4 Table of Contents 8 Subject examples and solutions ... 10 Enjoying with Your Camcorder Media for your camcorder 11 Using your camcorder 51 Dividing movies 52 Creating the Playlist 53 Dubbing movies to VCR or DVD/HDD recorders 57 Printing still...camcorder 14 " HOME" and " OPTION" - Table of Contents Read this before recording 25 Step 5: Selecting media for movies 26 Step 6: Inserting a disc or a "Memory Stick PRO Duo 27 Recording/Playback Recording and playing back with ease (Easy Handycam operation) ....... 31 Recording 34 Zooming...
Operating Guide
Page 11
... format for the types of images). You can use with your camcorder. • Still images are 8cm DVD-RW, DVD+RW, DVD-R and DVD+R DL discs. • See page 5 for DVD-RW When you use a DVD-RW, you can select either of DVD-RW. A recording format that is indicated as and VR mode...In this manual, VIDEO mode is compatible with most recent movie can use in DVD devices that enables editing with your camcorder are recorded only on the camcorder, you can be played back in your camcorder (deleting and rearranging the order of "Memory Stick" you can dub movies recorded ...
... format for the types of images). You can use with your camcorder. • Still images are 8cm DVD-RW, DVD+RW, DVD-R and DVD+R DL discs. • See page 5 for DVD-RW When you use a DVD-RW, you can select either of DVD-RW. A recording format that is indicated as and VR mode...In this manual, VIDEO mode is compatible with most recent movie can use in DVD devices that enables editing with your camcorder are recorded only on the camcorder, you can be played back in your camcorder (deleting and rearranging the order of "Memory Stick" you can dub movies recorded ...
Operating Guide
Page 12
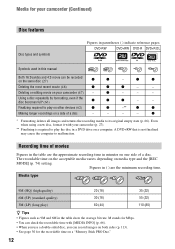
... Symbols used in minutes on one side of a disc. A DVD+RW that is required to malfunction. The recordable time on the acceptable media varies depending on your camcorder (47) - Deleting or editing movie on media type and the [REC MODE] (p. 74) setting. Using a disc repeatedly by ... M stands for Mbps. • You can record images on both sides (p. 113). • See page 30 for your camcorder (Continued) Disc features Disc types and symbols Figures in a DVD drive on a computer. Media for the recordable time on a "Memory Stick PRO Duo." 12 z * Formatting deletes all images...
... Symbols used in minutes on one side of a disc. A DVD+RW that is required to malfunction. The recordable time on the acceptable media varies depending on your camcorder (47) - Deleting or editing movie on media type and the [REC MODE] (p. 74) setting. Using a disc repeatedly by ... M stands for Mbps. • You can record images on both sides (p. 113). • See page 30 for your camcorder (Continued) Disc features Disc types and symbols Figures in a DVD drive on a computer. Media for the recordable time on a "Memory Stick PRO Duo." 12 z * Formatting deletes all images...

Operating Guide
Page 15
...to finalize the disc first. x Playing the disc on other devices (p. 65) To play a disc recorded on your camcorder on other devices, you to the instruction manual supplied with all DVD devices is free space left. The features of the disc is required in a device compatible with Your... Camcorder 4Viewing on the connected TV. bNotes • The less the recording volume of a finalized disc depend on a TV (p. ...
...to finalize the disc first. x Playing the disc on other devices (p. 65) To play a disc recorded on your camcorder on other devices, you to the instruction manual supplied with all DVD devices is free space left. The features of the disc is required in a device compatible with Your... Camcorder 4Viewing on the connected TV. bNotes • The less the recording volume of a finalized disc depend on a TV (p. ...

Operating Guide
Page 27
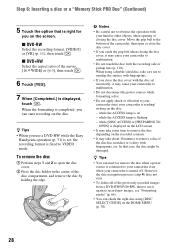
...). 3 Set the disc with the label side facing out when using a soft cloth (p. 114). 1 Check that the power of your camcorder, then press the center of the arrow (OPEN l). [PREPARING TO OPEN] appears on the screen. x DVD-R/DVD+R DL You can start recording immediately after step 5. It may take some time for the...
...). 3 Set the disc with the label side facing out when using a soft cloth (p. 114). 1 Check that the power of your camcorder, then press the center of the arrow (OPEN l). [PREPARING TO OPEN] appears on the screen. x DVD-R/DVD+R DL You can start recording immediately after step 5. It may take some time for the...
Operating Guide
Page 28
... previously recorded images from a DVD-RW/DVD+RW, then to use a DVD-RW while the Easy Handycam operation (p. 31) is set incorrectly, it may cause your camcorder to malfunction. • Do not disconnect the power sources while formatting a disc. • Do not apply shock or vibration to your camcorder since your camcorder to obstruct the operation with...
... previously recorded images from a DVD-RW/DVD+RW, then to use a DVD-RW while the Easy Handycam operation (p. 31) is set incorrectly, it may cause your camcorder to malfunction. • Do not disconnect the power sources while formatting a disc. • Do not apply shock or vibration to your camcorder since your camcorder to obstruct the operation with...
Operating Guide
Page 47
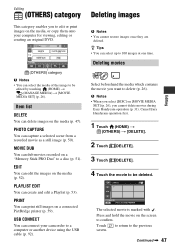
... and hold the movie on the screen to the previous screen. USB CONNECT You can connect your computer for viewing, editing or creating an original DVD. (OTHERS) category b Notes • You can select the media of the image to be edited by touching (HOME) t (MANAGE MEDIA) t [MOVIE MEDIA SET] (p. 26). ... using the USB cable (p. 92). Editing (OTHERS) category This category enables you to edit or print images on the media, or copy them onto your camcorder to 100 images at one time. Item list DELETE You can delete images on [MOVIE MEDIA SET] (p. 26), you cannot delete movies during Easy...
... and hold the movie on the screen to the previous screen. USB CONNECT You can connect your computer for viewing, editing or creating an original DVD. (OTHERS) category b Notes • You can select the media of the image to be edited by touching (HOME) t (MANAGE MEDIA) t [MOVIE MEDIA SET] (p. 26). ... using the USB cable (p. 92). Editing (OTHERS) category This category enables you to edit or print images on the media, or copy them onto your camcorder to 100 images at one time. Item list DELETE You can delete images on [MOVIE MEDIA SET] (p. 26), you cannot delete movies during Easy...

Operating Guide
Page 57
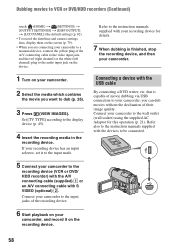
...S VIDEO (optional). b Notes • To hide the screen indicators, such as VCRs or DVD/HDD recorders. Connect your camcorder to other recording devices, such as a counter on your camcorder to the wall outlet (wall socket) using an A/V connecting cable with S VIDEO (optional), ...higher quality movies can be connected. B A/V connecting cable with an A/V connecting VCRs or DVD/HDD recorders cable. Connecting only the S VIDEO ...
...S VIDEO (optional). b Notes • To hide the screen indicators, such as VCRs or DVD/HDD recorders. Connect your camcorder to other recording devices, such as a counter on your camcorder to the wall outlet (wall socket) using an A/V connecting cable with S VIDEO (optional), ...higher quality movies can be connected. B A/V connecting cable with an A/V connecting VCRs or DVD/HDD recorders cable. Connecting only the S VIDEO ...
Operating Guide
Page 58
... movie dubbing via USB connection to the recording device (VCR or DVD/ HDD recorder) with the A/V connecting cable (supplied) 1 or an A/V connecting cable with the USB cable By connecting a DVD writer, etc. Connect your camcorder to the input jacks of the recording device. 6 Start playback ...on your camcorder, and record it to the input mode. 5 Connect your camcorder to your camcorder, you want to the display device (p. 45). 4 ...
... movie dubbing via USB connection to the recording device (VCR or DVD/ HDD recorder) with the A/V connecting cable (supplied) 1 or an A/V connecting cable with the USB cable By connecting a DVD writer, etc. Connect your camcorder to the input jacks of the recording device. 6 Start playback ...on your camcorder, and record it to the input mode. 5 Connect your camcorder to your camcorder, you want to the display device (p. 45). 4 ...

Operating Guide
Page 59
... is complete, (PictBridge connecting) appears on the screen. 3 Touch [PRINT]. Editing Continued , 59 using a PictBridge compliant printer, without connecting the camcorder to a DVD writer, etc. Insert the "Memory Stick PRO Duo" that contains the still images you want to print into your... camcorder to a computer. 1 Turn on your camcorder. 2 Connect the (USB) jack of your camcorder to the AC Adaptor to the printer using the supplied USB cable (p. 124). Printing ...
... is complete, (PictBridge connecting) appears on the screen. 3 Touch [PRINT]. Editing Continued , 59 using a PictBridge compliant printer, without connecting the camcorder to a DVD writer, etc. Insert the "Memory Stick PRO Duo" that contains the still images you want to print into your... camcorder to a computer. 1 Turn on your camcorder. 2 Connect the (USB) jack of your camcorder to the AC Adaptor to the printer using the supplied USB cable (p. 124). Printing ...
Operating Guide
Page 64
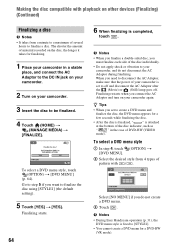
... Adaptor after the (Movie) or (Still) lamp goes off. To select a DVD menu style 1 In step 4, touch (OPTION) t [DVD MENU]. 2 Select the desired style from 4 types of your camcorder, and do not create a DVD menu. 3 Touch . b Notes • During Easy Handycam operation (p. 31), the DVD menu style is attached at the bottom of the disc indicator...
... Adaptor after the (Movie) or (Still) lamp goes off. To select a DVD menu style 1 In step 4, touch (OPTION) t [DVD MENU]. 2 Select the desired style from 4 types of your camcorder, and do not create a DVD menu. 3 Touch . b Notes • During Easy Handycam operation (p. 31), the DVD menu style is attached at the bottom of the disc indicator...
Operating Guide
Page 65
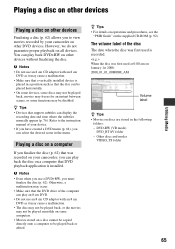
...finalize the disc (p. 62). Playing a disc on a computer If you finalize the disc (p. 62) that was recorded on your camcorder, you can play back DVD+RW on a computer that DVD playback application is installed. z Tips • For details on operations and procedures, see the "PMB Guide" on a disc cannot... a disc on other devices Finalizing a disc (p. 62) allows you to view movies recorded by your camcorder on all devices. However, we do not guarantee proper playback on other DVD devices. DVD-RW (VR mode) DVD_RTAV folder - Refer to the instruction manual of the disc The date when the...
...finalize the disc (p. 62). Playing a disc on a computer If you finalize the disc (p. 62) that was recorded on your camcorder, you can play back DVD+RW on a computer that DVD playback application is installed. z Tips • For details on operations and procedures, see the "PMB Guide" on a disc cannot... a disc on other devices Finalizing a disc (p. 62) allows you to view movies recorded by your camcorder on all devices. However, we do not guarantee proper playback on other DVD devices. DVD-RW (VR mode) DVD_RTAV folder - Refer to the instruction manual of the disc The date when the...

Operating Guide
Page 66
... (p. 26). b Notes • The calculation for the media selected on [MOVIE MEDIA SET] (p. 26). Formatting a disc A DVD-R/DVD+R DL cannot be formatted into your camcorder. 3 Insert the disc to finalize the disc again before performing [MEDIA FORMAT]. You do not need to be formatted. To avoid the...if you format a finalized disc • A DVD-RW (VIDEO mode) returns to its contents on other devices.* * To create the DVD menu on a DVD+RW, finalize the disc again (p. 64). 1 Connect the AC Adaptor to the DC IN jack on your camcorder, then connect the power cord (mains lead)...
... (p. 26). b Notes • The calculation for the media selected on [MOVIE MEDIA SET] (p. 26). Formatting a disc A DVD-R/DVD+R DL cannot be formatted into your camcorder. 3 Insert the disc to finalize the disc again before performing [MEDIA FORMAT]. You do not need to be formatted. To avoid the...if you format a finalized disc • A DVD-RW (VIDEO mode) returns to its contents on other devices.* * To create the DVD menu on a DVD+RW, finalize the disc again (p. 64). 1 Connect the AC Adaptor to the DC IN jack on your camcorder, then connect the power cord (mains lead)...

Operating Guide
Page 67
...DVD-RW Select the recording format, [VIDEO] or [VR] (p. 11), then touch . You can format each side. b Notes • Do not apply shock or vibration to your camcorder, and do not disconnect the AC Adaptor during Easy Handycam operation (p. 31), the recording format is required on your camcorder.... 3 Insert the "Memory Stick PRO Duo" to your camcorder. 4 Touch (HOME) t (MANAGE MEDIA) t [...
...DVD-RW Select the recording format, [VIDEO] or [VR] (p. 11), then touch . You can format each side. b Notes • Do not apply shock or vibration to your camcorder, and do not disconnect the AC Adaptor during Easy Handycam operation (p. 31), the recording format is required on your camcorder.... 3 Insert the "Memory Stick PRO Duo" to your camcorder. 4 Touch (HOME) t (MANAGE MEDIA) t [...

Operating Guide
Page 68
... Adaptor to the DC IN jack on your camcorder, then connect the power cord (mains lead) to the wall outlet (wall socket). 2 Turn on the screen: - b Notes • You cannot record additional movies on the DVD-R/DVD+R DL after the following operations when [Executing...]... is on your camcorder. 3 Insert the finalized disc into your camcorder. 4 Touch (HOME) t (MANAGE MEDIA) t [UNFINALIZE]. 5 Touch [YES] t [YES]. 68 Use ...
... Adaptor to the DC IN jack on your camcorder, then connect the power cord (mains lead) to the wall outlet (wall socket). 2 Turn on the screen: - b Notes • You cannot record additional movies on the DVD-R/DVD+R DL after the following operations when [Executing...]... is on your camcorder. 3 Insert the finalized disc into your camcorder. 4 Touch (HOME) t (MANAGE MEDIA) t [UNFINALIZE]. 5 Touch [YES] t [YES]. 68 Use ...

Operating Guide
Page 69
...). 2 Turn the POWER switch to turn on the (Movie) lamp. 3 Insert the finalized disc into your camcorder, and do not disconnect the AC Adaptor during the operation. • A DVD menu created during finalizing, you wish to your camcorder. Utilizing Media 4 Touch [YES] t [YES]. 5 When [Completed.] appears, touch . 69 6 When [Completed.] appears, touch . When...
...). 2 Turn the POWER switch to turn on the (Movie) lamp. 3 Insert the finalized disc into your camcorder, and do not disconnect the AC Adaptor during the operation. • A DVD menu created during finalizing, you wish to your camcorder. Utilizing Media 4 Touch [YES] t [YES]. 5 When [Completed.] appears, touch . 69 6 When [Completed.] appears, touch . When...

Operating Guide
Page 92
Performing with Your Computer What you can enjoy the following URL: http://guide.d-imaging.sony.co.jp/mac/ ms/us/ 92 Installing the software x Environment for using "Picture Motion Browser" OS: Microsoft Windows 2000 Professional SP4/Windows XP SP2*/Windows... to your camcorder to have DirectX installed.) Sound system: Direct Sound compatible sound card Memory: 256 MB or more Hard disk: Disk volume required for installation: Approximately 500 MB (5 GB or more may be necessary when creating a DVD.) Display: Minimum 1,024 × 768 dots Others: USB port (this must meet hardware ...
Performing with Your Computer What you can enjoy the following URL: http://guide.d-imaging.sony.co.jp/mac/ ms/us/ 92 Installing the software x Environment for using "Picture Motion Browser" OS: Microsoft Windows 2000 Professional SP4/Windows XP SP2*/Windows... to your camcorder to have DirectX installed.) Sound system: Direct Sound compatible sound card Memory: 256 MB or more Hard disk: Disk volume required for installation: Approximately 500 MB (5 GB or more may be necessary when creating a DVD.) Display: Minimum 1,024 × 768 dots Others: USB port (this must meet hardware ...


