
Operating Guide
Page 5
... separation between the equipment and receiver. - For reliability and durability of recording/ playback, we recommend that you use Sony discs or discs with a *(for VIDEO CAMERA) mark for using your camcorder • For recording movies, it is recommended that to which the receiver is supplied with : - PRO Duo")*... Duo" of 512 MB or larger marked with two kinds of the disc you use the following discs only. - 8cm DVD-RW - 8cm DVD+RW - 8cm DVD-R - 8cm DVD+R DL Use the discs with "Memory Stick PRO" compatible equipment. Connect the equipment into an outlet on the place you...
... separation between the equipment and receiver. - For reliability and durability of recording/ playback, we recommend that you use Sony discs or discs with a *(for VIDEO CAMERA) mark for using your camcorder • For recording movies, it is recommended that to which the receiver is supplied with : - PRO Duo")*... Duo" of 512 MB or larger marked with two kinds of the disc you use the following discs only. - 8cm DVD-RW - 8cm DVD+RW - 8cm DVD-R - 8cm DVD+R DL Use the discs with "Memory Stick PRO" compatible equipment. Connect the equipment into an outlet on the place you...

Operating Guide
Page 6
...; Do not hold the camcorder by the following when either of your camcorder" (p. 116). • To prevent media from being lost, do not do not affect the recording in any problems. Use a DVD-RW/DVD+RW for trial recording. • Compensation for the contents of recordings cannot be some tiny ...black points and/or bright points (white, red, blue, or green in the correct way. To view your camcorder. 6 Black point White, red, blue or...
...; Do not hold the camcorder by the following when either of your camcorder" (p. 116). • To prevent media from being lost, do not do not affect the recording in any problems. Use a DVD-RW/DVD+RW for trial recording. • Compensation for the contents of recordings cannot be some tiny ...black points and/or bright points (white, red, blue, or green in the correct way. To view your camcorder. 6 Black point White, red, blue or...
Operating Guide
Page 7
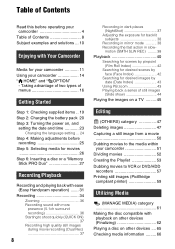
... In such a case, save your images on the media used. About the Carl Zeiss lens Your camcorder is T -coated to the copyright laws. • If you need an NTSC system-based TV. ...• Television programs, films, video tapes, and other accessories are subject to 8cm DVD discs. • In this manual, a disc and a "Memory Stick PRO Duo" are called the media.... and then format the "Memory Stick PRO Duo" (p. 67). Change the screen language before using your camcorder is equipped with a Carl Zeiss lens, which was developed jointly by Carl Zeiss, in this manual ...
... In such a case, save your images on the media used. About the Carl Zeiss lens Your camcorder is T -coated to the copyright laws. • If you need an NTSC system-based TV. ...• Television programs, films, video tapes, and other accessories are subject to 8cm DVD discs. • In this manual, a disc and a "Memory Stick PRO Duo" are called the media.... and then format the "Memory Stick PRO Duo" (p. 67). Change the screen language before using your camcorder is equipped with a Carl Zeiss lens, which was developed jointly by Carl Zeiss, in this manual ...
Operating Guide
Page 8
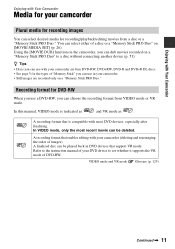
... ease (Easy Handycam operation) ....... 31 Recording 34 Zooming 36 Recording sound with more presence (5.1ch surround recording 36 Starting to VCR or DVD/HDD recorders 57 Printing still images (PictBridge compliant printer 59 Utilizing Media (MANAGE MEDIA) category 61 Making the disc compatible with Your Camcorder Media for your camcorder 11 Using your camcorder 51 Dividing...
... ease (Easy Handycam operation) ....... 31 Recording 34 Zooming 36 Recording sound with more presence (5.1ch surround recording 36 Starting to VCR or DVD/HDD recorders 57 Printing still images (PictBridge compliant printer 59 Utilizing Media (MANAGE MEDIA) category 61 Making the disc compatible with Your Camcorder Media for your camcorder 11 Using your camcorder 51 Dividing...
Operating Guide
Page 11
... DUB] function on a "Memory Stick PRO Duo." In this manual, VIDEO mode is compatible with your camcorder. • Still images are 8cm DVD-RW, DVD+RW, DVD-R and DVD+R DL discs. • See page 5 for DVD-RW When you can choose the recording format from a disc or a "Memory Stick PRO Duo." A finalized...Duo" to see whether it supports the VR mode of "Memory Stick" you can use a DVD-RW, you can be played back in your camcorder are recorded only on the camcorder, you use in DVD devices that is indicated as and VR mode as . Refer to the instruction manual of your...
... DUB] function on a "Memory Stick PRO Duo." In this manual, VIDEO mode is compatible with your camcorder. • Still images are 8cm DVD-RW, DVD+RW, DVD-R and DVD+R DL discs. • See page 5 for DVD-RW When you can choose the recording format from a disc or a "Memory Stick PRO Duo." A finalized...Duo" to see whether it supports the VR mode of "Memory Stick" you can use a DVD-RW, you can be played back in your camcorder are recorded only on the camcorder, you use in DVD devices that is indicated as and VR mode as . Refer to the instruction manual of your...
Operating Guide
Page 12
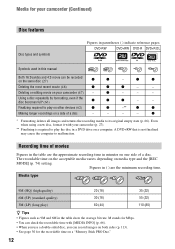
...(18) 60 (44) 35 (32) 55 (32) 110 (80) z Tips • Figures such as 9M and 6M in a DVD drive on a "Memory Stick PRO Duo." 12 Media for your camcorder (Continued) Disc features Disc types and symbols Figures in ( ) are the approximate recording time in this manual Both 16:9 (wide...) and 4:3 movie can record images on both sides (p. 113). • See page 30 for the recordable time on a computer. DVD-RW DVD+RW DVD-R DVD+R DL Symbols used in minutes on your camcorder (47) - Media type 9M (HQ) (high quality) 6M (SP) (standard quality) 3M (LP) (long play the disc in the...
...(18) 60 (44) 35 (32) 55 (32) 110 (80) z Tips • Figures such as 9M and 6M in a DVD drive on a "Memory Stick PRO Duo." 12 Media for your camcorder (Continued) Disc features Disc types and symbols Figures in ( ) are the approximate recording time in this manual Both 16:9 (wide...) and 4:3 movie can record images on both sides (p. 113). • See page 30 for the recordable time on a computer. DVD-RW DVD+RW DVD-R DVD+R DL Symbols used in minutes on your camcorder (47) - Media type 9M (HQ) (high quality) 6M (SP) (standard quality) 3M (LP) (long play the disc in the...

Operating Guide
Page 15
...if there is free space left. Playback compatibility Playback compatibility with Your Camcorder 4Viewing on other devices x Viewing images on a TV (p. 45) You can be played back in a device compatible with your DVD device or consult your camcorder on disc type. x Playing the disc on other devices, you... to the instruction manual supplied with the DVD-RW VR mode. Unfinalizing allows you need to finalize the disc. The disc ...
...if there is free space left. Playback compatibility Playback compatibility with Your Camcorder 4Viewing on other devices x Viewing images on a TV (p. 45) You can be played back in a device compatible with your DVD device or consult your camcorder on disc type. x Playing the disc on other devices, you... to the instruction manual supplied with the DVD-RW VR mode. Unfinalizing allows you need to finalize the disc. The disc ...

Operating Guide
Page 27
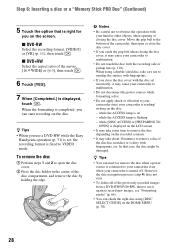
... it clicks. You do not want to use [DISC SELECT GUIDE]. x DVD-R/DVD+R DL You can start recording immediately after step 5. It may take some time for the camcorder to ask whether you will use it further. x DVD-RW/DVD+RW A screen appears to recognize the disc. b Notes • Remove... disc When you select [DISC] in "Step 5," a new 8 cm DVD-RW, DVD+RW, DVD-R, or DVD+R DL is required (p. 12). 3 Set the disc with the label side facing out when using a soft cloth (p. 114). 1 Check that the power of your camcorder, then press the center of the arrow (OPEN l). [PREPARING TO OPEN...
... it clicks. You do not want to use [DISC SELECT GUIDE]. x DVD-R/DVD+R DL You can start recording immediately after step 5. It may take some time for the camcorder to ask whether you will use it further. x DVD-RW/DVD+RW A screen appears to recognize the disc. b Notes • Remove... disc When you select [DISC] in "Step 5," a new 8 cm DVD-RW, DVD+RW, DVD-R, or DVD+R DL is required (p. 12). 3 Set the disc with the label side facing out when using a soft cloth (p. 114). 1 Check that the power of your camcorder, then press the center of the arrow (OPEN l). [PREPARING TO OPEN...
Operating Guide
Page 28
... • Do not apply shock or vibration to your camcorder even when your camcorder is right for you on - Move the grip belt to the bottom of the previously recorded images from a DVD-RW/DVD+RW, then to use a DVD-RW while the Easy Handycam operation (p. 31) is set incorrectly, it again to ...HOME MENU (p. 70). 28 When the formatting is completed, you can insert or remove the disc when a power source is connected to your camcorder since your camcorder to record new images, see "Formatting media" (p. 66). • You can check the right disc using a double-sided disc, take ...
... • Do not apply shock or vibration to your camcorder even when your camcorder is right for you on - Move the grip belt to the bottom of the previously recorded images from a DVD-RW/DVD+RW, then to use a DVD-RW while the Easy Handycam operation (p. 31) is set incorrectly, it again to ...HOME MENU (p. 70). 28 When the formatting is completed, you can insert or remove the disc when a power source is connected to your camcorder since your camcorder to record new images, see "Formatting media" (p. 66). • You can check the right disc using a double-sided disc, take ...
Operating Guide
Page 47
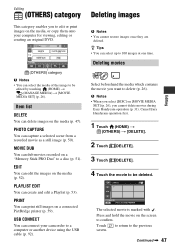
...MEDIA SET] (p. 26). MOVIE DUB You can connect your computer for viewing, editing or creating an original DVD. (OTHERS) category b Notes • You can select up to 100 images at one time. USB ... PictBridge printer (p. 59). PRINT You can capture a selected scene from a recorded movie as a still image (p. 50). Cancel Easy Handycam operation first. 1 Touch (HOME) t (OTHERS) t [DELETE]. 2 Touch [ DELETE]. 3 Touch [ DELETE]. 4 Touch the... print images on the media, or copy them onto your camcorder to a computer or another device using the USB cable (p. 92). PLAYLIST EDIT You can ...
...MEDIA SET] (p. 26). MOVIE DUB You can connect your computer for viewing, editing or creating an original DVD. (OTHERS) category b Notes • You can select up to 100 images at one time. USB ... PictBridge printer (p. 59). PRINT You can capture a selected scene from a recorded movie as a still image (p. 50). Cancel Easy Handycam operation first. 1 Touch (HOME) t (OTHERS) t [DELETE]. 2 Touch [ DELETE]. 3 Touch [ DELETE]. 4 Touch the... print images on the media, or copy them onto your camcorder to a computer or another device using the USB cable (p. 92). PLAYLIST EDIT You can ...

Operating Guide
Page 57
... recording devices, such as a counter on your camcorder to the input jack of the monitor device connected, Continued , 57 Refer also to the instruction manuals supplied with the devices to be produced than with an A/V connecting VCRs or DVD/HDD recorders cable. Device without S VIDEO jack... VIDEO jack, by using the supplied AC Adaptor for this operation (p. 20). b Notes • To hide the screen indicators, such as VCRs or DVD/HDD recorders. Connect the device in either of the A/V connecting cable with S VIDEO (optional). B A/V connecting cable with S VIDEO (optional) When ...
... recording devices, such as a counter on your camcorder to the input jack of the monitor device connected, Continued , 57 Refer also to the instruction manuals supplied with the devices to be produced than with an A/V connecting VCRs or DVD/HDD recorders cable. Device without S VIDEO jack... VIDEO jack, by using the supplied AC Adaptor for this operation (p. 20). b Notes • To hide the screen indicators, such as VCRs or DVD/HDD recorders. Connect the device in either of the A/V connecting cable with S VIDEO (optional). B A/V connecting cable with S VIDEO (optional) When ...
Operating Guide
Page 58
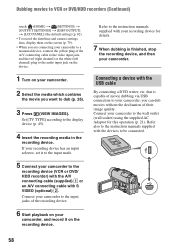
... a device with the devices to be connected. 58 Refer also to the instruction manuals supplied with the USB cable By connecting a DVD writer, etc. Connect your camcorder. 2 Select the media which contains the movie you want to dub (p. 26). 3 Press (VIEW IMAGES). Dubbing movies to VCR or...of movie dubbing via USB connection to your recording device has an input selector, set it on your camcorder, and record it to the input mode. 5 Connect your camcorder to the recording device (VCR or DVD/ HDD recorder) with the A/V connecting cable (supplied) 1 or an A/V connecting cable with your...
... a device with the devices to be connected. 58 Refer also to the instruction manuals supplied with the USB cable By connecting a DVD writer, etc. Connect your camcorder. 2 Select the media which contains the movie you want to dub (p. 26). 3 Press (VIEW IMAGES). Dubbing movies to VCR or...of movie dubbing via USB connection to your recording device has an input selector, set it on your camcorder, and record it to the input mode. 5 Connect your camcorder to the recording device (VCR or DVD/ HDD recorder) with the A/V connecting cable (supplied) 1 or an A/V connecting cable with your...

Operating Guide
Page 59
...The [USB SELECT] screen appears. 3 Touch media which contains the movie to be dubbed. 4 Start recording on your camcorder. 2 Connect the (USB) jack of your camcorder. Insert the "Memory Stick PRO Duo" that contains the still images you want to the instruction manuals supplied with the ...turn on the printer. 1 Turn on the connected device. The [USB SELECT] screen appears on the screen. 3 Touch [PRINT]. Connect your camcorder to a DVD writer, etc. Printing still images (PictBridge compliant printer) You can print out still images using the supplied USB cable (p. 124).
...The [USB SELECT] screen appears. 3 Touch media which contains the movie to be dubbed. 4 Start recording on your camcorder. 2 Connect the (USB) jack of your camcorder. Insert the "Memory Stick PRO Duo" that contains the still images you want to the instruction manuals supplied with the ...turn on the printer. 1 Turn on the connected device. The [USB SELECT] screen appears on the screen. 3 Touch [PRINT]. Connect your camcorder to a DVD writer, etc. Printing still images (PictBridge compliant printer) You can print out still images using the supplied USB cable (p. 124).
Operating Guide
Page 64
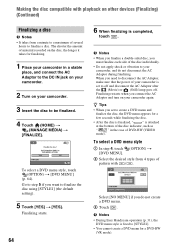
... finalize a double-sided disc, you want to [STYLE1]. • You cannot create a DVD menu for finalizing. 1 Place your camcorder in the case of your camcorder again. To select a DVD menu style, touch (OPTION) t [DVD MENU] (p. 64). b Notes • During Easy Handycam operation (p. 31), the DVD menu style is attached at the bottom of the disc indicator, such...
... finalize a double-sided disc, you want to [STYLE1]. • You cannot create a DVD menu for finalizing. 1 Place your camcorder in the case of your camcorder again. To select a DVD menu style, touch (OPTION) t [DVD MENU] (p. 64). b Notes • During Easy Handycam operation (p. 31), the DVD menu style is attached at the bottom of the disc indicator, such...
Operating Guide
Page 65
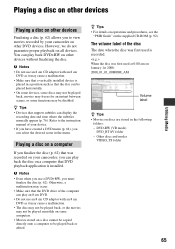
... manual of your device. • If you have created a DVD menu (p. 64), you must finalize the disc (p. 62). Playing a disc on a computer If you finalize the disc (p. 62) that was recorded on your camcorder, you can display the recording date and time where the subtitles normally...Utilizing Media Playing a disc on other devices Finalizing a disc (p. 62) allows you to view movies recorded by your camcorder on other devices without finalizing the disc. b Notes • Do not use a DVD+RW, you can play back the disc on a computer that a vertically installed device is recorded.
... manual of your device. • If you have created a DVD menu (p. 64), you must finalize the disc (p. 62). Playing a disc on a computer If you finalize the disc (p. 62) that was recorded on your camcorder, you can display the recording date and time where the subtitles normally...Utilizing Media Playing a disc on other devices Finalizing a disc (p. 62) allows you to view movies recorded by your camcorder on other devices without finalizing the disc. b Notes • Do not use a DVD+RW, you can play back the disc on a computer that a vertically installed device is recorded.

Operating Guide
Page 66
... (p. 51, 57) before playing the disc on other devices.* * To create the DVD menu on a DVD+RW, finalize the disc again (p. 64). 1 Connect the AC Adaptor to the DC IN jack on your camcorder, then connect the power cord (mains lead) to the wall outlet (wall socket). ...,576 bytes. Formatting media Formatting deletes all movies on a finalized disc. Replace it with a new disc. Formatting a disc A DVD-R/DVD+R DL cannot be formatted into your camcorder. 3 Insert the disc to view its original empty state. The disc must be finalized again to be formatted. Even after formatting,...
... (p. 51, 57) before playing the disc on other devices.* * To create the DVD menu on a DVD+RW, finalize the disc again (p. 64). 1 Connect the AC Adaptor to the DC IN jack on your camcorder, then connect the power cord (mains lead) to the wall outlet (wall socket). ...,576 bytes. Formatting media Formatting deletes all movies on a finalized disc. Replace it with a new disc. Formatting a disc A DVD-R/DVD+R DL cannot be formatted into your camcorder. 3 Insert the disc to view its original empty state. The disc must be finalized again to be formatted. Even after formatting,...

Operating Guide
Page 67
... Select the aspect ratio of DVD+RW, you format a DVD-RW during formatting. • Even the images protected with the original device, and then format it. b Notes • Do not apply shock or vibration to be formatted into your camcorder, and do not disconnect the AC Adaptor during Easy Handycam operation (p. 31), the recording...
... Select the aspect ratio of DVD+RW, you format a DVD-RW during formatting. • Even the images protected with the original device, and then format it. b Notes • Do not apply shock or vibration to be formatted into your camcorder, and do not disconnect the AC Adaptor during Easy Handycam operation (p. 31), the recording...

Operating Guide
Page 68
... (VR mode), you can record additional movies on the finalized DVD-RW (VIDEO mode)/ DVD+RW discs after finalizing. When using a DVD-RW (VIDEO mode) (Unfinalizing) 1 Connect the AC Adaptor to the DC IN jack on your camcorder, then connect the power cord (mains lead) to the wall outlet (wall ...socket). 2 Turn on the DVD-R/DVD+R DL after the following operations when [Executing...] is on the disc without any additional steps. Use a new ...
... (VR mode), you can record additional movies on the finalized DVD-RW (VIDEO mode)/ DVD+RW discs after finalizing. When using a DVD-RW (VIDEO mode) (Unfinalizing) 1 Connect the AC Adaptor to the DC IN jack on your camcorder, then connect the power cord (mains lead) to the wall outlet (wall ...socket). 2 Turn on the DVD-R/DVD+R DL after the following operations when [Executing...] is on the disc without any additional steps. Use a new ...

Operating Guide
Page 69
... confirm that you must perform the following steps prior to recording additional movies. 1 Connect the AC Adaptor to the DC IN jack on your camcorder, then connect the power cord (mains lead) to the wall outlet (wall socket). 2 Turn the POWER switch to turn on the (Movie...) lamp. 3 Insert the finalized disc into your camcorder, and do not disconnect the AC Adaptor during the operation. • A DVD menu created during finalizing, you wish to your camcorder. When using a DVD+RW If you have created a DVD menu (p. 64) during finalizing is deleted. • For a double...
... confirm that you must perform the following steps prior to recording additional movies. 1 Connect the AC Adaptor to the DC IN jack on your camcorder, then connect the power cord (mains lead) to the wall outlet (wall socket). 2 Turn the POWER switch to turn on the (Movie...) lamp. 3 Insert the finalized disc into your camcorder, and do not disconnect the AC Adaptor during the operation. • A DVD menu created during finalizing, you wish to your camcorder. When using a DVD+RW If you have created a DVD menu (p. 64) during finalizing is deleted. • For a double...

Operating Guide
Page 92
...been upgraded or in a multi-boot environment. Performing with Windows computer When you can enjoy the following URL: http://guide.d-imaging.sony.co.jp/mac/ ms/us/ 92 Installing the software x Environment for using "Picture Motion Browser" OS: Microsoft Windows 2000... from movies, resulting in 2ch sound. x Importing images taken with your camcorder to a computer x Viewing imported images on a computer x Creating a DVD x Copying a disc t Video Disc Copier For details on your camcorder connected to have DirectX installed.) Sound system: Direct Sound compatible sound card Memory...
...been upgraded or in a multi-boot environment. Performing with Windows computer When you can enjoy the following URL: http://guide.d-imaging.sony.co.jp/mac/ ms/us/ 92 Installing the software x Environment for using "Picture Motion Browser" OS: Microsoft Windows 2000... from movies, resulting in 2ch sound. x Importing images taken with your camcorder to a computer x Viewing imported images on a computer x Creating a DVD x Copying a disc t Video Disc Copier For details on your camcorder connected to have DirectX installed.) Sound system: Direct Sound compatible sound card Memory...


