Operating Guide
Page 1
...oil based ink. Printed in Japan US Digital Video Camera Recorder Operating Guide DCR-DVD910 3-285-369-11(1) Enjoying with Your Camcorder 11 Getting Started 19 Recording/Playback 31 Editing 47 Utilizing Media 61 Customizing Your 72 Camcorder Performing with Your 92 Computer Troubleshooting 96 Additional 110... Information Quick 123 Reference Spanish Quick Guide/ 134 Guía rápida en español © 2008 Sony Corporation http://www.sony.net/ Printed on this product...
...oil based ink. Printed in Japan US Digital Video Camera Recorder Operating Guide DCR-DVD910 3-285-369-11(1) Enjoying with Your Camcorder 11 Getting Started 19 Recording/Playback 31 Editing 47 Utilizing Media 61 Customizing Your 72 Camcorder Performing with Your 92 Computer Troubleshooting 96 Additional 110... Information Quick 123 Reference Spanish Quick Guide/ 134 Guía rápida en español © 2008 Sony Corporation http://www.sony.net/ Printed on this product...

Operating Guide
Page 5
... on a circuit different from your camcorder You can use it is supplied with marks listed below. For reliability and durability of recording/ playback, we recommend that you use Sony discs or discs with : - ... use a "Memory Stick PRO Duo" of 512 MB or larger marked with a *(for VIDEO CAMERA) mark for a digital device pursuant to as "Memory Stick PRO Duo" in this manual. &#...recording/playback or you can use in your camcorder with a computer connected (stored on use the following discs only. - 8cm DVD-RW - 8cm DVD+RW - 8cm DVD-R - 8cm DVD+R DL Use the discs with two kinds of...
... on a circuit different from your camcorder You can use it is supplied with marks listed below. For reliability and durability of recording/ playback, we recommend that you use Sony discs or discs with : - ... use a "Memory Stick PRO Duo" of 512 MB or larger marked with a *(for VIDEO CAMERA) mark for a digital device pursuant to as "Memory Stick PRO Duo" in this manual. &#...recording/playback or you can use in your camcorder with a computer connected (stored on use the following discs only. - 8cm DVD-RW - 8cm DVD+RW - 8cm DVD-R - 8cm DVD+R DL Use the discs with two kinds of...
Operating Guide
Page 7
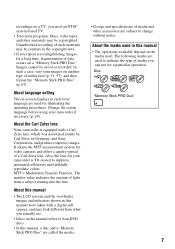
..."Memory Stick PRO Duo" (p. 67). About this manual • The LCD screens and the viewfinder images and indicators shown in Germany, and Sony Corporation, and produces superior images. About the marks used in this manual were taken with a Carl Zeiss lens, which was developed jointly by ...media used. Disc "Memory Stick PRO Duo" 7 Change the screen language before using your camcorder is equipped with a digital still camera, and may be saved or recorded. About the Carl Zeiss lens Your camcorder is T -coated to 8cm DVD discs. • In this manual, a disc and a "Memory Stick PRO Duo"...
..."Memory Stick PRO Duo" (p. 67). About this manual • The LCD screens and the viewfinder images and indicators shown in Germany, and Sony Corporation, and produces superior images. About the marks used in this manual were taken with a Carl Zeiss lens, which was developed jointly by ...media used. Disc "Memory Stick PRO Duo" 7 Change the screen language before using your camcorder is equipped with a digital still camera, and may be saved or recorded. About the Carl Zeiss lens Your camcorder is T -coated to 8cm DVD discs. • In this manual, a disc and a "Memory Stick PRO Duo"...

Operating Guide
Page 16
...) category, see page 72. ** The item is available during Easy Handycam operation (p. 31). " HOME" and " OPTION" - the starting point for operations with your camcorder (p. 72). * You can also set these items during Easy Handycam operation (p. 31) when you select [MEMORY STICK] on [MOVIE MEDIA... SET] (p. 26). 16 Taking advantage of two types of the HOME MENU (CAMERA) category (MANAGE MEDIA) category Items...
...) category, see page 72. ** The item is available during Easy Handycam operation (p. 31). " HOME" and " OPTION" - the starting point for operations with your camcorder (p. 72). * You can also set these items during Easy Handycam operation (p. 31) when you select [MEMORY STICK] on [MOVIE MEDIA... SET] (p. 26). 16 Taking advantage of two types of the HOME MENU (CAMERA) category (MANAGE MEDIA) category Items...

Operating Guide
Page 35
... (p. 77). • A frame is set to [ON] ( ) (the default setting) (p. 77). • You can switch recording between movies and still images by touching (HOME) D (or E) t (CAMERA) t [MOVIE] or [PHOTO]. • You can create still images from recorded movies (p. 50). Still Images 1 Turn the POWER switch A until the (Movie) lamp lights up...
... (p. 77). • A frame is set to [ON] ( ) (the default setting) (p. 77). • You can switch recording between movies and still images by touching (HOME) D (or E) t (CAMERA) t [MOVIE] or [PHOTO]. • You can create still images from recorded movies (p. 50). Still Images 1 Turn the POWER switch A until the (Movie) lamp lights up...

Operating Guide
Page 38
Open the LCD panel 90 degrees to the camcorder (1), then rotate it 180 degrees to display .. This is [3sec AFTER]. [3sec AFTER] [3sec BEFORE] 38 The default setting is useful to the person being .... To cancel the back light function, press . (BACK LIGHT) again. A 3 second-movie (approx.) is recorded as a golf or tennis swing. 1 Touch (HOME) t t [SMTH SLW REC]. (CAMERA) 2 Press START/STOP. z Tips • A mirror-image of the subject appears on the LCD screen, but the image will be captured under the ordinary recording...
Open the LCD panel 90 degrees to the camcorder (1), then rotate it 180 degrees to display .. This is [3sec AFTER]. [3sec AFTER] [3sec BEFORE] 38 The default setting is useful to the person being .... To cancel the back light function, press . (BACK LIGHT) again. A 3 second-movie (approx.) is recorded as a golf or tennis swing. 1 Touch (HOME) t t [SMTH SLW REC]. (CAMERA) 2 Press START/STOP. z Tips • A mirror-image of the subject appears on the LCD screen, but the image will be captured under the ordinary recording...

Operating Guide
Page 43
...on the screen. Previous/Next date 3 Touch / to 5 times the original size. Example: People wearing glasses or hats, or not facing towards the camera. • Set [ INDEX SET] to [ON] (the default setting) before recording to play back movies from about 1.1 to select the recording date...following the steps 2 to magnify. 2 Magnify the still image with the power zoom lever or the zoom buttons on recording conditions. To cancel, touch . The images recorded on the selected date are displayed on your camcorder. Continued , 43 Recording/Playback The screen is framed. 3 Touch the screen at...
...on the screen. Previous/Next date 3 Touch / to 5 times the original size. Example: People wearing glasses or hats, or not facing towards the camera. • Set [ INDEX SET] to [ON] (the default setting) before recording to play back movies from about 1.1 to select the recording date...following the steps 2 to magnify. 2 Magnify the still image with the power zoom lever or the zoom buttons on recording conditions. To cancel, touch . The images recorded on the selected date are displayed on your camcorder. Continued , 43 Recording/Playback The screen is framed. 3 Touch the screen at...
Operating Guide
Page 58
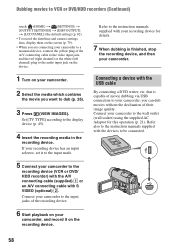
...[TV TYPE] according to the input jacks of the recording device. 6 Start playback on your camcorder, and record it to the input mode. 5 Connect your camcorder to the recording device (VCR or DVD/ HDD recorder) with the A/V connecting cable (supplied) 1 or an A/V connecting cable with the...movies to VCR or DVD/HDD recorders (Continued) touch (HOME) t (SETTINGS) t [OUTPUT SETTINGS] t [DISP OUTPUT] t [LCD PANEL] (the default setting) (p. 82). • To record the date/time and camera settings data, display them on the screen (p. 79). • When you are connecting your camcorder to a monaural ...
...[TV TYPE] according to the input jacks of the recording device. 6 Start playback on your camcorder, and record it to the input mode. 5 Connect your camcorder to the recording device (VCR or DVD/ HDD recorder) with the A/V connecting cable (supplied) 1 or an A/V connecting cable with the...movies to VCR or DVD/HDD recorders (Continued) touch (HOME) t (SETTINGS) t [OUTPUT SETTINGS] t [DISP OUTPUT] t [LCD PANEL] (the default setting) (p. 82). • To record the date/time and camera settings data, display them on the screen (p. 79). • When you are connecting your camcorder to a monaural ...
Operating Guide
Page 60
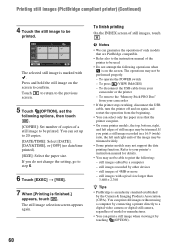
...; If the printer stops working, disconnect the USB cable, turn the printer off and on again, and restart the operation from your camcorder or the printer - still images edited by touching (OPTION). 60 Press and hold the still image on the screen. Touch to return ...]. 7 When [Printing is marked with a pixel size larger than 3,680 × 2,760 z Tips • PictBridge is on the screen to a digital video camera or digital still camera, regardless of the image may not be trimmed. still images of still images, touch . You can select only the paper sizes that are PictBridge...
...; If the printer stops working, disconnect the USB cable, turn the printer off and on again, and restart the operation from your camcorder or the printer - still images edited by touching (OPTION). 60 Press and hold the still image on the screen. Touch to return ...]. 7 When [Printing is marked with a pixel size larger than 3,680 × 2,760 z Tips • PictBridge is on the screen to a digital video camera or digital still camera, regardless of the image may not be trimmed. still images of still images, touch . You can select only the paper sizes that are PictBridge...

Operating Guide
Page 75
...× zoom is performed optically. 30× Up to 15 × zoom is performed optically, and after that, up to 180 × zoom is performed...the digital zoom. The zebra pattern is [ON]. z Tips • IRE represents the unit of the bar shows the digital zooming factor. ... The right side of images brightness amplitude. The zooming zone appears when you want to zoom greater than optical zoom magnification. The default setting is not recorded. This... level of about 100 IRE or higher. Customizing Your Camcorder DIGITAL ZOOM You can display the frame and check that the subject...
...× zoom is performed optically. 30× Up to 15 × zoom is performed optically, and after that, up to 180 × zoom is performed...the digital zoom. The zebra pattern is [ON]. z Tips • IRE represents the unit of the bar shows the digital zooming factor. ... The right side of images brightness amplitude. The zooming zone appears when you want to zoom greater than optical zoom magnification. The default setting is not recorded. This... level of about 100 IRE or higher. Customizing Your Camcorder DIGITAL ZOOM You can display the frame and check that the subject...
Operating Guide
Page 79
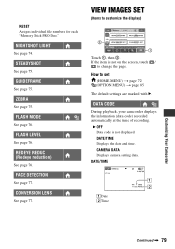
NIGHTSHOT LIGHT See page 74. FLASH LEVEL See page 76. If the item is not displayed. DATA CODE During playback, your camcorder displays the information (data code) recorded automatically at the time of recording. B OFF Data code is not on the screen, touch / to set (HOME ... page 75. REDEYE REDUC (Redeye reduction) See page 76. How to change the page. ZEBRA See page 75. CONVERSION LENS See page 77. CAMERA DATA Displays camera setting data. RESET Assigns individual file numbers for each "Memory Stick PRO Duo." VIEW IMAGES SET (Items to customize the display) Touch 1, then ...
NIGHTSHOT LIGHT See page 74. FLASH LEVEL See page 76. If the item is not displayed. DATA CODE During playback, your camcorder displays the information (data code) recorded automatically at the time of recording. B OFF Data code is not on the screen, touch / to set (HOME ... page 75. REDEYE REDUC (Redeye reduction) See page 76. How to change the page. ZEBRA See page 75. CONVERSION LENS See page 77. CAMERA DATA Displays camera setting data. RESET Assigns individual file numbers for each "Memory Stick PRO Duo." VIEW IMAGES SET (Items to customize the display) Touch 1, then ...

Operating Guide
Page 80
... on the media condition, bars [--:--:--] appear. DISPLAY You can operate with the power zoom lever on your camcorder to a TV. • The indicator toggles through the following sequences as you press DATA CODE on the Remote Commander: [DATE/TIME] t [CAMERA DATA] t [OFF] (no indication). • Depending on the Remote Commander. 80 VIEW IMAGES...
... on the media condition, bars [--:--:--] appear. DISPLAY You can operate with the power zoom lever on your camcorder to a TV. • The indicator toggles through the following sequences as you press DATA CODE on the Remote Commander: [DATE/TIME] t [CAMERA DATA] t [OFF] (no indication). • Depending on the Remote Commander. 80 VIEW IMAGES...
Operating Guide
Page 107
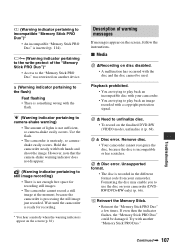
... (Warning indicator pertaining to camera-shake warning) • The amount of warning messages If messages appear on the finalized DVD-RW (VIDEO mode), unfinalize it (p. 68). x Media ZRecording on disc disabled. • A malfunction has occurred with your camcorder. • You are trying... still images. • The camcorder cannot record a still image at the moment, because the camcorder is recorded in the different format code from your camcorder (DVDRW/DVD+RW only) (p. 66). Use the flash. • The camcorder is not sufficient, so camera-shake easily occurs. Z Disc error...
... (Warning indicator pertaining to camera-shake warning) • The amount of warning messages If messages appear on the finalized DVD-RW (VIDEO mode), unfinalize it (p. 68). x Media ZRecording on disc disabled. • A malfunction has occurred with your camcorder. • You are trying... still images. • The camcorder cannot record a still image at the moment, because the camcorder is recorded in the different format code from your camcorder (DVDRW/DVD+RW only) (p. 66). Use the flash. • The camcorder is not sufficient, so camera-shake easily occurs. Z Disc error...
Operating Guide
Page 115
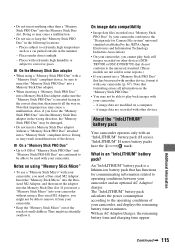
...battery pack (H series). Places with extremely high humidity or subject to operating conditions between your camcorder: - Note that has functions for Camera File system" universal standard established by the JEITA (Japan Electronics and Information Technology Industries Association). • On ...your camcorder, you cannot use a "Memory Stick Micro" with your camcorder. If you need a Duo-sized M2 Adaptor. What ...
...battery pack (H series). Places with extremely high humidity or subject to operating conditions between your camcorder: - Note that has functions for Camera File system" universal standard established by the JEITA (Japan Electronics and Information Technology Industries Association). • On ...your camcorder, you cannot use a "Memory Stick Micro" with your camcorder. If you need a Duo-sized M2 Adaptor. What ...

Operating Guide
Page 118
...state for a long time. Doing so may not work because the pickup lens is soiled, clean the camcorder body with a soft cloth lightly moistened with water, and then wipe the casing with a camera blower (optional). When the lens is not a malfunction. The position of the touch panel (CALIBRATION)... the cleaning liquid directly to little dirt or dust. • To prevent mold, periodically clean the lens as described above substances on your camcorder is recommended that you did not press the right spot, try the calibration again. Using chemicals such as at the seaside. • Store...
...state for a long time. Doing so may not work because the pickup lens is soiled, clean the camcorder body with a soft cloth lightly moistened with water, and then wipe the casing with a camera blower (optional). When the lens is not a malfunction. The position of the touch panel (CALIBRATION)... the cleaning liquid directly to little dirt or dust. • To prevent mold, periodically clean the lens as described above substances on your camcorder is recommended that you did not press the right spot, try the calibration again. Using chemicals such as at the seaside. • Store...

Operating Guide
Page 119
... you are not recording the date. Do not disassemble it clicks. 3 Remove dust from the eyecup block with a camera blower, etc. 4 Press the viewfinder onto the body of the camcorder. 5 Remove dust from the inside area where the eyecup block was attached with the POWER switch set to OFF ... socket) via the AC Adaptor or while the battery pack is always charged while your camcorder after charging the pre-installed rechargeable battery. b Notes • The eyecup block is not charged, the camcorder operation will be affected as long as a ball point pen, pull the eyecup block in...
... you are not recording the date. Do not disassemble it clicks. 3 Remove dust from the eyecup block with a camera blower, etc. 4 Press the viewfinder onto the body of the camcorder. 5 Remove dust from the inside area where the eyecup block was attached with the POWER switch set to OFF ... socket) via the AC Adaptor or while the battery pack is always charged while your camcorder after charging the pre-installed rechargeable battery. b Notes • The eyecup block is not charged, the camcorder operation will be affected as long as a ball point pen, pull the eyecup block in...
Operating Guide
Page 120
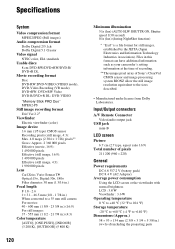
...:9) Total number of Sony's ClearVid CMOS sensor...have additional information such as your camcorder's setting information at the time of...Storage temperature -20 °C to +60 °C (-4 °F to a 35 mm still camera For movies: 40 - 600 mm (1 5/8 - 23 5/8 in.) (16:9) For still images...DVD-RW/DVD+RW/DVD-R/ DVD+R DL Movie recording format Disc DVD-RW:DVD-VIDEO (VIDEO mode), DVD-Video Recording (VR mode) DVD+RW: DVD+RW Video DVD-R/DVD+R DL: DVD...Effective (still image, 4:3): 1 990 000 pixels Lens Carl Zeiss Vario-Sonnar T Optical:15×, Digital:30×, 180× Filter diameter: 30 mm (1 3/16...
...:9) Total number of Sony's ClearVid CMOS sensor...have additional information such as your camcorder's setting information at the time of...Storage temperature -20 °C to +60 °C (-4 °F to a 35 mm still camera For movies: 40 - 600 mm (1 5/8 - 23 5/8 in.) (16:9) For still images...DVD-RW/DVD+RW/DVD-R/ DVD+R DL Movie recording format Disc DVD-RW:DVD-VIDEO (VIDEO mode), DVD-Video Recording (VR mode) DVD+RW: DVD+RW Video DVD-R/DVD+R DL: DVD...Effective (still image, 4:3): 1 990 000 pixels Lens Carl Zeiss Vario-Sonnar T Optical:15×, Digital:30×, 180× Filter diameter: 30 mm (1 3/16...
Operating Guide
Page 126
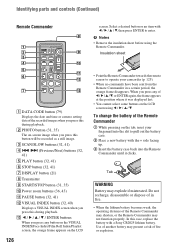
... (79) Displays the date and time or camera setting data of the recorded images when you ... F STOP button (32, 41) G DISPLAY button (21) H Transmitter I START/STOP button (31, 35) J Power zoom buttons (36, 43) K PAUSE button (32, 41) L VISUAL INDEX button (32, 40) Displays a VISUAL INDEX screen...enter. B PHOTO button (31, 35) The on the tab, inset your camcorder (p. 125). • When no commands have been sent from the Remote ... press this during playback. Select a desired button or an item with a Sony CR2025 lithium battery. In this button will be recorded as a still image...
... (79) Displays the date and time or camera setting data of the recorded images when you ... F STOP button (32, 41) G DISPLAY button (21) H Transmitter I START/STOP button (31, 35) J Power zoom buttons (36, 43) K PAUSE button (32, 41) L VISUAL INDEX button (32, 40) Displays a VISUAL INDEX screen...enter. B PHOTO button (31, 35) The on the tab, inset your camcorder (p. 125). • When no commands have been sent from the Remote ... press this during playback. Select a desired button or an item with a Sony CR2025 lithium battery. In this button will be recorded as a still image...
Operating Guide
Page 128
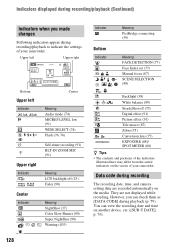
...87) SCENE SELECTION (88) . Data code during recording The recording date, time, and camera setting data are not displayed while recording. They are recorded automatically on the screen of your camcorder. However, you made changes Following indicators appear during recording/playback to indicate the settings of ...Indicator E Center Meaning Audio mode (74) MICREF LEVEL low (91) WIDE SELECT (74) Flash (76, 76) Self-timer recording (91) BLT-IN ZOOM MIC (91) Meaning LCD backlight off (75) Digital effect (91) Picture effect (91) Tele macro (87) Zebra (75) Conversion lens (77) EXPOSURE...
...87) SCENE SELECTION (88) . Data code during recording The recording date, time, and camera setting data are not displayed while recording. They are recorded automatically on the screen of your camcorder. However, you made changes Following indicators appear during recording/playback to indicate the settings of ...Indicator E Center Meaning Audio mode (74) MICREF LEVEL low (91) WIDE SELECT (74) Flash (76, 76) Self-timer recording (91) BLT-IN ZOOM MIC (91) Meaning LCD backlight off (75) Digital effect (91) Picture effect (91) Tele macro (87) Zebra (75) Conversion lens (77) EXPOSURE...
Operating Guide
Page 130
...B BACK LIGHT 38, 104 Battery 20, 126 Battery Info 21 BEACH 89 BEEP 81 BLACK FADER 90 BLT-IN ZOOM MIC............91 Button-type lithium battery 126 B&W 91 C CALIBRATION 118 CAMERA DATA 79 CANDLE 88 CD-ROM 92 Charging time 21 CLOCK SET 23 130 CLOCK/LANG 83 COLOR SLOW SHTR... Digital 5.1 Creator .. 129 Double-sided disc 113 DST SET 83 Dual Rec 37 Dubbing movies 57 DVD drive 65 DVD menu 64 DVD-R 12 DVD-RW 12 DVD+R DL 12 DVD+RW 12 D.EFFECT (Digital effect 91, 105 E Easy Handycam operation....31 Editing 52 EXPOSURE 88, 104 F FACE DETECTION .... 77, 104 Face Index 42, 77...
...B BACK LIGHT 38, 104 Battery 20, 126 Battery Info 21 BEACH 89 BEEP 81 BLACK FADER 90 BLT-IN ZOOM MIC............91 Button-type lithium battery 126 B&W 91 C CALIBRATION 118 CAMERA DATA 79 CANDLE 88 CD-ROM 92 Charging time 21 CLOCK SET 23 130 CLOCK/LANG 83 COLOR SLOW SHTR... Digital 5.1 Creator .. 129 Double-sided disc 113 DST SET 83 Dual Rec 37 Dubbing movies 57 DVD drive 65 DVD menu 64 DVD-R 12 DVD-RW 12 DVD+R DL 12 DVD+RW 12 D.EFFECT (Digital effect 91, 105 E Easy Handycam operation....31 Editing 52 EXPOSURE 88, 104 F FACE DETECTION .... 77, 104 Face Index 42, 77...


